Cash Register Parameters

Cash Register Parameters and Settings

Print on Demand

Printing on Demand can be setup on Host or Smartlane registers by navigating to the Register Parameters.
Navigation:
Host Register; POS-3-1
Smartlane; POS-5-3-1
Options:
Y = Suppress printing until the cashier chooses to print
N = Print line at a time
E = Print at the End of transaction
EMAIL = Send email receipts (Host Registers only)


**note: Registers parameters are setup on each register. If they are host based registers the parameters on the host connection are used for the register. If you are setting this parameters for a Smartlane registers they will need to be done on EACH of the registers are parameters can be set differently for each register.


Colleague Split Tender Checkout (FA)

Colleague-POSConnect/AR Split Tender


Setup

Please contact support to setup AR or POSCONNCECT Split Tender options.

Web Customer View

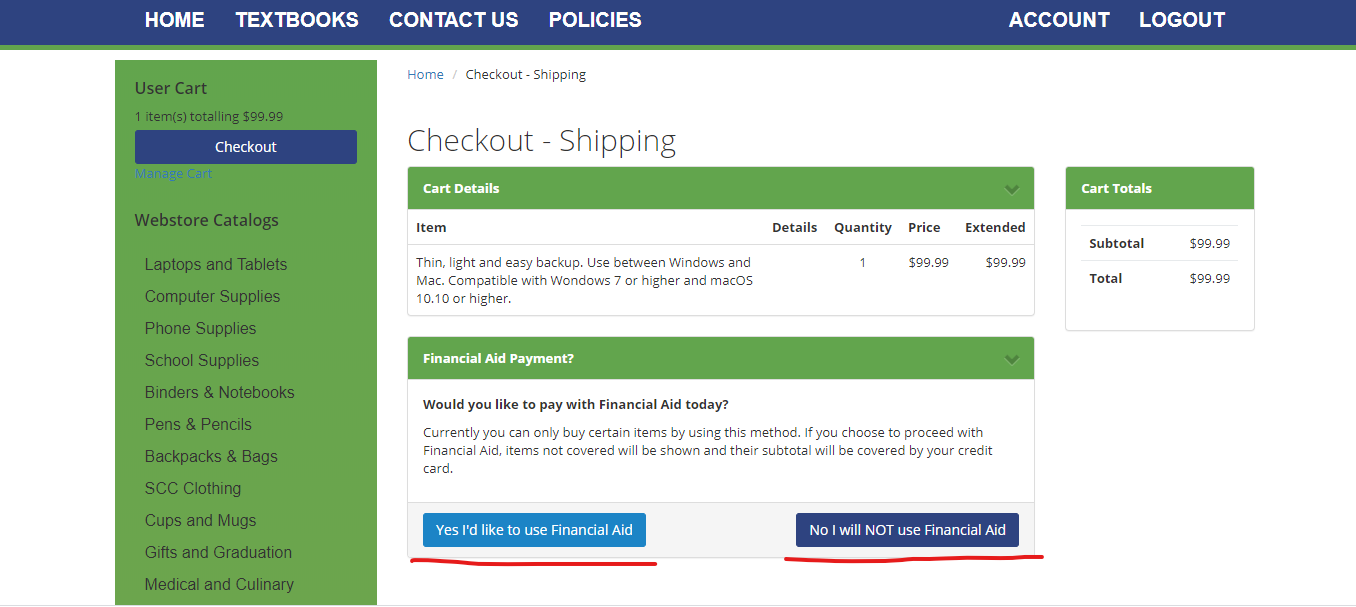
The change that you will see on the web is, as a customer, they will shop as normal. When they select the option to go to the cart the first thing they see will be the cart details and asking if the will pay with Financial Aid.

If they select ‘No I will NOT use Financial Aid’ then they will continue as normal

If they select ‘Yes I’d like to use Financial Aid’ as seen below.

Select Fin-Aid option

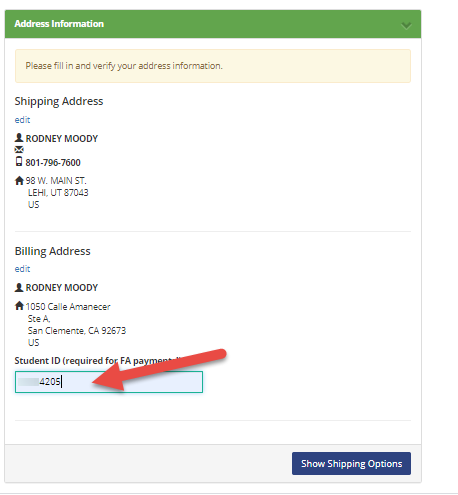
The customer will get presented with their address information to confirm/edit as needed and at the bottom of the screen they will need to enter in their student ID and then click on the ‘Show Shipping Options’.

Address Information

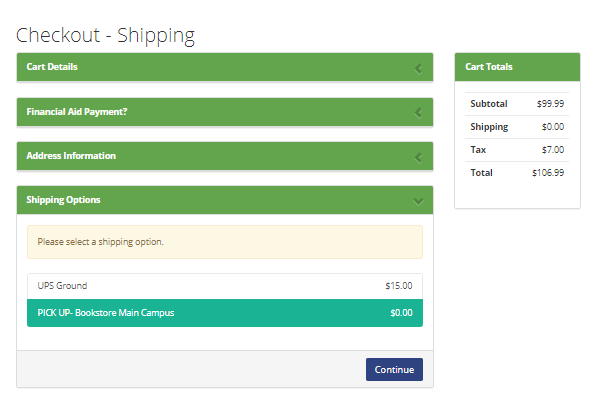
Now they will select their Shipping option from the list setup by the store.

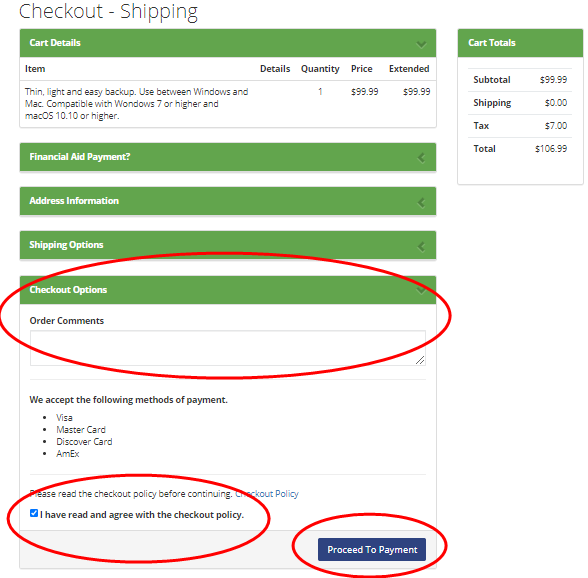
Enter in any Order Comments that are needed and then click/check the checkout policy box then ‘Proceed To Payment’.

Order Comments

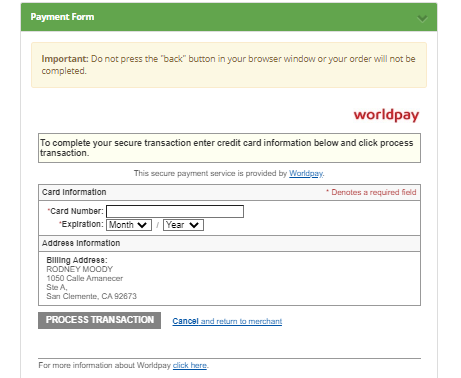
The customer will then need to enter in their credit card information, this will only be used if they order items that are not covered by the amount or type of aid the customer has.

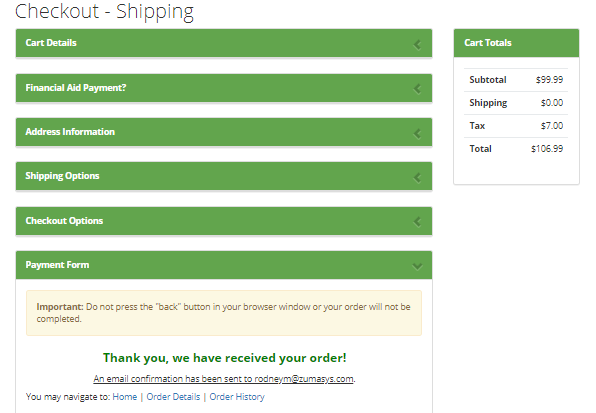
And finally, if the customer will see a message thanking them for their order and then receive an email with the order information confirming that the order has been received.

Store processing of Split Tender


The order will come to the store as a suspended transaction, just like a normal CC transaction. The store personnel will be able to run the pick slip reports (POS.26.10 or 13) and pending order reports the same as they do regular web transactions.

Bring up the suspended transaction the same as other web transactions

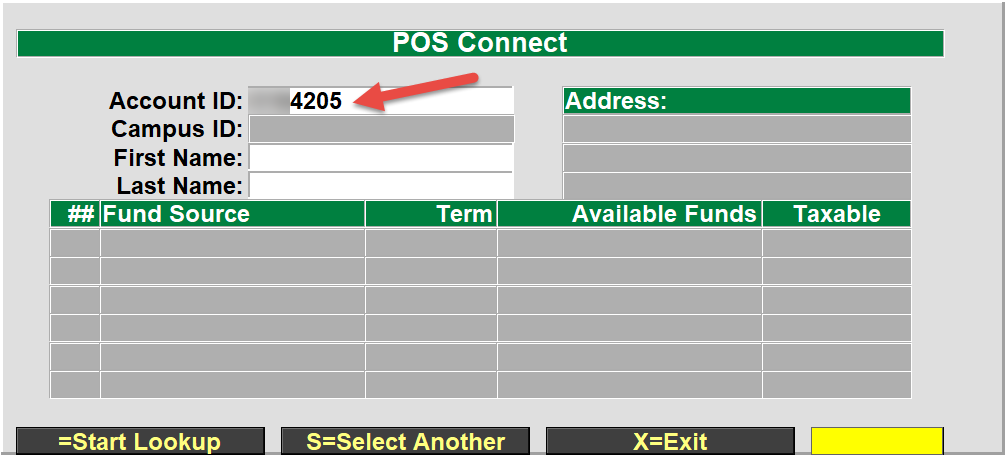
Since this will be treated as a POS Connect or FA order, you will get prompted to look up the customer the same as your existing POSCONNECT/FA transaction (POS Connect is used in the example).

The Account ID will be brought in from the transaction where the customer entered it on the web site.

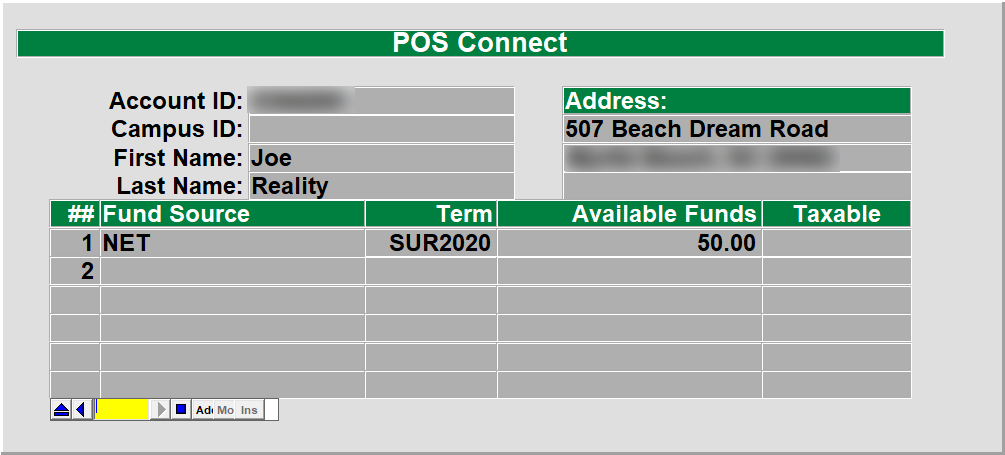
Select the fund source that you wish to use for this transaction

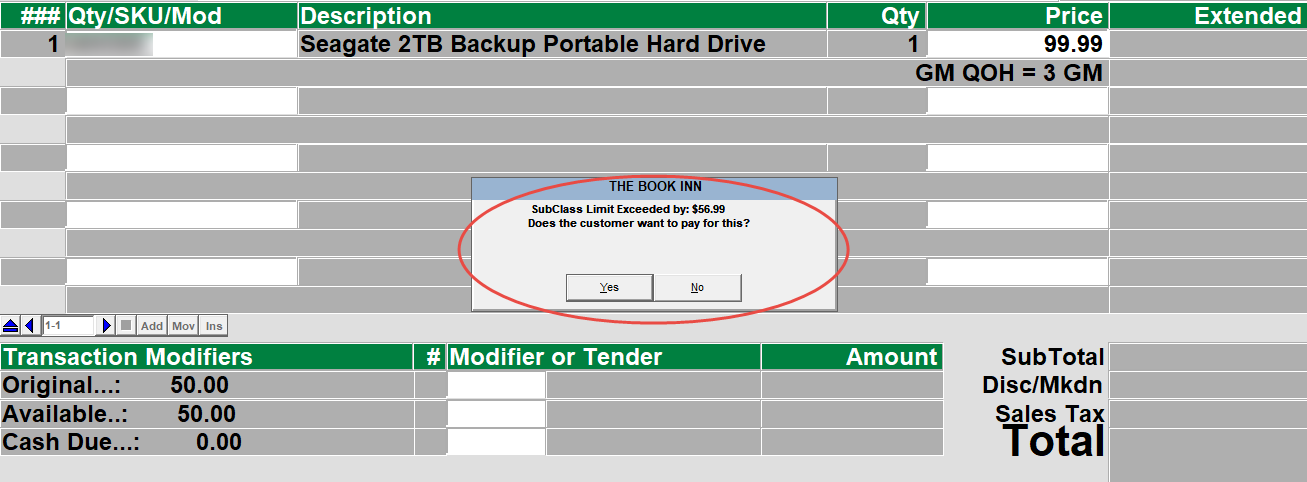
The transaction will load each item and validate the customer has the funds to cover each item that was ordered. If the customer goes over their limit or has purchased something that is not covered by their fund source then a message will display that the SubClass limit has been exceeded or that the limit has been reached. Click on the ‘Yes’ button to add the item to the cart and to proceed, if you select ‘No’ then the item will not be added to the cart.

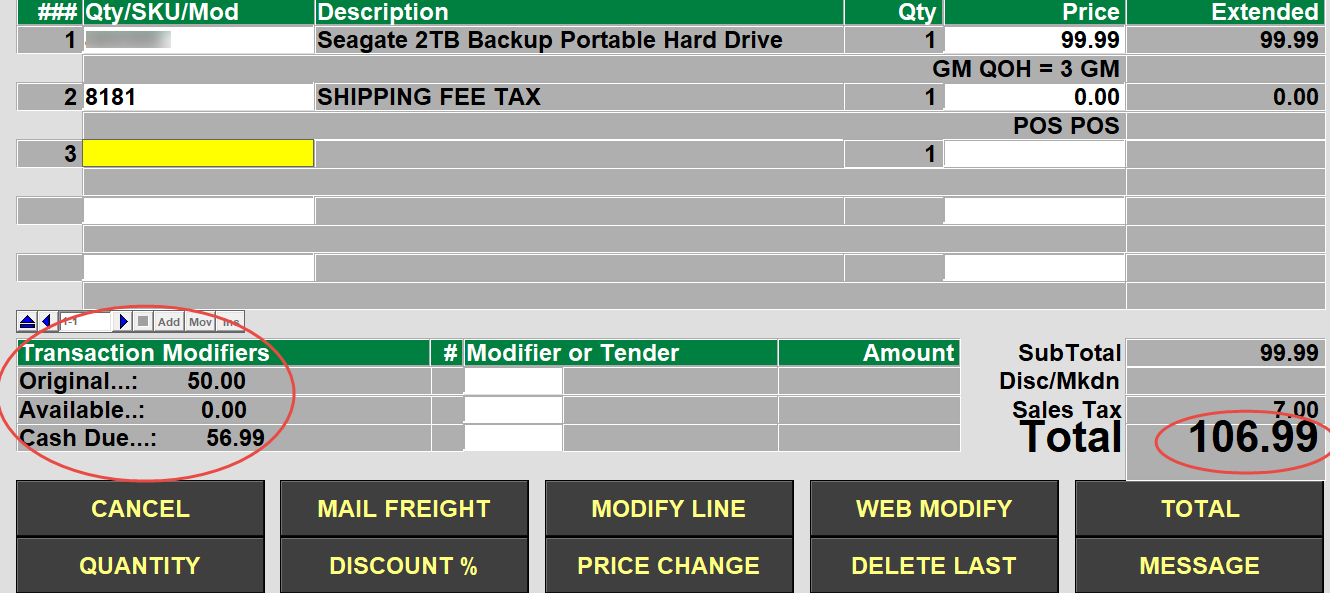
Once all of the items have been added to the transaction, the transaction will show the Total amount and also the Original fund amount, Available funds and the cash due that will be placed on to the credit card when the transaction is finalized.

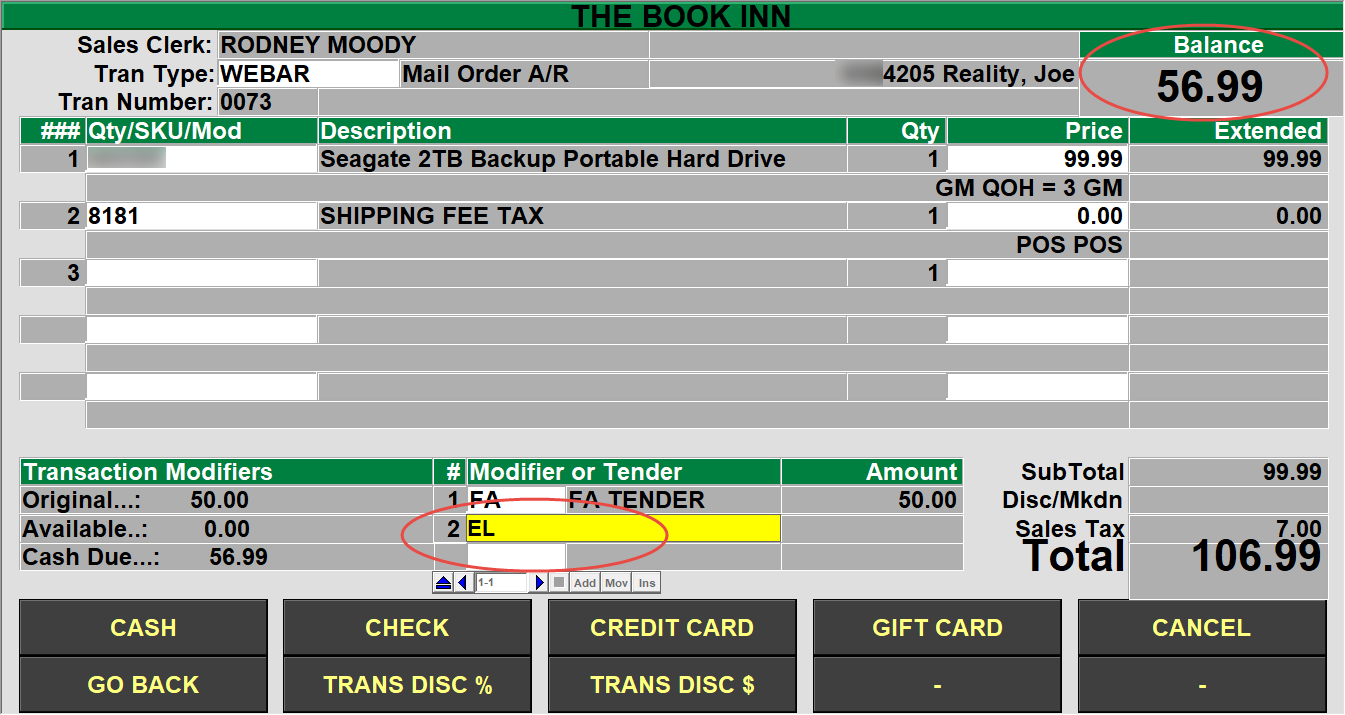
After selecting the ‘TOTAL’ button, the transaction will automatically enter the amount of funds to be used by the FA/POS Connect transaction tender, the cashier will just hit the ‘Enter’ key on the keyboard.

The transaction will then apply the financial aid funds to the customers fund source and report if there were any issues. Once the financial aid amount has been successfully applied then any additional amount will be applied to the credit card that was entered on the website.


Kitchen Printer Setup

Kitchen Printer Setup

There are several steps to create and setup a kitchen printer. To view the complete in-depth documentation on receipt detail setup refer to the Main POS Training Documentation here. This article is meant for information training purposes and setup.

  1. Create a “Kitchen Printer Receipt” header in POS.3.3

  • Enter the ‘Receipt Header Code’.
  • Enter a receipt ‘Description’.
  • Enter the ‘Override Printer’ that will be used (A5, A6, etc.). This will be setup in the ‘GUI’ configuration section. You can setup multiple receipt headers that print to different printers for different food types (Burger station, Pizza station, etc.)
  • Enter the ‘Lines Before’, ‘Indent’, ‘Print First’, ‘Max Lines’ for the receipt.
  • Enter the receipt header information

  • Enter the ‘R=Receipt Detail’ needed to print the information. (Contact support for assistance in setting up your receipt detail).
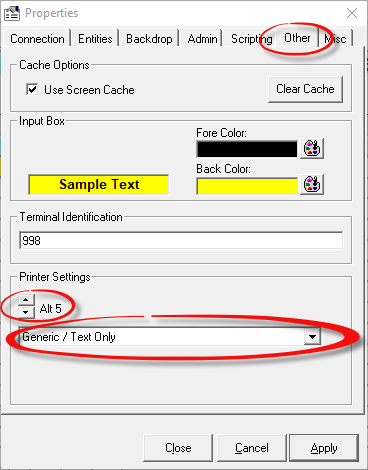
  • On the register that will print to the kitchen printer, assign the printer in the GUI properties.
  • Select the properties icon on the GUI toolbar.

  • Select the tab “Other”.
  • Use the Printer Settings spinner to select the printer to use as the kitchen printer and then select the windows printer to print to. (In the example above we used ‘A5’).
  • Set the register to use the kitchen printer
  • Log to ‘Register Parameters’ POS.3.1 and enter in the register that will print to the system printer.
  • Select ‘R=Restaurant’ from the bottom line
  • In the ‘Use Kitchen Printer’ field enter in a “Y” and save the record.
  • Setup which items will print to the kitchen printer. A hamburger or hotdog would print to the kitchen printer, but a candy bar or soda would not.

  • Log to POS.25.2 (SKU Maintenance).
  • Enter in a SKU that will print to a kitchen printer.
  • In the ‘Kitchen Header’ field, enter or select the receipt header to use for that option. As stated above, different headers can print to various printers for items.


Coupon, Promo, Voucher, Gift Certificate and Gift Card Setup – Online Redemption and Checkout

Setting up – redeeming Coupons, Promos, Vouchers, Gift Cards and Certificates.

This training document will walk you through setting up your Coupon/Promo Code(s) Along with Gift Cards, Vouchers and Certificates for the purpose of online ordering and order fulfillment.

*You can mix and match different Promos, Coupons, Vouchers, Gift Cards and Certificates with any valid webstore Tender.

Coupon & Promo Setup/Configuration

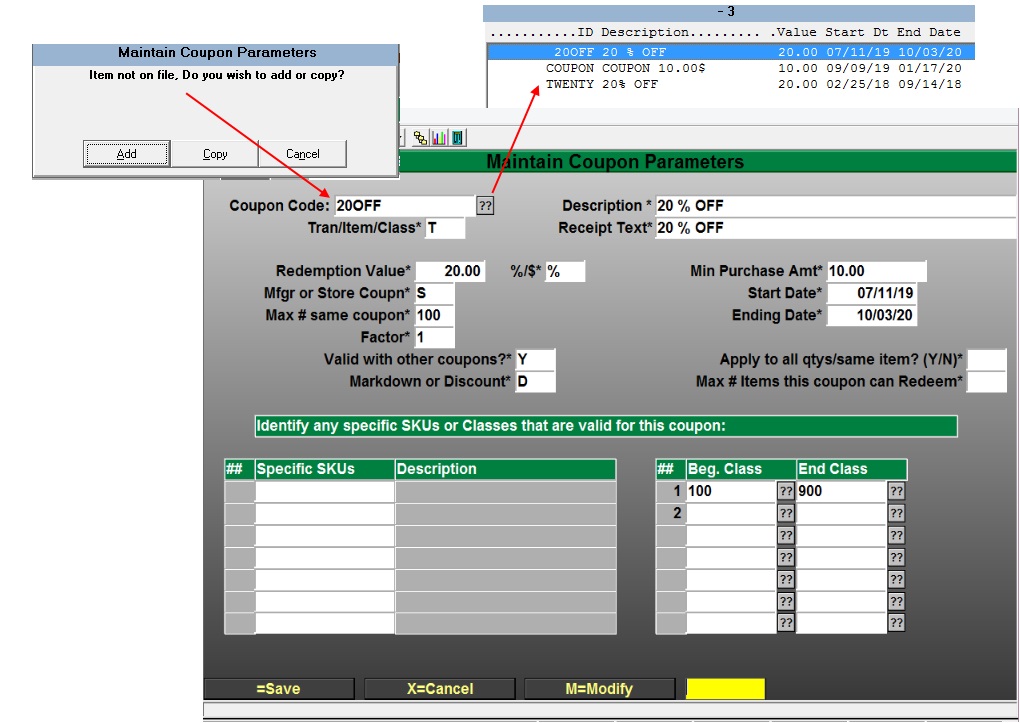
Menu Path POS-22-25-22

  • You can add a new Coupon Code by either typing in and Select the “Add” or “Copy” Option. You can also modify any previous coupon. You can also use the standard period “.” for the next numeric sequence number. *If you modify coupons after a Web Order has been placed the modified coupon will not be applied to any suspended transactions only to new Orders.
  • You will need to fill-in all of the required fields. For detailed field information input a single question mark for more help.
  • Selecting the “Tran/Item/Class” type of discount will determine your choices throughout the setup.
    T=Tran type discounts will apply the discount to the whole order.
    I=Item type discounts will apply the discounts to the “Specific SKUs” you list for the discount.
    C=Class type discounts will use the table defined in the “Beg. Class – End Class”. *note if you are adding groupings of class codes you will need to make sure they are in sequential order, example: 100-200 600-700.
    The CA option behaves the same as C but the discount will apply to all items in the defined class instead of just the first item added to the transaction.
  • Choosing either the Mfgr or Store Coupon will make a difference on if the coupon is treated  as a discount or as a tender amount.
    • A Manufacturer coupon will be treated as a TENDER amount and is normally issued by the manufacturer. As such it will decrease the balance due and will report as a tender amount.
    • A store coupon is issued by the store, maybe as a promotion to get people to shop at the store, and will be treated as a normal discount. These items will be treated as taxable, in other words, tax will be charged on the original retail amount before applying the coupon. The discount will be reported as any other discount.
  • Min Purchase Amt* – The way this field is applied depends on the coupon type (Tran/Item/Class) you set up.
    • Transaction – The transaction Subtotal amount must meet the minimum, once the subtotal meets the minimum then the coupon will apply the coupon amount.
    • Item – The line item amount must meet the minimum before the discount will be applied. If the item sells for 10.00 and the minimum is 30.00 then the item will not apply unless the quantity is more than 3 to meet the 30.00 minimum. The coupon will only be applied 1 time regardless of how many items meet the minimum.
    • Class – The class must meet the minimum, the coupon will only be applied to the first item of the class. The total is not cumulative.
    • Class All – When the minimum is met by a cumulative of all the classes in the coupon then the discount will be applied to the total amount for the valid classes or the dollar amount will be applied 1 time.


Applying Coupon(s) Promo(s)

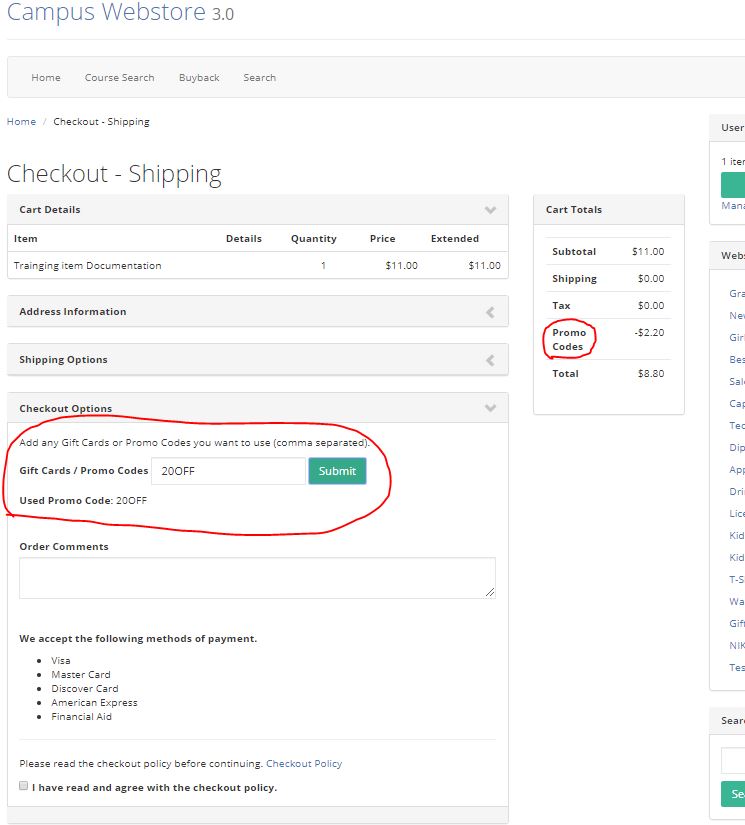
During the Checkout process the online user will have the option to enter the Promo/Coupon Code that was setup. Users can add additional Codes using the instructions listed online.


Selecting the “Submit” Button will apply the Codes to the users cart.

Resuming Orders Promo/Coupon


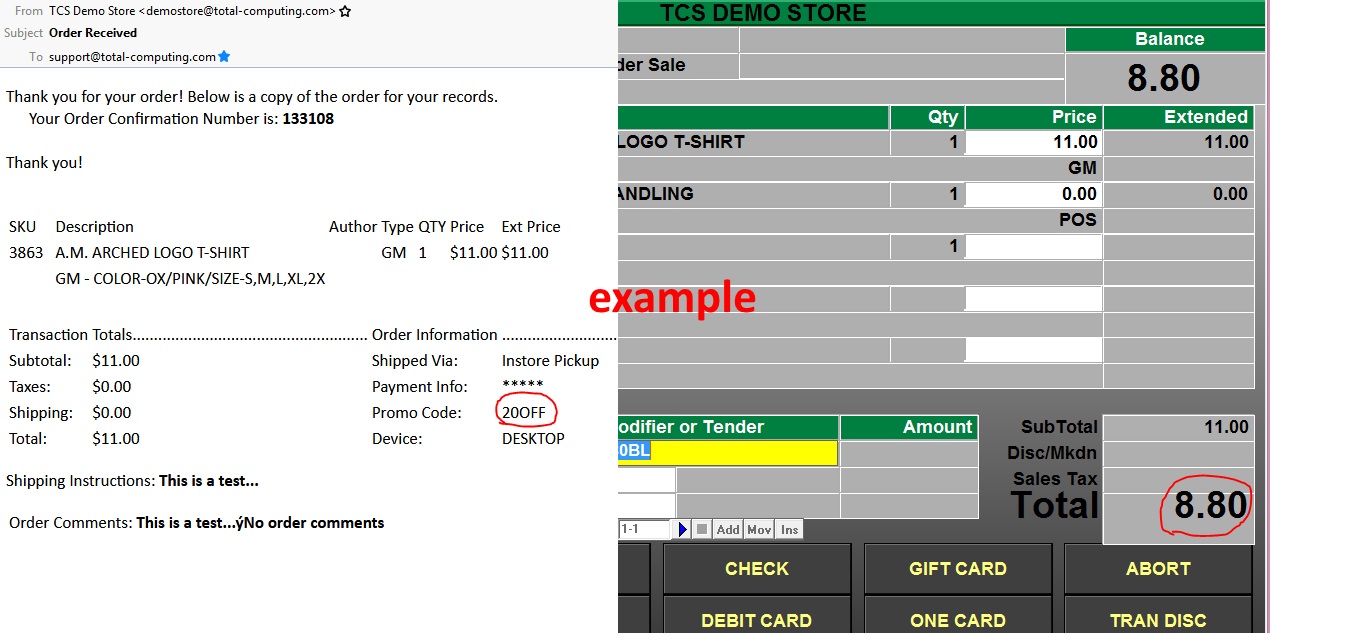
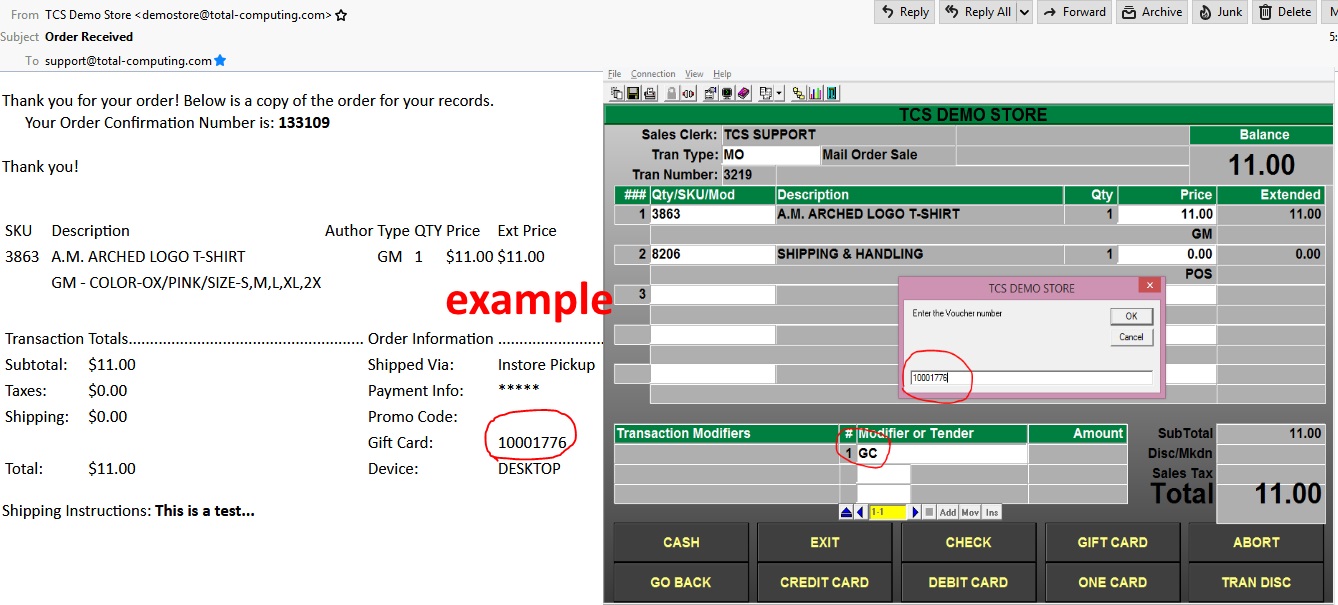
  • You will need to print Pick Slips or the email confirmation to see the type of Promo Code that your customer used at checkout.
  • To enter a Promo/Coupon code, after selecting TOTAL, you need to select the ‘coupon’ key or int the ‘Modifier or Tender’ field enter CPN and press enter. You will then enter the promo/coupon code in the pop up box.
  • Depending on the type of Promo/Coupon Code that was used on the online store will determine where the Code is applied in the transaction. See Gift, Voucher and Card Setup. to see how to check the types of Codes that are being used. example: T=Transaction I=Item C=Class

Adding and Maintaining Vouchers and Gift Certificates.

*See Gift, Voucher and Card Setup.

Redeeming Voucher, Certificates and Cards at Online Checkout.

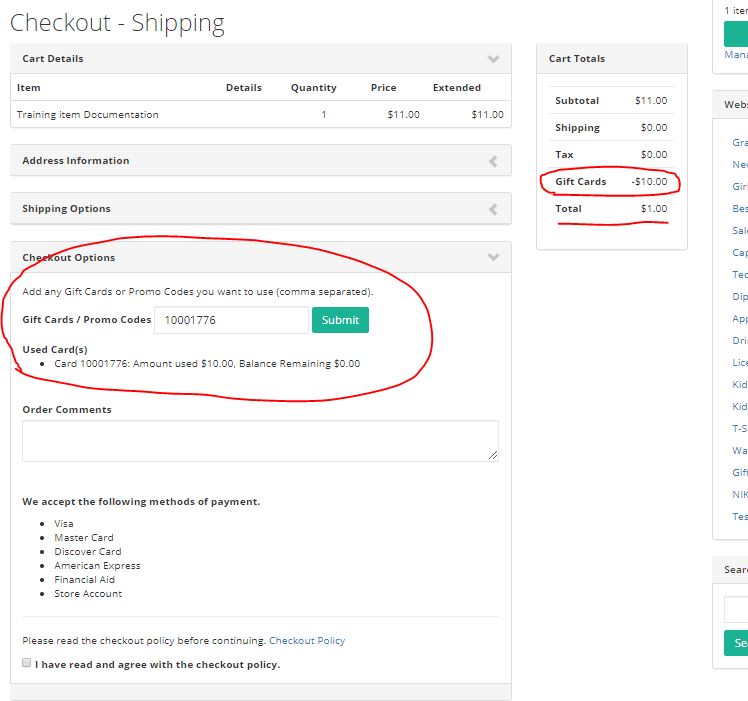
During checkout the user will have the option to Apply Gift Cards, Certificates and/or Promo Codes.

  • When a valid Voucher is entered and applied using the “Submit” button the shopping cart will update and reflect the new total.
  • The balance on the voucher will also be shown to the user on their checkout page.

*note that Vouchers, Gift Certificates and Cards follow the same rule as Credit Cards for Bookstore Clients. Funds are not changed until order fulfillment at the register.

Resuming Orders Vouchers, Cards and Certificates

  • You will need to print the order Pick Slip or the email confirmation to see the type of Voucher, Gift Certificate or Card that your customer used at checkout.
  • To enter a Promo/Coupon code, after selecting TOTAL, you need to select the ‘coupon’ key or int the ‘Modifier or Tender’ field enter CPN and press enter. You will then enter the promo/coupon code in the pop up box.
  • You can utilize the TCS standard types of Tender Codes and their rules e.g. Splitting Tenders between the Voucher, Gift Certificate or Card and other valid Tenders for web checkout.

*note you must be running webstore version 3.x.x or greater for these features to be available.


Resume Order Search Setup

Searching Suspended Orders.

Purpose of this document is to setup a search box prompt when you are resuming a transaction, for the purpose of eCommerce or Mail Order transaction resuming. The search will allow you to lookup orders without browsing through all of you open orders.
*if you wish to bypass this step you can press enter for the default option to scroll through all of you open or suspended orders.

This setup can replace scrolling through a long list of customer orders to find the desired order.

The search can be performed on suspended transactions on any one of the following items.
Phone Number format xxx-xxx-xxxx
First or Last name
Order confirmation number
Email address

prerequisite:
Mail Order Registers or Online Order Registers must be setup on the system you are resuming transactions on.
Applies only to host based registers or back-office connections.

Navigate to Menu Path POS-2-2

  • Select POS-2-2 Transaction Types

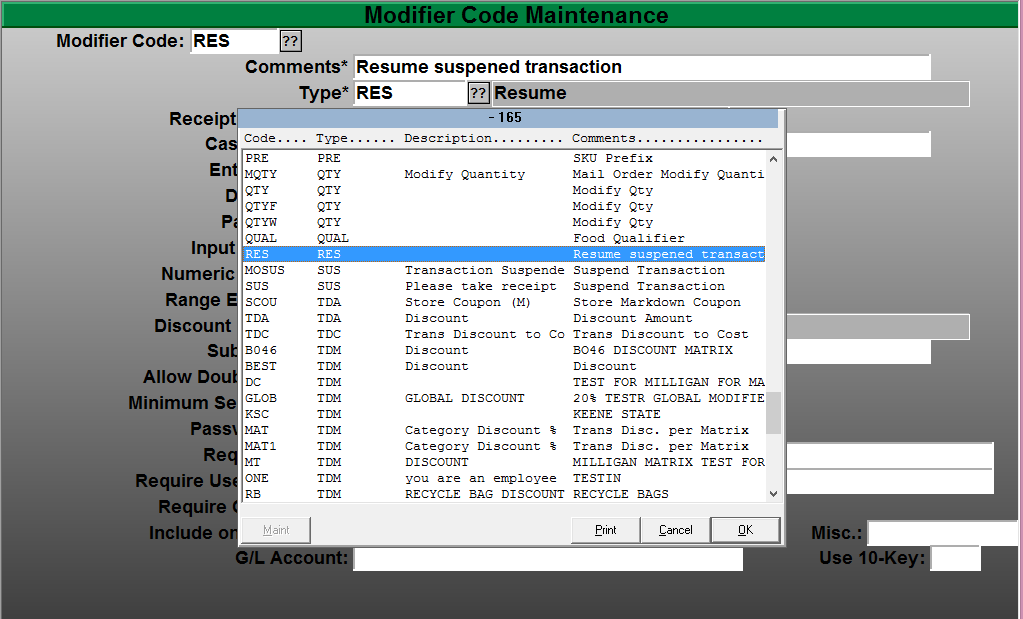
  • Select your Modifier code for resuming a transaction. The default is “RES” for Resume.

  • The “Cashier Prompt:” only needs to have information in it. For example the “Confirmation Number” is the example above. Keep in mind that this is a free form field record. You only need to have something in the Cashier Prompt to turn on this feature.

Resuming your orders

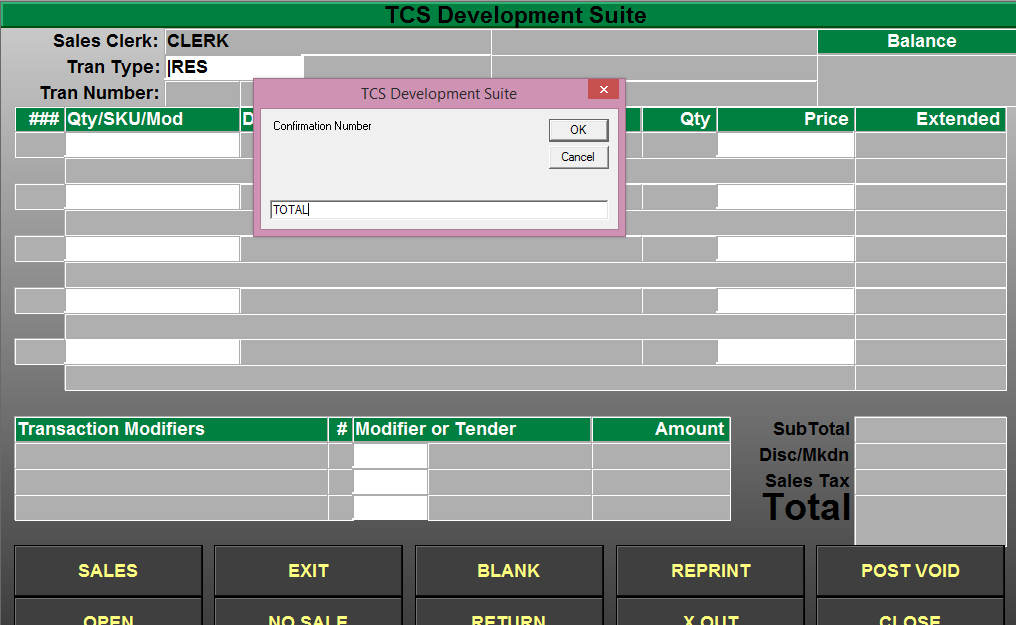
  • Select the resume feature or transaction type that you have setup. You should notice that you now have a search window that appears.
  • Input any portion of the web or suspended transaction.

Phone Number format xxx-xxx-xxxx
First or Last name
Order confirmation number
Email address

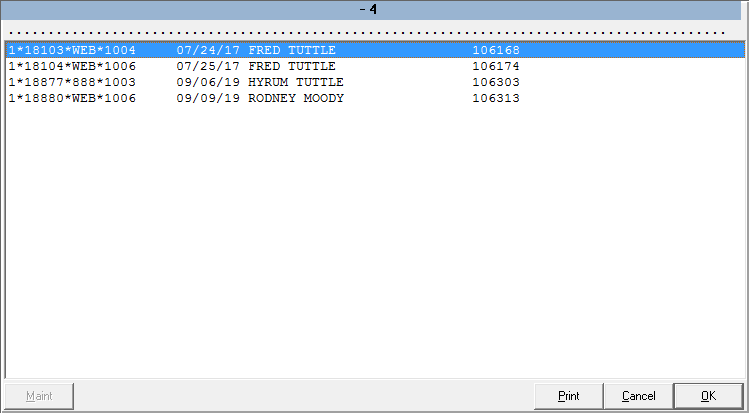
  • In the above example TOTAL is in the customers email address total-computing.com. All customers that meet that criteria will display in the search results with the orders that they have open.
  • Select the order that you wish to complete or view.


Tech Updates

Tech Update March 2022

Updated User and Cashier Maintenance have been combined into one screen.

Tech Update February 2022

Click here for e-book only documentation for Textbooks

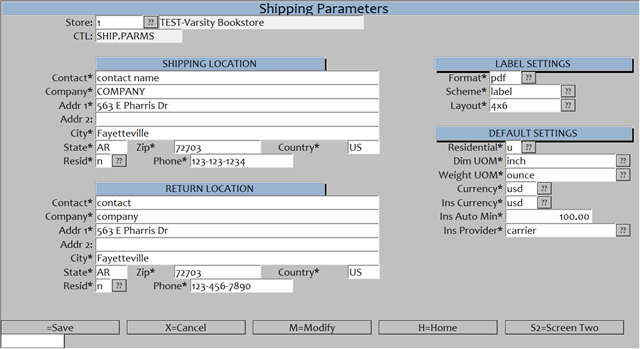
ShipEngine parameters can be found here. Also note you will need to setup a ShipEngine account
Tech Update October 2021

Web Order Subject Line:
For detailed instructions on customizing the subject like for your Wed Orders, Click here.

Textbooks new export features:
Click here for feature details and in-depth documentation.

Setting up Reprint-X report in Point-of-Sale:
You will need to add the below Transaction Type to your system.
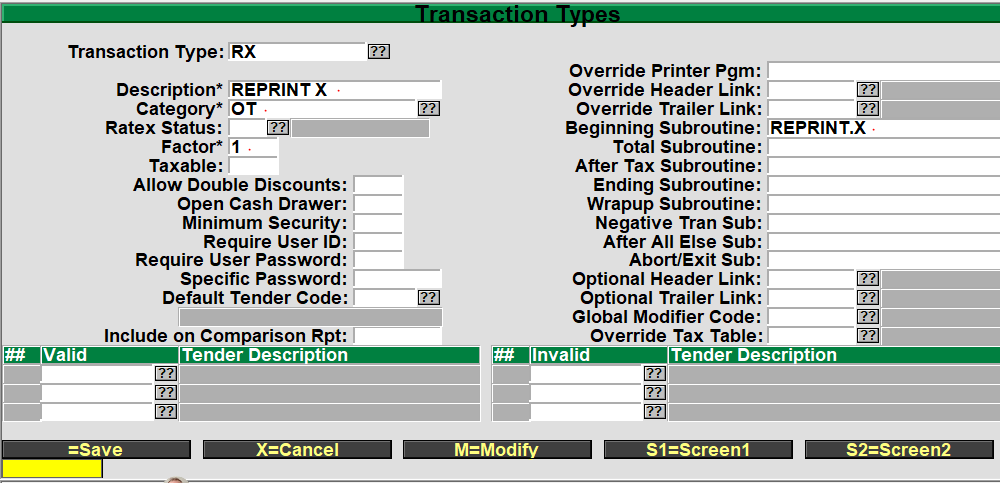

Path: POS > Transaction Parameters > Transaction Types
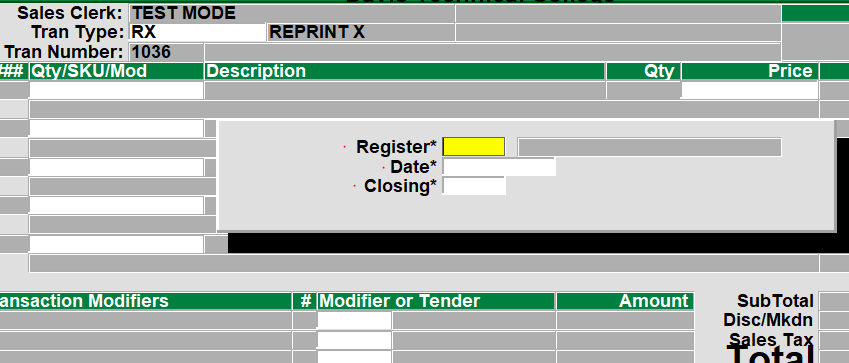
When using the new Transaction you will be prompted for the below. *all fields are required
Tech Update September 2021

Also see Smart Suite Release Notes | Zumasys Documentation for summary information

RedShelf Import detailed Instructions

Automated details for importing can be found here

  • We have added new features to the RedShelf import processes that allows you to easily import your book-list:
    •   Copy and Paste your download link
    •   Auto import new titles
    •   Auto remove stagnant titles
    •   Auto rebuild cross references
    •   Only updates Shelf Tag labels for only items that have changed (Updated Shelf Tags)
Also see Smart Suite Release Notes | Zumasys Documentation for summary information

Tech Update August 2021

Print on Demand
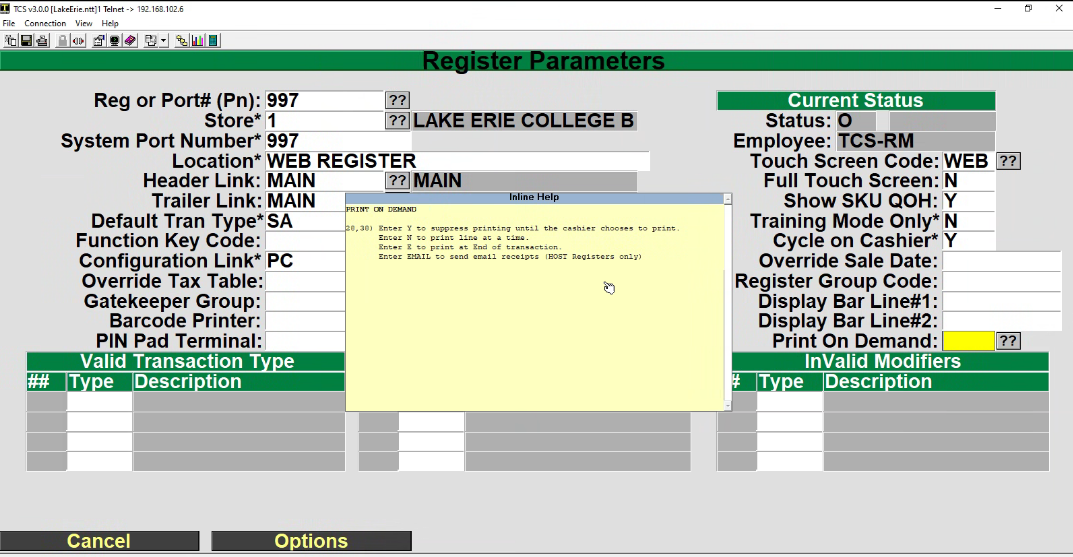
For detailed instructions for Printing on Demand see Register Parameters

Tech Update April 2021

TotaLink
Setting Time and Date on Ingenico Devices

IPP320 and IPP350 Ingenico Devices
• Press F, 7, 6, 7 on the device’s number pad to access the Bolt S.O.S. menu.
• Press F2 to navigate down.
• Press F3 to navigate up.
• Press O (green button) to select.
• Press < (yellow button) to clear.
• Press X (red button) to cancel or return to the main menu.
ISC-250 Touch Ingenico Devices
• Press +, 7, 6, 7 on the device’s number pad to access the Bolt S.O.S. menu.
• Press + to navigate down.
• Press – to navigate up.
• Press O (green button) to select.
• Press < (yellow button) to clear.
• Press X (red button) to cancel or return to the main menu.
iSMP4 Ingenico Devices
• Press F, 7, 6, 7 on the device’s number pad to access the Bolt S.O.S. menu.
• Press F1 to navigate left.
• Press F2 to navigate down.
• Press F3 to navigate up.
• Press F4 to navigate right.
• Press O (green button) to select.
• Press < (yellow button) to clear.
• Press X (red button) to cancel or return to the main menu.

Tech Update March 2021

TextBooks

Remember with spring break just around the corner:

  • Create your Summer and Fall terms now
  • Set up and prepare your web faculty adoption notifications

#Buyback

Remember to update the buying guides you plan on using this summer and fall for buyback with the latest versions.

If you or your staff are not receiving buying guide updates and you would like to receive these please email support@total-computing.com.

#General Merchandise

  • Added the ability to copy cost and sale prices to any store’s inventory
  • Added the ability to update an item’s costs from a single store to all other stores with the same inventory item

Tech Update February 2021

WebStore Update

Added POP-UP ability to promote discount codes and coupons for your WebStore

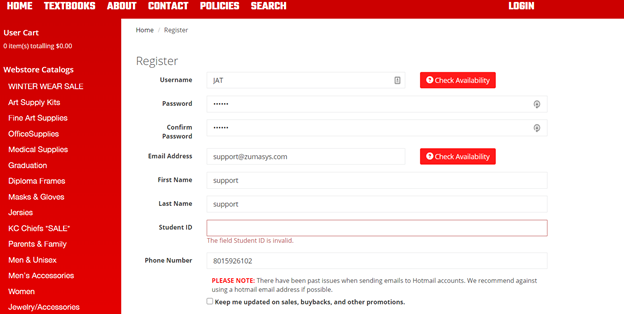
Student ID’s

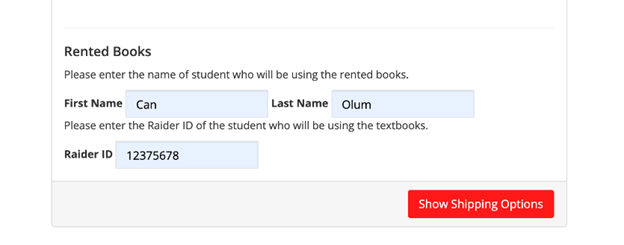
Force Student ID for websites with rental textbooks
Once set, web customers will be forced to add Student ID when creating a new account
*All existing accounts will be prompted to add their ID at checkout if a rental item is in their cart
*Custom language can be added to your site for school spirit and branded ID’s
Point-of-Sale Update

Add Image To a Fee Code

To add an image to a Fee code which will display online
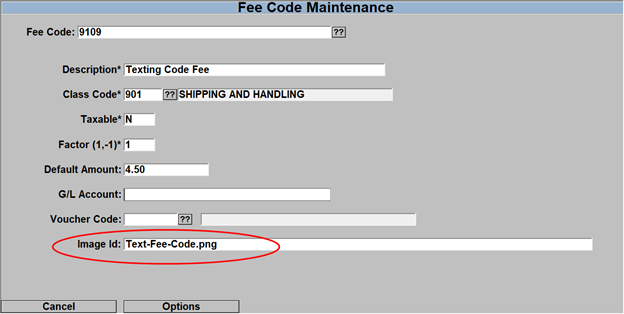
  • Log to POS.22.23 “Fee Code Maintenance”
  • Enter the Fee Code
  • Enter the image file name in the Image Id: field just like you would enter the image name in the GM-MF image name
  • Upload the image the same as you would a GM image.

Web Order Confirmation Status Display

To view the current status of a customer confirmation number

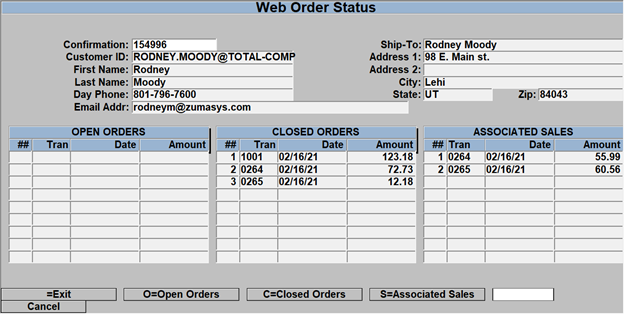
  • Log to POS.26.26 “Web Order Status”
  • Enter in the confirmation number

  • You will see 3 columns, ‘Open Order’, ‘Closed Order’, ‘Associated Sales’
    • Open Orders will display the open order, select O=Open Orders and then the line number with the confirmation # to see detailed information about the order.
    • Closed Orders will display if the order has been completed or if it has been deleted. If you select that option, then it will display the information from the original order.
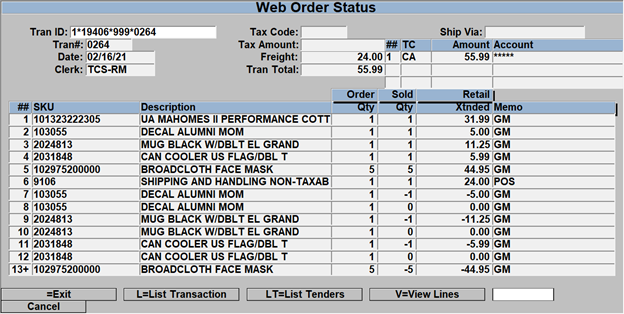
    • Associated Sales will list all of the ‘Sales’ that are associated to the confirmation number, so if the customer ordered 5 items and each item was sold on a different register transaction then there would be 5 associated sales. Select the S=Associated Sales and then the line number to view detailed information about that transactions.

Rental Customer Information Lookup

When you look up a customer for rental or for rental drop off you will see some additional information on the search display screen.

  1. If a customer record has ever had a rental, then a ‘Y’ will appear under the “Rnt” column
  2. If the customer currently has a rental that has not yet been returned, then a “*Y” will show, again, this is to indicate that the customer record currently has an outstanding rental

Tech Update 1-27-2021

We are proud to announce a new support process that will begin on February 1st, 2021. We are shifting from our current ShowMyPC support tool to our new ScreenConnect service. ShowMyPC sessions will no longer work and the desktop shortcuts should be removed. This means there will also be changes in the process of getting remote access to assist you.

  1. Support agents will initiate the session; customers will no longer be able to start a session preemptively
  2. You will then browse to http://support.total-computing.com on the machine that requires assistance
    1. Don’t be alarmed when you are redirected to our Zumasys branded support portal
    2. This website can be bookmarked in your favorite browser for future use
    3. We can also setup a shortcut on the desktop to open the website once we have a session on your machine
  3. The support agent will share the session code for you to enter into the “Join with a code” field on the website

Run/Open the client that is downloaded to complete the connection

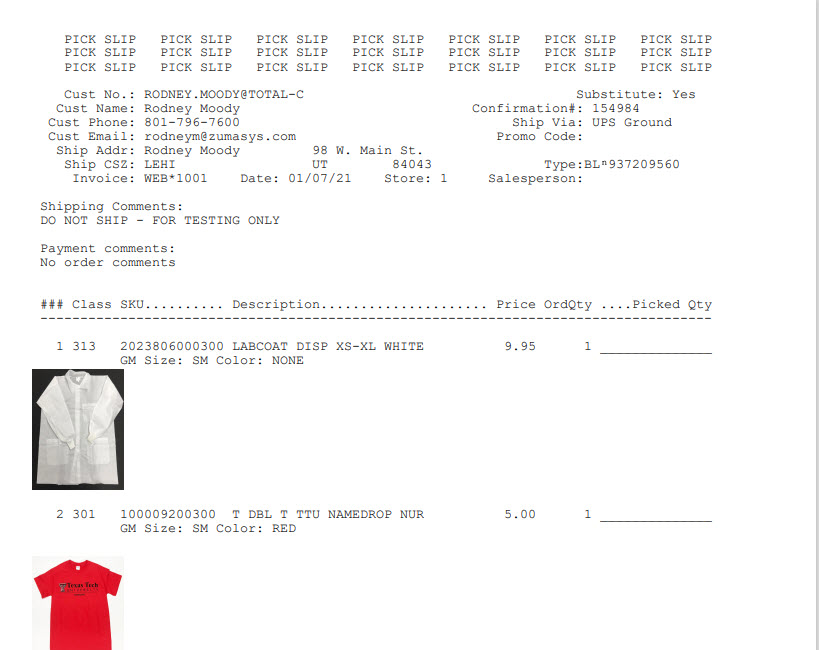
Added the ability to show images on Pick Slips

The image will be pulled from the same location that your website images are stored in. Pick slips will be emailed to a set email address as a pdf so that you can reprint them if needed. *Contact Support to have this feature setup
 

Setting up Rental Parameters: POS-27-21
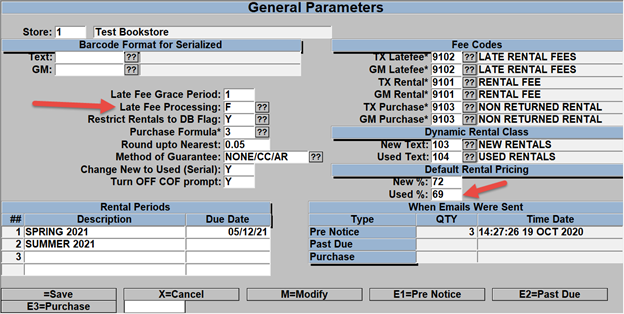
The new features here allow you to set your late fee processing type as either a Flat fee or a Daily fee, With the Flat fee, whatever flat fee you set on the item rental master then that is the fee that will be charged regardless of the number of days late. With the Daily fee, the customer will get charged the late fee on a per day basis, the more days late the larger the late fee. 

Rental Late Fees

You now have the ability to allow the system to auto calculate the new and used rental prices using different default percentages, you still have the ability to override the auto calculated prices whenever you wish.
POS-27-21-1
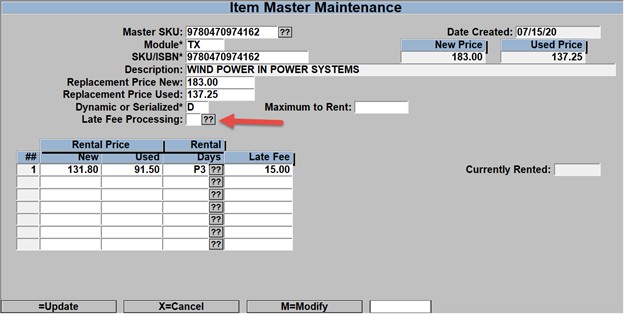
Added Late Fee Processing override option, this will override the Late Fee Processing

Rental Customer information lookup display

looking up a customer for rental or for rental drop off you will see some additional information on the search display screen.
If a customer record has ever had a rental then a ‘Y’ will appear under the “Rnt” column, if they currently have a rental that has not yet been turned in then a “*Y” will show, again this is to indicate that the customer record currently has an outstanding rental. 

Mass Update Replacement and Rental Price

POS-27-24-21
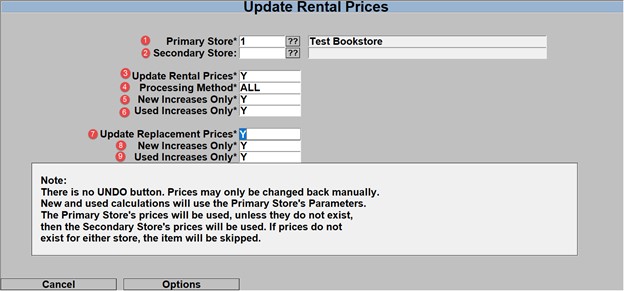
  1. Enter your Primary store
  2. Enter a secondary store if you have multiple stores
  3. Enter a ‘Y’ if you wish to update the Rental Prices using the rental percentages set in POS.27.21, If you enter an ‘N’ then the next 3 fields will be skipped.
  4. Enter the Periods that you wish to update,
    1. You can enter P1 (or any other P# option) if you only wish to update the rental price for the titles that have P1.
    2. Enter a line number, such as 1, if you wish to only update line 1 for each rental title master.
    3. Enter ‘All’ to update the rental price for all of each title’s rental line options.
  5. Enter ‘Y’ to only update the new rental price if there is an increase, ‘N’ will update the price if it goes in either direction.
  6. Enter ‘Y’ to only update the used rental price if there is an increase, ‘N’ will update the price if it goes in either direction.
  7. Enter a ‘Y’ if you wish to update the ‘Replacement Prices’. This is used when the TX New/Used prices have increased. You should run after you have seen a lot of price increases, Price increases in TX do not update the rental prices. If you enter ‘N’ the next 2 items will be skipped.
  8. If you only wish to update New replacement prices if there is an increase then enter ‘Y’, otherwise enter an ‘N’ and it will update for increases and decreases.
  9. If you only wish to update Used replacement prices if there is an increase then enter ‘Y’, otherwise enter an ‘N’ and it will update for increases and decreases.


Tech Update 12-30-2019

Rush Preparation

Close all previous Terms (TX-SU-1-2-2)
Update your Buying Guides (TX-24-21)
Sync your Registers (SL-2) (POS-6-2) Video
Verify your Rental Periods (POS-27-21)
GM End of Period Processing (GM-23)

Webstore Featured Catalog

Setup your catalog to be “Featured” during checkout. (POS-26-2 7.a)

Textbook Discounts

Textbook discount exclusion (TX-MF)

Tech Reminder 11-26-2019

Smartsuite
Detailed Documentation and links in the information below.
*note you much be a registered user to view documentation. If you are not a registered user please register using the top-right login options on this page. 

Closing a Term

  • Make sure that close any open terms that are no longer in use. This has the potential to of applying inventory needs to the wrong term for the purpose of ordering, wantlisting and reporting.

Rentals and Buyback

  • Setting up your estimated rental returns.
    Auto Calculate Rental Inventory – TX.2.30.1
    Rental Inventory Entry (Make sure you run the Auto Calculate process first and then the manual process for the exceptions) – TX.2.30.2

Buyback preparation

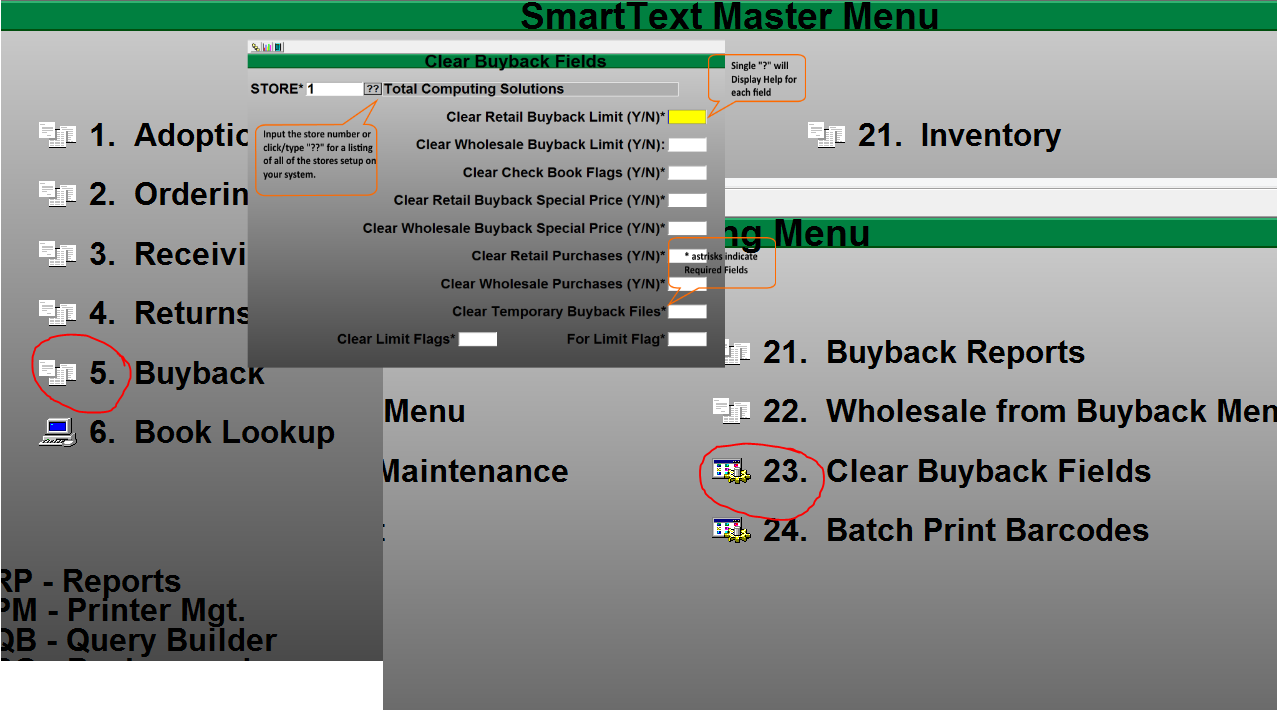
  • Make sure you clear out any previous custom parameters for your buyback.
    • Buyback Limits
      • Wholesale
      • Retail
    • Book specific flags
    • Special Price
      • Wholesale
      • Retail
    • Purchases
      • Wholesale
      • Retail
    • Limit Flags

Buying Guide Update.

  • It is so important that you have loaded and are running the latest buying guide.
    Instructions on loading the latest buying guide can be found here.

Updating your Textbook Inventory Average Cost.

  • When you have completed your buyback make sure that your average cost is recalculated.

Tech Update 10-07-2019

Fixes

Text Books

You have the ability to lookup ebooks from the Master File by any of the following
*this update also applies to the Point of Sale lookup/search
  • Digital ISBN
  • Print ISBN
  • ebook SKU
  • Traditional ISBN
  • Addressed the synonym problem when the Digital and Print ISBN are identical when your ebooks are imported

Enhancements

General Merchandise

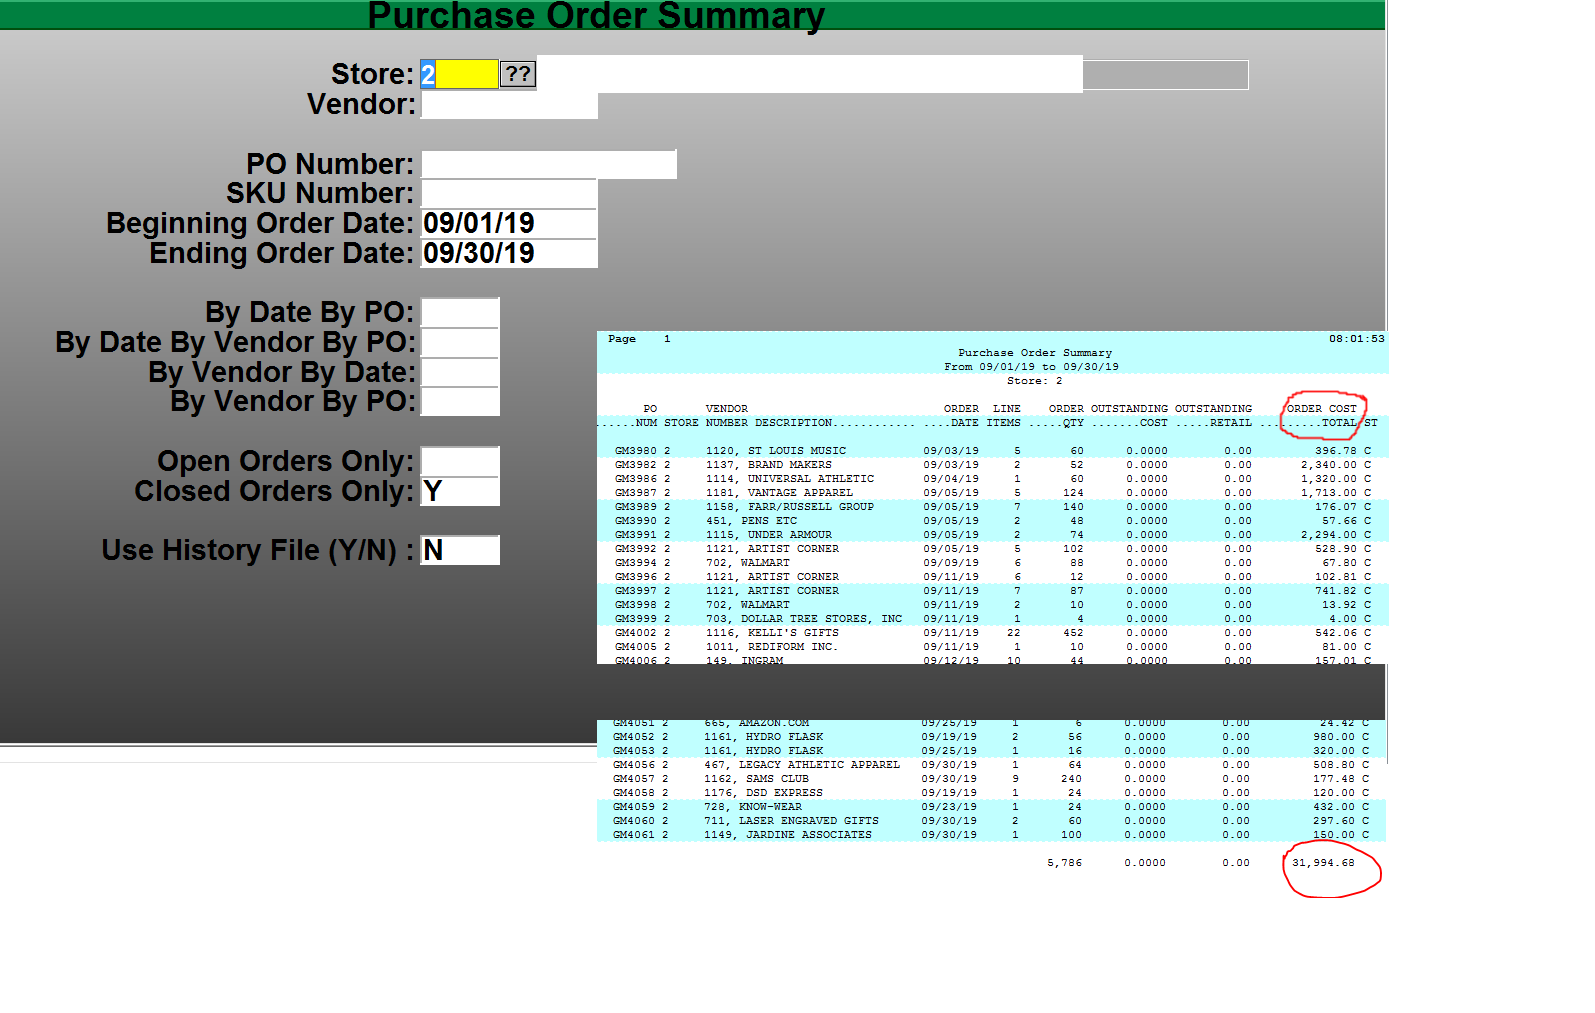
  • Added a new column to GM-RP-3-1 Purchase Order Summary to include the Cost Total in the report for each PO
Totalink / Credit Cards

TCS is releasing into Beta the latest version of our credit card Totalink software.
The new version of Totalink includes.
  • Enhanced communication with new Payment Gateways and Card Readers
  • Ability to share card reading devices between POS stations and/or Workstations.
  • Eliminates many PCI requirements
*Look for the production release dates before the end of year

Windows 10 Upgrade

We’ve created an article that covers how to determine the version of Windows running on a register, if that register is a valid Windows 10 upgrade candidate and what the upgrade process will entail. You can access that article through this link.

Tech Update 10-23-2019

Fixes

  • POS; Resolved the issue with ebook transactions when you aborted a transaction where a partial payment/split tender or a decline of a credit card would generate Activation Code from Redshelf. This fix allows for a clean Exit/Abort of the transaction undoing the Activation Code that was generated by a partial approval.
    • This issue stems from the architecture of the ebook interface and how Activation Codes are generated and when they are created. TCS verifies and gets the Activation Code Prior to Tender select, this can cause a problem when partial payments, declined cards and split tenders are used when the Cashier or Customer decides to Abort or Exit the transaction.
  • POS; Resolved the issue of POS Fees being place in the GM source file when the transaction was generated from the webstore. This resolves issues in reports that use the POS Fees Type. POS-RP-1-22&23 Details and Summary
  • GM; Removed the canceled PO’s from the Open PO List. GM-RP-3-1&2

Enhancements

  • POS; Class Comparison Report now automatically includes transactions that have been moved to history. This allows traversing current and historical files without being prompted. POS-RP-1-3-21 Report Menu Path
  • GM; Added the prompt to allow you to select which store in the Open Orders Report. GM-RP-3-1
  • POS; Kitchen Printer, This allows for Dinning/Food Services/Cafeteria users print to printers located anywhere in the facility in addition to the Cash Register Receipt. These Receipts can be duplicate receipts or they can be configured to contain any transaction information for employees. Updated Documentation found here *note in the current setup the sku must reside in the POS account for location printing.  

Buyback Preparation

There are several things that you can do ahead of time to help setup a smooth buying experience.
Make sure that you go over all of the preparation and test before your first day of Buyback.

  • Update the Wholesale Guides you are planning on using this season. *Details for loading and setting up guides can be found in the Main Text Training Document here.
  • Clearing out previous buyback “Flags” *note that buyback isbn specific flags stay in place until they are removed. *Detailed Documentation found here
  • Verify your Buyback Season Codes and dates. *Detailed Documentation found here
  • Verify your default Wholesaler and any additional alternate Wholesaler has been setup. *Detailed Documentation found here
  • Close all of your open terms that you are through with *Detailed Documentation found here
  • Verify your calendar dates for Buyback *Detailed here


Tech Update 10-10-2019

Enhancements

  • POSConnect Datatel Financial Aid Checkout
    If you are a POSConnect Retail Customer contact TCS Support on setting up your real-time Financial Aid Online Checkout
  • Adopting GM Items and Fees into your Courses.
    You now have the ability to add unlimited GM items and Fee codes to your online Course Adoptions.
    You can control the GM items and Fees through your regular adoption process. See the updated training documentation for details on setting up and using this new feature here
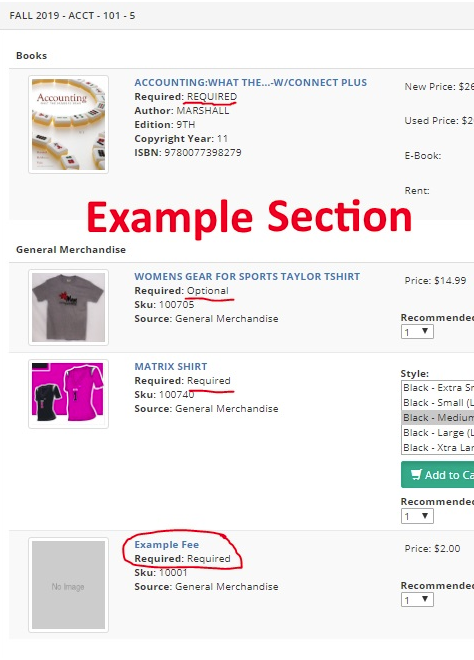
  • You can add multiple images to your online inventory. Instructions
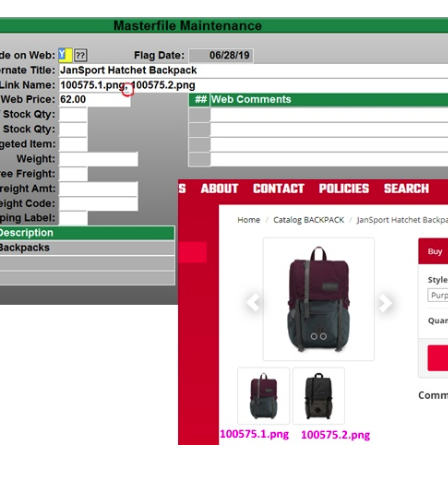
  • Coupons, Promo Codes, Vouchers, Gift Certificates and Cards
    Refined our checkout shopping cart process for using multiple types of Promo Codes and Vouchers. Allowing users more control to setup what Classes of Inventory, Specific items and Transaction level controls. Instructions and Documentation.


Tech Updates 09-25-2019

Redshelf Returns and Voids are now working correctly within Redshelf.

Enhancements

Printing Pickslips

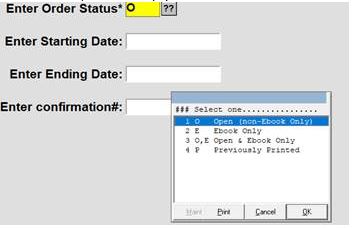
  • In POS.26.13 (Print Pickslips) the ‘Status’ has been modified to have a ??or// button/key. A new option of O,E has been added. This new option will print any un-printed orders regardless as to whether or not it has an ebook only title.
Ecommerce Resume Search Enhancement Web Orders.

  • Web orders are now easier to resume via a new search function. Starting a web order will display a prompt that will bring up orders based on the order number, customer name, email or phone number (xxx-xxx-xxxx). The old scroll list can still be accessed by just pressing Enter at the text field.

Instructions for setting up and enabling Web Order Search are be found here.

Rental Inquiry screen

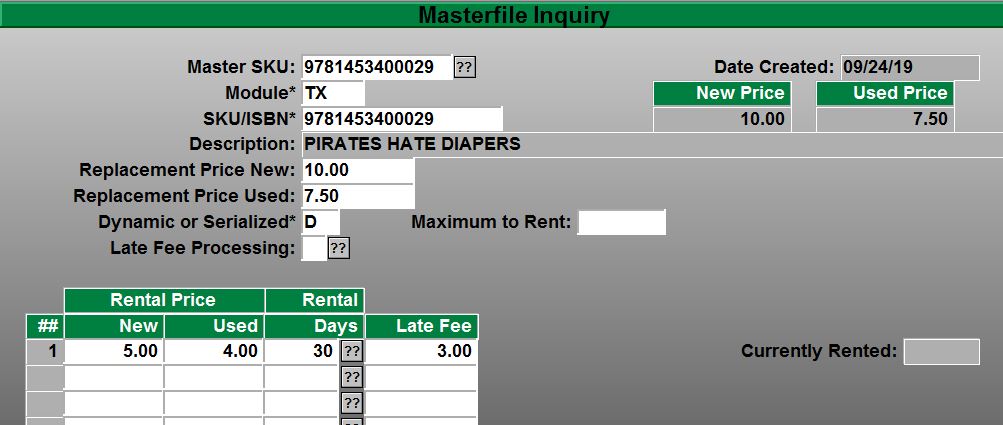
  • Customers have stated concerns about the locking of records when looking at the MF for Rental Record information. We added the ability to look at Rental information through the “Master File Inquiry (MI)” Menu instead of accessing rental information through the “Master File (MF)”. The new option in the MI screen is “RE=Rental”

Sales History

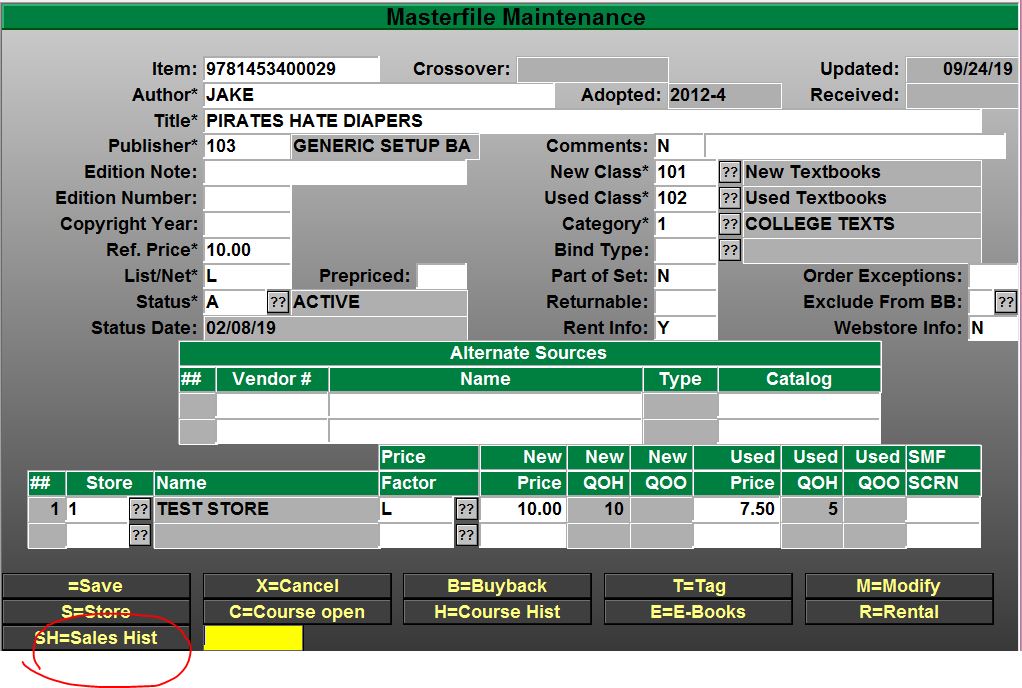
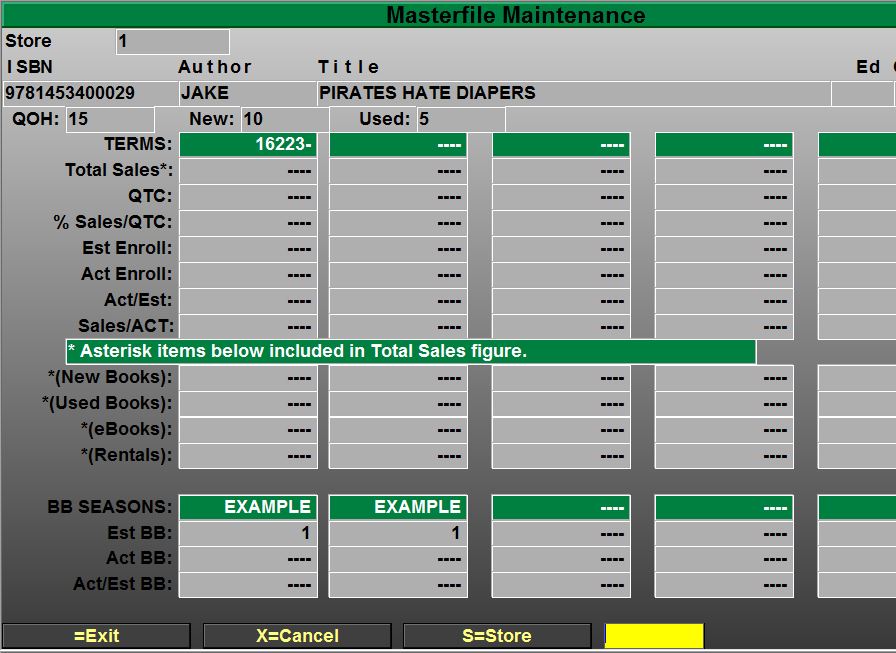
  • We have added the ability to view the Sales History from the MF screen with SH=Sales History button, made changes to the default Sales History in the Master File to use the users default store. You will still have the ability to browse between your store locations if you have permissions.


Online Orders Resume Suspend and Modify

Resuming Online and Mail Order Transactions

Prerequisite

  • The employee resuming the transactions are setup as Cashiers.
  • The PC or Register has been setup to run “Back office” or Web orders.

Once you have received your online orders you will need to resume the transactions on the system to fulfill and complete the purchases. *note that the card used to purchase the items is not changed until the resume transaction has been complete at the store. Online orders and the credit cards used for them are only verified valid and are not charged until the online order is completed in the store.

Your register must be open for the day in order to complete web transactions. Referrer to the general cash register training for Opening your register.

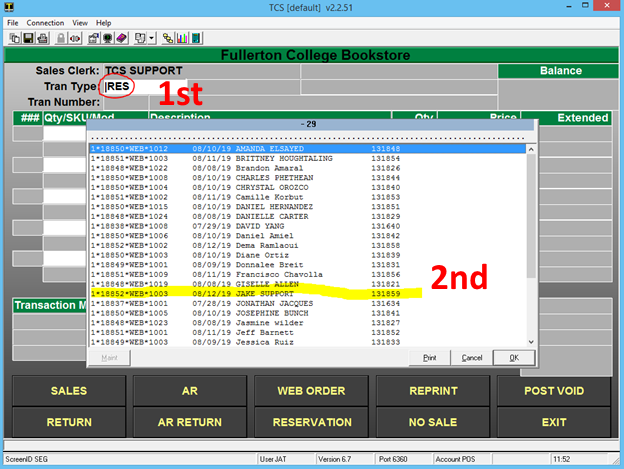
  1. Select the Transaction type Resume, Tap or Click the touch button, keyboard key or simple type |RES to bring up a listing of all pending orders on the system.
  2. Select the order you are completing from the list of suspended transactions displayed.

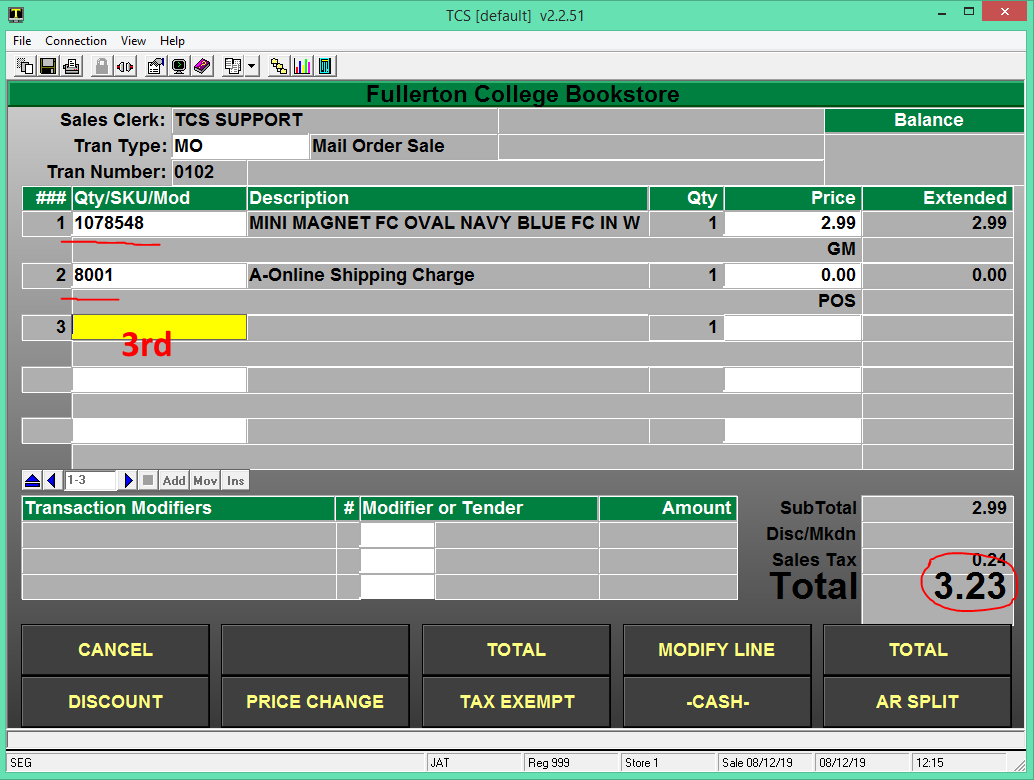
3. Your order will be displayed on the screen with the items the customer purchased in their online order. Review the items and remove, add or adjust and verify the contents of the order. *note that freight will display on pickup orders as a $0.00 dollar amount.

* If you modify the Freight you must use the Frieght modify option. This will be setup when the webstore and registers for processing online orders were setup (MOF) **

*If you modify the any item in the webtransaction you must use modify buttons that were created during the setup procedures.(MOM)**

*(MOM) and (MOF) are specific modifiers for online orders. Don’t you keyboard shortcuts for modifying web orders. example |LIM (line item modify) this will not work on a web transactions. 

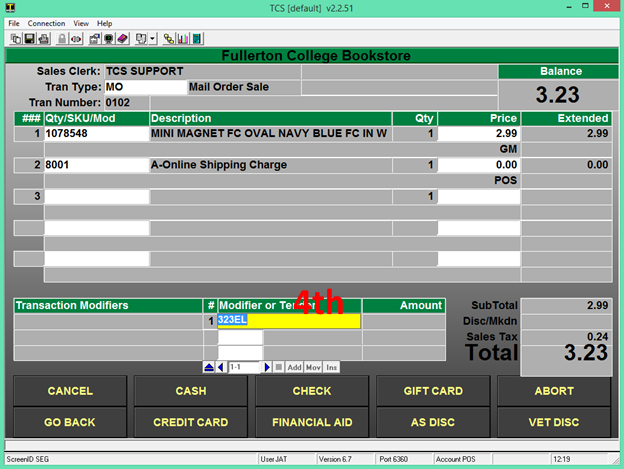
4. Totaling the online order will auto populate the tender code and transaction amount. You don’t need to do any modifications to the tender code unless the customer is using a different payment method than the one they used online to make the purchase.

  • Press enter through the tender field.

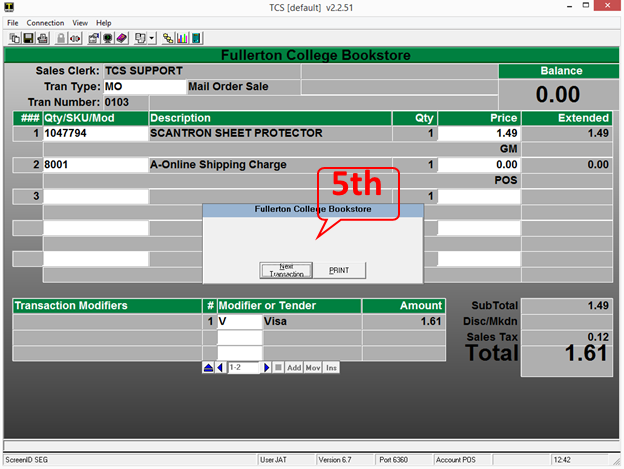
5. When the transaction is completed you will be prompted to proceed to the Next Transaction or to Reprint the current transaction.

  • At this stage in the order fulfillment an email will be sent to the customer notifying them that there order has been completed. *these email setting are setup during the initial setup of the webstore

Mail Order & Online Order with Returns and Transaction Match Tender

Prerequisite

Original Transaction number, date and register. This can be in any form but all of the material is required to complete the return process.

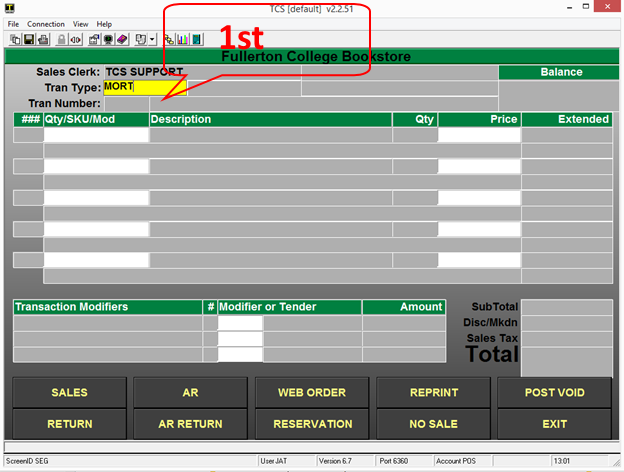
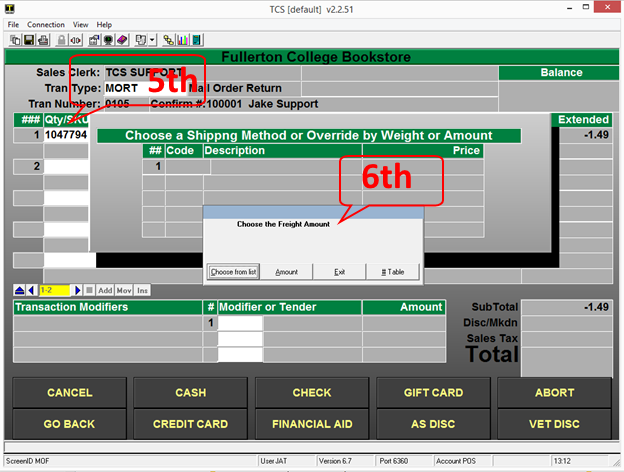
  1. On your back office, web register or any machine that has been setup to process web transactions go into the Cash Register function and select MORT, select the mail order return button or key that is setup to perform a mail order transaction.


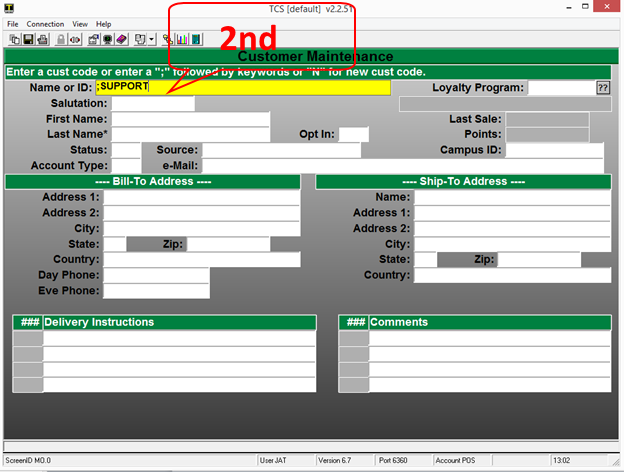
2. Input the customer ID or preform a search using the ;user’s name or portion of name.

  • You will be prompted for the customer name or ID that preformed the original transaction that you are wanting returning items against.

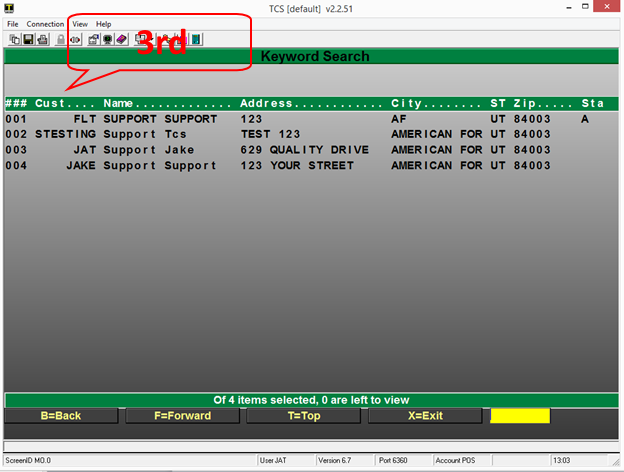
  • If you searched using the ; keyword search, select the appropriate customer to proceed to return items.
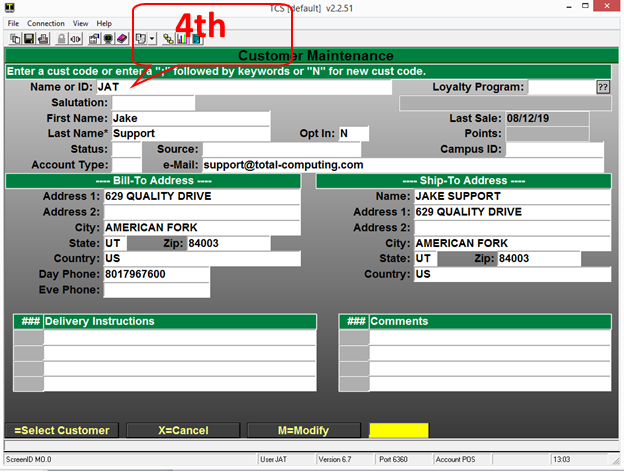
  • If you input the customer ID the search results should not display and the process should move you past the lookup and allow scanning items for the return.

5. Once you have selected or input the correct customer all you will need to do is scan or type in the items that were on the original order into the sku field.

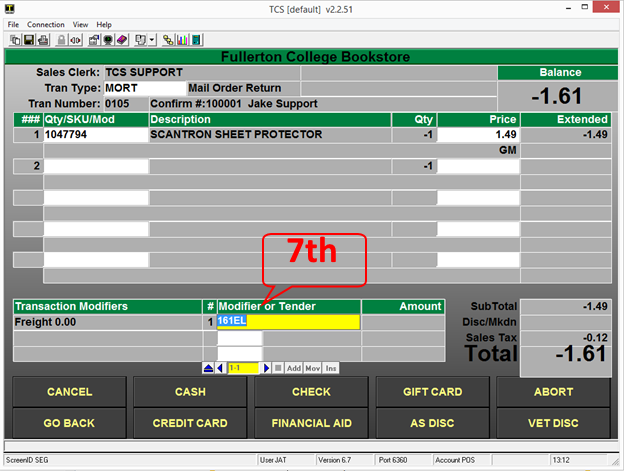
  • Once you have scanned or entered the items that you wish to return on the order and select Total you will be prompted for any shipping charges that you wish you apply to the return.
  • You can select a specific amount or select from a shipping table that you have setup or simple exit past this prompt.

  • Once you have scanned all of the items to be returned on the online order you will just need to Total the transaction and review the transaction total.
  • The Tender and amount should auto populate based off of the original transaction.
  • You will press “Enter” to proceed to the step

*note the system will not allow the tendered amount to be greater than the original purchase amount for the order.

**do not change the default tender code unless you are giving back cash or store credit. The tender determines what the cashier is prompted for.

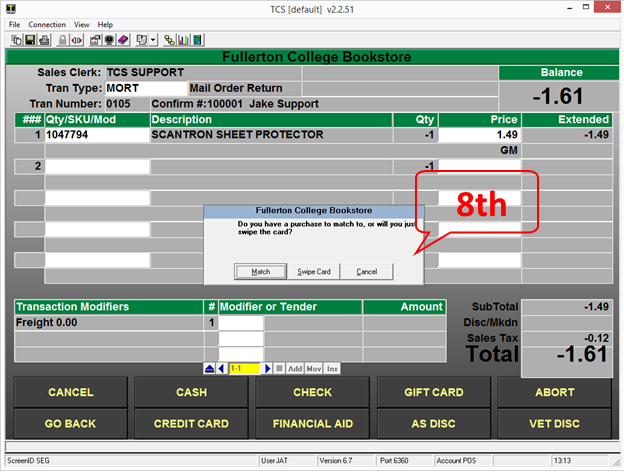
  • After you have accepted the tender and amount you will be prompted on how you would like to accept the payment return method.
    1. If the customer is present and has the credit card that they used to purchase the items you can have them swipe into your card reader their card when prompted.
    2. If you choose to refund to the original card that was used for the transaction you would select the “Match” option. You can use the “Match” option even if the customer is present with the original purchase card and the customer will not need to do anything.

*note that not all web registers are equipt with a card terminal.

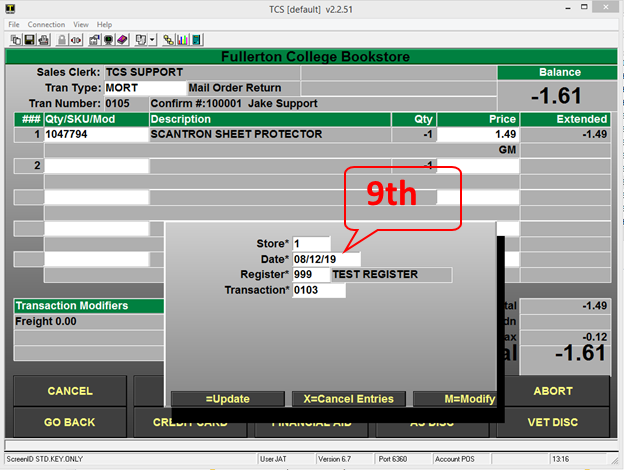
  • Input the transaction information is the only way to match a transaction against the original transaction. All of the inputs must match exactly.
  • It is important to note that even though you can have multiple Stations or Registers preforming web order usually all web registers utilize the same web register number.


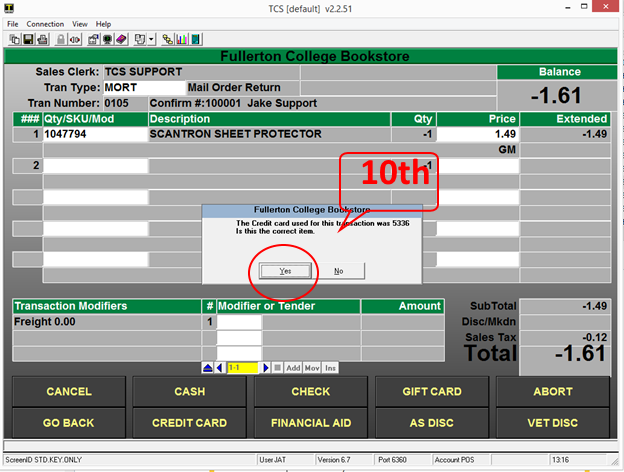
  • If the system matches the original transaction you will be prompted to verify the last 4 digits of the original transaction.

*note you can find the last 4 from the email confirmations or by reprinting the original receipt. If you do not have access to that information you may run several sales reports or lookup the transaction under the Mail order Customer Maintenance.

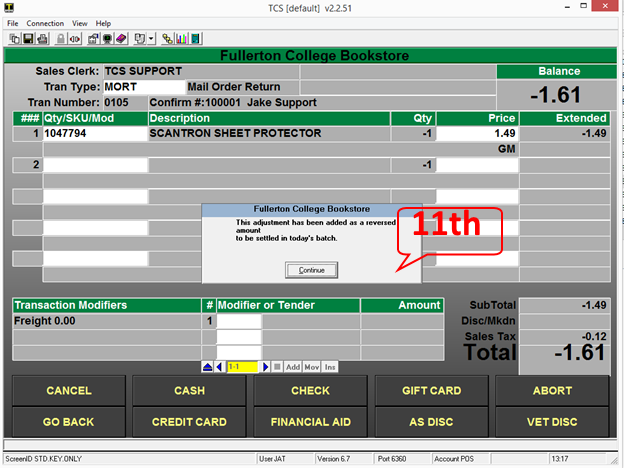
  • If the transaction matches and the tender total does not exceed the original purchase amount you will be displayed a message that the adjustment to the customer’s card has been made and the funds will be set to return to their card.

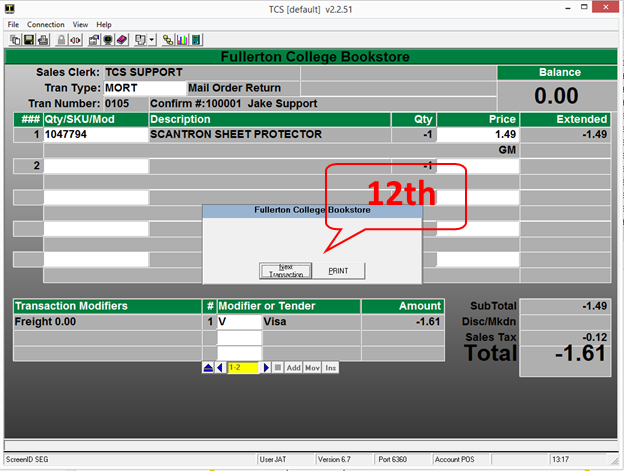
  • The last prompt you will receive once the return has been completed is to move onto the next transaction.
  • The system should print-off a return transactions receipt.

Suspending & Resuming orders from your Web register

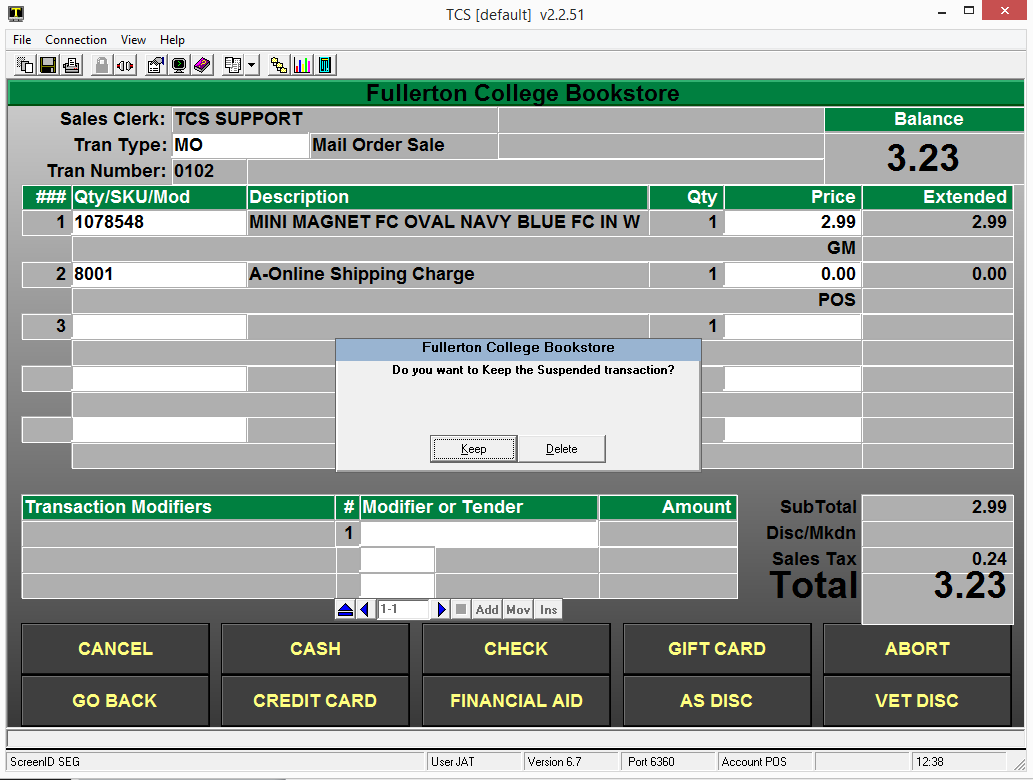
  • Any time that you are in a weborder transactions you can EXIT or ABORT to suspend the transaction or delete the transaction.
  • When you have selected a way to exit out of the web transaction you will be prompted to “Keep” or “Delete” the transaction. When you select the default option to “Keep” the transaction is restored to its original state so you can access the order at another time.
  • You can also select the “Delete” option when exiting your transactions and all of the information will be removed from the system and you will no longer be able to process that order.

*note that if you modify the online web transaction that those modifications will need to be added back as the “Keep” option restores the transaction prior to any of the users changes.

Declined Online Orders

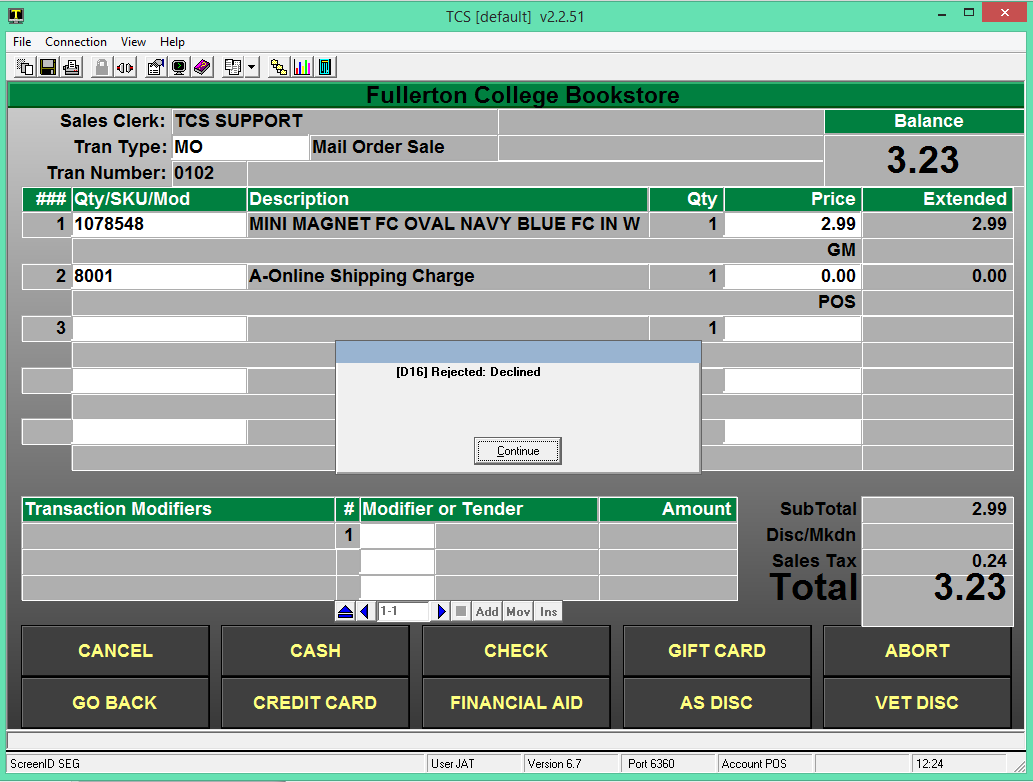
  • When you receive a declined response from the transaction when you try to process a web online order you will need to reach out to the customer to inform them that their card has been declined.
  • You can use the ABORT, EXIT or SUSPEND options to leave the transaction. Make sure that when prompted to “Keep” or “Delete” the transaction that you select the Keep option until the issue has been resolved.

*Please note that credit cards are not charged until the online order has been fulfilled at your web register.