Zebra zd410 manual

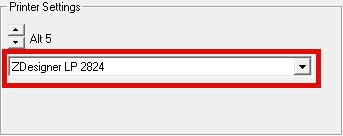
Below is a link to the Zebra ad410 users guide. You can use this document to see how to setup your printer or to do a calibration on the printer if it should have a problem determining the end of a label.

https://www.zebra.com/content/dam/zebra/manuals/printers/desktop/zd410d/zd410d-ug-en.pdf


Enhanced Serial Number Maintenance

Enhanced Serial Number Maintenance

The serial number feature in TCS has been enhanced so that it now you will track the serial number from the point of receiving through the selling at the register. In the previous model you only entered the serial number at the register as a memo line item so that you can check the serial number if the item is returned.

Creating a serialized item

To create a serialized item, you will create the item in GM.MF the same as any other item and in the ‘Serialized:’ field you will enter a “Y”

Creating a PO

You will create a PO and add the item to the PO the same as any other item, serial numbers do not affect a PO since you only know what serial number is received at the point of receiving.

Receiving on a PO

You will receive the item the same as any other item, when the item is selected to be received a screen will display prompting you to enter or scan in the serial numbers that are received.

Enter the quantity that you are receiving.

Enter in the serial numbers that you are receiving.

If the number of serial numbers entered does not match the number of items marked to receive then a warning will display, you will have to modify either the number of items received or the number of serial numbers entered.

Complete the receiving as normal.

When you complete the receiving log and print the receiving document, the serial numbers will be listed under the item they are associated with.

View the Serial Numbers in inventory

To view the serial numbers that are inventory, go to GM.MF and select the SN=SN from the bottom.

You can edit the serial numbers from the GM.MF screen, if you do not wish someone to edit these then you should direct that person to use the GM.MI screen instead.

Selling a serialized item

You will need to scan, enter, lookup the item the same as any other item being sold, a screen will display to ‘D’ or Enter Serial Number.

  • You can scan the serial number that is sold
  • You can manually type in the serial number sold
  • You can enter the ‘D’ to display the serial numbers on hand and select the one that is sold

The serial number will print on the receipt below the sku, you will need to make sure that the receipt detail has a memo line beneath the sku/description line. The memo line does not print unless there is something in the memo filed.


User-Cashier Maintenance

User-Cashier Maintenance

User and Cashier maintenance has been modified. You can now create or edit a user id and the cashier set from both screens UU.5.1 and from POS.22.1, both screens allow you to perform the same functions and the cashier maintenance has been merged to the user maintenance screen. The new menu screens have the name User-Cashier Maint.

Creating a User ID

When you enter a User ID, if the ID already exist then it will display the information. If it is a new ID then you will be prompted to with 3 options, ‘Add’, ‘Copy’, ‘Cancel’. If you Select ‘Add’ then you will need to enter all of the required information for the user. If you select ‘Copy’, then you will be prompted for a user/cashier code that the system will copy valid transaction and Invalid Transaction options from. ‘Cancel’ will cancel the input of the user maintenance.

  • User Id:                 This is the id assigned to the user and what they will use when they logon to the register, if they are setup as a cashier then this will also be their Cashier ID.
  • Name:                 The Name of the user.
  • Password:                 Here you will enter the temporary password assigned to the user. When you enter a password, it will prompt for you to reenter the password to make sure there was not a typo in the first attempt. The user will then be prompted to change their password the first time they log on. When setting up or changing a password, the user/cashier should logon to a host computer first so that when they change their password the change will go down to all of the registers. Any password changes made on a Smartlane register will only be on that register and it will NOT be transferred back to the host or to any other register.

  • Department:                 This is a free form field that you can enter the department that the user is assigned to.
  • Always Display Help (D): Enter a ‘D’ to always display help or a ‘Y’ for Performance. (You should always use ‘D’).
  • Require Clocking In: Enter a ‘Y’ only if you are using the Integris Time Clock feature, this should normally be blank or ‘N’.
  • Check Background Process:         Enter a ‘Y’ only if you want the system to check for background processes when the user logs on, this should normally be set the ‘N’ or blank.
  • Credit Card Access: Enter a ‘Y’ to allow this user to access credit card data. This should normally be left blank.
  • Cashier*: Enter a ‘Y’ if this user will also be setup as a Cashier, if it is set to ‘Y’ then the bottom prompt will also have a CM=Cashier Maintenance option and when you save the record, the cashier maintenance window will display to complete the cashier setup.
  • Active User*: This feature is still in development and is not used by the system. If you wish to prevent a user from logging in, then you can set the ‘Expires’ to 0 or delete the User ID.
  • Expires*: If you have just reset the password then this will display ‘Reset90’ this indicates that the user will have to reset their password the next time they log on and that it will be good for 90 days. Once the password is reset then it will display 90. By PCI requirements we must set this to 90 or less, if you change it to less than 90 then the user will expire that many days after the day the password was last changed.
  • Email Address: Enter the email address for the user.
  • Use Menu Tree: If this is set to ‘Y’ then the user can use the GUI Menu Tree    that you can use to navigate the module that you are currently in.
  • Supervisor: If you are using the Integris time clock then you can enter the supervisor id for time clock reporting.
  • Function Key Code: Here you can set the function key setup to use for this user.

Menu Options

You can set which menu options the user will have access to by adding or removing the options here and you will set what privilege level the user will have when they access the module.

  • Priv Enter the level that this user will have in associated account, for instance, if the user is set at 50 and a menu level is set at 75 then the user will not be able to access that option.
  • Menu The menu option that they will select
  • TCL Table Always set this to L1
  • Pick Account Enter the Pick account that the option is to access.
  • Description The description of the menu option

Stores

Default Store     This is the default store that the user is assigned to.

Valid Stores        This is where you can enter any or all (*) of the stores that the user will have access to.

Save/Cancel/Modify/Cashier Maintenance

Once you have created a User then you have the options below. If you have set the Cashier*: field to ‘Y’ then if you save this record and have not selected the Cashier Maint option, the Cashier maintenance window will display to allow you to edit the cahier information.

  • =Save                 Select this (or just hit the enter key) allows you to save the changes that you have made
  • X=Cancel Select this to discard any changes you have made
  • M=Modify Select this to start at the top and make any changes to the displayed record
  • CM=Cashier Select this to display the screen for the Cashier Maintenance.

Cashier Maintenance

The first time you enter the screen you will be prompted to ‘Add’, ‘Copy’, ‘Cancel’. If you Select ‘Add’ then the information from the ‘user’ screen will be copied over and you can enter any of the additional information as needed. If you select ‘Copy’, then you will be prompted for a cashier code that the system will copy valid transaction and Invalid Transaction options from. ‘Cancel’ will cancel the input of the cashier maintenance.

Code, Name, Status, Security, Password, Default Menu, TCL Table are all locked fields and can not be modified on this screen, they are for display only.

Drawer Number:              If your cash registers have multiple drawers then you can enter the drawer that this user will be assigned to, otherwise leave blank.

Check Clock:                       If you are using the Integris time clock then enter a ‘Y’ if the user must always be clocked in before entering a cash register. You can also enter an ‘L’ to require clocking in but returns the employee back to the sign-in box. Normally this will be left blank.

Valid Transaction Types:               If you enter something in these fields then these will be the only transaction types the cashier can perform. Normally you only enter something in the Valid or Invalid not both.

Invalid Transaction Types:            If you enter something in these fields then the cashier will be able to perform all transaction types except the ones entered. Normally you only enter something in the Valid or Invalid not both.


ADDING A VENDOR

ADDING A VENDOR

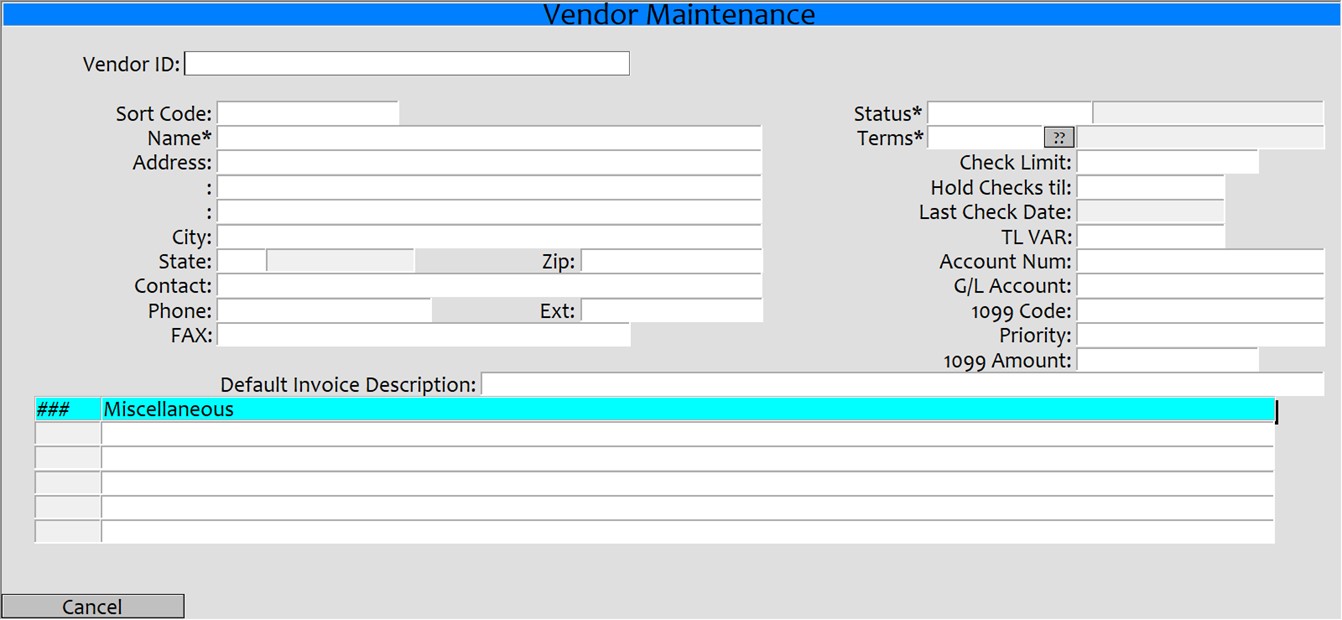
To add or create a new vendor in the system is the same process for General Merchandise and Textbook. If you have the Accounts Payable module then you will also need to create the vendor there and link it to the vendor that you created in GM or TX, keep in mind that GM and TX share the vendor file so if you create it in one then it will be available in the other.

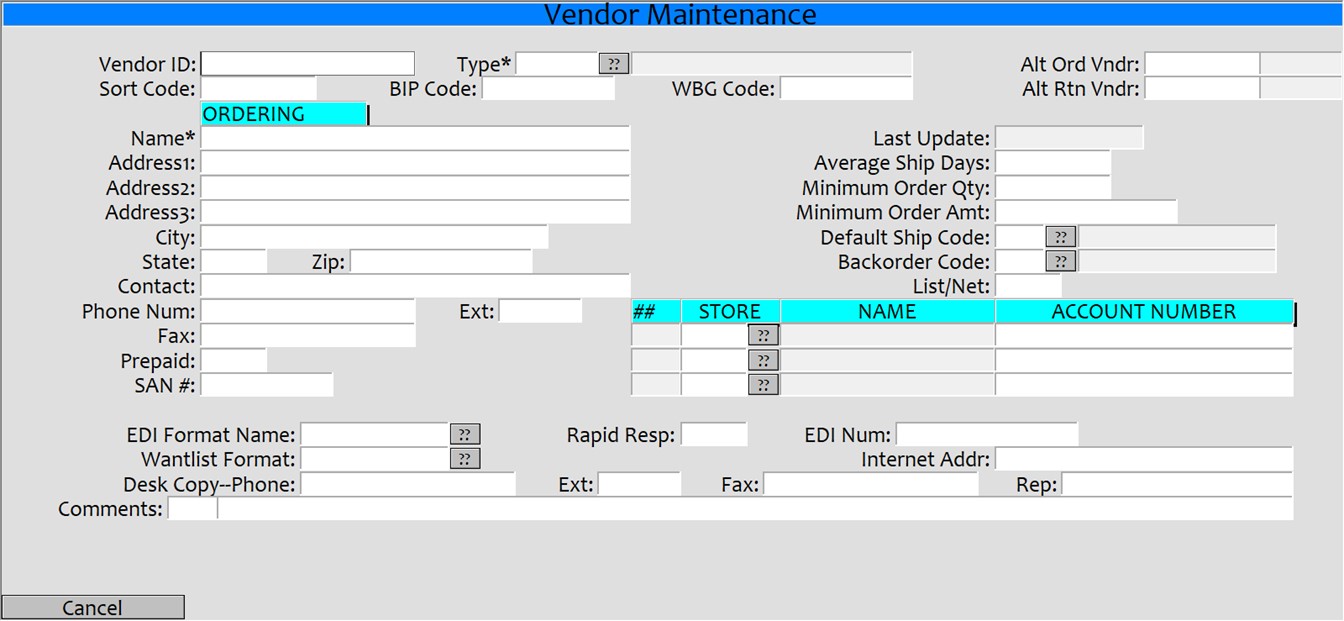
Log to either GM or TX and then select the VM – Vendor Maintenance option

  • Vendor ID: Enter a period ‘.’ To create a new vendor number or enter 3 or more letters in the vendor’s name or sort code to bring up an existing vendor.
  • Sort Code: Enter a code that will help you find or reference this vendor. This code is used in cross-references and for sorting in reports.
  • Type: Enter the Vendor type.  Options here are D=Distributor, M=Manufacturer, P=Publisher, V=Vendor, W=Wholesaler.  Publisher and Wholesaler are normally used in Textbook (TX), Manufacture and Vendor are normally used in General Merchandise (GM) and Distributor is used in both.
  • BIP Code: Used is TX and stands for Books In Print Code, Books In Print is not commonly used anymore.
  • WBG Code: Used in TX and stands for Wholesale Buying Guide, this indicates what wholesale guide code to associate with this vendor.
  • Alt Order Vndr: This is used to indicate if an alternate vendor should be used for this Vendor, this is normally used when one vendor buys another.
  • Alt Rtn Vndr: This is used to indicate if an alternate vendor should be used for this Vendor, this is normally used when one vendor buys another.
  • Name: The name of the Vendor as it will show on reports and POs and Returns.
  • Enter Address, City, State, and other information as it is available.
  • Prepaid: Enter a ‘Y’ here if this vendor must be prepaid.
  • SAN #: This is a textbook field and stands for Standard Address Number.
  • Last Update: This field is maintained by the system
  • Average Ship Days: Enter in the average number of days it takes for shipping.
  • Minimum Order Qty: Enter the minimum order quantity that this vendor requires to process/ship an order, this is usually a GM vendor field.
  • Minimum Order Amt: Enter the minimum order amount that this vendor requires to process/ship an order, this is usually a GM vendor field.
  • Default Ship Code: Enter in the default ship code that will be used when creating a po for this vendor.
  • Backorder Code: Enter the default backorder code to use when processing a receiving for this vendor.
  • List/Net: Enter either ‘L’ or ‘N’ to set the default pricing type to use when creating a PO for this vendor. L=List pricing and N=Net pricing, List pricing usually includes a discount off of the List and Net is direct price of the item.
  • Store/Name/Account Number Enter in the store number and Account Number associated with that store
  • EDI/Wantlist/etc. This is used in TX for the electronic wantlisting.
  • Comments: Enter a ‘Y’ and then enter any comments that you would like to have associated with this vendor.

Next you should enter in the additional ordering information and the returns information.

Additional Ordering

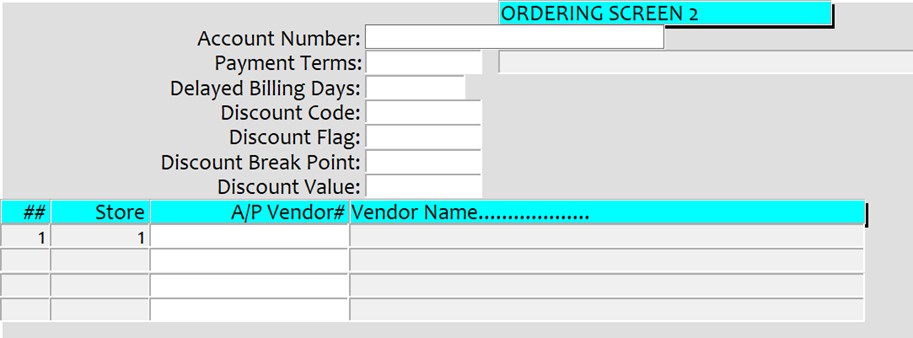
To enter in the additional ordering information, select the ‘A=Additional Ordering’. The information on this page is used with the Accounts Payable (AP) module

  • Account Number: Enter in the Primary Account number
  • Payment Terms: Enter the default payment terms, normally net30
  • Delayed Billing Days: Enter if there is a default billing days for this vendor.
  • Discount Code: Enter a discount code to use for this vendor.
  • Discount Flag: Enter a discount flag to use for this vendor.
  • Discount Break Point: Enter a discount break point for this vendor.
  • Discount Value: Enter a discount value to use for this vendor.
  • A/P Vendor # Enter in the A/P vendor to associate this vendor to. If this is left blank and you have the AP module then the invoices will be associated with the AP Vendor 99999. You will need to navigate to the AP module and create the appropriate vendor there and then enter that vendor number here.

Returns

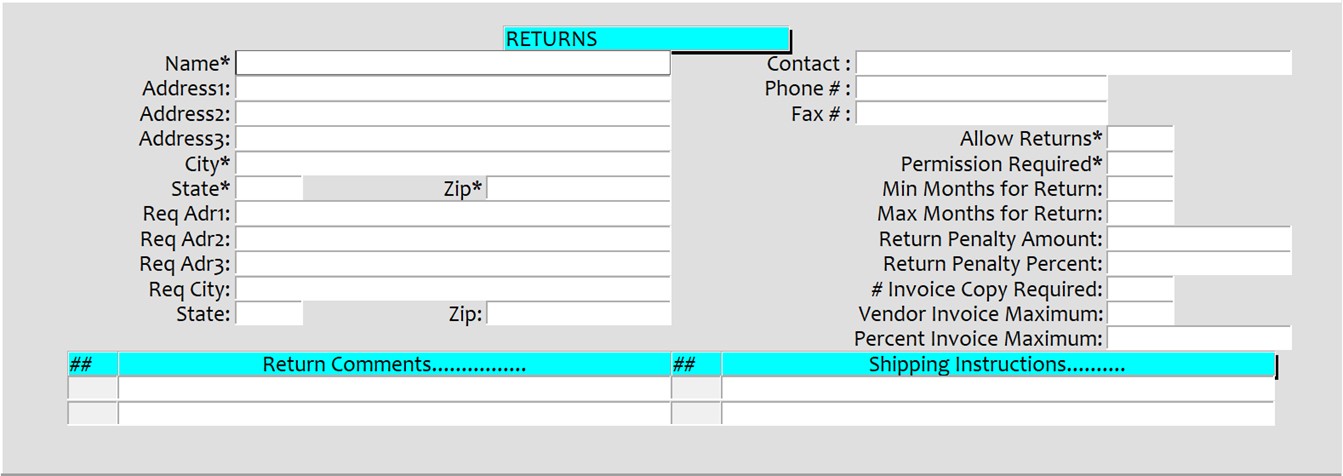
  • Name/Address Enter the Return address information for this Vendor
  • Contact/Phone/Fax#: Enter in the contact information for the Return information.
  • Allow Returns* Enter ‘Y’ if vendor allows returns or ‘N’ if they do not allow returns, this will affect the returns processing in TX.
  • Permission Required* Enter ‘Y’ if permission is required for returns or ‘N’ if no permission is required. This does affect the returns processing in TX.
  • Min/Max Months for Returns: Enter in the minimum and maximum number of months allowed for returns, maximum returns is required for the TX auto return process to work.
  • Return Penalty Amount: Enter in any penalty amount vendor will apply to returns.
  • Return Penalty Percent: Enter in any penalty percentage a vendor will apply to returns.
  • Invoice Copy Required:                 Enter in the number of invoices the vendor requires for each return.
  • Vendor Invoice Maximum: Enter the maximum dollar amount a vendor will allow you to return.
  • Percent Invoice Maximum: Enter the maximum invoice percentage that the vendor will allow to return.
  • Return Comments… Enter in any default return comments, these will print on every return created to this vendor unless overridden on the return.
  • Shipping Instructions…. Enter in any default shipping instructions that you would like to print on every PO.


Create the vendor in AP

Log to the AP module and select VM=Vendor Maintenance from the main screen.

  • Vendor ID:                 Enter a period ‘.’ to create a new vendor or enter 3 or more letters in the vendor’s name to edit an existing vendor. This vendor number will be used in the GM/TX vendor record in the ‘Additional Ordering’ information screen.
  • Sort Code:                 Enter 3 or more letters to use as a sort code for the vendor.
  • Name/Address/Contact Enter the vendor’s name, address, phone, contact information.
  • Status:                 This should normally be ‘A’
  • Terms:                 This is normally N30 but can be any payment term that you have created. You can use the ?? button to select from the available terms or from the selection screen you can select the ‘Maint’ button to jump to the terms maintenance screen and create a new one if needed.
  • Check Limit:                 Enter a check limit amount for this vendor or leave blank for normal
  • Hold Checks til:                 Enter a date if you wish to hold checks until a certain date.
  • Last Check Date: This is maintained by the system and will list that last date a check was created.
  • TL VAR:                 Enter ‘Y’ if this is a TotaLink VAR, enter ‘YN’ if no checks should print.
  • Account Num:                 Enter in the account number.
  • G/L Account: Enter the GL account number that this should be associated with.
  • 1099 Code: Enter any 1099 codes for this vendor
  • Priority: This will default to 90.
  • 1099 Amount: Enter any 1099 information.
  • Default Invoice Description: Enter any default description that you would like to display.
  • Miscellaneous Enter any miscellaneous information that you would like for this vendor.


SHIP ENGINE PROCEDURES

SHIP ENGINE PROCEDURES


There is a new menu option in POS for the Ship Engine interface.

Contact Total Computing Solutions Sales to setup an account with Ship Engine.
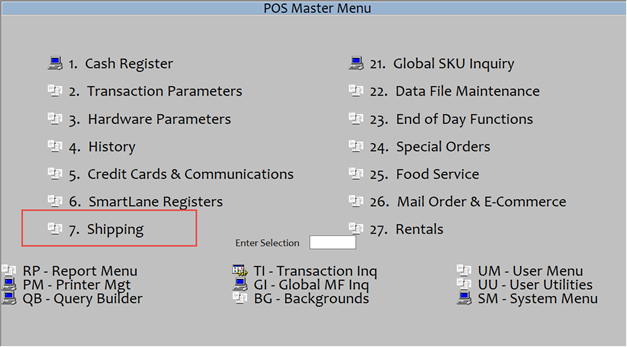
Menu option #7 for Shipping.

Select option #21 for Shipping Parameters.
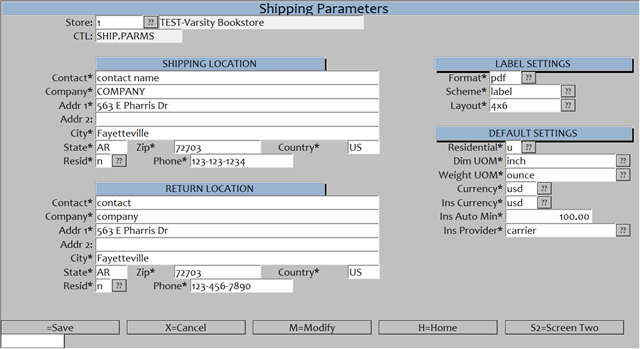
In the Shipping Parameters,

  • fill out your company Shipping Location and Return Location information
  • Enter your label settings
    • Format select from
      • Pdf
      • Png
      • Zpl
    • Scheme settings
      • Label
      • QR_Code
    • Layout
      • 4 X 6
      • Letter
    • Default Settings
      • Residential
        • Y-Yes
        • N-No
        • U-Uknown
      • Dim UOM
        • Inch
        • Centimeter
      • Weight UOM
        • Ounce
        • Pound
        • Gram
        • Kilogram
      • Currency
        • USD
        • CAD
        • AUD
        • GBP
        • EUR
        • NZD
      • Ins Currency
        • USD
        • CAD
        • AUD
        • GBP
        • EUR
        • NZD
      • Ins Auto Min – enter the minimum value to incur insurance charges.
      • Ins Provider
        • None
        • Carrier
        • ShipSurance
        • 3rd Party
      • Select the S2 = Screen Two to fill out you Ship Engine ID information

Enter in your Whs Name, Carrier ID, Carrier Name, fi you enter in a specific carrier ID and Carrier Name then when you select to view shipping results you will only see the results for that specific shipper. Leaving this field blank will make it so that when you view the shipping results you will see the results for all carriers (stamps/usps, UPS, FedEx).

Ship Engine Stuff with the API KEY assigned by Ship Engine.

Select #1 Shipping to enter in you shipping information for specific transactions
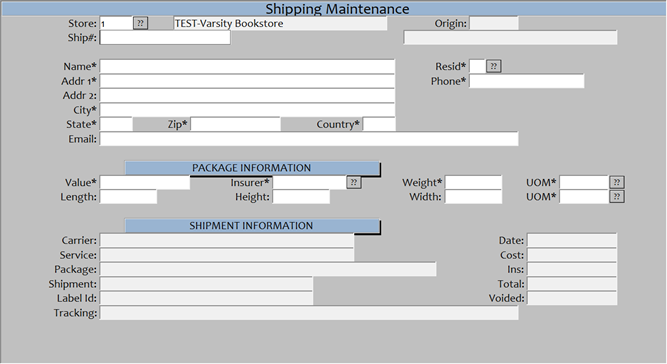
Select store number that you are shipping for, leave as 1 if you only have one store.

Ship# – Enter in the transaction information to select a transaction or a ‘.’ for manual shipment record.

  • ‘.’ – to manually create shipment record
  • CONF;### – to create shipment record from POS Transaction by confirmation #
  • POS;xxxx – to create shipment record from POS Transaction.
  • PC;xxxx – to create shipment record from Pref Customer look up.
  • AR;xxxx –              to create shipment record from A/R Customer look up.
  • ### – to pull up existing shipment record.
  • XO;### – to search for shipment records using confirmation #.
  • XN;xxxx – to search for shipment records using name.

After entering the information for an existing transaction then the Name, Addr, information will be populated from the transaction, if you manually create a ship# then you will have to fill out the information as seen below.
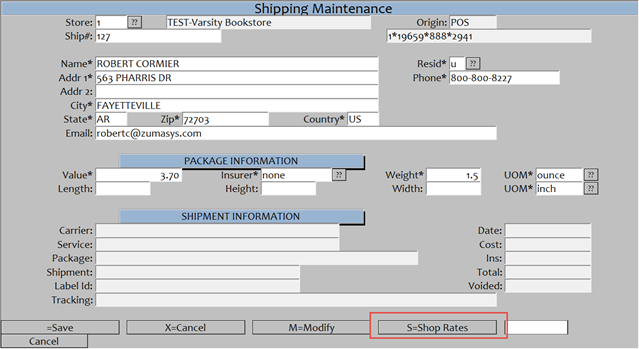
Once all of the information has been entered, select the S=Shop Rates to see the shipping options.
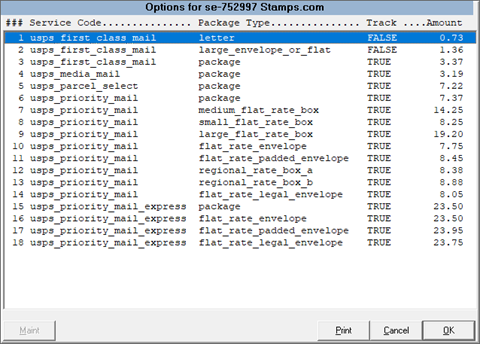
Choose from the displayed shipping rates the one that you would like to use for this shipment. Please note that some of the options allow for tracking while others do not.

After selecting a shipping option there will be an option P=Print Label. After selecting this option, you will see a new popup window, as seen below, you will highlight and copy all of the information in the ’URL’ field and past that in to a browser window to bring up a window to print the shipping label.

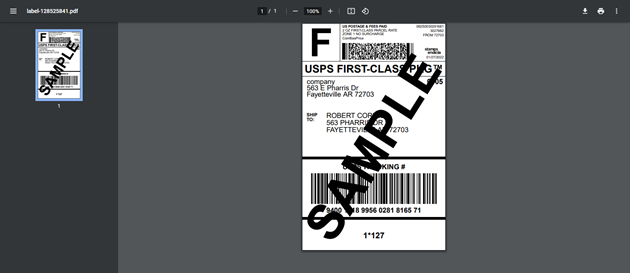
The browser window will open with the option to print the label as seen above.

After printing the label, all of the tracking information will be displayed in the ‘Shipment Information’ section of the window, you have the option to R=Reprint Label or VO=Void Label, you can reprint the label as many times as you need.

At the end of the day when shipping has been completed, select #2 the Shipping EOD option to finalize you shipping manifest.
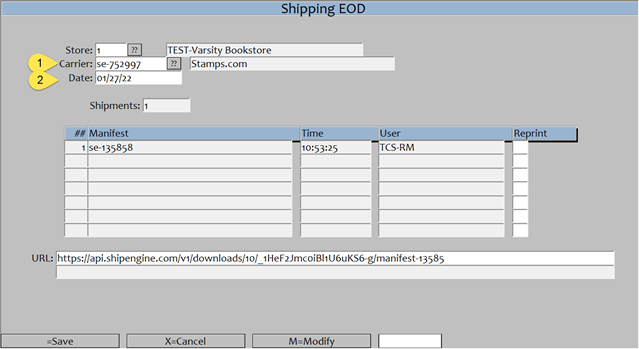
From the ?? Button select the Carrier option and the date then select the C=Create Manifest option when the manifest is created you will see the manifest # above.

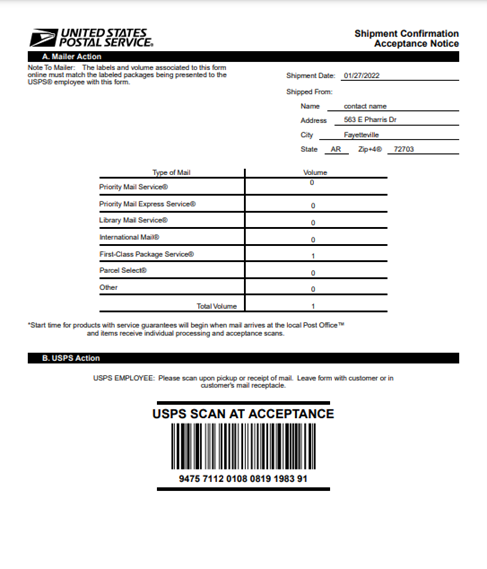
Copy the URL field and paste that in to a browser window to get a copy of the shipping manifest. Below is an example of what you should see for the stamps.com/usps shipper.


PICK SLIP Inactive-Over Due Rental Notification

To add notification of Inactive customer or Over Due rentals to a pick slip then you need to add the following line to the MO.PICK header.

Line 1 in the example below shows how to add the notification to the top of the pick slip printing.  The attribute can be RPD (Rental Past Due) or PDR (Past Due Rental) and the L#94 fills the entire lines, if you wish then you can also put in a blank line after this for better formatting.


Add an E-Book only ISBN to the TX-MF

Adding an E-Book only ISBN to the MF

As times are changing, there are now titles that are only available as an e-book option normally referred as EISBN. These can be added to the system but there are a few items that need to be set correctly so that only the e-book will be an option.

When creating the ISBN in the mf record, setting the record as below will prevent the New/Used options from displaying on the website and when selling the ISBN, only the E-Book option will be available on the register.

  1. in the New/Used Class you need to use the E-Book class code that you have setup.
  2. New Price needs to be BLANK or NULL (NOT 0.00)
  3. Used Price needs to be BLANK or NULL (NOT 0.00)

Once the MF record has been created then you can attach the ISBN to the courses the same as always. When adopting the title to courses/sections you will need to set the QTC to 0 to prevent the system from trying to order quantities through wantlisting or through publisher orders. (You may want to edit the ‘Order Exceptions’ and ‘Exclude from BB’ options in the MF record to make sure that the title is not added to a wantlist/PO and excluded from all BB options.)

If the title was created via some kind of course/book import then you will need to edit the MF record as directed above.

Set the E-book UPC codes up as normal. If you create the E-Book only ISBN then the next time you download your E-Book list from your vendor then the UPC/Selling periods will be created the same as they are with a standard ISBN.


GM WEB TAGS

GM WEB TAGS 

Web-Tags is a new webstore feature that allows customers to filter items within their webstore selections. For instance, if a customer accesses a clothing catalog, they may want to filter the items to only display the items that have the color and size they are looking for. 

Web tag categories are the objects a user can select to filter on, e.g. Size, Color or Fabric and include a list of values such as Blue, Red, Large, Small, Cotton, or Polyester to filter on. These Blue, Red, Large, Cotton, etc. options are called tags. 

Note: there is no required sequence for creating Web-Tags and categories. You can create a new category first or create the Web-Tags first 

Web-tag category maintenance is used to manage what categories a tag is associated with or to.   

Here are some naming conventions to follow  

  • Underscores are converted to spaces DRESS_SHOES = DRESS SHOES 
  • Special characters should not be used in naming Web-Tags or categories 
  • Keep in mind, the names of the categories will be displayed as a drop down Keeping the names short will be ideal.

When attaching Web-Tags to a matrix item, the tag needs to be added to the Parent item only, do not add the tags to the child items. 

Note: there is no required sequence for creating Web-Tags and categories. You can create a new category first or create the Web-Tags first 

Adding a non-existent tag label to a tag category will create the new tag
Adding a non-existent tag category to a tag will create the new category 

To use GM WEB Tags you will need to create the Web-Tag categories and the Web-Tag labels. 

Log to POS.26.6.1 to enter/modify a Web-Tag Category.

  • Tag Category– Enter in the new tag category or select the ?? to edit an existing category.  
  • A category will be a way to group your tags such as Size or Color. 
  • You would create the category of Color and then in the next section where you create the Tag, each of the colors you create would be associated to the category. 
  • TAG– Enter or select the tag to associate to the Tag Category. 
  • SortBy– Enter a number 1-? to indicate the sequence that you would like to sort them by. This will affect the display sequence within the Webtag/Category filter display. If you leave the ‘SortBy’ field blank then they will be displayed in alphabetical order. 
  • HexColor– If this is a color associated field then you can enter the ‘HexColor’ code to help identify the color. You can only enter the ‘Hexcolor’ if the Tag Category is COLOR.

The color will be displayed when you click on the color tag on the web site. The ‘Hexcolor’ will only be displayed if the Tag Category is COLOR, otherwise the swatch will not be displayed. 

Log to POS.26.6.2 to enter/modify the Web-Tag Tag Maintenance.  

Web-Tags -these are going to be the options that you can click to filter items in the webstore 

  • Web Tag– Enter/modify the web tag label to use. (If a tag already exists that tag information will appear) 
  • Color field– Enter the color code if this is associated with a color. The color will be displayed when you click on the color tag on the web site. Entering the ‘hexcode’ in the Color field display the color swatch next to the color name as seen below.
  • If you have entered a Tag in the Tag Category Maintenance, then it will be available here and it will display the Category that it was assigned to. 
  • You can also set the ‘SortBy’ attribute which is the order in which the tag will appear in the dropdown menu. If left blank the webstore will simply sort by alphabetical order. 

Adding Web-Tags to GM items.

Now that the tags have been created, you will need to go to GM > MF to add the tags to the items. 

  • Log to GM.MF, enter a SKU that you want to add the web tags to.
  • Select W=Web to go to the web maintenance screen.
  • You will see a new section called Web-Tags.
  • Select the ?? to display the list of tags and select the one you want to add to this item
  • Repeat for each of the tags you wish to add to this item.

When you go to the website, and after you select a catalog on the left, you will then see the tag categories that you can click and select to filter the results by. 

Selecting multiple filters will result in only displaying the items that meet all the filters selected. If you do not see any results, then remove some of the filters that you have selected. 

it will aggregate filters within a category then filter down when you select a filter in a different category 

So, if I select 4 different colors, it will show me all the items that have any of those colors, but then if I pick a size, it will show me the items of that size that are any of the 4 colors. So, if I choose medium, it will show the mediums that have any of those 4 colors 


GM WEB TAGS

GM WEB TAGS 

Web-Tags is a new webstore feature that allows customers to filter items within their webstore selections. For instance, if a customer accesses a clothing catalog, they may want to filter the items to only display the items that have the color and size they are looking for. 

Web tag categories are the objects a user can select to filter on, e.g. Size, Color or Fabric and include a list of values such as Blue, Red, Large, Small, Cotton, or Polyester to filter on. These Blue, Red, Large, Cotton, etc. options are called tags. 

Note: there is no required sequence for creating Web-Tags and categories. You can create a new category first or create the Web-Tags first 

Web-tag category maintenance is used to manage what categories a tag is associated with or to.   

Here are some naming conventions to follow  

  • Underscores are converted to spaces DRESS_SHOES = DRESS SHOES 
  • Special characters should not be used in naming Web-Tags or categories 
  • Keep in mind, the names of the categories will be displayed as a drop down Keeping the names short will be ideal.

When attaching Web-Tags to a matrix item, the tag needs to be added to the Parent item only, do not add the tags to the child items. 

Note: there is no required sequence for creating Web-Tags and categories. You can create a new category first or create the Web-Tags first 

Adding a non-existant tag label to a tag category will create the new tag
Adding a non-existant tag category to a tag will create the new category 

To use GM WEB Tags you will need to create the Web-Tag categories and the Web-Tag labels. 

Log to POS.26.6.1 to enter/modify a Web-Tag Category.

  • Tag Category– Enter in the new tag category or select the ?? to edit an existing category.  
  • A category will be a way to group your tags such as Sizeor Color. 
  • You would create the category of Color and then in the next section where you create the Tag, each of the colors you create would be associated tothe category. 
  • TAG– Enter or select the tag to associate to the Tag Category. 
  • SortBy– Enter a number 1-? to indicate the sequence that you would like to sort them by. This will affect the display sequence withing the Webtag/Category filter display. If you leave the SortBy field blank then they will be displayed in alphabetical order. 
  • HexColor– If this is a color associated field then you can enter the HexColor code to help identify the color. You can only enter the Hexcolor if the Tag Category is COLOR.

The color will be displayed when you click on the color tag on the web site. The Hexcolor will only be displayed if the Tag Category is COLOR, otherwise the swatch will not be displayed. 

Log to POS.26.6.2 to enter/modify the Web-Tag Tag Maintenance.  

Web-Tags -these are going to be the options that you can click to filter items in the webstore 

  • Web Tag– Enter/modify the web tag label to use. (If a tag already exists that tag information will appear) 
  • Color field– Enter the color code if this is associated with a color. The color will be displayed when you click on the color tag on the web site. Entering the hexcode in the Color field display the color swatch next to the color name as seen below.
  • If you have entered a Tag in the Tag Category Maintenance,then it will be available here and it will display the Category that it was assigned to. 
  • You can also set the SortByattribute which is the order in which the tag will appear in the dropdown menu. If left blank the webstore will simply sort by alphabetical order. 

Adding Web-Tags to GM items.

Now that the tags have been created, you will need to go to GM > MF to add the tags to the items. 

  • Log to GM.MF, enter a SKU that you want to add the web tags to.
  • Select W=Web to go to the web maintenance screen.
  • You will see a new section called Web-Tags.
  • Select the ?? to display the list of tags and select the one you want to add to this item
  • Repeat for each of the tags you wish to add to this item.

When you go to the website, and after you select a catalog on the left, you will then see the tag categories that you can click and select to filter the results by. 

Selecting multiple filters will result in only displaying the items that meet all the filters selected. If you do not see any results, then remove some of the filters that you have selected. 

it will aggregate filters within a category then filter down when you select a filter in a different category 

So, if I select 4 different colors, it will show me all the items that have any of those colors, but then if I pick a size, it will show me the items of that size that are any of the 4 colors. So, if I choose medium, it will show the mediums that have any of those 4 colors 


EDIT SUBJECT LINE ON WEBSTORE EMAILS

EDIT SUBJECT LINE ON WEBSTORE EMAILS

When a web order is received, if you have enabled the parameter to send out notifications when received, then an email will be sent to the customer to let them know that you have received their order. For that email the subject line is hard coded to be ‘Order Received’ and you could not change that.

Likewise, when you process an order, an email is sent to the customer with the details of the order. The subject could be modified for this email, but it was limited to just static information enter in the “Subject” line in POS.26.5

You now can modify the subject line for both emails and include the customer’s confirmation # in the email.

  • Log to POS.26.5 “Email Parameters”
  • Select T=Mail Text from the bottom prompt.
  • In each of the sections, select the right arrow to highlight the lines and then select ‘Ins’ and enter 1 to create a new line at line 1.     
  • On the new line enter ‘SUBJECT: ‘ this must be the word “SUBJECT” followed by a ‘:’ and a space then you can type what you would like the subject to be.  You can also include the keyword =CONFIRMATION to include the confirmation #
    • SUBJECT: This is the new subject line for order submitted confirmation =CONF

Once that is done for the section to send the order received confirmation then hit enter until you get to the next section for ‘Order is shipped’ and repeat the steps above and modify the subject matter to be similar to the example below.

SUBJECT: Order =CONF has been processed