Reports: Best Practices and Procedures

Below is a list of the most common report fields and what they do. The purpose of this article is to avoid having to specify “the Store field restricts the report to the specified store” on every single report article.

There is also a best practices on the more optimal ways of running reports. This includes how to report on multiple class or department codes, what to do when you get a “0 records listed” response as well as other things.

Common Practices

  • Populate as few fields as possible to get the information you need.
    • Data presented in a report is information that meets every single field criteria.
    • If you get a response of “0 records to display” then consider widening your parameters. Filling out every single field will rarely work.
    • e.g. If you specify: “Store 1, Register 101, Beginning Date 8/1/18, Ending Date 8/1/18, Department 90, Class 101, SKU 9781234567890, Tran Type RT, WEB Transactions N, History file N” you probably won’t get anything.
      • If you remove the tran type criteria, or the department and class fields (you’re specifying the item anyways) then you may get some results.
  • Multiple criteria can be entered into most fields by separating them with a comma.
    • e.g. If you want to report on class numbers 101,102 and 103 you will enter them as 101,102,103
  • There is currently no way to report on “everything except” unless you enter every valid option.
    • e.g. If you want to report on every class other than 101 you would have to enter every class code except 101, into the Class field.

Common Fields

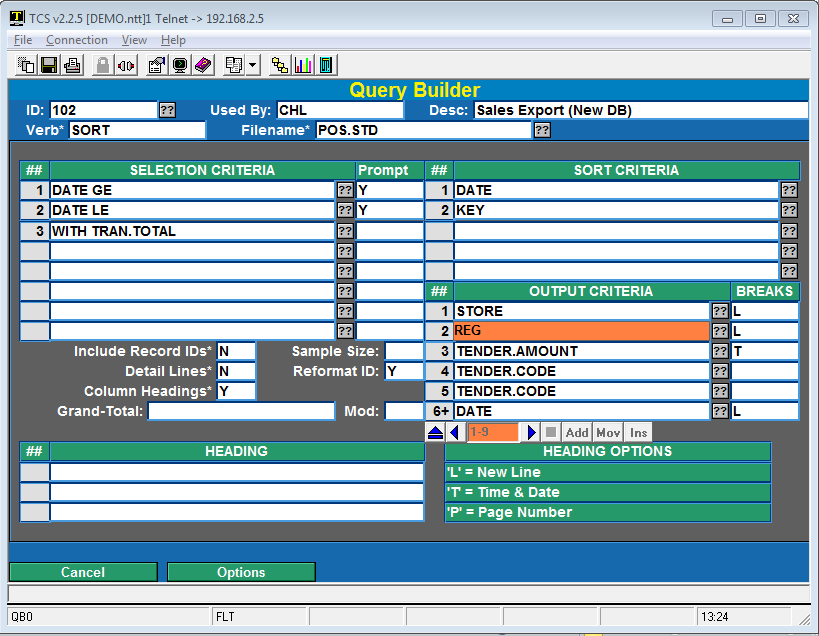
  • Store: Entering a value for Store restricts the report to only display results for the specified store.
    • Note that some items are not store specific, e.g. Class codes or fee codes are store agnostic.
  • Register: Entering a value for Register restricts the report to only display data on the specified register.
    • Multiple registers can be entered by separating them with a comma. e.g. 101,102,103 will report on all three registers.
  • Beginning Date: A “start date” that limits the data to not include information before this date.
    • e.g. A transaction search with a start date of 7/1/18 will not include any transactions prior to July 1st, 2018.
  • Ending Date: Specifies the “stop date” in the data, nothing after this date will be displayed.
    • e.g.A transaction search with a stop date of 7/1/18 will not include any transactions done on 7/2/18 or after.
    • To report on a single day make the beginning and ending date the same.
  • Department: Restricts the report to include data that falls under the specified department
  • Class: Restricts the report to data that includes items that fall under that class
  • SKU: Enter a SKU, ISBN, Fee Code, etc. to only report on data that includes this item
  • Detail: Is used to display as much information as possible for that data being reported on.
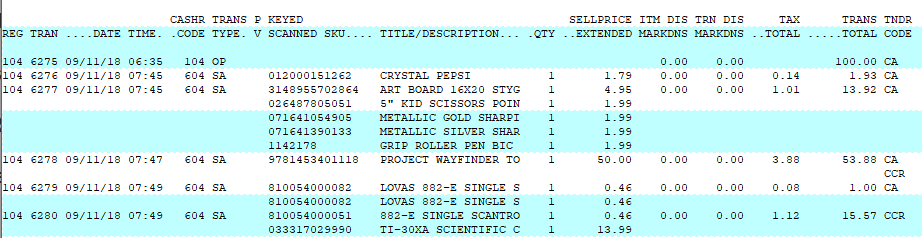
    •  For example, a report against transaction data with Detail flagged will display every line item in the transaction, the cost, quantity and total for every transaction for the date range specified.
    • The majority of reports are either Detail or Summary, but there are a few exceptions that will report the detailed information and include a separate summary section at the bottom. One example would be inventory valuation reports that will list all of the inventory items and then include summary totals for each inventory class.
  • Summary: The summary flag will combine and summarize the data reported on various break points.
    • For example, a transaction report with Summary flagged will simply report the transaction total instead of every single line item, their cost, and the total for the date range specified.
  • History: Almost always a N.
    • This is not a “include History as well” flag.This is a hard switch, meaning it reads from the History ONLY and will not report on current data.
    • Data can be moved to history to separate it from current data without throwing it away.
    • Once it has been moved to history then the History field would have to be a Y to read it from the History file.
  • Web: Almost always an N or empty. Entering a Y will restrict the report to ONLY web transactions similar to the History field only reporting on the History file.


Report: Detail by Trans Number

Below is an overview of the Detail by Transaction Number report. General information on what fields are available, what they do and what data is presented in the report.

Path: POS-RP-1-1

Purpose: This report is used to display detailed information on every transaction that meets the selection criteria.

Output: Register, Transaction #, Date, Time, Cashier Code, Transaction Type, Post Void status, Scanned Items, Item Descriptions, Quantity, Sell Price Extended (qty * price), Item Discounts, Transaction Discounts, Tax Total, Transaction Total and Tender Code.

Unique Field Options

A/R Invoice: Allows you to specify an AR Invoice number to view the other transaction details.

Note: the most common fields are covered in the Reports: Best Practices and Procedures article. Only special usage scenarios or options are covered in this article.


POS Menu List

Below is a list of all menu options inside of the POS module. The numbering of the list reflects the path numbering of the menu options. For instance, maintaining the Tax Tables in POS-2-3-1 is in section 2 – Transaction Parameters, 3 – Tax Tables, 1 – Tax Tables. At first glance it can be a little jarring to see the list go from 5 to 21 but it was necessary to keep the options true to the screen layout.

  1. Cash Register
  2. Transaction Parameters >

    1. General Parameters
    2. Modifiers
    3. Tax Tables >

      1. Tax Tables
      2. Import Tax Tables
    4. Tender Codes
    5. Transaction Types
    6. Discount Matrix
    1. Modifier Descriptions
    2. Credit Card Parameters
    3. Tender Categories
    4. Tax Exemption Reason Table
    5. Error Message Maintenance
    6. Price Table Maintenance
  3. Hardware Parameters >

    1. Register Parameters
    2. Hardware Configuration Codes
    3. Receipt Header
    4. Receipt Trailer
    5. Gift Receipts
    1. Function Key Definitions
    2. Touch Screen Codes
  4. History >

    1. History Parameters
    2. Run History Process
    3. Purge Processed Sales Records (DIS)
  5. Credit Cards & Communications >

    1. TotaLink Credit Cards
    2. Gratuity Processing
    3. ICOMM Credit Card Reports >
    4. CourseWorks >
    5. Create CC Adjustments from STD
    6. Element Vault Maintenance
  6. SmartLane Registers >

    1. Host Background Control
    2. Transfer Control & Status
    3. Send POS Parameters
    4. Send PLU and Data Files
    5. Send Specific Item
    6. List Send Log
  1. Global SKU Inquiry
  2. Data File Maintenance >

    1. Cashier Maintenance
    2. SKU Maintenance
    3. Department & Class Maintenance >
      1. Department Maintenance
      2. Class Maintenance
      3. Class Category Maintenance
      4. Distribution Code Maintenance
      1. Calendar
    4. Delete SKUs Marked For Deletion
    5. Catalog Maintenance
    6. Food Services >

      1. Meal Maintenance
      2. SKU Maintenance
      3. Meal Plan Parameters
      4. blank
      5. Meal Category Codes
      1. Reset Meal Plans
      2. Import Meal Plan Customers
      3. Food Service Reports >

        1. Meal Usage
    7. GateKeeper
    1. Negative Account Maintenance
    2. Positive Account Maintenance
    3. Fee Code Maintenance
    4. Cross Reference Rebuild >

      1. Title/Description Xref
      2. Author/Manufacturer Xref
      3. ISBN & UPC Xref
      4. 1-3 Above
      5. Rebuild MFX
      1. Pref Customer Xref
      2. Voucher Xref
      3. Employee Xref
      4. Special Orders Xrefs
    5. Vouchers & Coupons >

      1. Maintain Voucher Records
      2. Voucher History Inquiry
      3. Move Vouchers to History
      1. Voucher Parameters
      2. Maintain Coupon Parameters
    6. Loyalty >

      1. Enter/Maintain Customers
      2. Pref Customer Report
      1. Loyalty Type Maintenance
      2. Print Mailing Labels
  3. End of Day Functions > Reconciliations & End of Day

    1. Employee
    2. Register
    3. Register History
    4. Register Report
    5. Employee Report
    6. Daily Register Counts
    7. Employee Audit
    1. Check for Gaps
    2. Remote Close Registers
    3. Back Office Post Void
    4. Post Unposted Transactions
    5. Modify Tenders on STD
    6. Re-Open Closed Day
    7. Download Host AR Data
    8. Nightly Resize & Backup
    9. General Ledger >
      1. Create G/L Distribution
      2. Print G/L Distribution
      3. Create G/L Journal Entry
      1. Maintain Distribution Codes
      2. Create G/L Journal Entry for Quickbooks
  4. Special Orders >

    1. Maintenance
    1. Report
  5. Food Service >

    1. Meal Maintenance
    2. SKU Maintenance
    3. Meal Plan Parameters
    4. Meal Category Codes
    1. Reset Meal Plans
    2. Import Meal Plan Customers
    3. blank
    4. blank
    5. Food Service Reports >
      1. Meal Usage
  6. Mail Order & E-Commerce >

    1. Order Entry
    2. Catalog Maintenance
    3. General Parameters
    4. Campus Webstore Parameters >
      1. General Parameters
      2. Freight Tables
    5. Email Parameters
    6. Web Tags>
      1. Web-Tag Category Maint
      2. Web-Tag Tag Maint
    1. Mail Order Open Items Detail
    2. Customer Listing
    3. Fedex List
    4. Print Pickslips
    5. e-Mail List
    1. Customer Maintenance
    2. Customer Inquiry
    3. Purge Completed Orders
    4. Merge Identical Customers
    5. Mail Labels
    6. Web Order Status
    1. Zip Zone Table
    2. Rate Table – Weight
    3. Rate Table – Purch Amt
    4. Tracking – STD
    5. Tracking – Confirmation
  • Rentals >

    1. Item Master Maintenance
    2. Serial Number Maintenance
    3. Drop Off – Serial
    4. Item Retirement
    5. Move S/N to Regular Inventory
    6. Specify Tag Printer
    1. General Parameters
    2. Condition Codes
    3. Email Notices >
      1. Email Pre-Notice
      2. Email Past Due Notice
      3. Email Charged Card
    4. Utilities >

      1. Post STD to Serial#’s
      2. Customer Information
      3. Recalculate Quantity
      4. Rental Updates
      1. Update Rental Prices
      2. Rental Purchase Processing
    5. Customer Inquiry
    6. Reports >

      1. Rental Items Due
      2. Rental Items Past Due by Cust Name
      3. Rental Items Past Due
      4. Rental Items CC Charged
      5. Master List
      6. Daily Rentals
      7. Daily Returns
      1. Rental Items Available
      2. Rental Items Sold – Serial
      3. Rental Items Sold – Dynamic
      4. Rental Items Retired
      5. Rental Inventory
      6. Daily Dropoff
      7. Daily Rentals and Returns
      8. Physical Inventory Valuation
RP – Report Menu
PM – Printer Mgt
QB – Query Builder
TI – Transaction Inquiry
GI – Global MF Inquiry
BG – Backgrounds
UM – User Menu
UU – User Utilities
SM – System Menu


POS Report Menu List

POS Reports Menu(RP)

Below is the layout of the Reports menu in the POS module in an ordered list. The purpose of this page is to allow for a searchable list of reports. This is a constant work in progress, so some details may not be available at this time.

Clicking on a report name will navigate to a page with an example of what the report looks like, a brief summary of what the report will report on as well as explanations of the fields used to generate the report. Please note that every field definition is not listed for every single report, instead the most common fields are covered in the Reports: Best Practices and Procedures article. Only special usage scenarios or unique field options are covered in the individual report articles.

The numbering of the list reflects the path numbering of the reports. For instance, the Tender/Register Summary Report (RP-2-21) is down in section 2; Tender Reports, option 21 for Tender/Register Summary. At first glance it can be a little jarring to see the list go from 5 to 21 but it was necessary to keep the options true to the screen layout.

      1. Sales Reports >

        1. Detail by Trans Number
        2. Consolidated by Register
        3. Class Reports Menu >

          1. Class Detail by Date by Class
          2. Class Detail by Class by Date
          3. Class Summary by Class
          4. Class Summary by Register
          5. Item Disc/Mkdn by Class
          1. Class Comparison – Net
          2. Class Comparison – Returns
        4. Time Interval Sales Menu >

          1. Store Sales by Store by Register by Date
          2. Store Sales by Store by Date by Interval
          3. Employee Sales by Employee by Time
          4. Employee Sales by Time by Employee
          5. Sales $$ by Time Interval
          6. 7-Day Sales Report
        5. Special Sales Reports Menu >

          1. Gross-to-Net Sales
          2. Departmental Sales
          3. Sales and Returns by Department
          4. Sales by SKU/ISBN
          5. Sales by Transaction Discount Code
          6. Serial Number Search
          1. Maintain Flash Dates
          2. Update and Print
          3. Print Flash Data
          4. Akademos Sales Detail
        6. A/R Reports Menu >

          1. Invoices
          2. Payments
          1. POSCONNECT Error Report
        1. Transaction Detail (Inquiry)
        2. Fee Detail
        3. Fee Summary
        4. Item Disc/Mkdn Detail
        5. Movement/Ranking Menu >

          1. Build Ranking File
          2. Run Ranking Reports
          3. Build Movement File
          4. Run Movement Report
        6. E-Book Trans Detail
      2. Tender Reports >

          1. Tender Detail by Reg# by Tran#
          2. Summarized by Register
          3. Summarized by Store
          4. Detail with Account Information
          5. Summarized by Cashier Code
          1. Tender/Register Summary
          2. Consolidated Register Summary
          3. Sales Tax Summary
          4. Register Parameter Screen
          5. Credit Card Detail
      3. Inventory Reports >

          1. Daily Sales Detail
          2. With Sales in Last Seven Days
          3. Inventory Movement Report
          4. Inventory Movement by Time
          5. Same SKU in Multiple Modules
      4. Data File Listings >

        1. Department List By Dept Code
        2. Class Reports >
        3. Vendor Order Address List
        4. Sales Entry Messages
        5. Catalog QOH Report
        1. Cashier Listing
        2. Employee Listing
      5. Employee Reports >

        1. Transaction Detail by Employee
        2. Transaction Summary by Employee
        3. Employee Time
        4. Employee Sales By Employee By Time Interval
        5. Employee Sales By Time Interval By Employee
        6. Percent Employee Sales
      6. Miscellaneous Reports >

        1. Voucher Special Order Report
        2. Gift Card Report
        3. Cap & Gown Report
        4. Miscellaneous Voucher Report
        5. Departmental Vouchers
        6. Suspended Transactions Report
        7. Discount Summary
        1. Tax Report From POS.STD
        2. Tax Report From POS.TES
        3. Supervisor Authorizations
        4. Percent of Trans. per Register
        5. Neg Accounts Listing
        6. A/R Customer Report
    1. Buyback Reports >

      1. Dollars Spent Report
      2. Buyback Audit Report
      3. Buyback Detail Report
      4. Transaction Inqiry
    2. Register Errors
    3. User Audit


GM Price Changes

The Price Change screen allows you to change the prices of multiple items without having to navigate through each individual item. It also allows you to set prices for items for a specific time frame.

Creating Price Changes

To get started, navigate to GM-22-1 to create your list of items and their new prices.

  1. Enter the correct store
  2. Choose S for the source
  3. Enter a “.” for a new document number, or enter a preexisting document number to access that document.
  4. The effective date controls when these changes should be applied. Never use a date prior to todays date.
  5. If the price changes are going to be temporary, then enter an End Date for the changes.
  6. Cancellation is only used if the price change is temporary. If so, then enter a Y

Adding Items

  1. Navigate to the ISBN/SKU field and bring up an item by a description lookup or entering its SKU.
    • The MOD column will populate automatically. This is the module of the item (GM or TX)
  2. Use the ?? next to the Reason Code to choose an appropriate readon
    1. If you want to add a Reason Code, choose the ?? and then click on the Maint button at the bottom of the list window.
    2. Enter a short 2-3 digit code for the Reason Code you would like to add and select the Add option when prompted.
    3. Enter a description for this new code and save your changes.
      • Repeat the steps above for any additional codes
    4. Press enter at the empty Reason Code field to get back to the Price Change document.
  3. Enter the New price for the item.
  4. Continue adding additional items to the document. Once all items have been added save the document which takes you to the previous menu.
  5. Choose option 2 (GM-22-2) to post ALL open price change documents.
    1. Posting a document changes the status to P, which prevents it from posting a second time.
  6. At this point all items on the document will have their new prices.


Adoption Import File Specification

Format Layouts for Various Import/Export Files (Banner, Course Adoption, etc.)

From Campus to TCS:

File Name: Adpt-Imp.txt
File Type: DOS ASCII Text – Tab Delimited
Line Terminator: Carriage Return/Line Feed [decimal 13:10]

There is one line per adoption. If there is more than one book per adoption, you must provide a new line for each with the department, course, and section duplicated.

The fields with an “*” in the front are required.

If you are exporting for use with the on-line faculty adoptions then you also need fields 5 (Instructor) and 18 (Instructor Email).

If you are only reporting Actual Enrollment then fields 1, 2, 3, and 19 are required.

The fields MUST be provided in the order listed. This means that if position 8, Required (Y/N), is going to be imported then positions 5-7 must be populated or entered as an empty position. An empty position in Excel would display as an empty column. An empty position in text format would be denoted with an empty tab delimiter.

* Denotes Required Fields
~ Denotes Non-Book Fields
(ABC) Denotes Excel column label if editing in Excel prior to saving as tab delimited

*~1 (A). Department
*~2 (B). Course
*~3 (C). Section
~4 (D). Estimated Enrollment
~5 (E). Instructor
6 (F). ISBN-13
7 (G). Quantity to Cover
8 (H). Required (Y/N)
~9 (I). Course Description
10 (J). Author
11 (K). Title
12 (L). Edition
13 (M). Copyright Year
14 (N). New Price
15 (O). Used Price
16 (P). QOH New
17 (Q). QOH Used
~18 (R). Instructor Email
~19 (S). Actual Enrollment
~20 (T). Campus Class Number (unique per store/term/dept/crs/sect)
~21 (U). Store Number (if the file contains detail for multiple stores)
~22 (V). reserved for admin use
~23 (W). Virtual Crs Flag (“VC” = Campus Class Number is for all stores)
~24 (X). Section Web Comments (pain text only.)

A/R Customer File Export to TCS

From Campus to TCS:
File Name: BKSTCHRG_yyyymmdd_hhmnss.TXT
File Type: DOS ASCII Text
Line Terminator: Carriage Return/Line Feed [decimal 13:10]
Line Layout as follows:

This file can either be fixed column as shown below or Tab delimited in the order below.
The Customer must indicate their preference when the interface is initially configured.

Columns:

1 – 10 Customer Identification Number                                     Up to 10 numeric characters left justified – space filled
11 – 40 Customer Name
Up to 30 alpha characters left justified – space filled (Last name, First name)
41 – 50 Credit limit dollar amount
10 numeric characters right justified – space filled
No decimal (2 point assumed)
Remit ‘9999999999’ if Credit Limit is NOT Limited
Remit ‘0’ (zero) if Credit Limit is NONE
51 – 65 Customer type/termyear (e.g. PELLGRNT/201310)
Customer type is limited to 8 alpha numeric characters
Termyear is limited to ‘/’ and 6 alpha numeric characters
These two fields should be concatenated and then left justified in
15 characters – space filled.
66 – 100 E-mail address (optional)
Up to 35 characters left justified – space filled
101 – 110 Expiration Date (optional)
Up to 10 characters left justified – space filled
Format: mmddyy or mm/dd/yy or mm/dd/yyyy

A/R Customer File Export to Campus

From TCS to Campus:

File Name: BKSTINVO_yyyymmdd_hhmnss.TXT
File Type: DOS ASCII Text
Line Terminator: Carriage return/line feed [decimal 13:10]

Line layout as follows:
This file can either be fixed column as shown below or Tab delimited in the order below.
The Customer must indicate their preference when the interface is initially configured.

Columns

1 – 10 Customer Identification Number
Up to 10 numeric characters left justified – space filled
11 – 40 Customer Name
Up to 30 alpha characters left justified – space filled
(Last name, First name)
41 – 55 Customer type/termyear (e.g. PELLGRNT/201310)
Up to 15 alpha numeric characters left justified – space filled
This field is same as what is sent in the BKSTCHRG file.
(Customer type is limited to 8 alpha numeric characters
Termyear is limited to ‘/’ and 6 alpha numeric characters
These two fields should be concatenated and then left justified in 15 characters – space filled.)
56 – 65 Transaction Reference
Up to 10 numeric characters
5 digit register number + 5 digit receipt number
66 – 75 Transaction amount
10 numeric characters right justified – space filled
Positive value     (e.g. ‘      1423’ = $14.23 charge)
Negative value    (e.g. ‘     1423’ = $14.23 credit)
76 – 83 Transaction date
8 numeric characters
YYYYMMDD format (e.g.  20130620 = June 20, 2013)


Custom Reports Through Query Builder

The TCS Query Builder is a very powerful tool for users of SmartSuite to customize or create new reports that more specifically meet their needs.

The Basics

Verbs Can be either SORT or LIST. List is random and SORT is ordered.
Filename The SmartSuite system is comprised of several data files unique to each module.
Dictionaries Each data file has its own unique set of dictionaries that define how data fields are represented.
Selection Criteria The rules you define to limit the volume of data to be included on a report.
Sort Criteria The rules you set to define how the data will be sorted.
Output Criteria The columns that will be included on a report.


Nearly 100% of the reports in SmartSuite utilize the same rules that the Query Builder does. We just add a more complex screen for your parameters and do a few more technical things.

The best way to create a query is to start from an existing one. If you don’t have an existing one then choose one of the system reports and see how we did it. Try to run a report that contains similar data to what you would like to create. For example, if you are going to create a report to display sale information, then use a Sales report as a reference. This way you can see what filename we are pulling sales data from and can use that same filename in your query.

You can see our query string by running the report but instead of selecting terminal, or printer, etc. choose the option to show the Command String.

Here’s a simple command from POS-RP-04-21 (Cashier Listing).

This has a Verb (SORT), a Filename (POS.EM), and Output Criteria (NAME.15 SECURITY.LEVEL.8 MISC.INFO.40. There is also a HEADING.

Screen Elements

Here’s an example of a query created by an end-user for doing a sales export.

ID This can be alpha or numeric. It is just the name you want associated with the report and is assigned by the user.
Used By Can be left blank or filled in with the name of the person who will be the primary user of the report. (When you enter “??” in the ID field the list is sorted by Used By and then by Desc.)
Verb Use either SORT or LIST
Filename Enter “??” to view a list of all of the files for the database you are logged into (POS, TEXT, GM, etc.) This is where it is easier to use the Command String to see what file to use. After some experience you become familiar with our naming convention and the file names will make sense.
Selection Criteria Enter valid dictionary items. If you click on “??” you will see a complete list of the dictionaries for the file selected. Here is a list of the POS.EM file (employee master).

If you enter “Y” in the Prompt column then when you run the report you will be prompted for the value you want to use. Dates can be entered just like in our screens.

The “??” works the same in each area, so the explanation will not be repeated.

The “?” provides most of the information provided in this document.

Sort Criteria The report above is going to be sorted by DATE and then by KEY. Since it is using the SalesTransactionDetail file (POS.STD) the key is store*date*register*transaction.

Output Criteria This varies in that the 2nd column is for BREAKS. A Break is usually used to provide subtotals. It can also be used to create a logical break on the report. Break options include:

T Total the column

Y Break with no total

P When breaking start a new Page

D Only show the detail lines

U Underline the total

L Suppress and blank lines following a total or other break

Breaks can be combined to cause multiple effects.

Include Record IDs Frequently the ID to a file is cryptic and the data you are viewing is redundant to the ID (just formatted better); in this case enter an “N”. If you want to see the record IDs, then enter a “Y”.

Detail Lines If your primary interest is summary data then enter “N” for detail lines. The 1st time you run the report, or as you are developing it, leave this a “Y” to have a better feel for the data.

Column Headings This is almost always a “Y” but they can be turned off for exporting/importing.

Sample Size When developing the report, you may not want to wait very long for you to see what you will get. Enter number here and as soon as that number of detail records is reached the report will print (or display). We usually start with 10 and move up to 100 if necessary.

Grand Total Enter any wording you want to appear on a grand total line. The Mod: field is used to Underline any totals.

Heading This optional field will cause a heading to print at the top of the report.

There are 3 primary modifiers that can be used in defining a heading. They include:

L Create a Line Break

T Insert the Time & Date

P Insert the Page Number

Here’s a sample:


When you choose the Run option you will be prompted for any of the inputs you specified and then you will select where to print the report using the same options as all other SmartSuite reports.


Campus Integration Web

Campus Integration – Pass Student Course info to webserver to get a listing of books. For Sections webstore 2.x only.

Url: http://client.site.com/campus-integration?classxml={data} Method: POST

Data Example:

<?xml version="1.0"?>
<datareturn>
    <studentname>Michael Shattuck</studentname>
    <studentid>testid</studentid>
    <term>06-2014</term>
    <cmpcode>06-2014</cmpcode>
    <courses>
        <dscr>
            <dept>ACCT</dept>
            <nbr>2010</nbr>
            <section>1367</section>
        </dscr>
        <dscr>
            <dept>ACCT</dept>
            <nbr>2010</nbr>
            <section>1368</section>
        </dscr>
    </courses>
</datareturn>

Details

  • The data sent will need:
  • studentname – Only used to display on the page
  • studentid – Only used to display on the page
  • termid
  • cmpcode – campus/store id
  • courses – a list of course descriptions (this will be used to display the details for all courses provided. Each course is wrapped in a ‘dscr’ tag and will need the following:
    • dept – department id
    • nbr – course id
    • section – section id
    • The data needs to be url-encoded and will replace the ‘{data}’ section or the url.

Final example URL:
POST http://demo.campuswebstore.com/campus-integration?classxml=%3C%3Fxml%20version%3D%221.0%22%3F%3E%0A%3Cdatareturn%3E%0A%20%20%20%20%3Cstudentname%3EMichael%20Shattuck%3C%2Fstudentname%3E%0A%20%20%20%20%3Cstudentid%3Etestid%3C%2Fstudentid%3E%0A%20%20%20%20%3Cterm%3E06-2014%3C%2Fterm%3E%0A%20%20%20%20%3Ccmpcode%3E06-2014%3C%2Fcmpcode%3E%0A%20%20%20%20%3Ccourses%3E%0A%20%20%20%20%20%20%20%20%3Cdscr%3E%0A%20%20%20%20%20%20%20%20%20%20%20%20%3Cdept%3EACCT%3C%2Fdept%3E%0A%20%20%20%20%20%20%20%20%20%20%20%20%3Cnbr%3E2010%3C%2Fnbr%3E%0A%20%20%20%20%20%20%20%20%20%20%20%20%3Csection%3E1367%3C%2Fsection%3E%0A%20%20%20%20%20%20%20%20%3C%2Fdscr%3E%0A%20%20%20%20%20%20%20%20%3Cdscr%3E%0A%20%20%20%20%20%20%20%20%20%20%20%20%3Cdept%3EACCT%3C%2Fdept%3E%0A%20%20%20%20%20%20%20%20%20%20%20%20%3Cnbr%3E2010%3C%2Fnbr%3E%0A%20%20%20%20%20%20%20%20%20%20%20%20%3Csection%3E1368%3C%2Fsection%3E%0A%20%20%20%20%20%20%20%20%3C%2Fdscr%3E%0A%20%20%20%20%3C%2Fcourses%3E%0A%3C%2Fdatareturn%3E

College WEB Interface Data Connector webstore 2.x

The data sent to the D3 server included:

  1. XMLDATA (see below)
  2. TERMID (201440)
  3. STOREID (1)
<?xml version="1.0" encoding="UTF-8"?>
<datareturn>
 <term>201440</term>
 <studentname>Kyleah S Gamble</studentname>
 <studentid>S00000000</studentid>
  <courses>
    <dscr>
     <dept>HIST</dept>
     <nbr>1100</nbr>
      <section>400</section>
     <cmpcode>Bookstore Online</cmpcode>
    </dscr>
    <dscr>
     <dept>PSY</dept>
     <nbr>1100</nbr>
      <section>403</section>
     <cmpcode>Bookstore Online</cmpcode>
    </dscr>
    <dscr>
     <dept>FHS</dept>
     <nbr>2450</nbr>
      <section>402</section>
     <cmpcode>Bookstore Online</cmpcode>
    </dscr>
    <dscr>
     <dept>ENGL</dept>
     <nbr>1010</nbr>
      <section>418</section>
     <cmpcode>Bookstore Online</cmpcode>
    </dscr>
  </courses>
</datareturn>


Scanpal Usage Guide

Simple Overview

The overall process is listed below with more details following.

  1. Charge your scanners and verify that they will scan items. It’s also a good idea to do a test upload of the scanned data to the PC it connects to.
  2. You will follow the steps listed below once you start your inventory. Repeat them as necessary until it’s time to post your counts.
    1. Collect data. Be sure to enter the correct header information
    2. Upload the scanned to the SmartLane register (hosted customers) or the correct directory on your host (self hosted customers)
    3. Create your worksheets
    4. Run your reports
    5. Repeat steps 1-4 until everything is counted and reports look good.
  3. After everything appears to be correct you will post your inventory. This completes the inventory process and is irreversible.

Using the ScanPal

Upon powering on the unit you will be greeted with this main screen.

  • Collect Data is where all of the data collection settings and functions are located. You can specify stores, locations, the type of merchandise and many other settings here.
  • Upload Data is used to sync the gathered information to your PC.
  • System Utilities provides additional functions specific to the device itself as well as options on viewing or deleting data.

This guide will go through each screen step by step and explain all of the options and functions of that screen.

Collect Data

Collect Data contains the primary settings and functions for performing the counting process.

  • Header allows you to set the general settings to be used while scanning.
  • Scan data will scan the barcode and prompt you for a quantity
  • Location, Module, and Employee allow a temporary override of the settings specified in the header. You may quickly and temporarily change these for the next scan.

Header. These settings allow you to specify the store number, the name of the employee gathering the data, the location, module and class of the textbooks being scanned.

Scan Data. Scanning barcodes and quantities is done in this screen. The barcode may be scanned as well as manually entered. The default quantity is set to one, although this can be changed in the utilities section. The counter keeps track of the number of barcodes scanned, not the total inventory quantity.

If you need to check any data that was scanned you can go to Utilities, Browse Data to review and make changes.

Upload data.

There are a number of items that need to be setup before data can be uploaded. Check through this list to make sure that everything is ready before attempting to upload any data.

First Time Setup

  1. Please contact TCS Support to set up the ScanPal environment.

Transfer Steps

  1. Power on the scanner and from the main menu select “Upload Data”
  2. Connect the scanner to the PC
  3. Double click on the “Scanpal Upload – Shortcut” located on the desktop. If this shortcut does not exist then you will need to contact TCS support.
  4. Review the program window that opens to make sure all settings are correct
  5. Select “OK” to transfer the data to the PC
  • Directory: This is where the scanned text files are to be saved. This should be C:\Scanpal\Scanned Data but can be changed.
  • File name: You may specify a name for the file. If you specify a name please select New Name or Overwrite in the “File mode” field. It is recommended that you leave this blank and use the “Auto” file mode.
  • Enter the COM port the device is plugged into.
  • Leave Baud rate alone
  • File mode:
    • Overwrite will overwrite the previous file unless you specify a unique name
    • Append will merge all data
    • New Name is used when creating a new name
    • Auto will generate a sequential number for each file. Recommended
  • NEVER uncheck any check boxes unless directed by a TCS support technician to do so.


Transfer Data to the Data Collection File

New and existing customers will need to check the upload location in the system.

  1. Go to POS-UU-22 and verify that the Upload Folder Patch is:
    1. Typically C:\Palmsync for self hosted users
    2. C:\TCSDB\CUST\POS\HOST.SCANNED.DATA for hosted customers

Add Data to the DC File

  1. Minimize all windows until you are at the desktop
  2. On the desktop, double click the “Upload to Server – Shortcut”. Leave this open.
  3. On the desktop, double click on the “Scanner Data – Shortcut”.
    • There should be text documents containing your inventory counts in this folder
  4. Copy the text files in Scanner Data into the “Upload to Server” window.
    • These files will disappear once they have been added to the DC file on self hosted systems.
    • For hosted customers they will disappear once the SmartLane main menu option 7 – Send Inventory Scanned Data option is ran.
  5. The inventory data is now ready to be added to a worksheet.

Utilities

Utilities allows you to change the device settings, browse and manipulate scanned data, run tests and view the status of the scanner.

  • System Settings is a password protected section that should not be altered unless directed by a member of the TCS support team.
  • Browse Data allows you to view the data scanned, edit it or delete it by individual record. Editing in this interface is not recommended, it is simpler to edit the data in notepad.
  • Delete Data allows you to delete the last record scanned or all data. All data is automatically deleted when it is uploaded.
  • Reading Test displays the barcode type and character length of a scanned barcode.
  • Set Date & Time adjusts the date and time on the device.
  • Download Program
  • Memory & Battery displays the remaining free space and remaining battery power.

Scan Sheet Example

SP2:Str:1,Emp:CC,Loc:,Typ:GM (GM, TR, N, U)
4001134009,41
404427,218
4044227703,126
4044255903,328
4044273603,208
4044256003,130
4044256003,248
4044255903,322


Creating Kits (or Bundles)

Overview

A kit in the TCS system is a bundle of items that are sold under one SKU. For example, if you wanted to sell a tablet, cleaning cloths and a USB flash drive all as one item then a kit would need to be created.

The main item that is sold (the bundle) along with each inventoried item needs to exist prior to creating a kit. Once all of the items exist, the kit quantity on hand is generated by pulling quantities from all of the items that make up the bundle.

In the following example all items have already been created in the GM, MF database. Instructions on how to create individual items can be found in the General Merchandise Training page.

Assign Items to the Kit

  1. Bring up the MF record for the bundle that is going to be sold
  2. Select the K=Kit option at the bottom of the screen
  3. Select the M=Modify button to navigate to the item table
  4. Add each SKU that makes up a part of this bundle
    • In this example there will 2 Microfiber cloths added when we generate quantities of this bundle to sell. There will be one each of an 8inch tablet and a 8GB flash drive.
  5. Press Enter until you are at the Kits to Assemble
    • Enter the number of kits (bundles) you want to create. Notice that in this example we’re limited to 10, since there are only 20 cloths on hand and there will be 2 used per kit created.
    • If too many kits are created then the Kits to Disassemble field can be used to assign quantities back into the items that make up the kit. Simply enter how many of this kit you want to disassemble and proceed through step 6 to assign quantities back out to the kit items.
  6. Press Enter until you are at the bottom of the screen with a =Save option and press Enter to return to the main item screen.
    • At this point the QoH for each kit item has been reduced
    • The QoH of the kit will not refresh until you leave the item screen and look it up again.
  7. The kit can now be sold. All quantities sold will decrement the kit QoH since the items that make up the kit have already had their QoH reduced in step 5-6.