Negative Accounts (Bad Checks)

Here are the steps that can be taken to setup a bad check, or Negative Account, in the system so further checks are blocked.

  1. Set up the account in POS-22-21
    1. The account number can be anything you’d like. Student ID, Driver’s license, bank acct, etc.
      • It’s recommended to set a standard and stick to it. Reasons for this are explained in the final point of this document.
    2. Information can be filled out as needed. The key field that the system looks at is the Status field. If this is anything other than OK, the system will not accept the CK tender type for the transaction.
    3. The comments at the bottom are for informational purposes only.
  2. When using the CK tender, your cashiers will see a prompt to enter the account number.
    1. If the account number entered by the cashier matches the Negative Account number (e.g. 55555 from this example) then they will not be able to use a check.
    2. If the number entered by the cashier doesn’t match any Negative Accounts, then the transaction is processed.
      • This is why following a standard for the account number is so important. If the negative account was created using a student ID, but the customer driver’s license is entered, then there is no match and the transaction will go through.


Printing Adoption Forms

Printing Adoption Forms

This makes the assumption that the new term has already been created. Please reference the Textbook Training page for instructions on how to open a term.

  1. Log to TX.RP.1.23 Print Adoption Forms
  2. Fill out the options for your needs
    1. Store
    2. Term* – this is the previous term to reference titles from.
    3. Beg Dept: and End Dept: – To limit the adoptions to just the departments entered.
    4. Course: – If a single department was entered then you can specify a course.
    5. Section: – If a course was entered then you can also specify a section.
    6. Current Term: – Enter the current or upcoming term for the adoptions
    7. Include Titles: – Blank or Y will print adopted titles or enter N to not include titles.
    8. Due Date* – Required field, this is the date the form should be returned from the instructor.
    9. Blank Forms Only: – Enter ‘Y’ if you want to print forms with no department, course,section or specific title information. The supposition is that the instructor will fill in all such information.
    10. Number of Blank Forms: – Enter the number of blank forms you want to print. You don’t have to enter anything if you did not answer ‘Y’ to the previous field.
    11. Select the R=Run Procedure to create the report
  3. From the main screen, select the PM – Printer Mgt. option
  4. Select the print job with the correct date/time from the list and then select the “Print Job” from the right. You can also select “System Wide” or “Account Wide” under the “Job View” section, to view additional print jobs either just within the current account (Text) or the system wide will view print jobs form other accounts (GM, POS, etc.).
  5. The normal print dialog box will display to allow you to select Terminal, Local Printer, Email, etc.


Getting a Report Into Excel

These instructions cover how to save your reports as a text file and then import it into Excel. Most reports are formatted in a way that allows this but there are a few exceptions. Exceptions occur when the report data doesn’t line up perfectly into columns, such as the Tender Register Summary report (POS-RP-2-21).

  1. First, run your report as normal and send the output to Terminal.
  2. Now we need to save the report as a text file on your computer to import into Excel.
    1. Click on the Save icon at the top of the Terminal Window
    2. Select where you want to save the file.
      • This can be anywhere on your computer. Typical locations will be Documents or Desktop
    3. Name the file
      • Keep it simple and preferably without spaces.
    4. Change the “Save as type” to “Text Files”
    5. Click on the Save button

Importing Into Excel

This assumes that the steps above have been performed and you have a copy of the report on your computer as a .txt file. Things can get a little confusing but if you watch the animated image in step 6 it will cover most of the non-intuitive steps.

  1. Open Excel
  2. Go to File > Open
    • Or press and hold the Ctrl key and then press O bring up the Open dialogue.
  3. Browse to where you saved the file in step 2.2 above
  4. Change the All Excel Files drop down box to All Files
  5. Select the .txt file saved in step 2.2 above
  6. In the Text Import Wizard (step 1 of 3) Select the Fixed width option
  7. In step 2 of 3, click and drag the arrows/lines to the edge of the text. These mark the columns to be used in the spreadsheet.
  8. In step 3 of 3, click on each column and asign the Text data format in the top left
    • You can select the first column, move the slider all the way to the right, press and hold SHIFT and click on the last column. With all columns selected click on the Text data format option on the top left.
    • Click Finish
  9. Now all of the data should be in the Excel document. The ISBN numbers should not look like a notation number (9.78129E+12) they should display as full ISBNs.
  10. Save the document.
    1. If sending to another organization (e.g. Redshelf ebook list, third party inventory company, etc.)
      1. Go to File > Save As.
      2. Browse to where you would like to save the document
      3. Enter a name in the File name field
      4. Click on the Save as type: drop down and select “CSV (Comma delimited) (*.csv)”
      5. Click on Save
      6. The file can now be sent as an attachment
    2. If saving for internal use
      1. Go to File > Save As.
      2. Browse to where you would like to save the document
      3. Enter a name in the File name field
      4. Choose whatever you would like as the file type. The default is typically .xlsx
      5. Click on Save


Notes on Universe 11.2.5

Below are notes and observations on what I’ve seen so far with 11.2.5 on the SaaS server on 192.168.2.6.

  1. Non-administrative accounts must explicitly be given permissions in the Extensible Administration Tool (new version of Uniadmin) in order to connect and authenticate.
    1. Remote desktop into the server
    2. Run the Extensible Administration Tool with admin rights
    3. Expand servers on top left section, double click localhost and use your Windows account credentials to log in.
    4. The admin tasks pane is on the bottom left side of the screen. Scroll downn until Network Services appears, expand that and then double click Telnet Users.
    5. Click Add or select an account to Update
    6. User Name field should match the Windows account user name
    7. User Description can be anything
    8. In the Local Machines section (bottom area) click on the Add (or Update) section to specify their Universe Admin path
      1. The local Machine is TCS-POS-SAAS
      2. Click on Browse to navigate to their c:\tcsdb\user\admin path
        1. e.g. USMA is c:\tcsdb\usma\admin
    9. Click on OK the entire way through and then Close (may not be necessary). The user should then be able to log in and go to their USER.ADMIN account.
  2. The TASKKILL tool is no longer valid. I’m not sure what options we have to perform the same function, but this could be a serious issue for web connections overloading the system. Although the SaaS model should mitigate it, our averages will be inflated by those connections (if they count, not sure on uvnet accounts).
    1. This is also an issue on smart lanes when resetting the host communication. (2, H to reset the host) as this does a TASKKILL as part of that process.
      1. Do an S to Stop and then go back in and start the process.


Campus Webstore Parameters

The following steps cover setting up the Campus Webstore parameters, email parameters, shipping and other settings in order to use the web store.

Email Parameters

The email parameters pertain to the email contents a customer receives when placing an order, which bookstore staff receive order notifications and what events trigger emails to be sent. These are found in POS-26-5.

The more technical fields will already be populated with the correct information (program file path, website url, SMTP settings, etc.). The only fields that a typical user needs to modify are listed below.

  1. From Name: allows you to specify the name that appears on the email that customers receive. E.g. ABC Bookstore.
  2. From Address: is where you would put an email address belonging to your organization. Typically whoever would interact with web customers and fulfill web orders.
  3. Send CC to: allows you to specify multiple bookstore recipients who may wish to be notified when an order has been placed.
    1. Multiple email addresses must be separated with a ; without any spaces
      • e.g. user1@bookstore.com;user2@bookstore.com
  4. Subject: specifies what subject will appear on the order confirmation email that a customer receives.
  5. Send email when user submits web order: Enter either a Y or N. Typically a Y
  6. Send email when invoice is printed: When an order is fulfilled a Y will have the system email the customer that the order has been processed.
  7. The “T-Mail Text” button goes to a second screen where the body of the email text can be manipulated. There is some code and variables that will appear in the default text. Those codes and variables should remain in the screen but specific parts can be changed.
    1. For example the text may contain a line like “Your order #=CONFIRMATION has been processed. Expect it to ship within 24 hours.” Feel free to edit the regular verbiage or wording like the 24 hours but don’t remove the #=CONFIRMATION. This is a flag the system is looking for to inject the order confirmation number and could cause issues if removed.

Campus Webstore Parameters

The general parameters contain the bulk of the web store settings and are located in POS-26-4-1. This is where fee codes, shipping options, transaction types, tenders and other settings are maintained.

This setup presents a bit of a chicken or the egg paradox. Many of the fields prompt for entries like fee codes that may not be setup yet. If you would prefer to set those up first then they can be maintained in POS-22-3.  Tax tables should already exist in POS-2-3-1. Shipping Tables (commonly referred to as Freight Tables) are covered in this document. Below are the points of interest for the different codes you will need.

  • Taxable freight code
  • Non-Taxable freight code (freight amount, not items, that is non-taxable)
  • Sales tax rate for pickup orders
    • This should already exist for regular transactions. Reference POS-2-1 for the tax table currently in use for in store purchases.
  • A shipping table for each shipping method you may use.

We’ll start with the first, main screen and then progress from there.

  1. Freight Taxable Fee Code: specifies what fee code to use when freight amount is taxed
  2. Freight Non-Taxable Fee Code: specifies what fee code to use when freight amount is non-taxable
  3. Pickup Order Tax State: enter the two character state code where items are being picked up.
    1. For example, Utah would be UT, Arkansas is AK, etc.
  4. Display ISBN Order Detail: enter a Y to display the ISBN in the order details.
  5. Origination Zip Code: enter the zip code for the location shipping the order.
  6. Encryption Type: will typically be ELEMENT
  7. Default Tran Type: needs to be a web specific transaction type, typically MO
  8. WebAR Tran Type: enter the transaction type used for AR tendered web orders, typically WEBAR.
  9. Store #: should match the store entered at the top of the screen.
  10. Register: must be set to WEB.
  11. Default Tax Table: enter the default tax table to be used when processing web orders.
  12. Tran Taxable: specify if web transactions should be taxable by default.
  13. Use TotaLink: should be set to Y.
  14. Taxable Merchandise table:
    1. Enter the two character state code for any possible destination states. Tax rate used is based off of the billing address.
  15. Taxable Freight table:
    1. Enter the two character state code for any possible destination states. Tax rate used is based off of the billing address.
  16. Shipping Tables table
    1. These codes are maintained in POS-26-4-2 and are options that customers can select when checking out on the website.
  17. Campus Integration
    1. This is used for sites that integrate with a campus portal such as Black Board. Students can be directed from the campus portal to the website and automatically have their required books populated. This is not standard with the website but is available as a billable feature.
  18. Tenders table:
    1. This is typically already set with a CC tender and a description for each credit card network.

The Buyback screen – This is where you will setup your Online Buyback parameters.

Ratex screen is currently under development and is a special use case.
The Akademos screen is a special use case and is setup by TCS personnel.
The Faculty Adoption screen is covered in the faculty adoption process.

Below are instructions on how to utilize the GM, Text and Email parameter screens.

GM Webstore Parameters

This screen is reached by going to POS-26-4-1, then enter GM at the bottom of the screen.

  1. Use Alternate Desc: a Y will tell the system to use the Alternate Description from the GM, MF web screen for an item as the items description on the website. A N will have the system use the regular description from the GM, MF record.
  2. Use Web Flag: a Y will only allow GM items specifically flagged to show on the website to appear on the site. A N will allow ALL GM records to appear on the site.
  3. Show Out of Stock: a Y will allow items to be purchased even if their quantity on hand is below the Out of Stock Qty level. A N will prevent items from selling on the website if their QoH is below the Out of Stock Qty level.
  4. Multi Store Flag: should be a Y if you are a multi store environment.
  5. Use Quantity on Order: flags the system to include the quantity on order in the quantity on hand calculations.
  6. Allow Free Shipping: set to Y if you want to allow free shipping for GM specific items.
  7. Image Path: is under development and should be left blank.
  8. Low Stock Qty: set the quantity on hand amount where the system will display a Low Inventory message for items on the website.
  9. Low Stock Msg: specify the message to display when an item meets the Low Stock Qty threshold.
  10. Out of Stock Qty: set the quantity on hand level for when an item should be considered out of stock to the website.
    1. This exists to prevent items that may be in a customer’s hands in the store from being sold by the website.
  11. Out of Stock Msg: specify the message to display when an item meets the Out of Stock Qty threshold.
  12. Default Weight: sets a default weight to be used for items that do not have a weight specified in their GM, MF web screen.
  13. Override Store: can be used to specify which store’s inventory to pull quantity from in a multi store setup.
  14. Block Purchases: will block the ability for all GM items to be purchased on the website. They will still be shown, but there will be no add to cart button.

TX Webstore Parameters

This screen is reached by going to POS-26-4-1, then enter TX at the bottom of the screen.

  1. Honor MF Flag: a Y will only allow TX items specifically flagged to show on the website to appear on the site. A N will allow ALL TX records to appear on the site. This is typically a N for textbook items.
  2. Image Path: Under development and should not be used.
  3. Show Out of Stock Message: enter a Y to display the out of stock message or a N to not show the message once New and Used out of stock threshold has been reached.
  4. Use Pending Return Qty: tells the system to use pending return quantities in the quantity on hand calculations. Typically a N.
  5. Default Weight: specify a default weight to be used when weight has not be specified in the TX, MF record.
  6. Allow Free Shipping: can be used to deny or allow free shipping for TX items.
  7. New Low Stock Qty: set the NEW quantity on hand amount where the system will display a Low Inventory message for items on the website.
  8. New Low Stock Message: specify the message to display when an item meets the NEW Low Stock Qty threshold.
  9. New Out of Stock Qty: set the NEW quantity on hand level for when an item should be considered out of stock to the website.
    1. This exists to prevent items that may be in a customer’s hands in the store from being sold by the website.
  10. New Out of Stock Message: specify the message to display when an item meets the New Out of Stock Qty threshold.
  11. Used Low Stock Qty: set the USED quantity on hand amount where the system will display a Low Inventory message for items on the website.
  12. Used Low Stock Message: specify the message to display when an item meets the USED Low Stock Qty threshold.
  13. Used Out of Stock Qty: set the USED quantity on hand level for when an item should be considered out of stock to the website.
    1. This exists to prevent items that may be in a customer’s hands in the store from being sold by the website.
  14. Used Out of Stock Message: specify the message to display when an item meets the Used Out of Stock Qty threshold.
  15. Override Store: can be used to specify which store’s inventory to pull quantity from in a multi store setup.
  16. Show New Prices: left empty or Y will display New textbook prices on the site. N will now show prices.
  17. Show Used Prices: left empty or Y will display Used textbook prices on the site. N will now show prices.
  18. Show Rentals: a Y will display rental items for purchase. N will block rentals from showing.
  19. Show eBooks: a Y will display eBook items for purchase. N will block eBooks from showing.
  20. Block Purchases: will block the ability for all TX items to be purchased on the website. They will still be shown, but there will be no add to cart button.

Buyback Parameters

Online Buyback Parameters

To enable the ‘Buyback’ option on your website menu, call support.

Log to POS.26.4.1, enter in your store number and then select BB=Buyback from the bottom options

Fill in each of the parameters below as you need for your store.


  • Store Credit %: This is where you can issue store credit for an item. Leave blank if you will not be issuing store credit but instead you will be issuing a check.
  • Retail %: This is the percentage of the retail selling price that will be displayed for the buyback, similar to the percentage parameter setup in Textbook buyback.
  • Retail Rounding: This is the rounding direction used for the Retail percentage. (‘U’p, ‘D’own)
  • Retail Coin: This is the rounding coin to use for online BB. (5, 10, 25, 50, 00)
  • Wholesale %: Same as retail but for wholesale pricing
  • Wholesale Rounding: Same as retail but for wholesale pricing
  • Wholesale Coin: Same as retail but for wholesale pricing
  • Retail Wording: This is where you can set the verbiage to display for Retail Pricing.
  • Wholesale Wording: This is where you can set the wholesale verbiage.
  • EBB Need Wording: Enter the verbiage to use to show what your need is.
  • Buying Wording: Enter the verbiage to use to display that you will be buying a title.

Not Buying Wording: Enter the verbiage to use for titles that you will not be buying.

Email Webstore Parameters

These parameters can be found in POS-26-4-1 and then enter E for Email Parameters

This screen allows you to list the staff email address(s) to send email notifications when an order has been placed. Simply enter one email per line.

Setting up Shipping Tables

Shipping tables, which are often times referred to as freight tables, are used to establish different price points to charge for freight based off of the total order amount. They can be found in POS-26-4-2 or by clicking the ?? button next to the Code field and then clicking on the Maint button at the bottom of the selection list found in POS-26-4-1.

  1. Freight Code: is the code used to reference the freight table.
  2. Web Description: is what the customer sees when selecting the shipping options when checking out.
  3. Shipper Code: is a free form field for reference. Examples would be FedEx, UPS, USPS, etc.
  4. Ship Method: is a free form field that should reference a shipping method supported by the shipping company. E.g. second day, over night, ground, etc.
  5. Days to Ship: is a reference field where you can enter the average number of days in transit for this shipping method.
  6. Live Freight: references a billable add on module to the website and is typically False
  7. Free Shipping Subtotal: allows specifying a minimum order amount, that when met or surpassed, will trigger free shipping.
    1. For example, if 100.00 is entered any order over $100.00 will not be charged shipping.
  8. Additional Handling Fee: enter an amount to be charged to every order as a handling fee.
  9. Calculation Method: left blank
  10. Dollar Amount Freight Table
    1. Any amount UP TO the amount entered will be charged the fee entered in the Shipping Fee Field
    2. In the screenshot shown every order will be charged 9.21 in shipping
    3. If multiple price points are desired then the lowest “cap” should be entered first with the next level cap being entered second and so on.
      1. Sub total of 100.00 with fee 9.00
      2. Sub total of 200.00 with fee 12.00
      3. Sub total of 500 with fee 15.00
      4. Sub Total of 99,999.99 with fee 20.00
      5. Would result in orders of $1 – 100 being charged $9 in shipping. Orders of $100.01 – $200.00 being charged $12 and $200.01 – $500.00 will be charged $15.00 with everything above that up to $99,999.99 being charged $20.00
  11. Quantity Freight: charges specific fee amounts per item on the order.
    1. First Item Fee: specifies the fee amount to charge for the first item.
    2. Additional Item(s) Fee: the fee amount to charge for each additional item beyond the first item.


Adding GM Items to the Web

The following are instructions on how to add GM items to the website, create catalogs and assign images to an item.

Adding Items to Web

The primary way to display items is via a catalog. An example of some catalogs could be Electronics, Mens Apparel, Women’s Apparel, Prints and Frames, etc. all containing items that pertain to that theme.

An item can be assigned to as many catalogs as you would like. For example a Nike men’s t-shirt could belong to a Nike catalog, a t-shirt catalog and Men’s Apparel.

The only other way for items to appear on the website is via a search. If an item is flagged to show on the web, but does not appear on a catalog, then a search is the only way for that item to be accessible to your customers.

The recommended process is to first create your catalogs and then go to each item that will appear on the web and assign their image, alternate titles, special web pricing, etc.

Creating Catalogs

Catalogs are maintained in POS-26-2. Please note that many of the fields on the screen and their functions are under development and may not be functional or require a specific value.

  1. The Catalog ID is the record ID for the catalog
  2. Description is what will appear on the menu bar of the website
    1. Catalogs will automatically show up on the website once they are created.
  3. Sort sequence is the order in which catalogs are listed on the site menu
    1. A catalog with Sort Sequence 1 will appear first, sequence 2 will be second, etc.
    2. If two catalogs have the same sort sequence then the site will list them alphabetically
  4. Start and Expire Date allow you to specify when the catalog should or should not appear on the site.
    1. If you don’t want a catalog to appear on the site, but would like to keep it for reference or future use, then give it an expire date of -1 and it will no longer appear on the site.
  5. Suppress Thumbnails is currently under development and should be left blank.
  6. Columns on Page allows you to set the number of columns displayed when showing the catalog items.
    1. This may be overwritten by site themes which will render it unusable.
  7. Type is to set the type of catalog. The default normal catalog is ‘C’ but you can set a catalog to any type. The system will maintain certain catalogs ( BEST.SELLERS, SALE.ITEMS, NEW.ITEMS), if you wish to manually maintain these catalogs yourself then you will need to set the ‘Expire Date’ on these to an historical date and then create a new catalog with the correct description and set the ‘Type’ to correspond to catalog you are creating.
    1. C=Catalog
    2. H = Home Page
    3. F = Featured Catalog
    4. N = New Items Catalog
    5. B = Best Sellers Catalog
    6. S = Sale Items Catalog
    7. R = Recommended Items Catalog
  8. Restrict to Store is for multi store environments and allows you to restrict the catalog to the store number you enter.
  9. Sale Discount allows you to apply a percentage discount to every item listed in the catalog.
    1. It only applies to items current on the catalog. If you add items later then you will need to go back to the Sale Discount field, enter the percentage and press Enter to update the newly added items.

Adding Items to a Catalog

If items are already flagged to appear on the web then they can be added to the catalog through Catalog Maintenance by typing their SKU into the SKU field. This would be the process if the web product has been in use for some time and most items are already setup to display on the website.

New customers will need to change their GM items to appear on the web. By default all or no items are flagged to appear on the web (POS-26-4-1, GM, Use Web Flag field), so the next step is to flag the specific items you want to be available on the website. If there is a large group of items, such as all items in a particular class, then TCS staff can flag those in mass to appear on the web.

Adding an item, assigning images, customizing item page information and descriptions are all done through the GM, MF record of the item.

To get started log to the GM module and then enter MF at the menu, look up an item you would like to add and make note of the W=Web option. By choosing that we can get to the web maintenance part of the item record and add it to the website.

  1. The include on Web field must be set to a Y or an A to flag it to appear on the website.
    1. Y will have it appear as long as it meets the low and out of stock requirements. If it drops below the out of stock threshold then it will no longer appear.
    2. A marks the item as always available for purchase, regardless of stock levels. This can be used for special orders and other scenarios.
    3. N for Never would be used if, by default, all GM items are web enabled
    4. NQ for No Zero QOH is under development and should not be used
  2. Alternate Title: provides the option to specify a description other than the main description of the MF item. Whatever is entered here will override the GM description for the item when it displays on the web.
  3. Graphic Link Name: maps the GM item to the image uploaded (image uploading covered below). The name entered must be exact including case and include the image file’s extension (common file types are .jpg, gif and .png)
    1. Additional images may be added using a comma to separate the image names. The first image is the default image for the item, additional images will be in the order that they are arranged in the field but must all be separated with a comma.
  4. Special Web Price: is an override price for the item if it is sold on the web vs. rung up at the register.
  5. Out of Stock Qty and Low Stock Qty: are item specific overrides to the low and out of stock levels specified in the web general parameters (POS-26-4-1)
  6. Targeted Item: allows you to weight the item more heavily in search results on the site.
  7. Weight: can be used to specify a shipping weight.
  8. Allow Free Freight: flag as Y for free freight.
  9. Specific Freight Amt: will set a shipping cost for the item.
  10. Override Freight Code: can be used to ship the item a specific way regardless of what is chosen by the customer at checkout.
  11. Print Shipping Label: is for live fright customers only and is currently under development.
  12. Web Comments: is used for additional product info and appear at the bottom of the page. HTML markup can be used for formatting as well.
  13. Catalog ID: is a listing of catalogs that the item is currently assigned to. You can also assign the item to a catalog by entering the catalog ID in this field.

Save the record once all desired fields have been filled out. Please note that while changes are made live immediately, your browser session may have cached the catalog information and may take up to 10 minutes to update. You can typically force an update by pressing CTRL+F5 to request a non-cached version of the page.

Managing Images

Images must be uploaded for each item and the image name, including the file extension, must be included in the GM, MF, web screen shown above.

Points of Interest for Images

  1. Supported image formats:
    1. .jpg and .gif are supported on all versions of the website. .png is supported in version 3.x
  2. Image sizes
    1. When uploading an image the site will automatically generate scaled down medium and small versions for thumbnails and other views.
    2. Images should not be much larger than 1024 pixels in width. Images that are too large may not upload or will take a considerable amount of time to load for your customers.
  3. Use human friendly naming conventions.
    1. Many cameras will name images with something like 01012017_0001.jpg which is a month, day, year and counter format. Rename your images to something more meaningful to make them easier to work with.
    2. Avoid special characters in image names. A dash (-) or underscore (__) are the only special characters that should be used.

Uploading Images

  1. Log into the site with an administrative account
    1. Accounts can be elevated to admin status by going to POS-26-21, bring up the account and change the Account Type to A. If the account does not exist then you can create the user id here and set the account type to ‘A’. After you create the account you will need to go to the website and on the logon screen select the ‘Forgot Password’ option to have a temporary password sent to you.
    2. The user will need to log out and back in on the website to apply that change.
  2. Go to Site Administration on the landing page.
  3. Click on the Upload Management icon
  4.  Here you can either select the option to Upload New Files or Manage Files in the table beneath.
    1. Upload New Files
      1. Click on the Add files… button which will display a window to browse to and select your images.
      2. Multiple images can be uploaded by holding shift or ctrl when selecting images.
        • Click on the Open button once all items are selected.
      3. A list of images will appear similar to the image above.
        • Take a look at the size of each image. Anything in the KB range or low MB range (e.g. 1.05 MB) is fine. Anything over 10MB you will want to consider resizing to a smaller size.
        • All images can be uploaded by clicking on the Start upload button beneath the drop down.
        • Individual images can be uploaded by clicking on the Start button on their line.
      4. A progress bar will display for the entire upload along with a progress bar for each image being uploaded. Once each item is done uploading it will then have a Remove option in case you want to back out.

Manage Images

Images that have already been uploaded can be viewed by going to Account, Site Administration, Upload Management and then clicking on the Manage Files on the right hand side of the table.

Here you can view the image names, remove an image, download a copy or continue on to upload more images by using the Upload New Files on the top right.


Automatic Reports via Background Processor

Introduction

The Background Process allows you to set up recurring processes that either process data or creates reports. For Hosted accounts these reports can only be emailed. Self-hosted accounts can have reports emailed or printed on a designated printer. The process can be set up to run just once or repeatedly on a prescribed schedule.

If the process has dates or other parameters to be entered these can be set up as part of the process.

Job Parameters

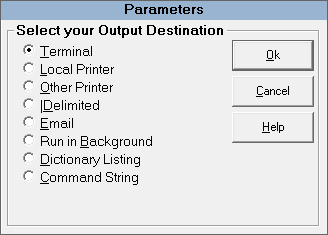
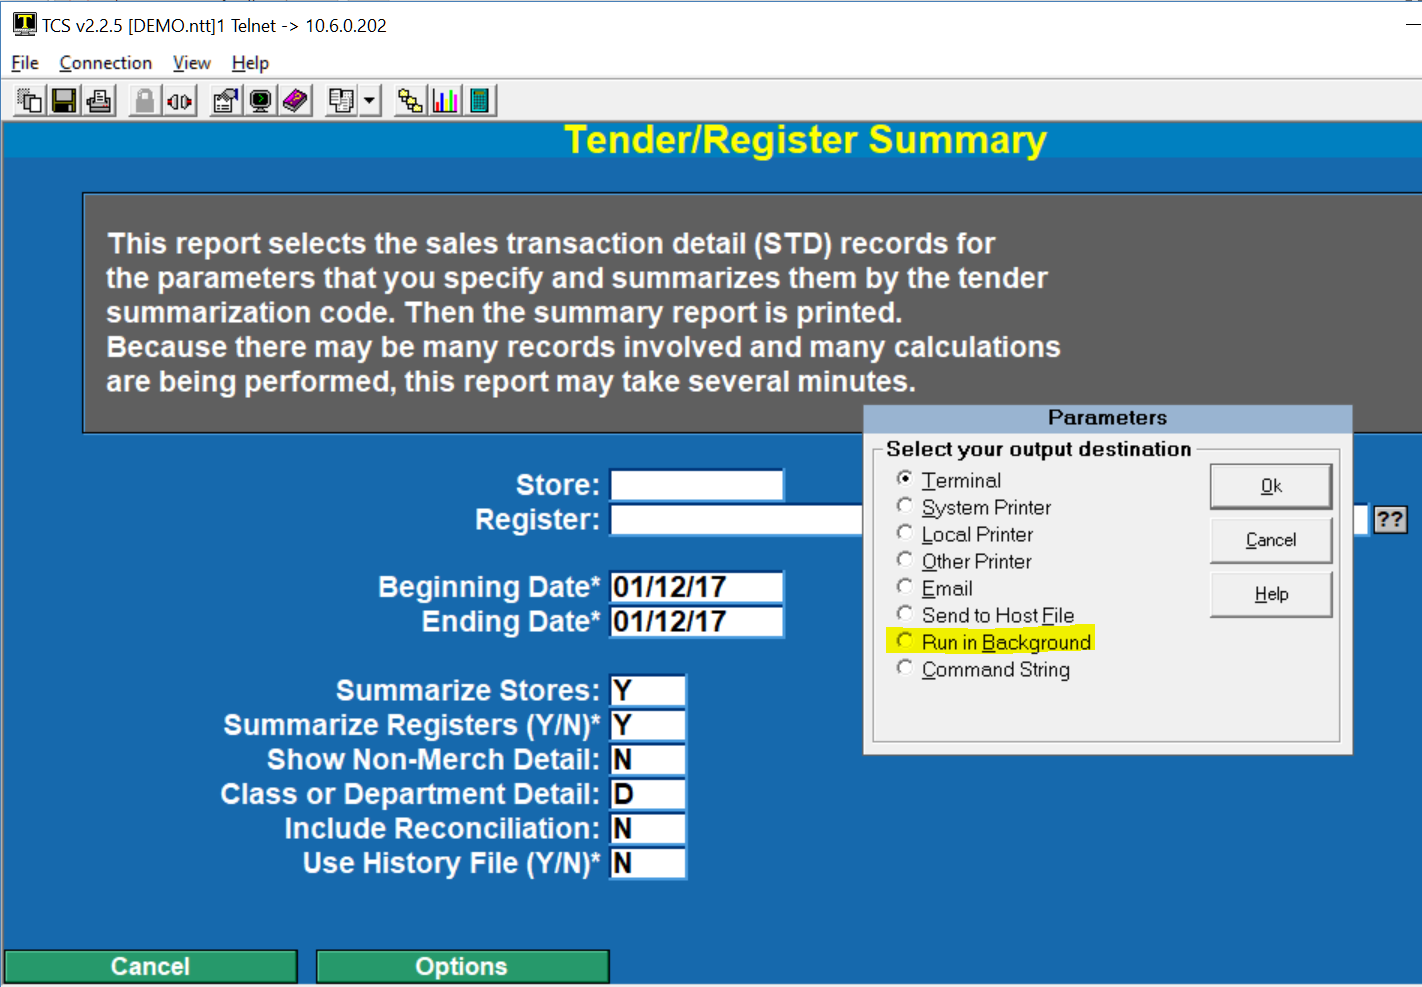
In order to facilitate setting up a report you can select Run in Background from the Output Destination box. This will work with nearly all of your background processing needs.

Here is how this would work if you were to schedule POS report POS-RP-2-21 (Tender Register Summary).

  1. Do everything that you would normally do to run the report but select Run in Background instead of the Terminal or a Printer.

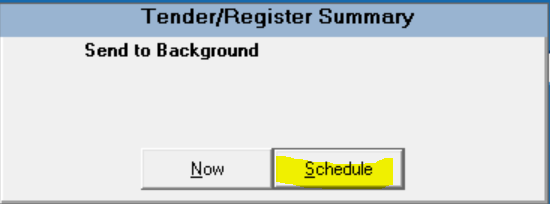
After selecting Run in Background the following box will appear. Select “Schedule”.

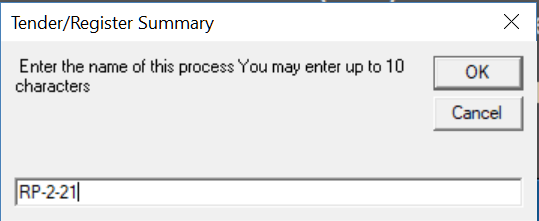
After selecting Schedule you are then prompted for a name to call this process. Enter a brief code, do not enter spaces.

When you have chosen a name/code to call this process the following screen appears. This is the Job record that will be used to run this process on the schedule you specify.

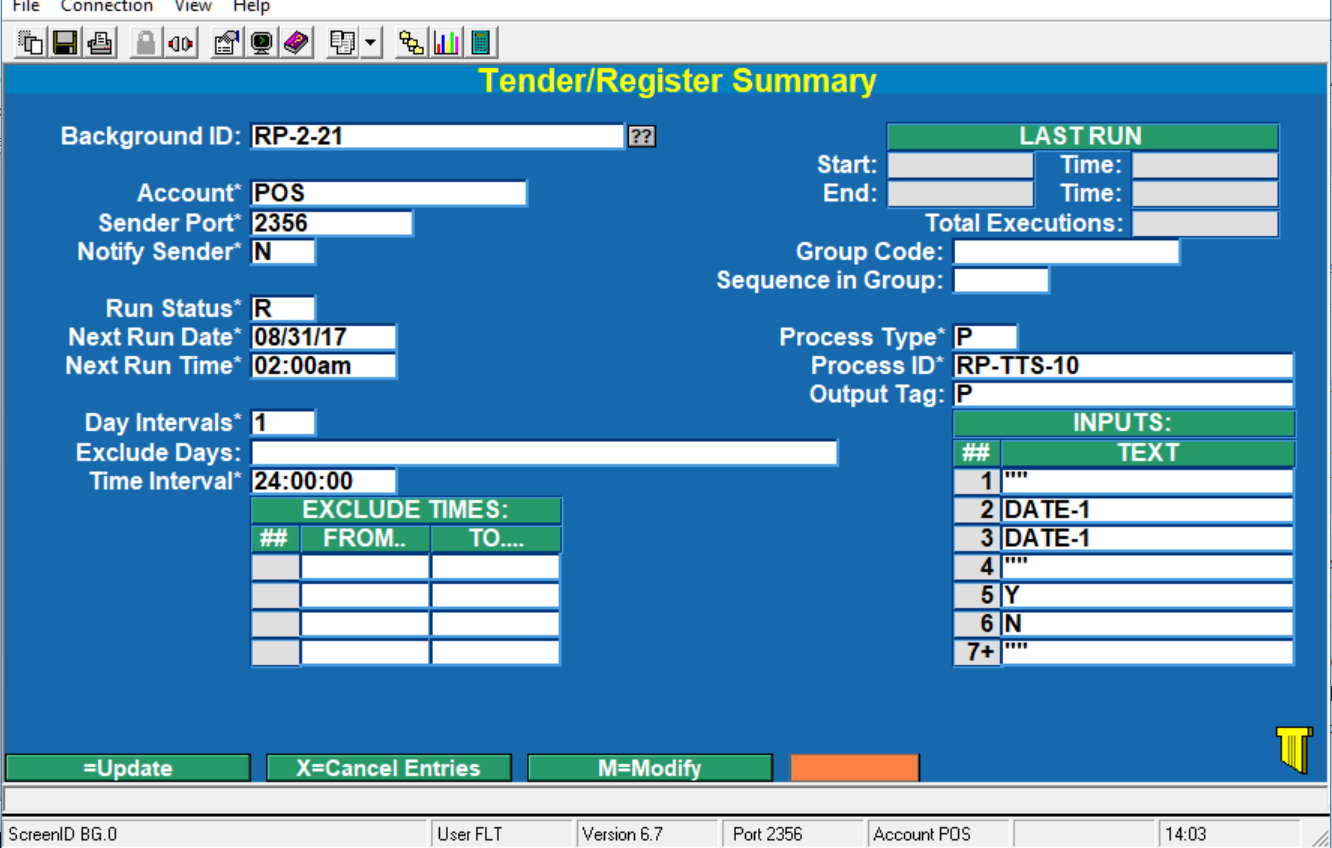
This is the record that is created. Once you saved it you will be able to access through BG-01.

Field Definitions

  • Account This is the Account that the process will run from. It is strictly informational.
  • Sender Port Not used
  • Notify Sender Not used
  • Run Status R=run at scheduled time and intervals, I=run immediately (great for testing), and X=Stop from running. If this is set to “I” then it will switch to “R” once it has run.
  • Next Run Date The next date this process is set to run.
  • Next Run Time The next time this process is set to run.
  • Day Intervals This is how frequently you want to run the process.
    • 1 = daily, 7 = weekly, 14 = every two weeks, etc.
  • Exclude Days Enter the days that you do not want this process to run. Options include SUN, MON, TUE, WED,THUR,FRI, and SAT.
  • Time Interval This is how frequently in a given Day Interval you want this process to run. 1:00:00 is hourly, 24:00:00 is once per Day Interval.
  • Exclude Times Time ranges that you do not want the process to run.
  • Group Code This allows you to create groups so that processes run in the order you want.
  • Sequence in Group Where in this group the process will run.
  • Process Type There are three options based on the kind of process is going to run. Valid types include “T” for TCL/Command Line, “P” for Procsub (this is the majority of processes), and “TD” for TCL/Command Line with data being supplied by the INPUTS in this process.
  • Process ID Each menu option on the system takes you to another Menu, a Data Entry Screen, or a Process. Always use a Process. Nearly all process have a set of inputs that is used to define parameters for that process.
  • Output Tag This parameter is used to define printer and email options. It is discussed in detail below.
  • LAST RUN This box has the last run date and starting time, and the date that the last run ended and the time that it ended. Most processes take a minute or two at the most.

INPUTS: This is a list of any values as they will be needed by the process. In this particular example we have “” (press enter) three separate times. And then the word DATE twice. Since you are probably familiar with this report this values would look familiar. Other values on the next screen include Y, N, D, N, etc.

When DATE is used there are three options:

DATE This is today’s date. Use this if the scheduled run date is for the current date.

DATE+n This is today’s date + n days.

DATE-n This is today’s date – n days.

It is recommended that you run a process a at lease an hour prior to midnight and some time after midnight.

Output Tag

The Output Tag is used to indicate if the process is to be printed or emailed.

If Printed (Self-Hosted users only) enter a “P” in the field. If emailed enter “E” in the field.

Printer Output Tag

When selecting Printer the following appears.
*NOTE: Printer output is only available for self hosted systems. Customers running on the hosted environment will need to use the email output.

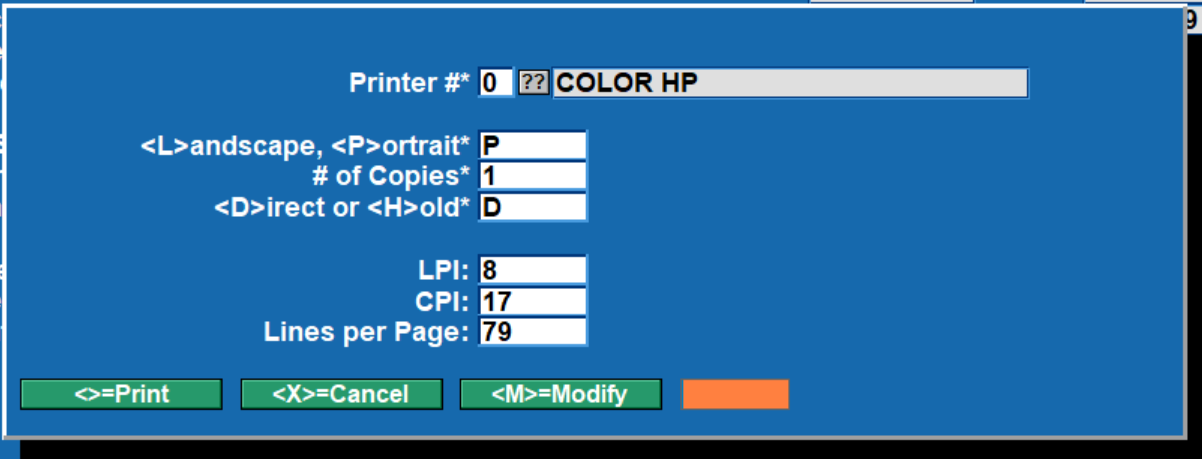
Select your printer options.
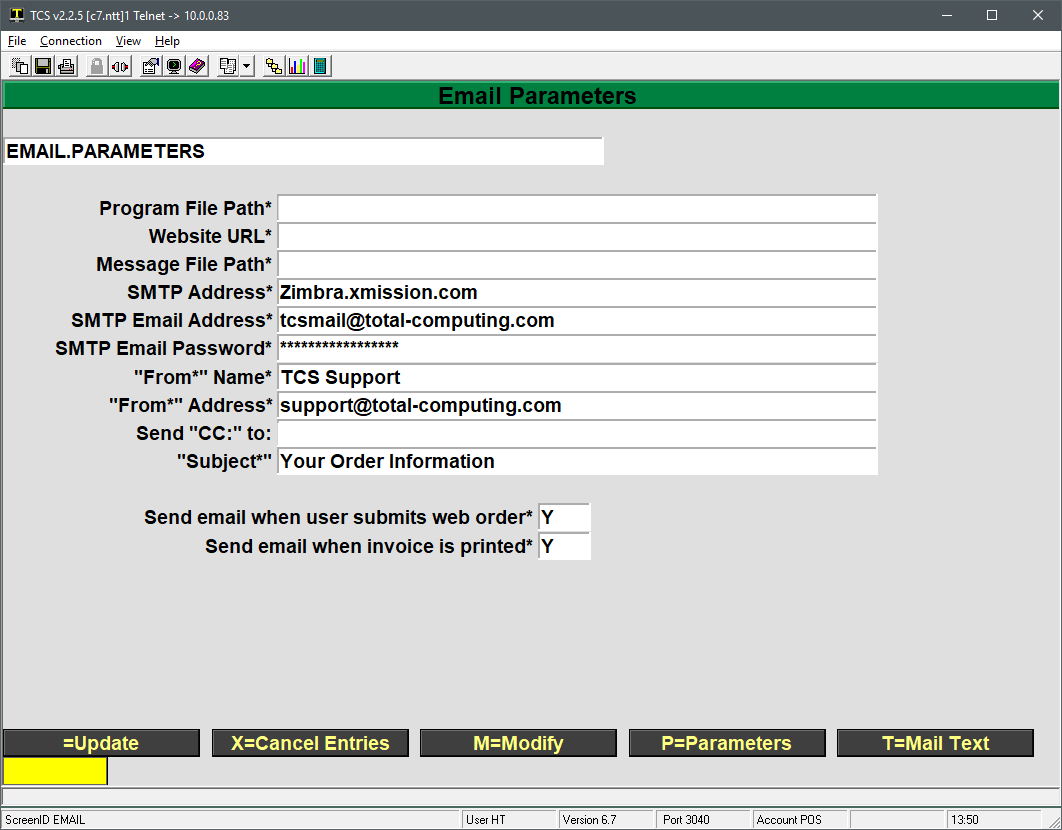
Email Output Tag

When selecting Email the following appears. Enter the fields as they best match your requirements. If you have already entered the fields and just want to make some adjustments then after entering “E” your prior settings appear (as in this example).

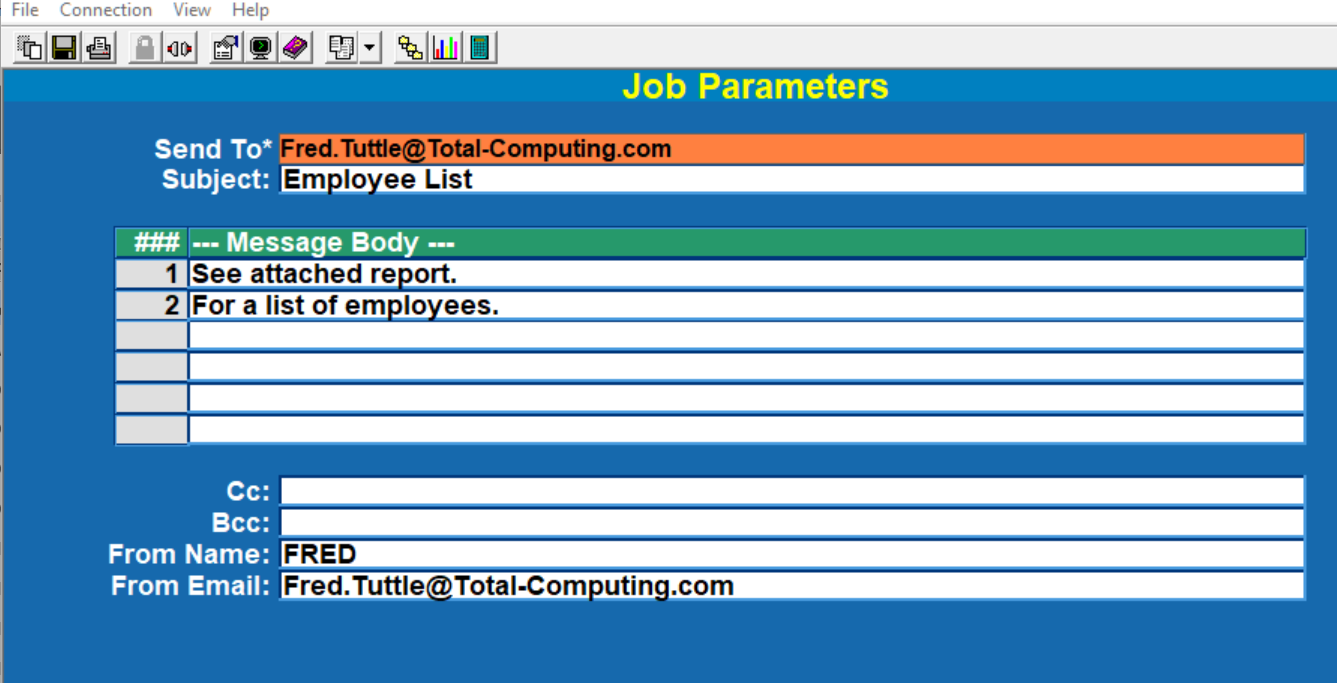
You can have multiple email address by separating them with a comma.

Managing Backgrounds

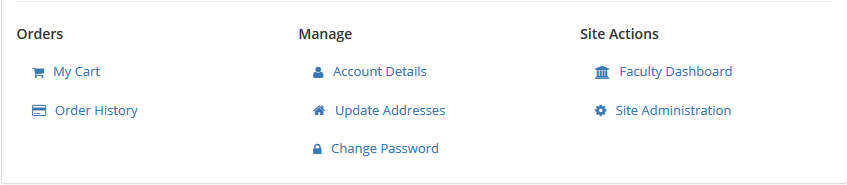
The background process is managed by selecting option “BG” at the bottom (or common section) of the screen. This is available in all modules and can be ran by entering BG into the menu selection field even if you do not see a button on screen.

When you select BG the following menu is displayed.

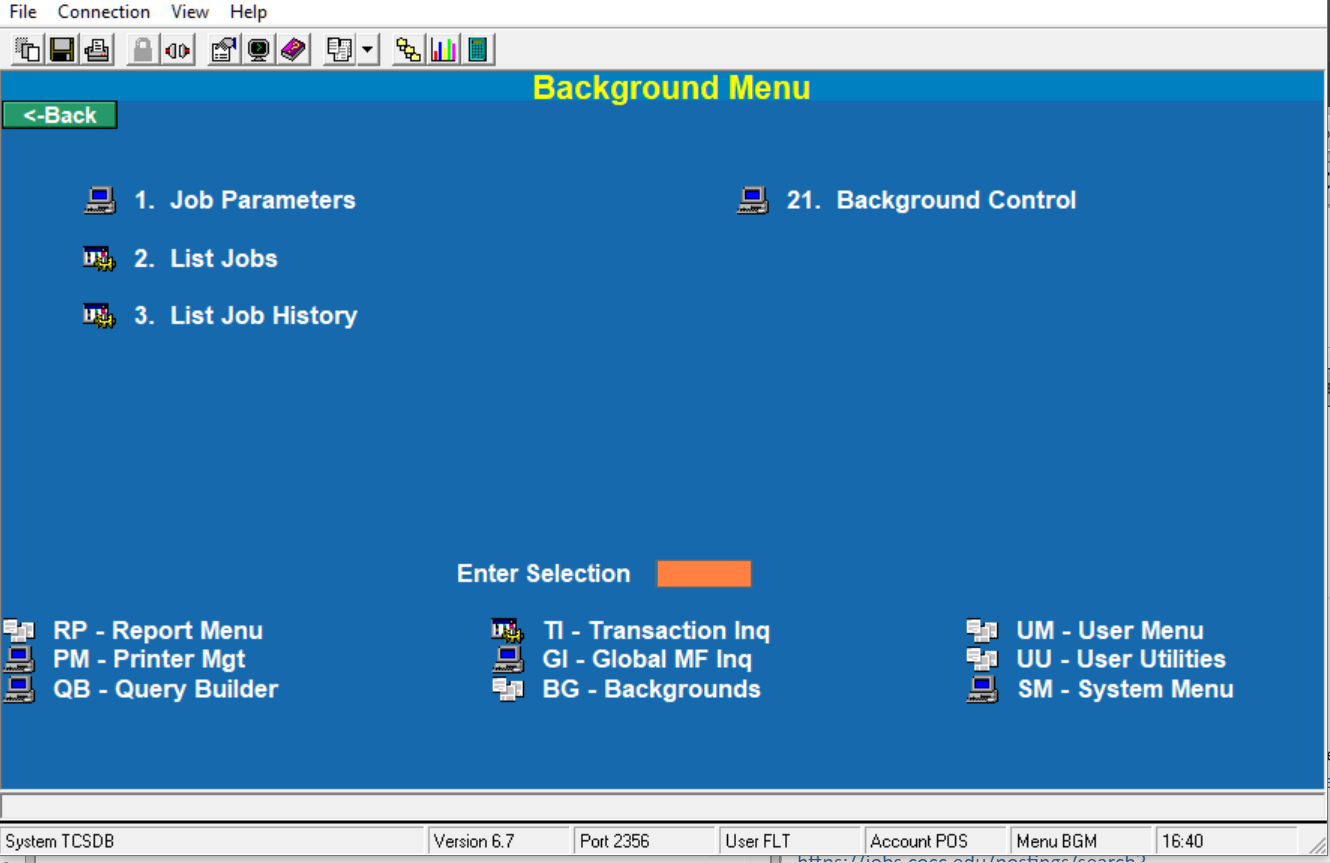
  1. Job Parameters was discussed in the prior section.
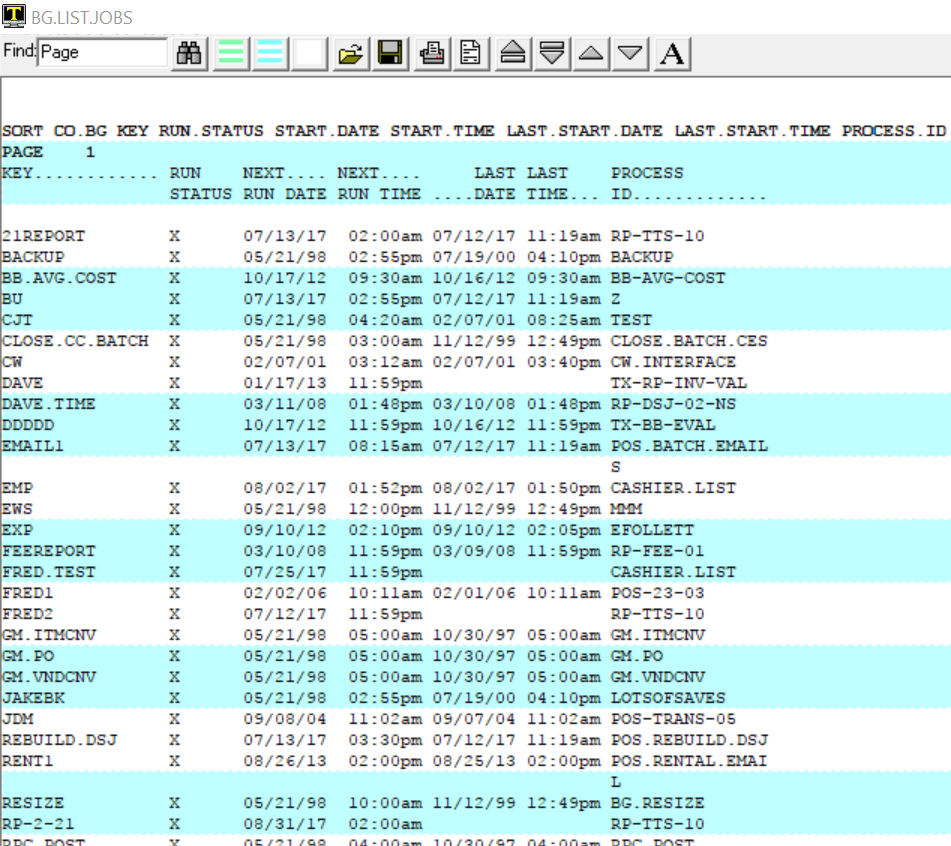
  2. List Jobs will give you a report of all of the jobs that have been setup on your database. You will notice on the following list that there are many different jobs that can be set up.

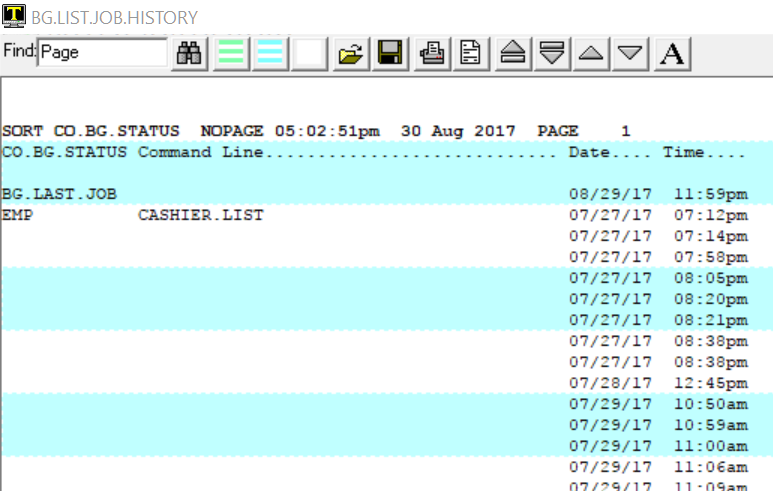
  1. List Job History shows a list of the last 50 times that a job was processed.

21. Background Control is where you start and stop phantom jobs. The only job that you should stop is BG.PROCESSOR. All other phantoms are controled by their own process.

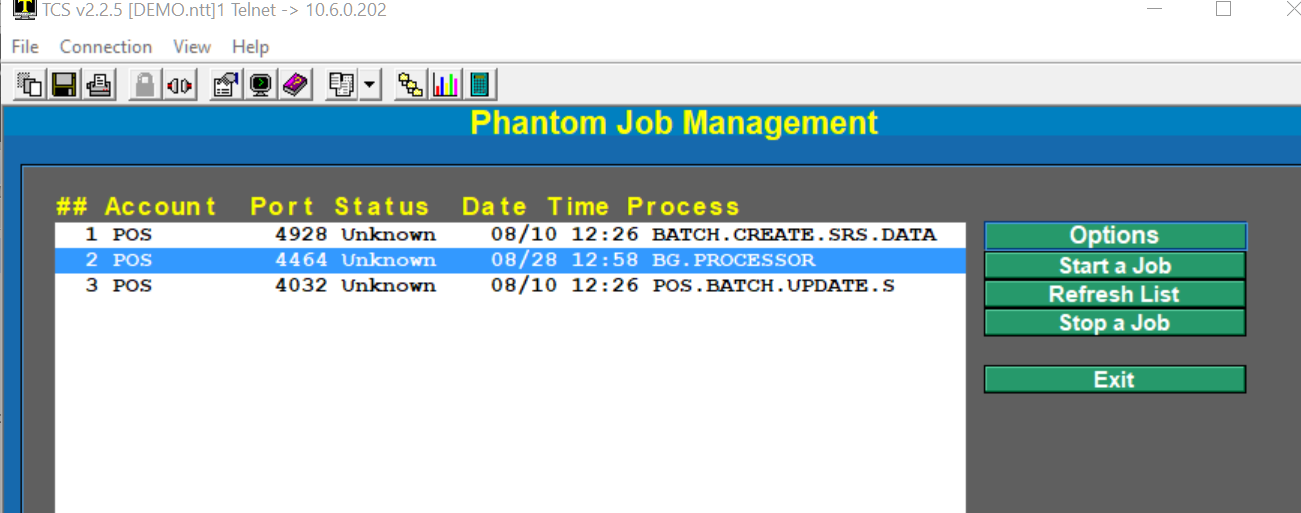
To Stop a Job click on the row that has BG.PROCESSSOR on it then click on Stop a Job.

To Start a Job simply click on Start a Job.

After you do either one of these you may experience a short pause. This is caused by the system monitoring the process to make certain that it was started or stopped.

Email Notification

Self-Hosted users may choose to have reports print to a specific printer or sent via email. Hosted users are limited to reports that are emailed only.

When an email is sent it will have the Sequence/Iteration number of the report included in the body of the email. The email will look similar to this.

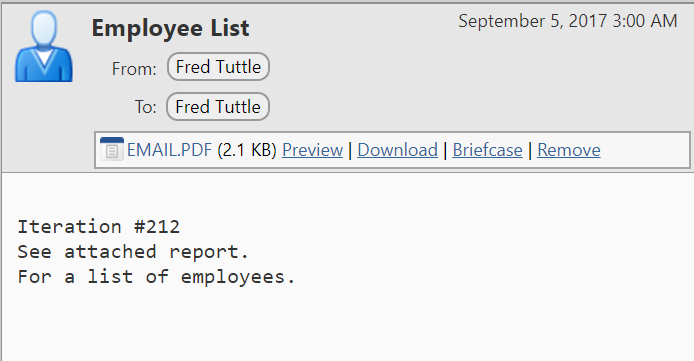
The EMAIL.PDF attachment is the report that was scheduled to run. This is the 212th iteration of this Employee List.
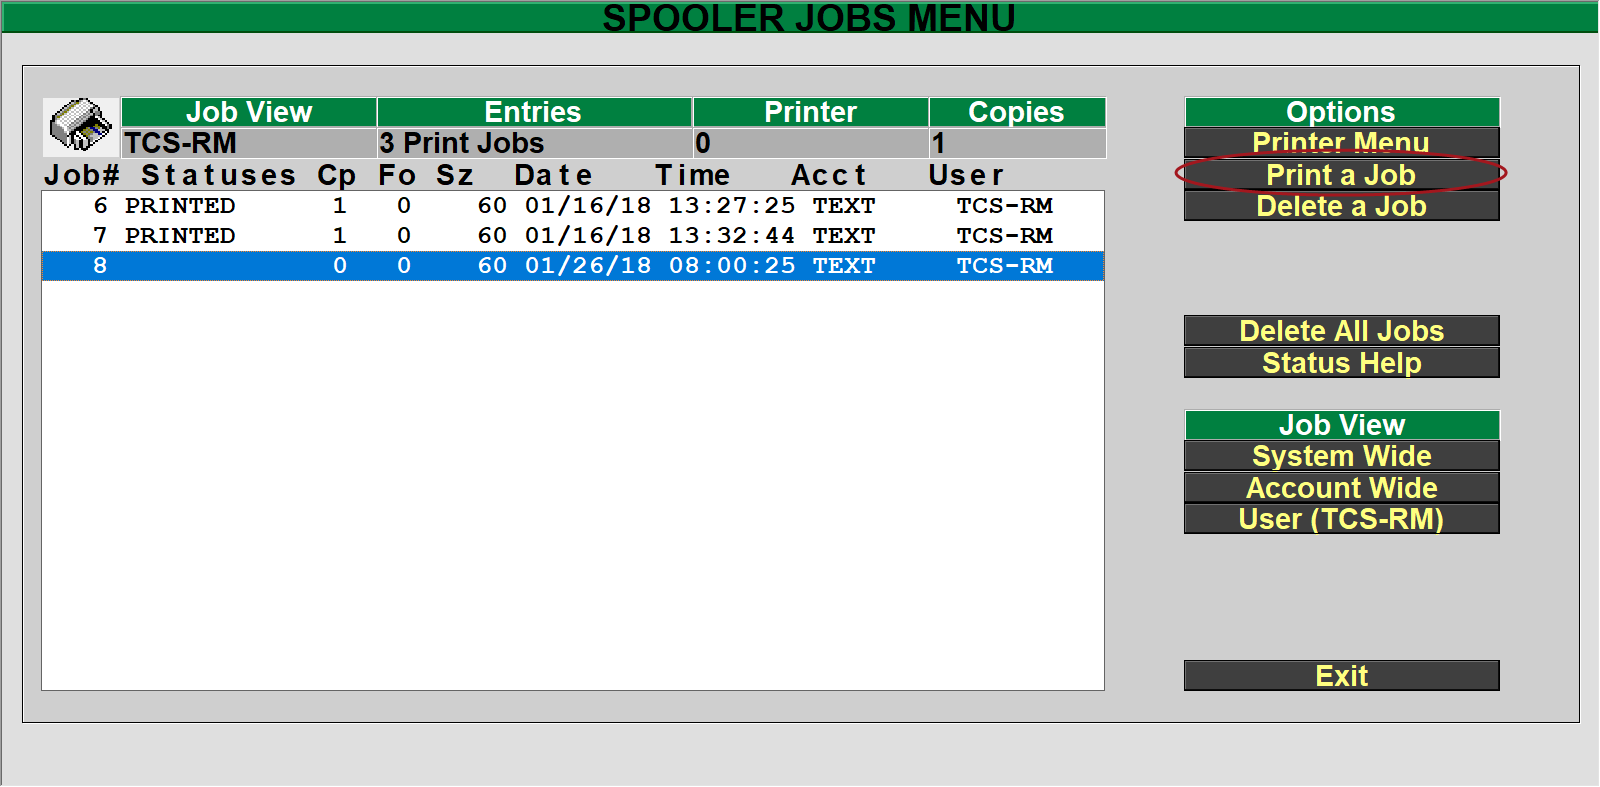


Implementation Guide for IT

Network Rules

The following is a list of connections that may need to be opened on any firewall systems regulating traffic to/from the bookstore to the outside internet.

Mandatory

  1. Outbound UDP traffic to 104.209.214.232 on ports 1171 – 1174. This rule is to allow the cash registers and back office workstations to establish a VPN connection to the point of sale host.
    1. We use OpenVPN for the VPN connections
    2. Client/server communication is encrypted using the AES-256-GCM encryption algorithm
  2. The customer is contractually required to provide remote access for the SmartSuite support team when needed.
    1. Zumasys uses the ConnectWise remote support tool to assist customers when they do not have a tool for us to use.
    2. If the firewall rules block the establishment of outbound connections then it will be necessary to allow network traffic for the ConnectWise application.
      • If your firewall appliance supports URL/Alias’  then whitelist the following:
        • https://zumasys.screenconnect.com/
        • relay://instance-sisn83-relay.screenconnect.com:443/
      • Whitelist the following IP addresses if your firewall appliance does not support URL/Alias whitelisting
        • 54.188.209.27 – port 443
        • 44.224.173.7 – port 443
    3. The customer must provide a reasonable solution for remote support access if the customer is unable, or unwilling, to utilize the ConnectWise application.
  3. Vantiv/Worldpay Credit Card Processing
    1. This is required to allow on premises cash registers to perform credit card authorization requests via their P2PE devices.
    2. If your firewall supports domain based filtering, then you can simply add a rule to allow traffic to https://transaction.elementexpress.com on port 443.
    3. They round robin through the IP addresses below.
      1. 74.120.156.1 to 74.120.156.254 Port 443
      2. 74.120.157.1 to 74.120.157.254 Port 443
      3. 74.120.158.1 to 74.120.158.254 Port 443
      4. 74.120.159.1 to 74.120.159.254 Port 443
  4. Bolt/CardConnect Credit Card Processing
    1. This is required to allow on premises cash registers to perform credit card authorization requests via their P2PE devices.
    2. Their IP address range is:
      1. 198.62.138.0/24
      2. 206.201.63.0/24
    3. An up to date list can be found on their support site: https://support.cardconnect.com/bolt/terminal/network-whitelisting
  5. Administrative permissions are necessary to install and configure back office workstations with SmartSuite software.
    1. A temporary administrative account can be created for Zumasys use in installing SmartSuite software.
    2. A member of the Customer’s IT staff can accompany Zumasys staff to each workstation to provide administrative credentials as needed

Optional/Situational

  1. Any batch import/export processes will require SFTP access to connect2.total-computing.com (104.209.214.232) on port 4355.
    1. Batch processes include student information, course information, financial aid, etc.
    2. Credentials will be provided during the installation phase.
  2. Redshelf ebooks authorizations require access to the following IP addresses on ports 443 and 80.
    1. 34.196.10.62
    2. 34.196.7.198
    3. 34.206.13.124
    4. 5.171.101.186
  3. Sender authentication setup for emailed reports, order notification and rental notices originating from the hosting system.
    • These communications are configured with the customer’s domain in the “From” address which will trigger spam/junk filters if the steps below are not taken.
      1. Sendgrid Domain Authentication
        • This is completed during the installation and onboarding process and requires the following
          1. Various DNS records to be added to the customer’s DNS service
          2. Modification of the customer’s SPF, DKIM and DMARC records to include the Sendgrid service as a valid sender
    • If the Sendgrid Domain Authenitcation is not completed, it may be necessary to whitelist the following domains and IP used by our Sendgrid service. This is not ideal as our customer’s end users have an increased chance of not receiving email communications.
      1. 149.72.56.9
      2. em94.total-computing.com
      3. em1553.total-computing.com
    • The system may also be configured to use a customer owned Sendgrid service using their basic SMTP service.
  4. Website password reset emails are sent via a second service. This service will ultimately be phased out in favor of the Sendgrid service.
    1. 166.70.13.231 – out01.mta.xmission.com
      166.70.13.232 – out02.mta.xmission.com
      166.70.13.233 – out03.mta.xmission.com
      198.60.22.202 – mgr2.xmission.com

Software and Data

Zumasys does not provide any backup services for data stored on hardware at the customer’s site. All customer data on the SmartSuite servers is backed up daily for 90 days. Weekly backups are retained for at least 180 days and monthly for one year.

Any removal of data, software or utilities installed during the installation phase will incur a per-hour charge to reinstall and reconfigure. This includes installing any of the above on re-imaged or new/upgraded hardware.

Any in-warranty hardware repairs to hardware provided by Zumasys that removes software or data will not incur the hourly charge to reinstall and configure.

Virus and Malware Protection

Zumasys does not provide or install any Anti-Virus or Anti-Malware software on any customer machines. It is the responsibility of the customer to install, update and run such products at their own discretion.

Real-time data monitoring programs may need to be configured to exclude certain programs (VPN, Cash Register application) and certain directories if the real time protection features interfere with the day-to-day operations. Zumasys can provide a list of directories, executables and/or services that may need to be added to exclusion lists if real-time monitoring is having an adverse effect on register operations.

Pre-Existing Hardware and Peripherals

Pre-existing hardware is under the customer’s responsibility to support. Zumasys staff will do their best to ensure peripherals work within our system, but the ultimate responsibility for unsupported hardware is on the customer. Below is a list of items that fall under the customer’s responsibilities to support when they are not purchased from Zumasys.

  1. Receipt Printers
    1. USB and Serial receipt printers are typically compatible as long as they support Epson emulation.
  2. Scanners
    1. Scanners may need to be programmed to read certain barcode formats.
  3. Report Printers
    1. The SmartSuite system supports printing to printers that natively support PCL5. Some printers that emulate PCL 5, and some PCL 6 printers, may work. Post Script and other non-PCL based printers are not recommended or supported in any way.
  4. Barcode Printers
    1. SmartSuite supports printing formats for the following brands. Note that model specific features or functions may require additional effort to setup and configure.
      1. Zebra
      2. Datamax
      3. Cognitive
  5. Inventory scanners
    1. Metrologic Scanpal v2 and Tricoder scanners are currently support in SmartSuite.
  6. Credit Card Readers
    1. Zumasys officially supports credit card readers purchased through Zumasys.
  7. Customer displays
  8. Programmable Keyboards
  9. Cash Drawers
    1. Zumasys only supports cash drawers that connect to the receipt printer CD port.


Firewall Rules

Below is a list of traffic that will need to allowed through the bookstore firewall for access to TCS systems. We also need to know the forward facing IP that bookstore traffic comes from in order to enable certain processes. Primarily for SFTP access to import any course adoption records, student accounts, etc. that the bookstore may need to import in bulk.

I’ve added the URLs in case your firewall supports URL based filtering.

  1. transaction.elementexpress.com port 443
    1. This is the URL for the credit card authentication requests.
    2. They round robin quite a few IP address
  2. 104.209.214.232 port 1191 over TCP
    1. Used for OpenVPN traffic
  3. redshelf.com
    1. All registers that will process RedShelf e-books will need access to Redshelf’s services. The addresses that need to be accessed from all POS stations that will sell RedShelf products are 34.196.10.62, 34.196.7.198, 34.206.13.124 and 35.171.101.186 on port 80 and 443.


Redshelf Adoption Export

This is an overview on how to export your adoption list to Redshelf. This is done each semester after adoptions have been entered so that Redshelf can provide a list of available ebooks.

Redshelf will generate an import file from the adoption information which can be imported following the steps in the Redshelf Import article

  1. First, we need to run a Query Builder report to generate the file we’re going to send to Redshelf.
    1. Log to the TEXT module
    2. Type QB at the menu
    3. Enter REDSHELF in the ID field
      • You will see this Query Builder screen
    4. Select the R=Run Now option
    5. Enter you store number at the Store prompt (certain locations only)
    6. Enter your term code at the prompt
    7. Select the Terminal option for the destination
  2. Now we need to save the report as a text file and send that file to Redshelf
    1. Click on the Save icon at the top of the Terminal Window
    2. Select where you want to save the file.
      • This can be anywhere on your computer. Typical locations will be Documents or Desktop
    3. Name the file
      • Keep it simple and preferably without spaces. E.g. redshelf, redshelf2017-2, adoption_list, etc.
    4. Change the “Save as type” to “Text Files”
    5. Click on the Save button
  3. Next the file needs to be sent to Redshelf. If your Redshelf rep requests an Excel or CSV file, follow the steps below in the Importing Into Excel section.
    1. Open your email application, typically Outlook or through a web site
    2. Create a new message addressed to your Redshelf contact
    3. Attach the file to the email
      • This can vary depending on your email client. There may be an Insert > Attach File option, an Attach File button or you can typically navigate to where you saved the file in Windows and drag it into the email message.

Importing Into Excel

Sometimes a Redshelf rep will request that the file be sent to them as an Excel document or a CSV document. The steps below cover how to do that. This assumes that the steps above have been performed and you have a copy of the report on your computer as a .txt file.

  1. Open Excel
  2. Go to File > Open
    • Or press and hold the Ctrl key and then press O bring up the Open dialogue.
  3. Browse to where you saved the file in step 2.2 above
  4. Change the All Excel Files drop down box to All Files
  5. Select the .txt file saved in step 2.2 above
  6. In the Text Import Wizard (step 1 of 3) Select the Fixed width option
  7. In step 2 of 3, click and drag the arrows/lines to the edge of the text. These mark the columns to be used in the spreadsheet.
  8. In step 3 of 3, click on each column and asign the Text data format in the top left
    • You can select the first column, move the slider all the way to the right, press and hold SHIFT and click on the last column. With all columns selected click on the Text data format option on the top left.
    • Click Finish
  9. Now all of the data should be in the Excel document. The ISBN numbers should not look like a notation number (9.78129E+12) they should display as full ISBNs.
  10. Save the document
    1. Go to File > Save As.
    2. Browse to where you would like to save the document
    3. Enter a name in the File name field
    4. Click on the Save as type: drop down and select the option with “CSV (MS-DOS)”
    5. Click on Save
  11. Send the new csv file to your Redshelf representative.
  12. Note that if you open the document in Excel after closing the ISBN fields will be truncated with 9.78129E+12. Select the for the ISBNs, right click and select Format Cells, change the format to Number and change the decimal count to 0.