ADDING A VENDOR
ADDING A VENDOR
To add or create a new vendor in the system is the same process for General Merchandise and Textbook. If you have the Accounts Payable module then you will also need to create the vendor there and link it to the vendor that you created in GM or TX, keep in mind that GM and TX share the vendor file so if you create it in one then it will be available in the other.
Log to either GM or TX and then select the VM – Vendor Maintenance option
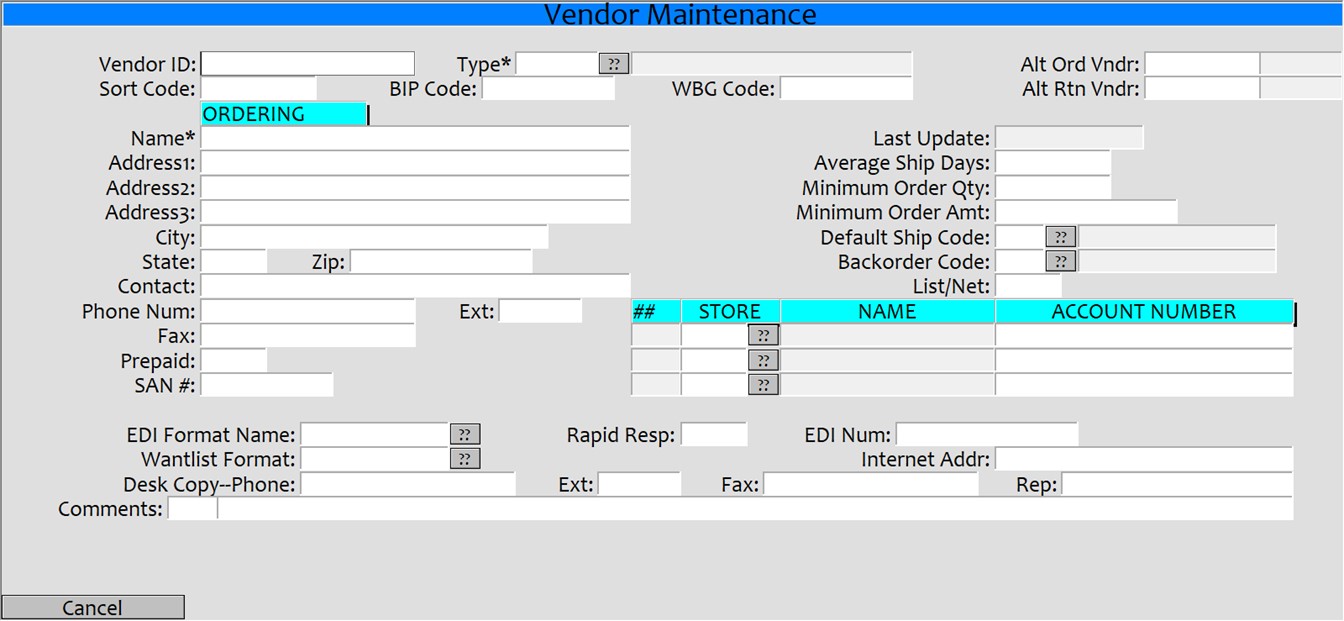
- Vendor ID: Enter a period ‘.’ To create a new vendor number or enter 3 or more letters in the vendor’s name or sort code to bring up an existing vendor.
- Sort Code: Enter a code that will help you find or reference this vendor. This code is used in cross-references and for sorting in reports.
- Type: Enter the Vendor type. Options here are D=Distributor, M=Manufacturer, P=Publisher, V=Vendor, W=Wholesaler. Publisher and Wholesaler are normally used in Textbook (TX), Manufacture and Vendor are normally used in General Merchandise (GM) and Distributor is used in both.
- BIP Code: Used is TX and stands for Books In Print Code, Books In Print is not commonly used anymore.
- WBG Code: Used in TX and stands for Wholesale Buying Guide, this indicates what wholesale guide code to associate with this vendor.
- Alt Order Vndr: This is used to indicate if an alternate vendor should be used for this Vendor, this is normally used when one vendor buys another.
- Alt Rtn Vndr: This is used to indicate if an alternate vendor should be used for this Vendor, this is normally used when one vendor buys another.
- Name: The name of the Vendor as it will show on reports and POs and Returns.
- Enter Address, City, State, and other information as it is available.
- Prepaid: Enter a ‘Y’ here if this vendor must be prepaid.
- SAN #: This is a textbook field and stands for Standard Address Number.
- Last Update: This field is maintained by the system
- Average Ship Days: Enter in the average number of days it takes for shipping.
- Minimum Order Qty: Enter the minimum order quantity that this vendor requires to process/ship an order, this is usually a GM vendor field.
- Minimum Order Amt: Enter the minimum order amount that this vendor requires to process/ship an order, this is usually a GM vendor field.
- Default Ship Code: Enter in the default ship code that will be used when creating a po for this vendor.
- Backorder Code: Enter the default backorder code to use when processing a receiving for this vendor.
- List/Net: Enter either ‘L’ or ‘N’ to set the default pricing type to use when creating a PO for this vendor. L=List pricing and N=Net pricing, List pricing usually includes a discount off of the List and Net is direct price of the item.
- Store/Name/Account Number Enter in the store number and Account Number associated with that store
- EDI/Wantlist/etc. This is used in TX for the electronic wantlisting.
- Comments: Enter a ‘Y’ and then enter any comments that you would like to have associated with this vendor.
Next you should enter in the additional ordering information and the returns information.

Additional Ordering
To enter in the additional ordering information, select the ‘A=Additional Ordering’. The information on this page is used with the Accounts Payable (AP) module
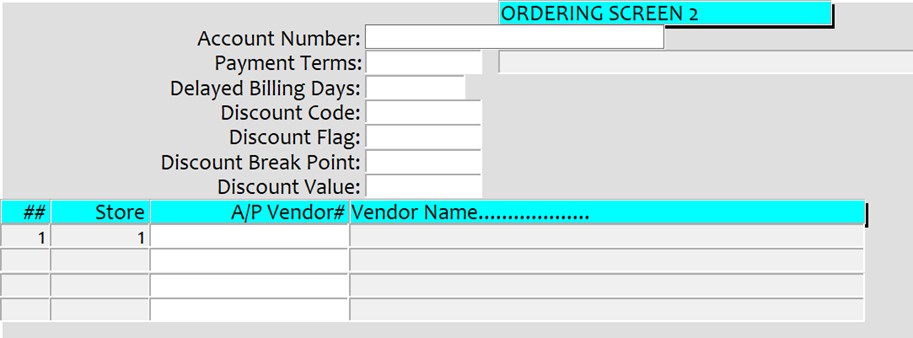
- Account Number: Enter in the Primary Account number
- Payment Terms: Enter the default payment terms, normally net30
- Delayed Billing Days: Enter if there is a default billing days for this vendor.
- Discount Code: Enter a discount code to use for this vendor.
- Discount Flag: Enter a discount flag to use for this vendor.
- Discount Break Point: Enter a discount break point for this vendor.
- Discount Value: Enter a discount value to use for this vendor.
- A/P Vendor # Enter in the A/P vendor to associate this vendor to. If this is left blank and you have the AP module then the invoices will be associated with the AP Vendor 99999. You will need to navigate to the AP module and create the appropriate vendor there and then enter that vendor number here.
Returns
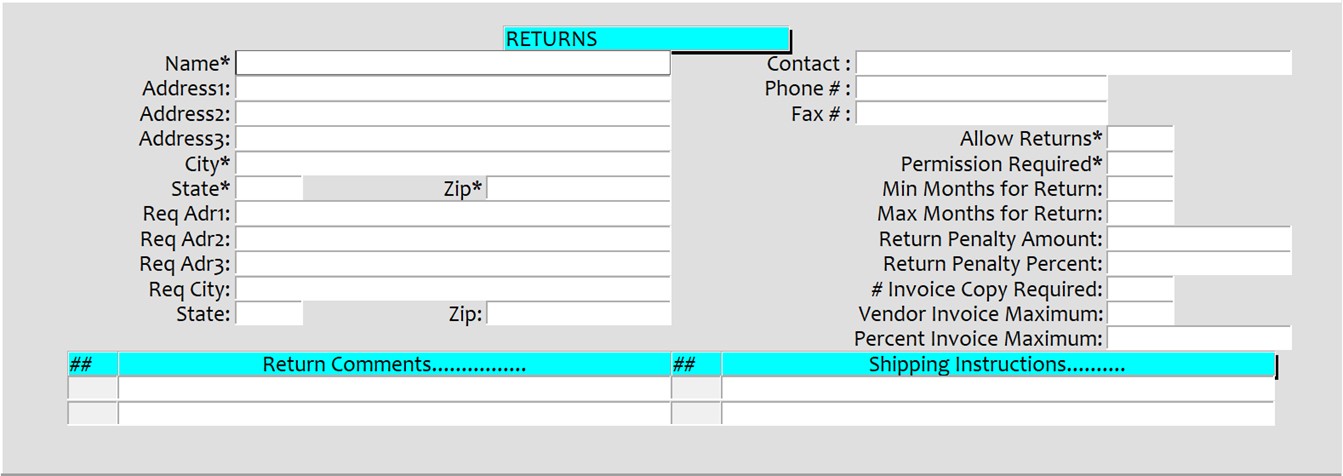
- Name/Address Enter the Return address information for this Vendor
- Contact/Phone/Fax#: Enter in the contact information for the Return information.
- Allow Returns* Enter ‘Y’ if vendor allows returns or ‘N’ if they do not allow returns, this will affect the returns processing in TX.
- Permission Required* Enter ‘Y’ if permission is required for returns or ‘N’ if no permission is required. This does affect the returns processing in TX.
- Min/Max Months for Returns: Enter in the minimum and maximum number of months allowed for returns, maximum returns is required for the TX auto return process to work.
- Return Penalty Amount: Enter in any penalty amount vendor will apply to returns.
- Return Penalty Percent: Enter in any penalty percentage a vendor will apply to returns.
- Invoice Copy Required: Enter in the number of invoices the vendor requires for each return.
- Vendor Invoice Maximum: Enter the maximum dollar amount a vendor will allow you to return.
- Percent Invoice Maximum: Enter the maximum invoice percentage that the vendor will allow to return.
- Return Comments… Enter in any default return comments, these will print on every return created to this vendor unless overridden on the return.
- Shipping Instructions…. Enter in any default shipping instructions that you would like to print on every PO.
Create the vendor in AP
Log to the AP module and select VM=Vendor Maintenance from the main screen.
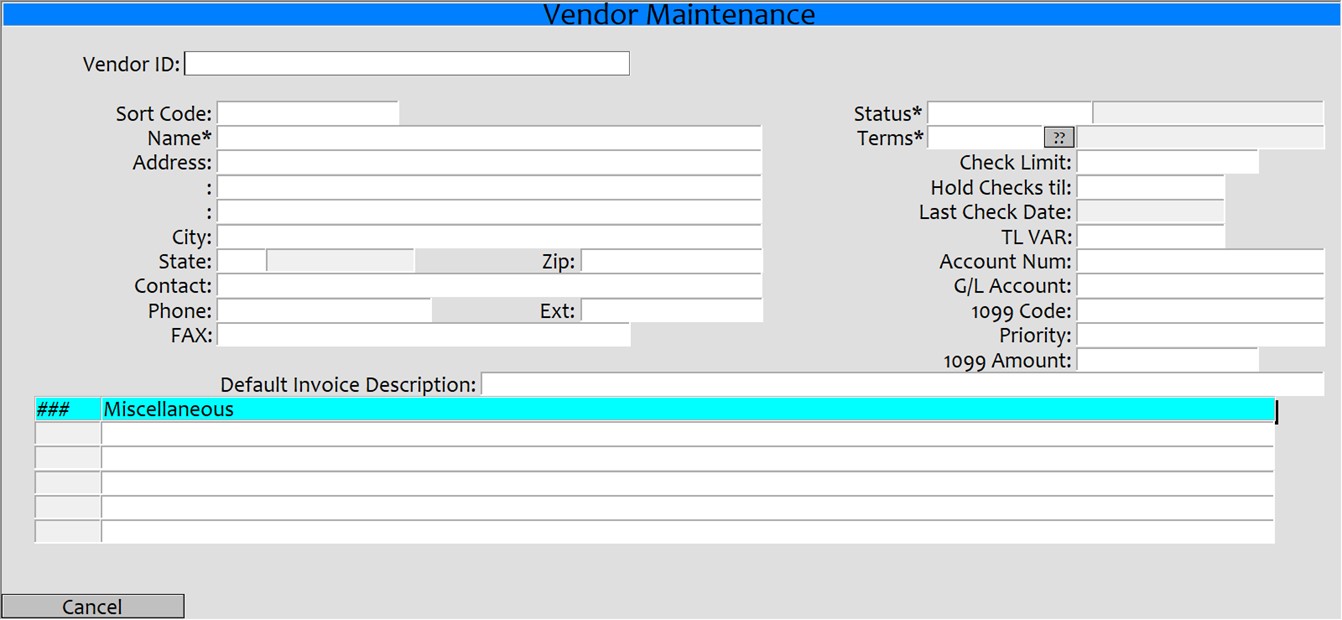
- Vendor ID: Enter a period ‘.’ to create a new vendor or enter 3 or more letters in the vendor’s name to edit an existing vendor. This vendor number will be used in the GM/TX vendor record in the ‘Additional Ordering’ information screen.
- Sort Code: Enter 3 or more letters to use as a sort code for the vendor.
- Name/Address/Contact Enter the vendor’s name, address, phone, contact information.
- Status: This should normally be ‘A’
- Terms: This is normally N30 but can be any payment term that you have created. You can use the ?? button to select from the available terms or from the selection screen you can select the ‘Maint’ button to jump to the terms maintenance screen and create a new one if needed.
- Check Limit: Enter a check limit amount for this vendor or leave blank for normal
- Hold Checks til: Enter a date if you wish to hold checks until a certain date.
- Last Check Date: This is maintained by the system and will list that last date a check was created.
- TL VAR: Enter ‘Y’ if this is a TotaLink VAR, enter ‘YN’ if no checks should print.
- Account Num: Enter in the account number.
- G/L Account: Enter the GL account number that this should be associated with.
- 1099 Code: Enter any 1099 codes for this vendor
- Priority: This will default to 90.
- 1099 Amount: Enter any 1099 information.
- Default Invoice Description: Enter any default description that you would like to display.
- Miscellaneous Enter any miscellaneous information that you would like for this vendor.