GM WEB TAGS
Web-Tags is a new webstore feature that allows customers to filter items within their webstore selections. For instance, if a customer accesses a clothing catalog, they may want to filter the items to only display the items that have the color and size they are looking for.
Web tag categories are the objects a user can select to filter on, e.g. Size, Color or Fabric and include a list of values such as Blue, Red, Large, Small, Cotton, or Polyester to filter on. These Blue, Red, Large, Cotton, etc. options are called tags.
Note: there is no required sequence for creating Web-Tags and categories. You can create a new category first or create the Web-Tags first
Web-tag category maintenance is used to manage what categories a tag is associated with or to.
Here are some naming conventions to follow
- Underscores are converted to spaces DRESS_SHOES = DRESS SHOES
- Special characters should not be used in naming Web-Tags or categories
- Keep in mind, the names of the categories will be displayed as a drop down Keeping the names short will be ideal.
When attaching Web-Tags to a matrix item, the tag needs to be added to the Parent item only, do not add the tags to the child items.
Note: there is no required sequence for creating Web-Tags and categories. You can create a new category first or create the Web-Tags first
Adding a non-existent tag label to a tag category will create the new tag
Adding a non-existent tag category to a tag will create the new category
To use GM WEB Tags you will need to create the Web-Tag categories and the Web-Tag labels.
Log to POS.26.6.1 to enter/modify a Web-Tag Category.
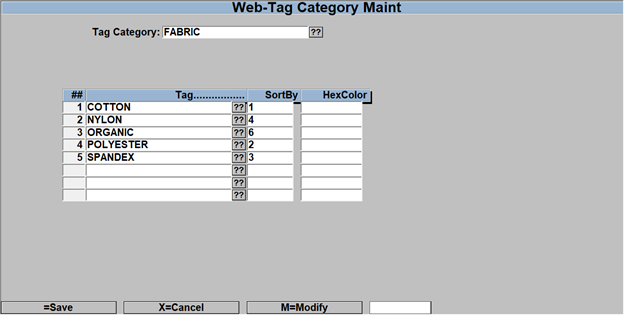
- Tag Category– Enter in the new tag category or select the ?? to edit an existing category.
- A category will be a way to group your tags such as Size or Color.
- You would create the category of Color and then in the next section where you create the Tag, each of the colors you create would be associated to the category.
- TAG– Enter or select the tag to associate to the Tag Category.
- SortBy– Enter a number 1-? to indicate the sequence that you would like to sort them by. This will affect the display sequence within the Webtag/Category filter display. If you leave the ‘SortBy’ field blank then they will be displayed in alphabetical order.
- HexColor– If this is a color associated field then you can enter the ‘HexColor’ code to help identify the color. You can only enter the ‘Hexcolor’ if the Tag Category is COLOR.
The color will be displayed when you click on the color tag on the web site. The ‘Hexcolor’ will only be displayed if the Tag Category is COLOR, otherwise the swatch will not be displayed.
Log to POS.26.6.2 to enter/modify the Web-Tag Tag Maintenance.
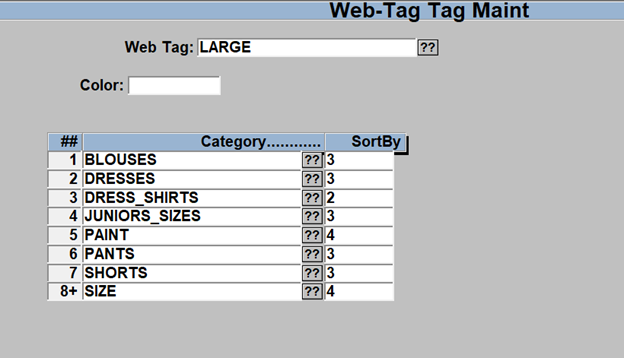
Web-Tags -these are going to be the options that you can click to filter items in the webstore
- Web Tag– Enter/modify the web tag label to use. (If a tag already exists that tag information will appear)
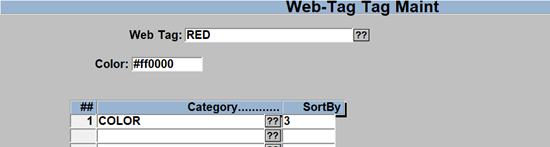
- Color field– Enter the color code if this is associated with a color. The color will be displayed when you click on the color tag on the web site. Entering the ‘hexcode’ in the Color field display the color swatch next to the color name as seen below.
-
- If you have entered a Tag in the Tag Category Maintenance, then it will be available here and it will display the Category that it was assigned to.
- You can also set the ‘SortBy’ attribute which is the order in which the tag will appear in the dropdown menu. If left blank the webstore will simply sort by alphabetical order.
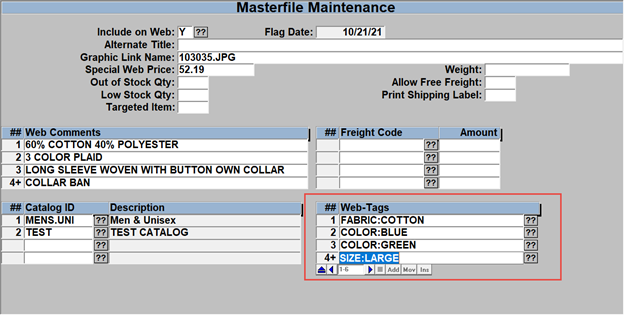
Adding Web-Tags to GM items.
Now that the tags have been created, you will need to go to GM > MF to add the tags to the items.
- Log to GM.MF, enter a SKU that you want to add the web tags to.
- Select W=Web to go to the web maintenance screen.
- You will see a new section called Web-Tags.
- Select the ?? to display the list of tags and select the one you want to add to this item
- Repeat for each of the tags you wish to add to this item.
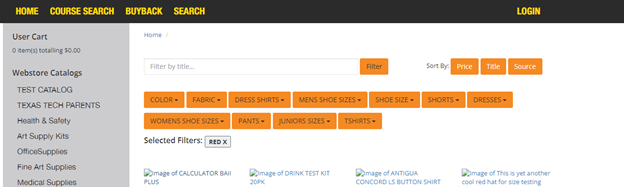
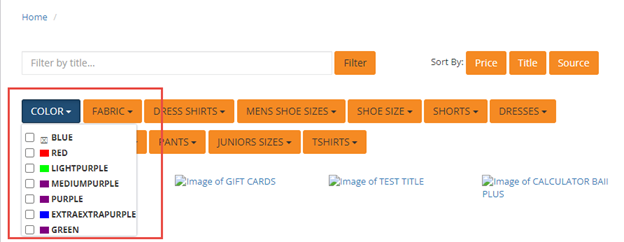
When you go to the website, and after you select a catalog on the left, you will then see the tag categories that you can click and select to filter the results by.
Selecting multiple filters will result in only displaying the items that meet all the filters selected. If you do not see any results, then remove some of the filters that you have selected.
it will aggregate filters within a category then filter down when you select a filter in a different category
So, if I select 4 different colors, it will show me all the items that have any of those colors, but then if I pick a size, it will show me the items of that size that are any of the 4 colors. So, if I choose medium, it will show the mediums that have any of those 4 colors