Tech Update March 2022
Updated User and Cashier Maintenance have been combined into one screen.
Tech Update February 2022
Click here for e-book only documentation for Textbooks
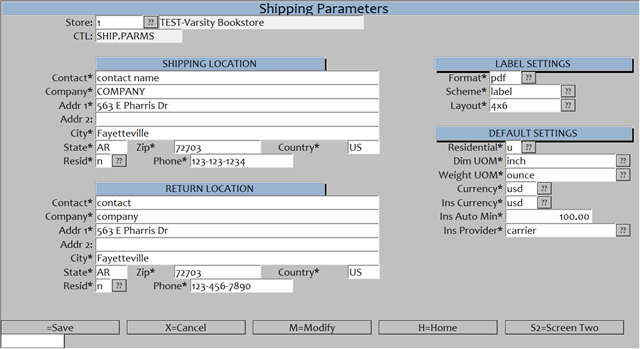
ShipEngine parameters can be found here. Also note you will need to setup a ShipEngine account
Tech Update October 2021
Web Order Subject Line:
For detailed instructions on customizing the subject like for your Wed Orders, Click here.
Textbooks new export features:
Click here for feature details and in-depth documentation.
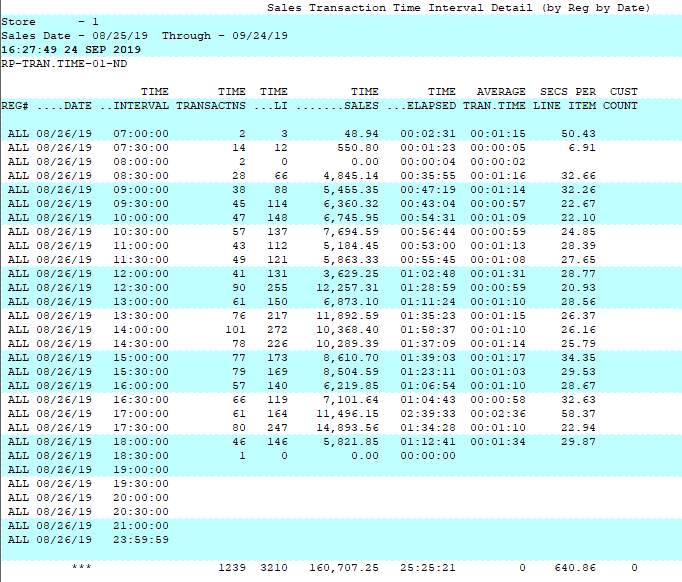
Setting up Reprint-X report in Point-of-Sale:
You will need to add the below Transaction Type to your system.
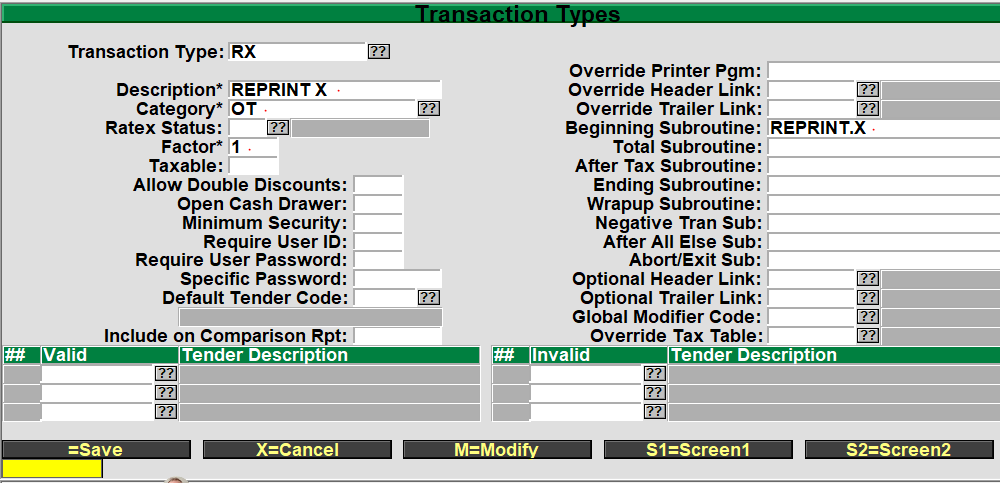
Path: POS > Transaction Parameters > Transaction Types
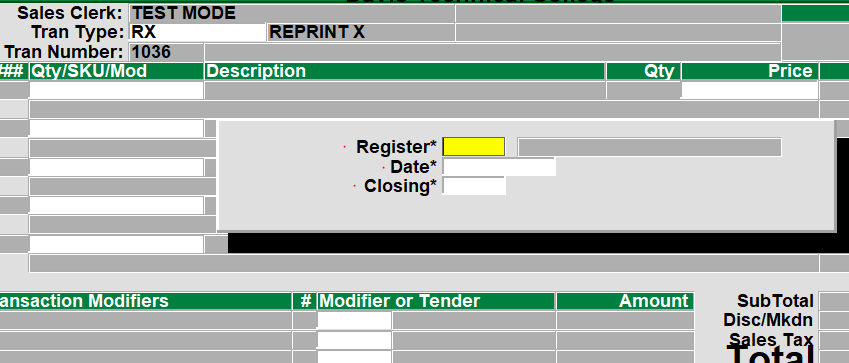
When using the new Transaction you will be prompted for the below. *all fields are required
Tech Update September 2021
RedShelf Import detailed Instructions
Automated details for importing can be found here
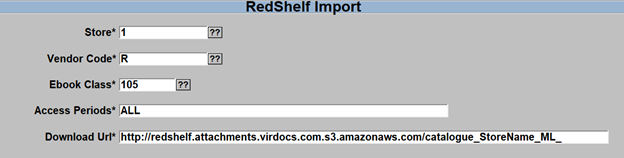
- We have added new features to the RedShelf import processes that allows you to easily import your book-list:
- Copy and Paste your download link
- Auto import new titles
- Auto remove stagnant titles
- Auto rebuild cross references
- Only updates Shelf Tag labels for only items that have changed (Updated Shelf Tags)
Tech Update August 2021
Print on Demand
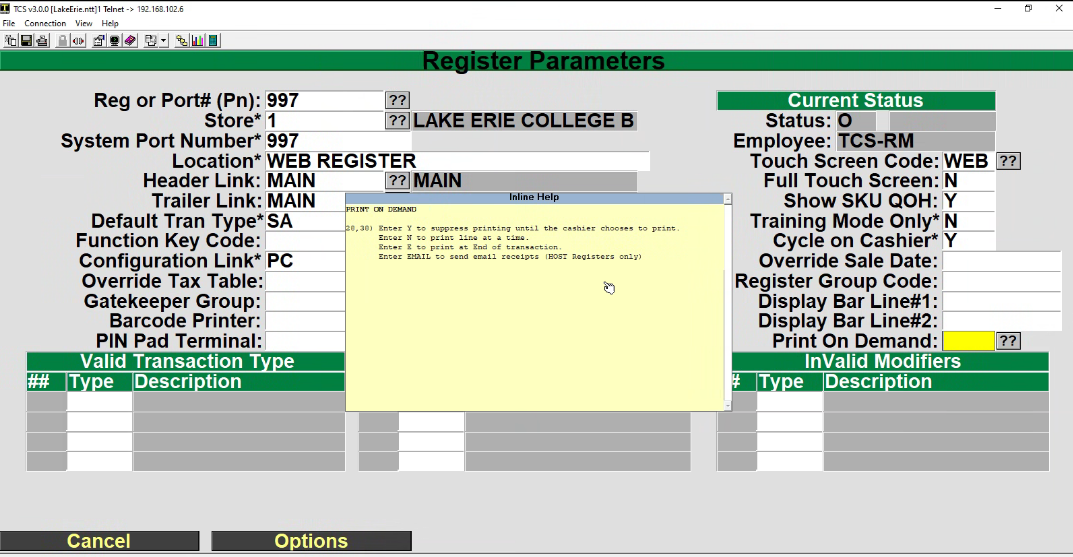
For detailed instructions for Printing on Demand see Register Parameters
Tech Update April 2021
TotaLink
Setting Time and Date on Ingenico Devices
IPP320 and IPP350 Ingenico Devices
• Press F, 7, 6, 7 on the device’s number pad to access the Bolt S.O.S. menu.
• Press F2 to navigate down.
• Press F3 to navigate up.
• Press O (green button) to select.
• Press < (yellow button) to clear.
• Press X (red button) to cancel or return to the main menu.
ISC-250 Touch Ingenico Devices
• Press +, 7, 6, 7 on the device’s number pad to access the Bolt S.O.S. menu.
• Press + to navigate down.
• Press – to navigate up.
• Press O (green button) to select.
• Press < (yellow button) to clear.
• Press X (red button) to cancel or return to the main menu.
iSMP4 Ingenico Devices
• Press F, 7, 6, 7 on the device’s number pad to access the Bolt S.O.S. menu.
• Press F1 to navigate left.
• Press F2 to navigate down.
• Press F3 to navigate up.
• Press F4 to navigate right.
• Press O (green button) to select.
• Press < (yellow button) to clear.
• Press X (red button) to cancel or return to the main menu.
Tech Update March 2021
TextBooks
Remember with spring break just around the corner:
- Create your Summer and Fall terms now
- Set up and prepare your web faculty adoption notifications
Buyback
Remember to update the buying guides you plan on using this summer and fall for buyback with the latest versions.
If you or your staff are not receiving buying guide updates and you would like to receive these please email support@total-computing.com.
General Merchandise
- Added the ability to copy cost and sale prices to any store’s inventory
- Added the ability to update an item’s costs from a single store to all other stores with the same inventory item
Tech Update February 2021
WebStore Update
Added POP-UP ability to promote discount codes and coupons for your WebStore

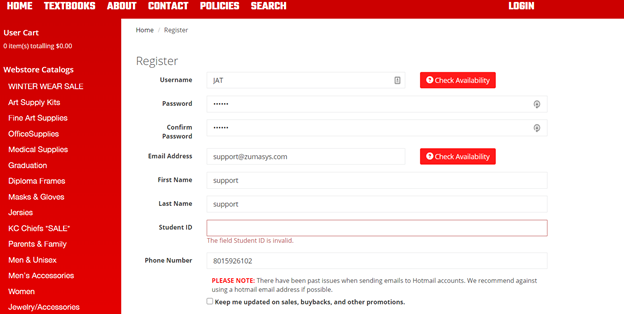
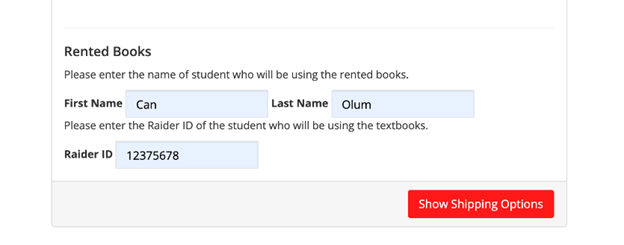
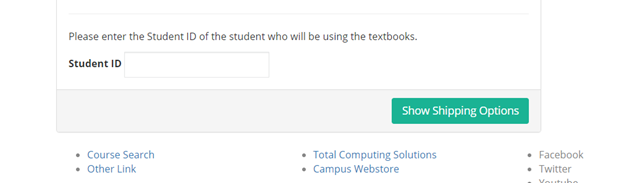
Student ID’s
Force Student ID for websites with rental textbooks
Once set, web customers will be forced to add Student ID when creating a new account
*All existing accounts will be prompted to add their ID at checkout if a rental item is in their cart
*Custom language can be added to your site for school spirit and branded ID’s
Point-of-Sale Update
Add Image To a Fee Code
To add an image to a Fee code which will display online
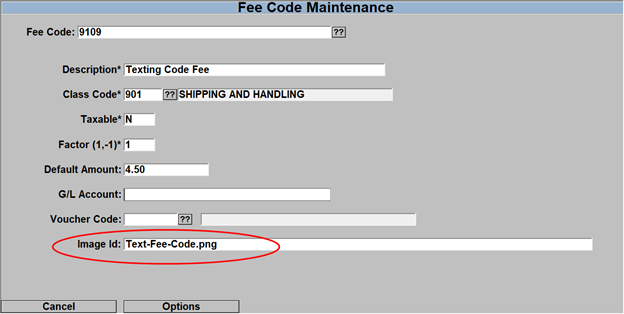
- Log to POS.22.23 “Fee Code Maintenance”
- Enter the Fee Code
- Enter the image file name in the Image Id: field just like you would enter the image name in the GM-MF image name
- Upload the image the same as you would a GM image.
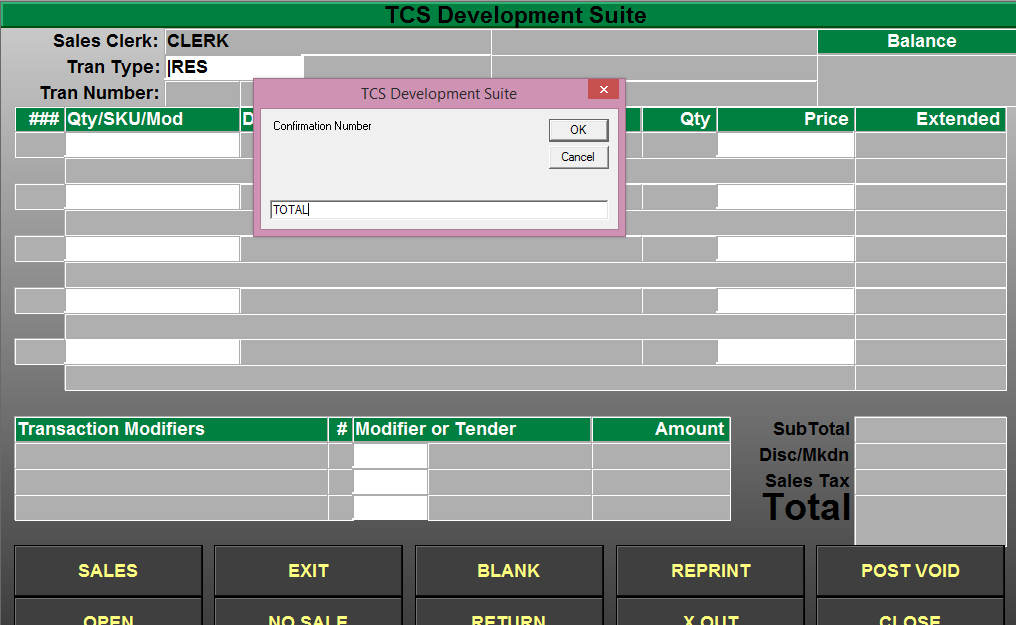
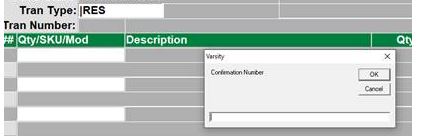
Web Order Confirmation Status Display
To view the current status of a customer confirmation number
- Log to POS.26.26 “Web Order Status”
- Enter in the confirmation number

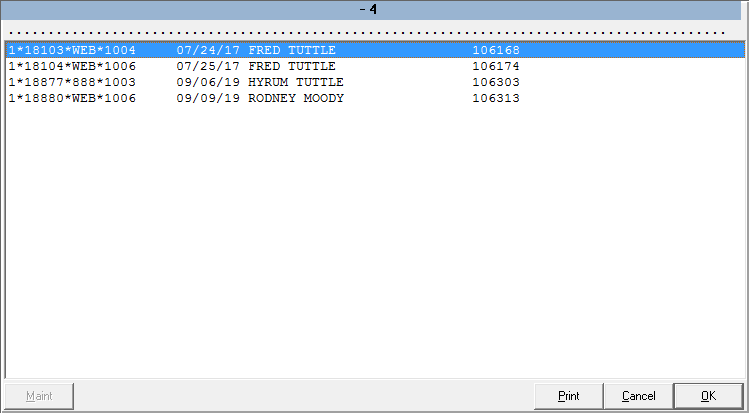
- You will see 3 columns, ‘Open Order’, ‘Closed Order’, ‘Associated Sales’
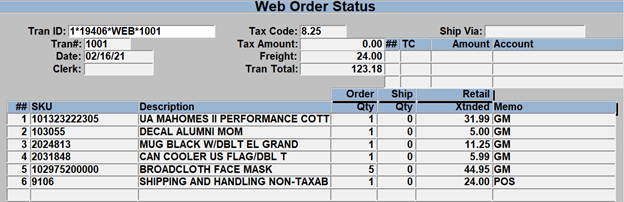
- Open Orders will display the open order, select O=Open Orders and then the line number with the confirmation # to see detailed information about the order.
- Closed Orders will display if the order has been completed or if it has been deleted. If you select that option, then it will display the information from the original order.
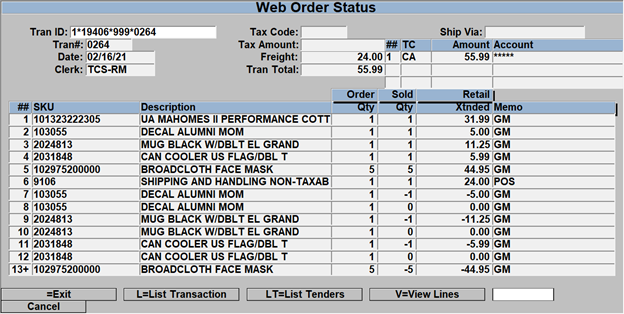
- Associated Sales will list all of the ‘Sales’ that are associated to the confirmation number, so if the customer ordered 5 items and each item was sold on a different register transaction then there would be 5 associated sales. Select the S=Associated Sales and then the line number to view detailed information about that transactions.
Rental Customer Information Lookup

When you look up a customer for rental or for rental drop off you will see some additional information on the search display screen.
- If a customer record has ever had a rental, then a ‘Y’ will appear under the “Rnt” column
- If the customer currently has a rental that has not yet been returned, then a “*Y” will show, again, this is to indicate that the customer record currently has an outstanding rental
Tech Update 1-27-2021
We are proud to announce a new support process that will begin on February 1st, 2021. We are shifting from our current ShowMyPC support tool to our new ScreenConnect service. ShowMyPC sessions will no longer work and the desktop shortcuts should be removed. This means there will also be changes in the process of getting remote access to assist you.
- Support agents will initiate the session; customers will no longer be able to start a session preemptively
- You will then browse to http://support.total-computing.com on the machine that requires assistance
- Don’t be alarmed when you are redirected to our Zumasys branded support portal
- This website can be bookmarked in your favorite browser for future use
- We can also setup a shortcut on the desktop to open the website once we have a session on your machine
- The support agent will share the session code for you to enter into the “Join with a code” field on the website
Run/Open the client that is downloaded to complete the connection
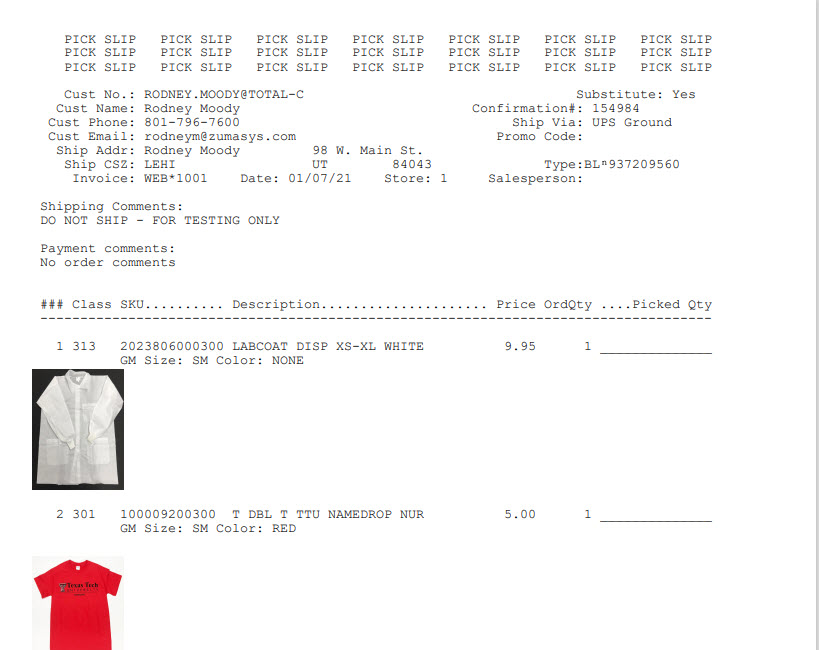
Added the ability to show images on Pick Slips
The image will be pulled from the same location that your website images are stored in. Pick slips will be emailed to a set email address as a pdf so that you can reprint them if needed. *Contact Support to have this feature setup
Setting up Rental Parameters: POS-27-21
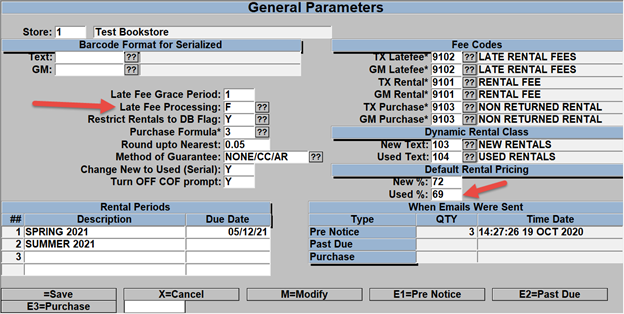
The new features here allow you to set your late fee processing type as either a Flat fee or a Daily fee, With the Flat fee, whatever flat fee you set on the item rental master then that is the fee that will be charged regardless of the number of days late. With the Daily fee, the customer will get charged the late fee on a per day basis, the more days late the larger the late fee.
Rental Late Fees
You now have the ability to allow the system to auto calculate the new and used rental prices using different default percentages, you still have the ability to override the auto calculated prices whenever you wish.
POS-27-21-1
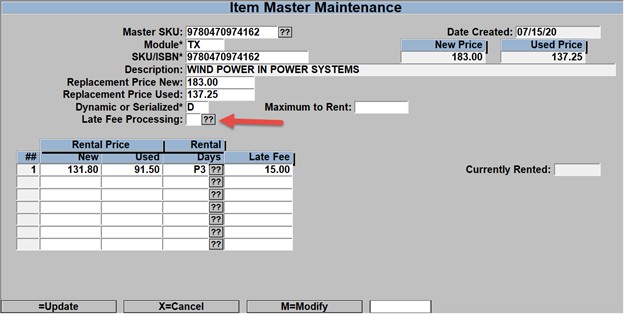
Added Late Fee Processing override option, this will override the Late Fee Processing
Rental Customer information lookup display

looking up a customer for rental or for rental drop off you will see some additional information on the search display screen.
If a customer record has ever had a rental then a ‘Y’ will appear under the “Rnt” column, if they currently have a rental that has not yet been turned in then a “*Y” will show, again this is to indicate that the customer record currently has an outstanding rental.
Mass Update Replacement and Rental Price
POS-27-24-21
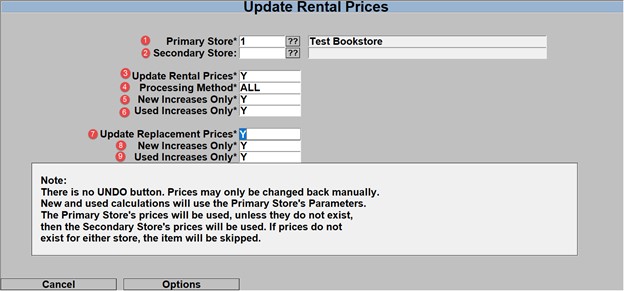
- Enter your Primary store
- Enter a secondary store if you have multiple stores
- Enter a ‘Y’ if you wish to update the Rental Prices using the rental percentages set in POS.27.21, If you enter an ‘N’ then the next 3 fields will be skipped.
- Enter the Periods that you wish to update,
- You can enter P1 (or any other P# option) if you only wish to update the rental price for the titles that have P1.
- Enter a line number, such as 1, if you wish to only update line 1 for each rental title master.
- Enter ‘All’ to update the rental price for all of each title’s rental line options.
- Enter ‘Y’ to only update the new rental price if there is an increase, ‘N’ will update the price if it goes in either direction.
- Enter ‘Y’ to only update the used rental price if there is an increase, ‘N’ will update the price if it goes in either direction.
- Enter a ‘Y’ if you wish to update the ‘Replacement Prices’. This is used when the TX New/Used prices have increased. You should run after you have seen a lot of price increases, Price increases in TX do not update the rental prices. If you enter ‘N’ the next 2 items will be skipped.
- If you only wish to update New replacement prices if there is an increase then enter ‘Y’, otherwise enter an ‘N’ and it will update for increases and decreases.
- If you only wish to update Used replacement prices if there is an increase then enter ‘Y’, otherwise enter an ‘N’ and it will update for increases and decreases.
Tech Update 12-30-2019
Rush Preparation
Close all previous Terms (TX-SU-1-2-2)
Update your Buying Guides (TX-24-21)
Sync your Registers (SL-2) (POS-6-2) Video
Verify your Rental Periods (POS-27-21)
GM End of Period Processing (GM-23)
Webstore Featured Catalog
Setup your catalog to be “Featured” during checkout. (POS-26-2 7.a)
Textbook Discounts
Textbook discount exclusion (TX-MF)
Tech Reminder 11-26-2019
Smartsuite
Detailed Documentation and links in the information below.
*note you much be a registered user to view documentation. If you are not a registered user please register using the top-right login options on this page.
Closing a Term
- Make sure that close any open terms that are no longer in use. This has the potential to of applying inventory needs to the wrong term for the purpose of ordering, wantlisting and reporting.
Rentals and Buyback
- Setting up your estimated rental returns.
Auto Calculate Rental Inventory – TX.2.30.1
Rental Inventory Entry (Make sure you run the Auto Calculate process first and then the manual process for the exceptions) – TX.2.30.2
Buyback preparation
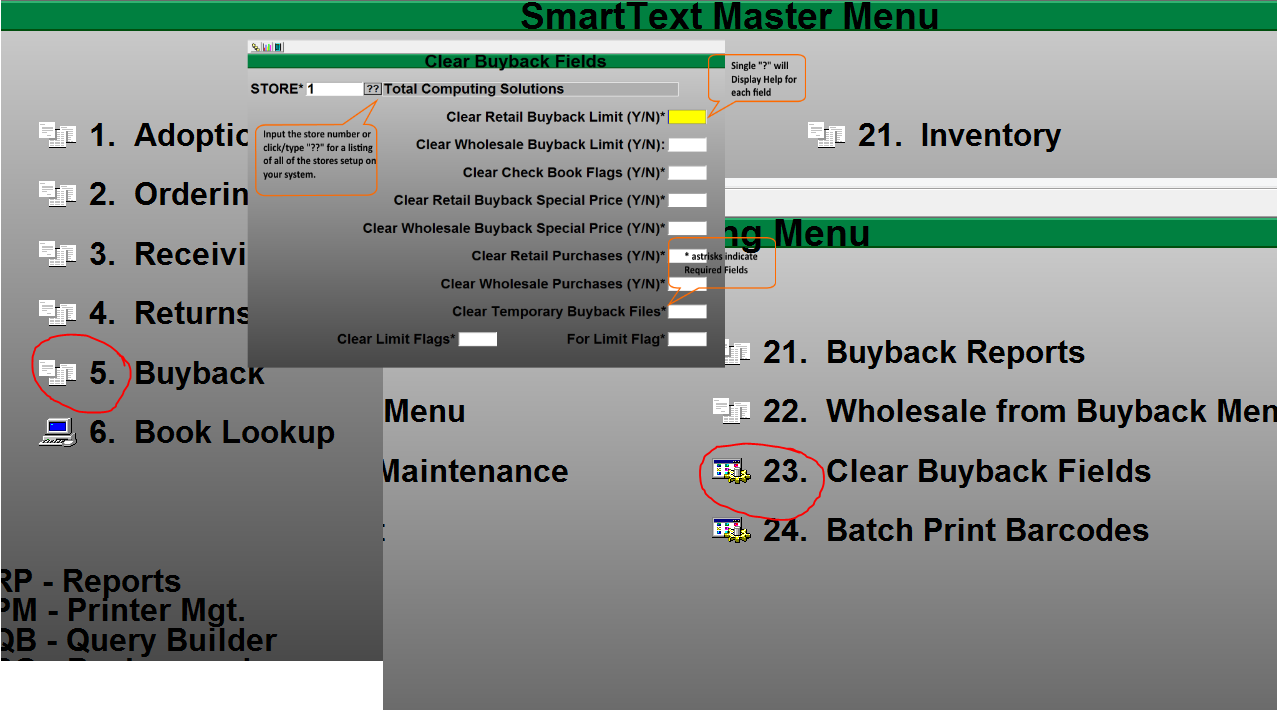
- Make sure you clear out any previous custom parameters for your buyback.
- Buyback Limits
- Book specific flags
- Special Price
- Purchases
- Limit Flags
Buying Guide Update.
- It is so important that you have loaded and are running the latest buying guide.
Instructions on loading the latest buying guide can be found here.
Updating your Textbook Inventory Average Cost.
- When you have completed your buyback make sure that your average cost is recalculated.
Tech Update 10-07-2019
Fixes
Text Books
You have the ability to lookup ebooks from the Master File by any of the following
*this update also applies to the Point of Sale lookup/search
- Digital ISBN
- Print ISBN
- ebook SKU
- Traditional ISBN
- Addressed the synonym problem when the Digital and Print ISBN are identical when your ebooks are imported
Enhancements
General Merchandise
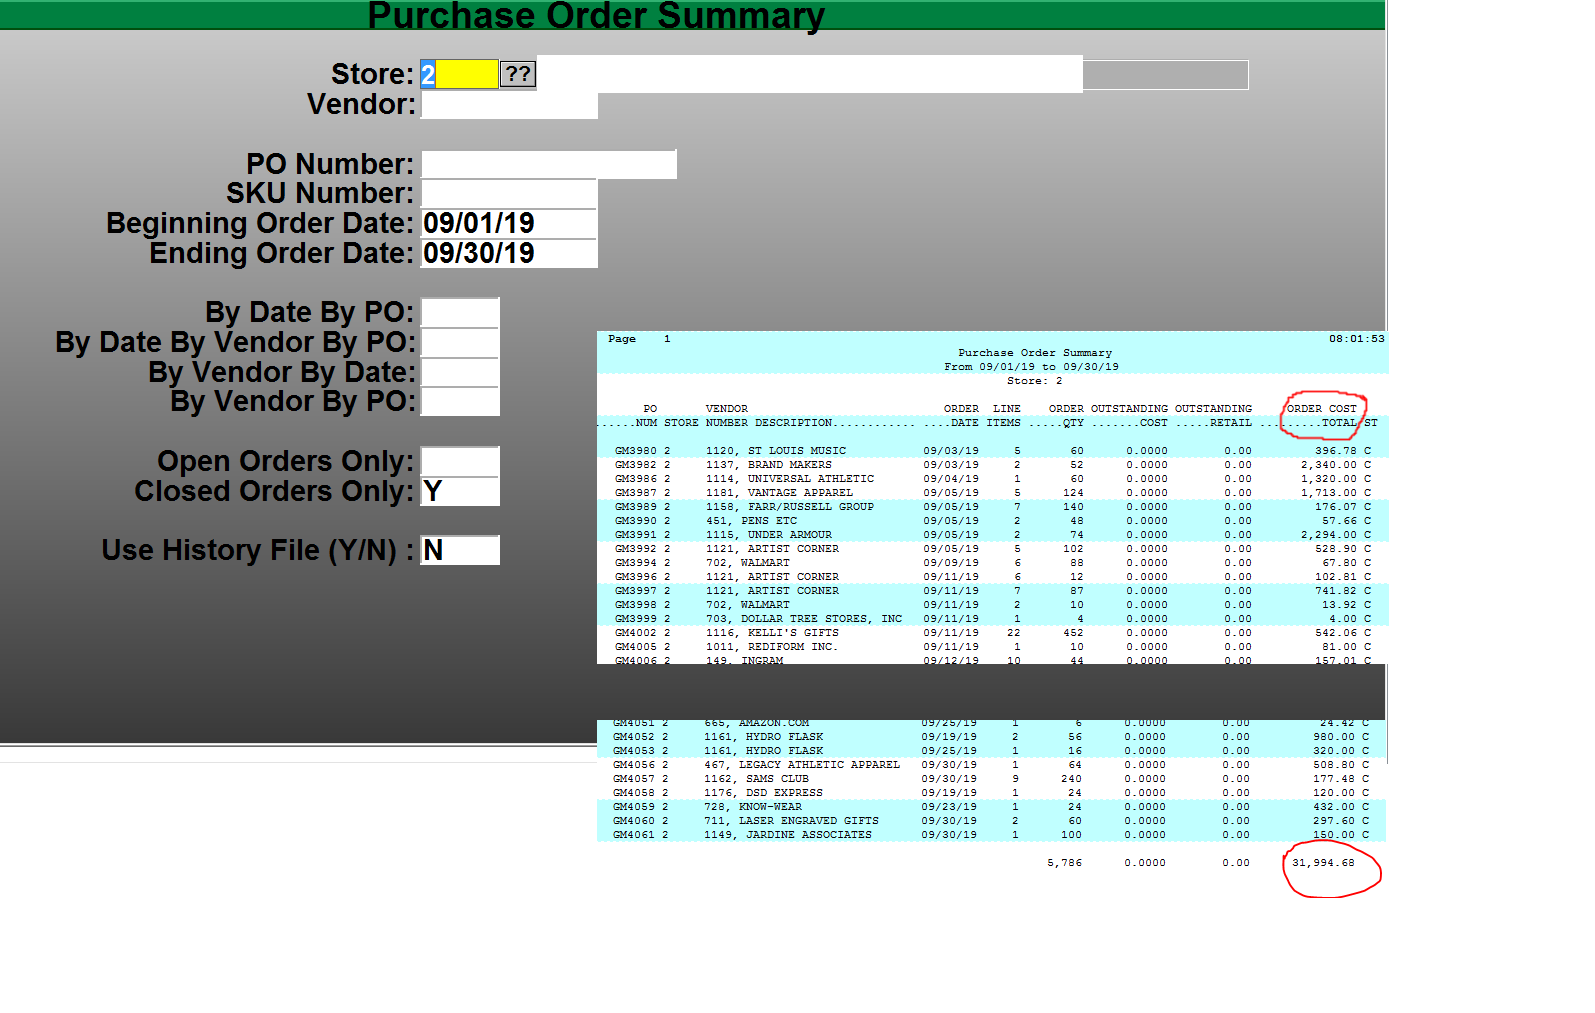
- Added a new column to GM-RP-3-1 Purchase Order Summary to include the Cost Total in the report for each PO
Totalink / Credit Cards
TCS is releasing into Beta the latest version of our credit card Totalink software.
The new version of Totalink includes.
- Enhanced communication with new Payment Gateways and Card Readers
- Ability to share card reading devices between POS stations and/or Workstations.
- Eliminates many PCI requirements
*Look for the production release dates before the end of year
Windows 10 Upgrade
We’ve created an article that covers how to determine the version of Windows running on a register, if that register is a valid Windows 10 upgrade candidate and what the upgrade process will entail. You can access that article through this link.
Tech Update 10-23-2019
Fixes
- POS; Resolved the issue with ebook transactions when you aborted a transaction where a partial payment/split tender or a decline of a credit card would generate Activation Code from Redshelf. This fix allows for a clean Exit/Abort of the transaction undoing the Activation Code that was generated by a partial approval.
- This issue stems from the architecture of the ebook interface and how Activation Codes are generated and when they are created. TCS verifies and gets the Activation Code Prior to Tender select, this can cause a problem when partial payments, declined cards and split tenders are used when the Cashier or Customer decides to Abort or Exit the transaction.
- POS; Resolved the issue of POS Fees being place in the GM source file when the transaction was generated from the webstore. This resolves issues in reports that use the POS Fees Type. POS-RP-1-22&23 Details and Summary
- GM; Removed the canceled PO’s from the Open PO List. GM-RP-3-1&2
Enhancements
- POS; Class Comparison Report now automatically includes transactions that have been moved to history. This allows traversing current and historical files without being prompted. POS-RP-1-3-21 Report Menu Path
- GM; Added the prompt to allow you to select which store in the Open Orders Report. GM-RP-3-1
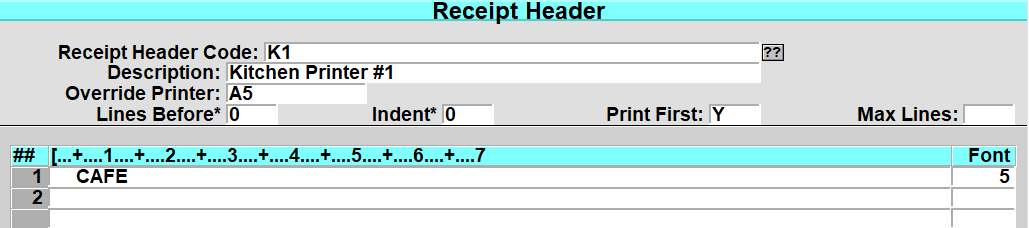
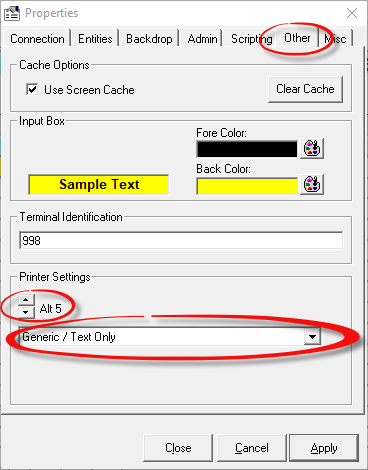
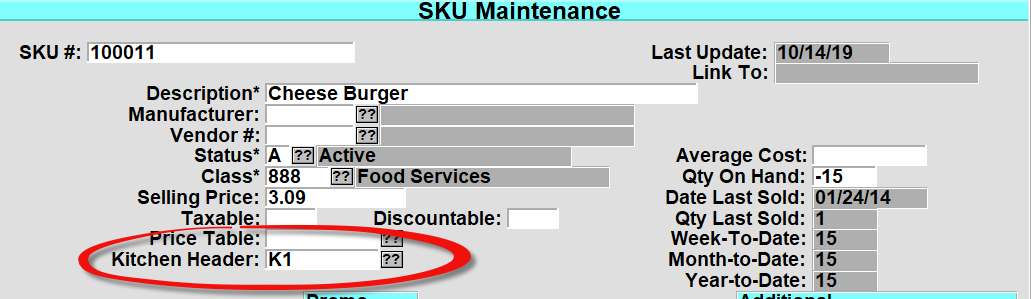
- POS; Kitchen Printer, This allows for Dinning/Food Services/Cafeteria users print to printers located anywhere in the facility in addition to the Cash Register Receipt. These Receipts can be duplicate receipts or they can be configured to contain any transaction information for employees. Updated Documentation found here *note in the current setup the sku must reside in the POS account for location printing.
Buyback Preparation
There are several things that you can do ahead of time to help setup a smooth buying experience.
Make sure that you go over all of the preparation and test before your first day of Buyback.
- Update the Wholesale Guides you are planning on using this season. *Details for loading and setting up guides can be found in the Main Text Training Document here.
- Clearing out previous buyback “Flags” *note that buyback isbn specific flags stay in place until they are removed. *Detailed Documentation found here
- Verify your Buyback Season Codes and dates. *Detailed Documentation found here
- Verify your default Wholesaler and any additional alternate Wholesaler has been setup. *Detailed Documentation found here
- Close all of your open terms that you are through with *Detailed Documentation found here
- Verify your calendar dates for Buyback *Detailed here
Tech Update 10-10-2019
Enhancements
- POSConnect Datatel Financial Aid Checkout
If you are a POSConnect Retail Customer contact TCS Support on setting up your real-time Financial Aid Online Checkout
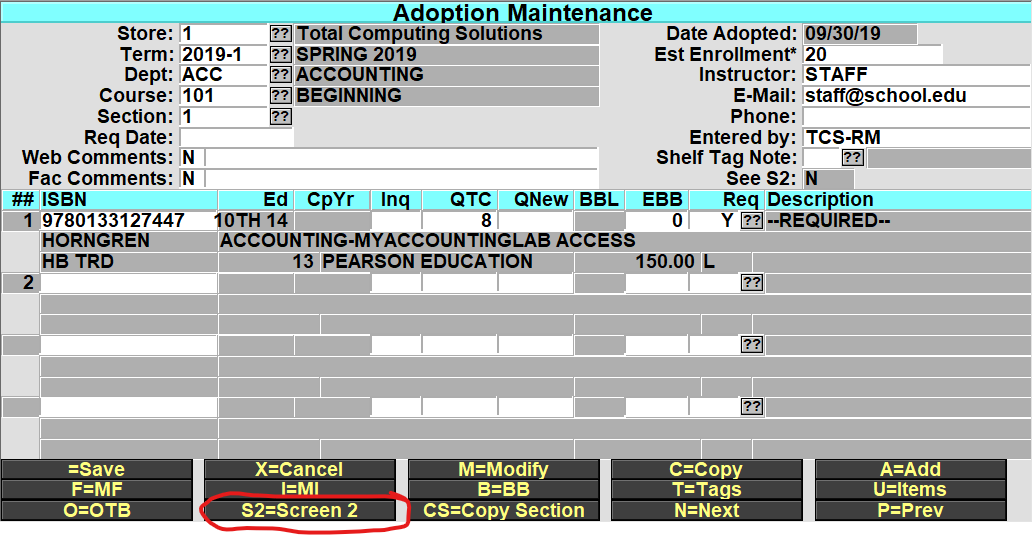
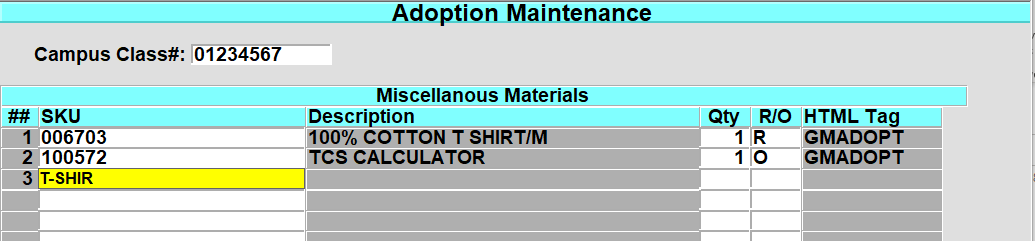
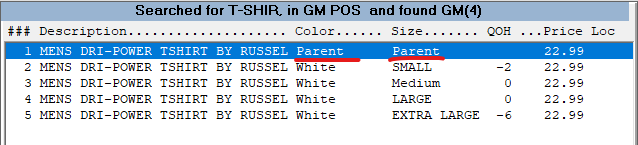
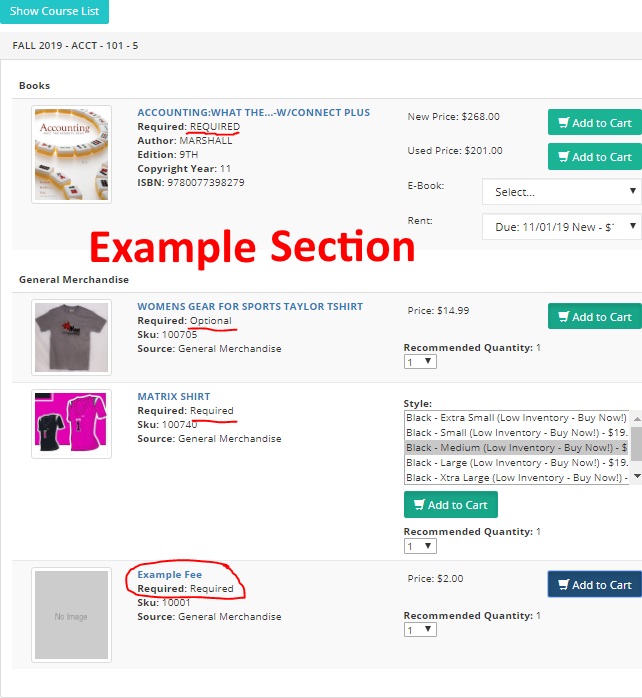
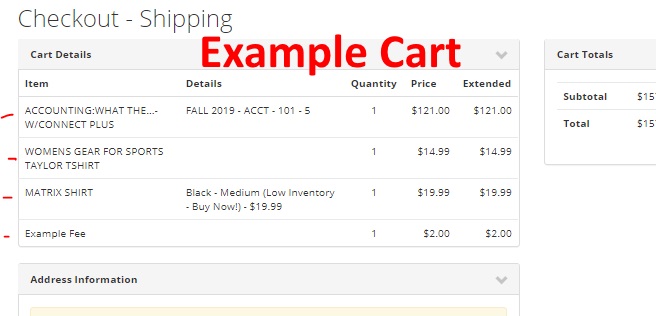
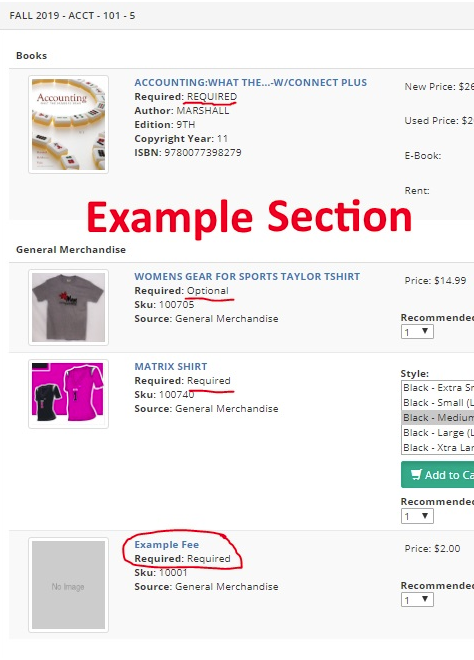
- Adopting GM Items and Fees into your Courses.
You now have the ability to add unlimited GM items and Fee codes to your online Course Adoptions.
You can control the GM items and Fees through your regular adoption process. See the updated training documentation for details on setting up and using this new feature here
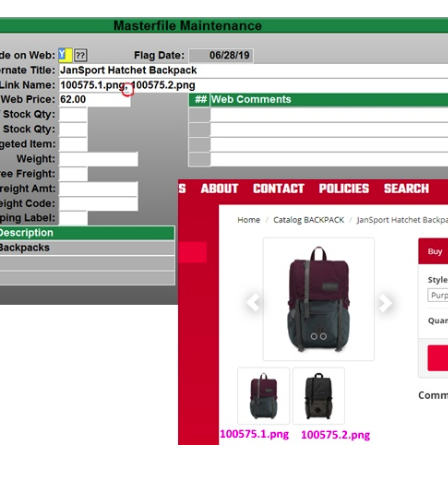
- You can add multiple images to your online inventory. Instructions
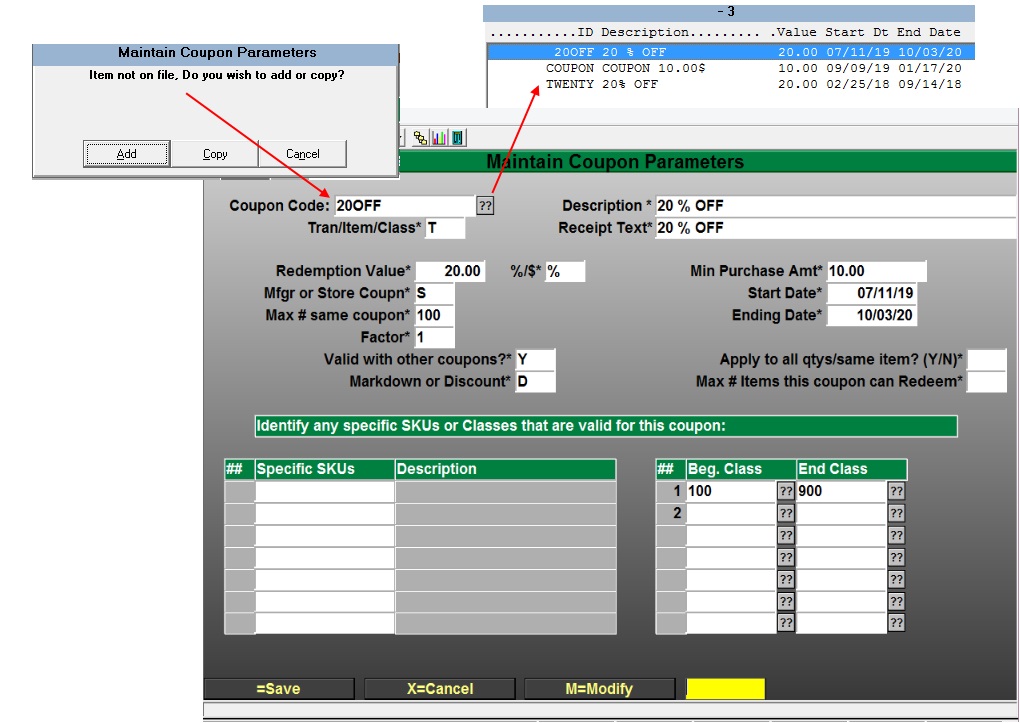
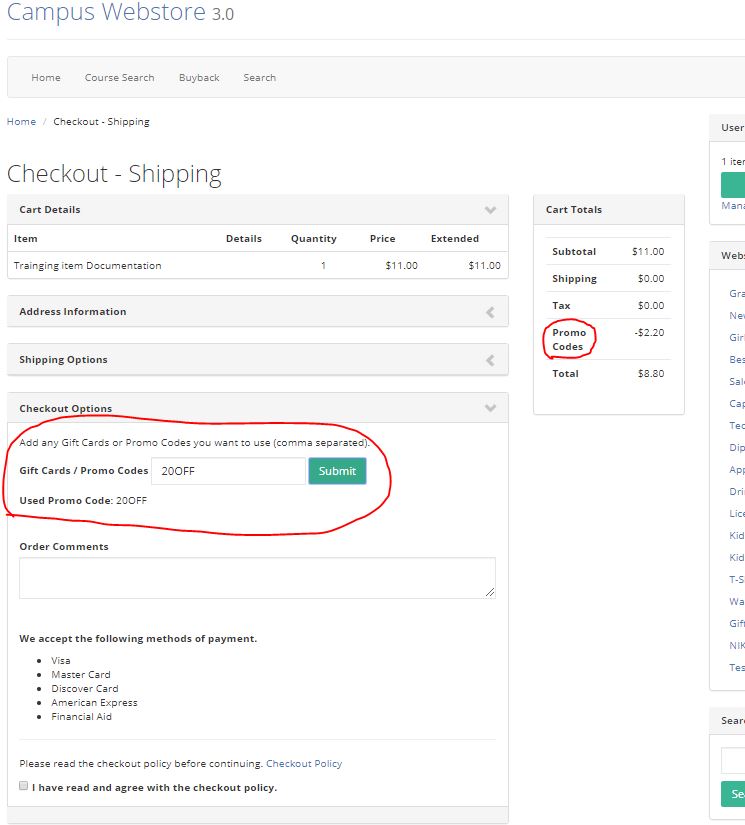
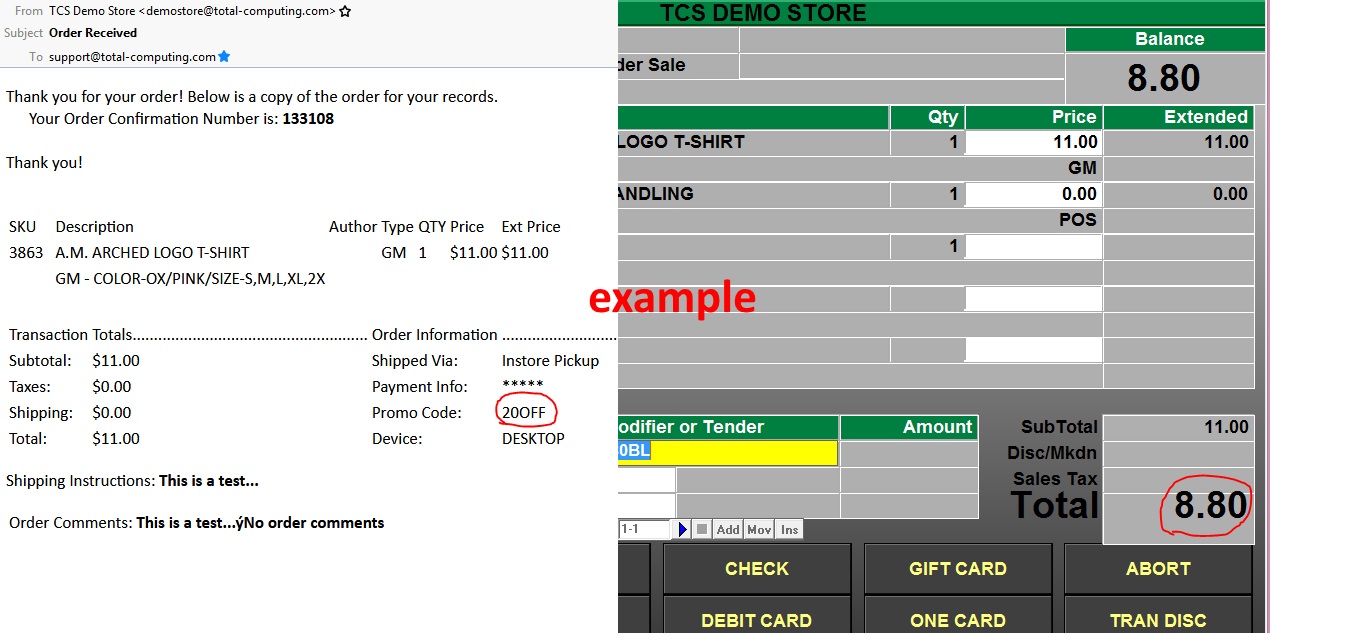
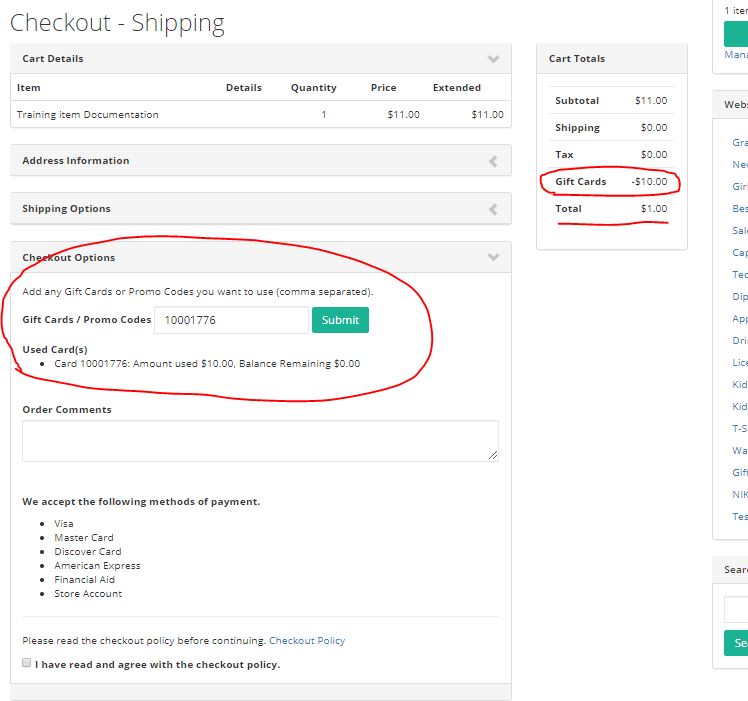
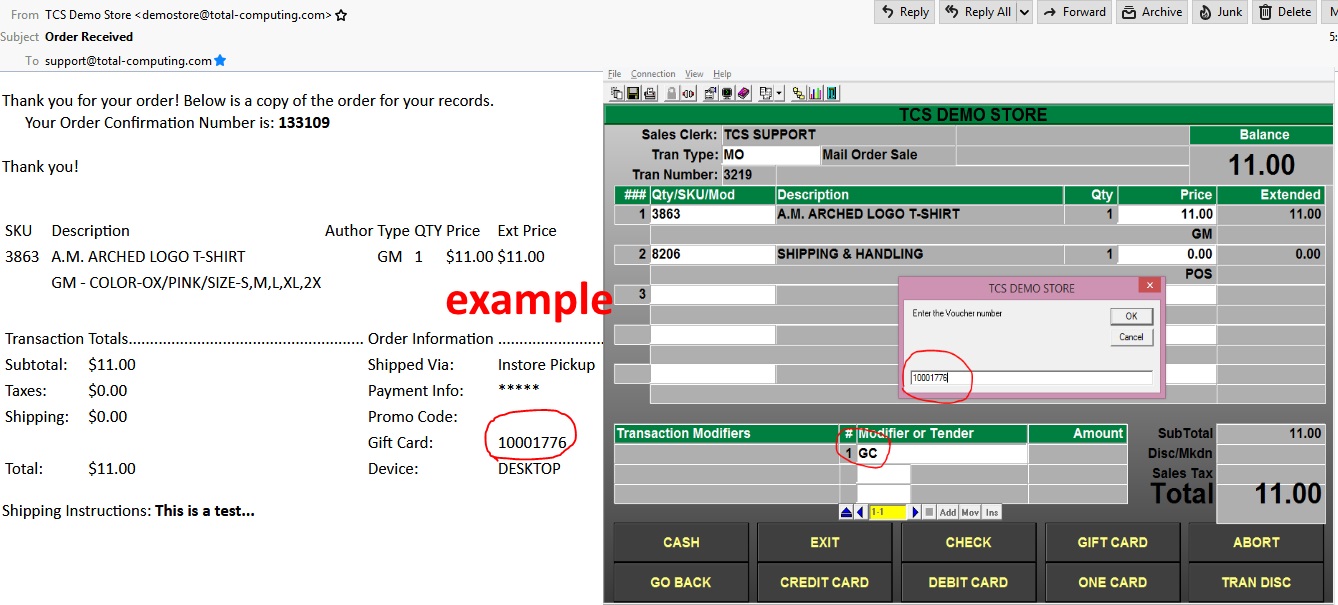
- Coupons, Promo Codes, Vouchers, Gift Certificates and Cards
Refined our checkout shopping cart process for using multiple types of Promo Codes and Vouchers. Allowing users more control to setup what Classes of Inventory, Specific items and Transaction level controls. Instructions and Documentation.
Tech Updates 09-25-2019
Redshelf Returns and Voids are now working correctly within Redshelf.
Enhancements
Printing Pickslips
- In POS.26.13 (Print Pickslips) the ‘Status’ has been modified to have a ??or// button/key. A new option of O,E has been added. This new option will print any un-printed orders regardless as to whether or not it has an ebook only title.

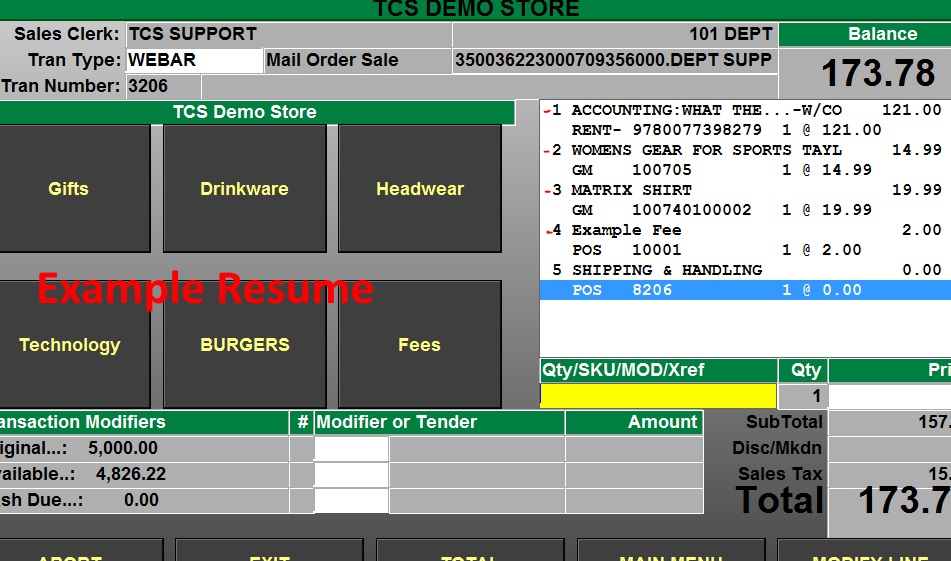
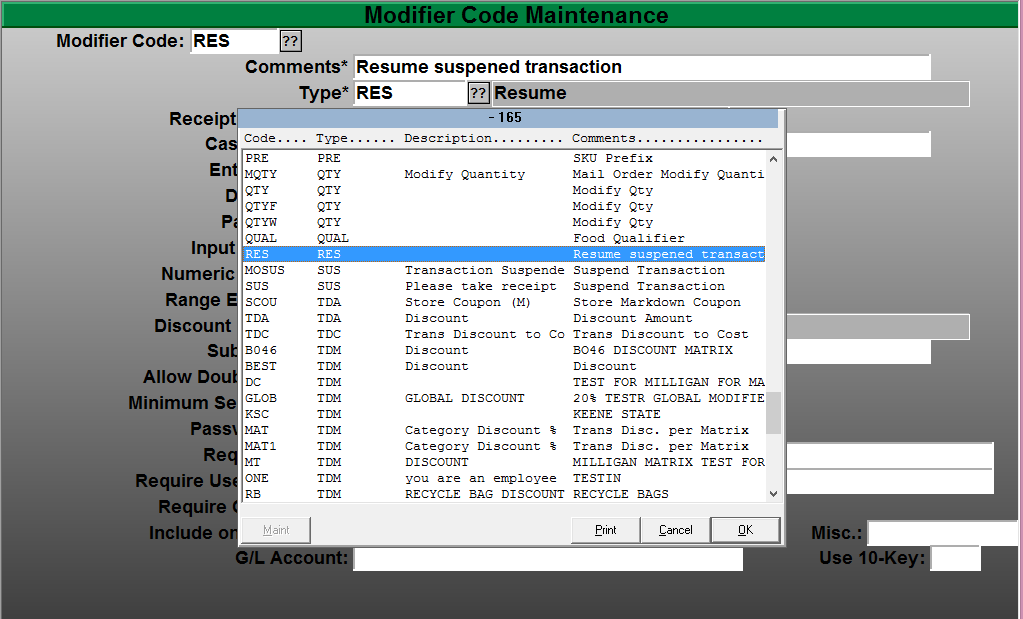
Ecommerce Resume Search Enhancement Web Orders.
- Web orders are now easier to resume via a new search function. Starting a web order will display a prompt that will bring up orders based on the order number, customer name, email or phone number (xxx-xxx-xxxx). The old scroll list can still be accessed by just pressing Enter at the text field.
Instructions for setting up and enabling Web Order Search are be found here.
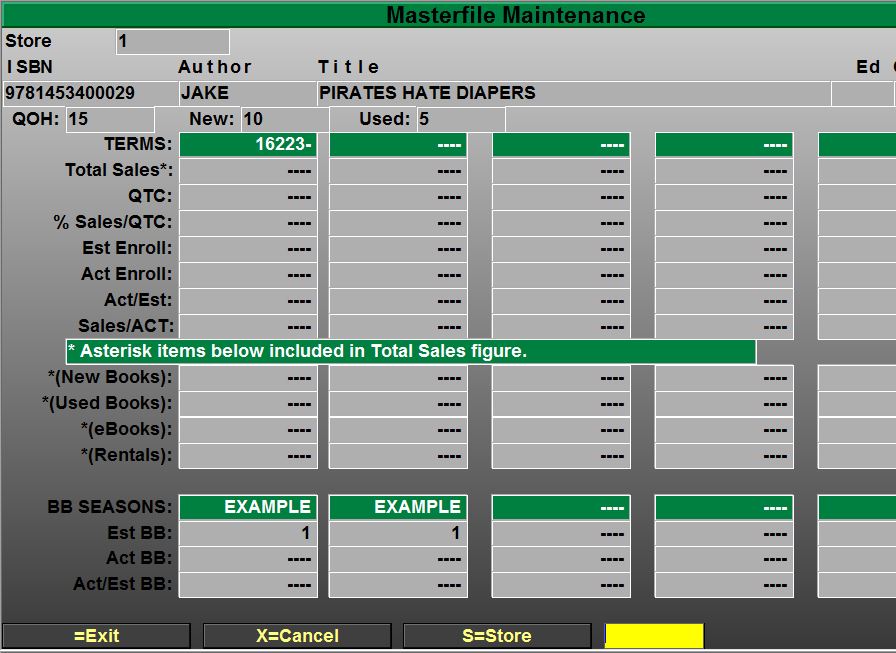
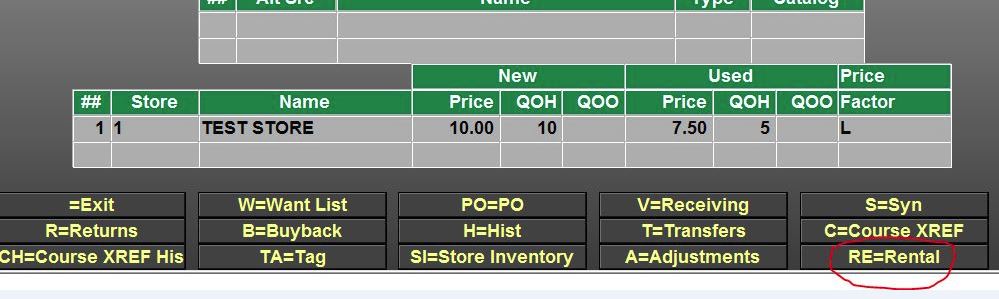
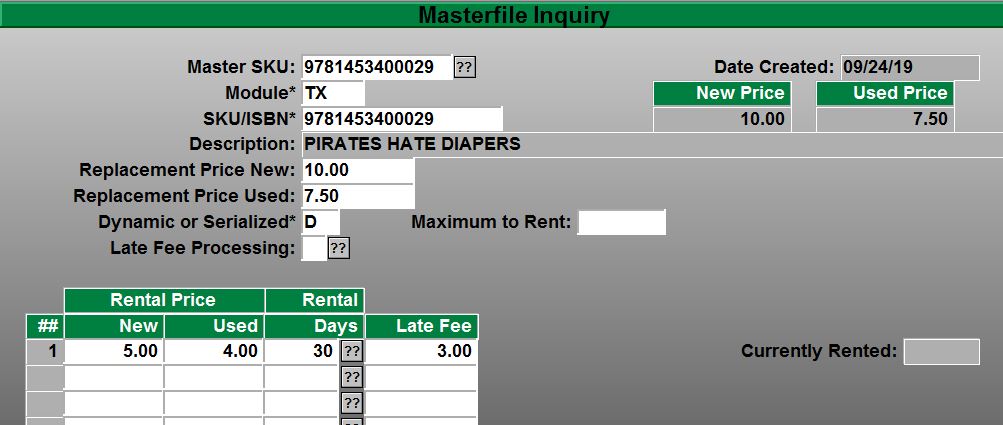
Rental Inquiry screen
- Customers have stated concerns about the locking of records when looking at the MF for Rental Record information. We added the ability to look at Rental information through the “Master File Inquiry (MI)” Menu instead of accessing rental information through the “Master File (MF)”. The new option in the MI screen is “RE=Rental”
Sales History
- We have added the ability to view the Sales History from the MF screen with SH=Sales History button, made changes to the default Sales History in the Master File to use the users default store. You will still have the ability to browse between your store locations if you have permissions.