Touch Screen Menus and Buttons

This article will cover how to modify the touch screen buttons and layouts used in the transaction screen. It will also go over how to create new screens, how to assign those screens to specific registers, and how to find the various fees, modifiers, and other values that a button can have.

A couple points of interest before digging in:

  1. You can view or re-assign the primary touch screen in use at a register by going to Main Menu-5-3-1 or POS-3-1 on the host for host based registers.
    1. Enter the register number you want to view
    2. Check the top right hand area for the Touch Screen Code field. The value of that field is the primary screen for that register. Note that the field could be truncated. Clicking in the field and highlighting it typically displays the entire value.
    3. Assigning a screen to that field makes that assigned screen the primary screen.
  2. Changes to screens should always be done on the host
  3. Changes made to a screen will affect every register assigned to use that screen
  4. Any updates made to any touch screen will not reflect on a register until:
    1. That register is up to date with the host communication in POS-6-2
    2. The cashier leaves the transaction screen to the main menu, then chooses 1. Cash Register to go back into the transaction screen.
  5. Secondary menus are button layouts that cashiers can navigate to. Only the Fixed buttons of a secondary menu are ever displayed.

Transaction Screen Overview

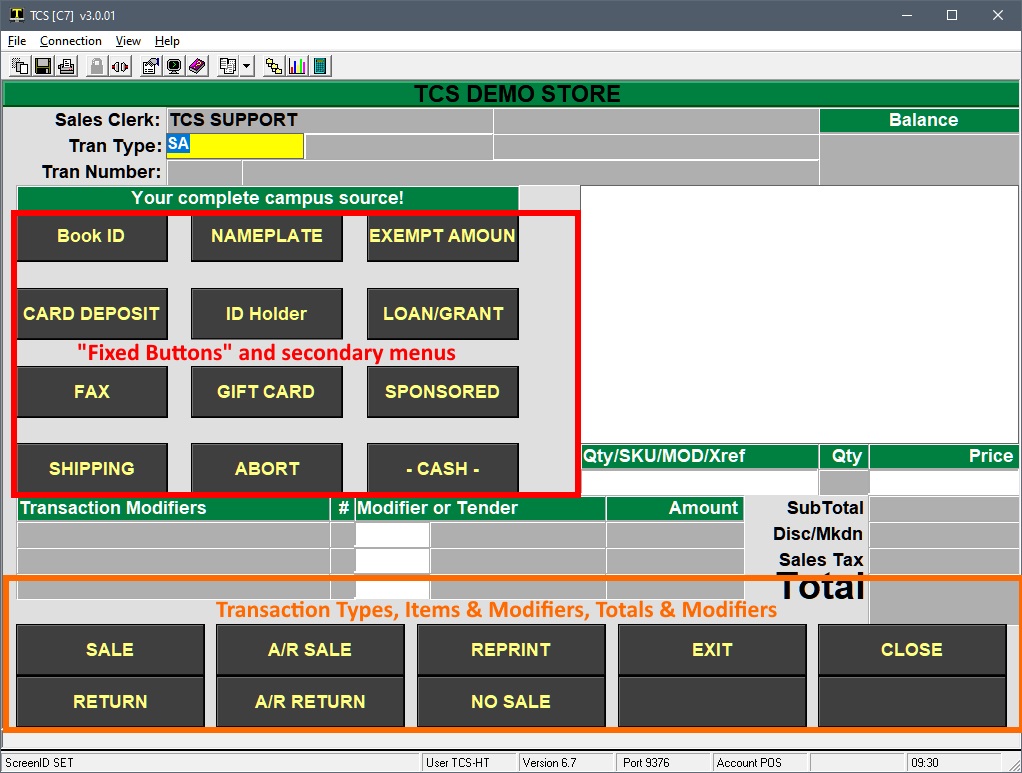
It’s important to first understand the areas of the transaction screen and how they relate to the screen maintenance in POS-3-22. So first, here is a typical touch screen layout:
Changing the Bottom Screen Buttons

Below is the MAIN touch screen layout found in POS-3-22, Touch Screen Codes. This first view are the three tables that control the bottom section of the transaction screen. The F=Fixed Buttons button is what controls the fixed buttons and menu area highlighted in red in the example above.
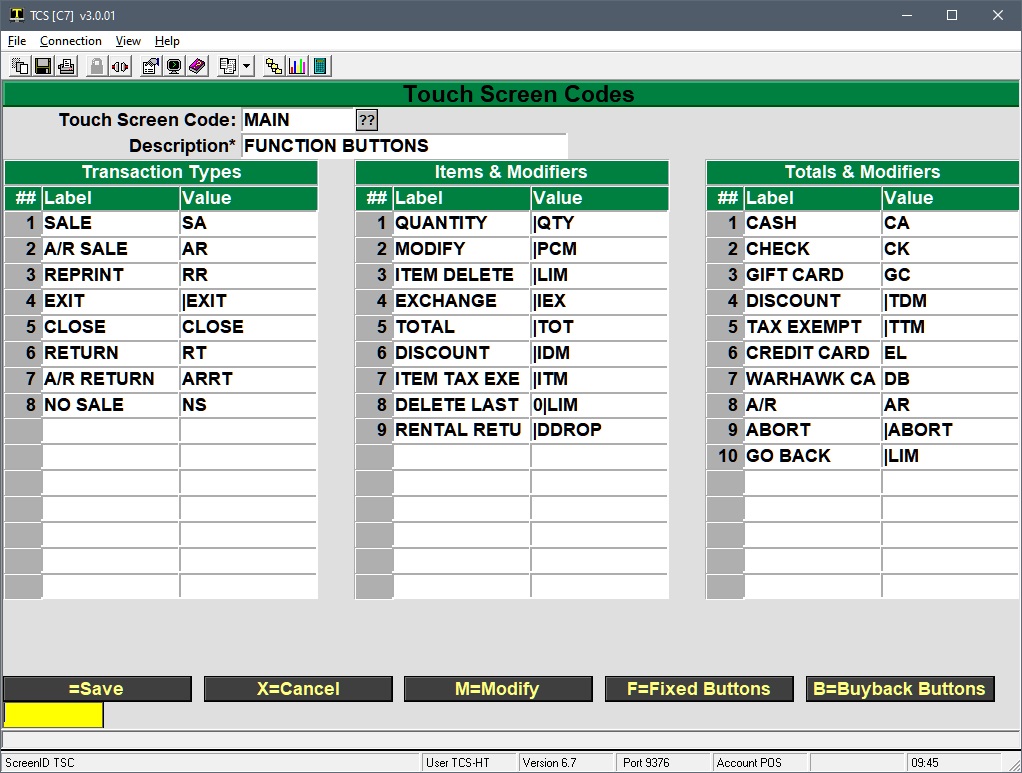
What makes the bottom buttons unique is that they will change depending on what part of the transaction the user is in. Starting with the Transaction Type, moving to ringing up items and using item level modifiers, then on to tender and transaction modifiers after the transaction has been Totaled.
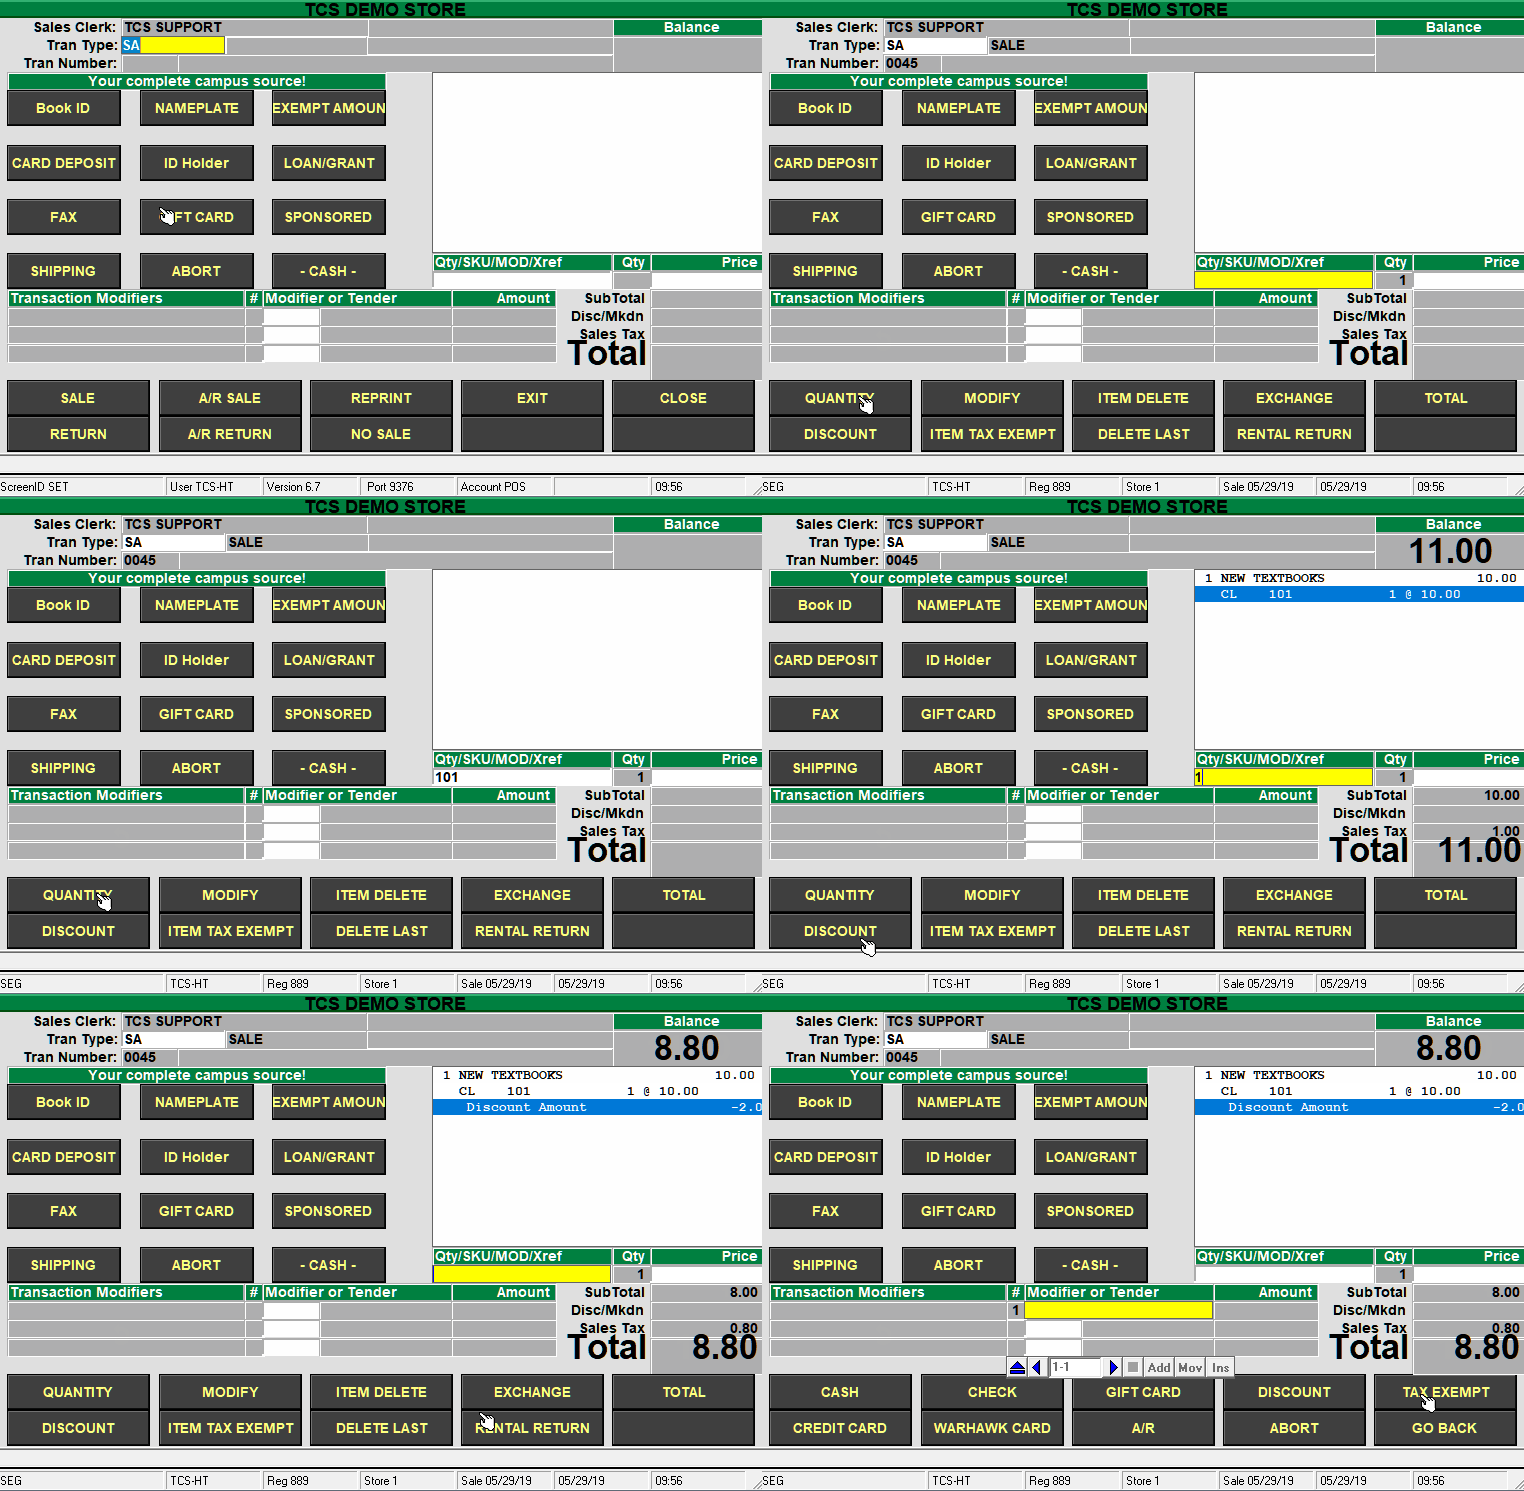
The “Transaction Types” table is what displays on the bottom of the screen when the cashier is in the Tran Type field.

As soon as they start a transaction, the bottom buttons will change and display the buttons mapped in the “Items & Modifiers” table.

Finally, when the cashier Totals the transaction, the buttons change to the buttons mapped in the “Totals & Modifiers” table.

Changing these buttons is straight forward, but there are some restrictions on the buttons along the bottom of the screen.

  1. Only the wording on the button and what it does can be changed.
  2. There is a fixed number of buttons
  3. The layout cannot be changed
    • Buttons can be “moved” by swapping the label and value between different positions in the list
  4. Buttons have to display in the appropriate part of the transaction.
    • e.g. Having a button that discounts the transaction in the “Items & Modifiers” table will never work. A transaction has be totaled (a transaction amount calculated) before the transaction amount can be discounted.
  5. The buttons on the bottom of the screen do not change as you navigate to other secondary menus in the Fixed buttons area.
  6. The bottom buttons will only display the buttons specified in the primary screen layout.

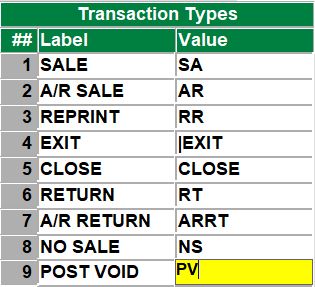
Instructions on adding or changing a button are below. The steps used in this example are for adding a Post Void transaction type.

  1. Navigate the cursor to the existing button to be changed, or empty spot where a button will be added.
    1. Add a line in the Transaction Types table by navigating to the line beneath NO SALE
  2. Specify the Label of the button.
    1. This is the text that will appear on the button. So POST VOID
  3. Specify the Value of the button
    1. This is what the button does. Buttons can be a:
      1. Transaction Type, which can be found in POS-2-5
      2. A fee, found in POS-22-23
      3. A modifier, found in POS-2-2
      4. An item, enter the SKU of any GM or TX item
      5. A tender code, found in POS-2-4
    2. The Post Void transaction type is PV, so that is what is entered
  4. Save your changes
  5. Now every register that is configured to use the MAIN touch screen code will have the new POST VOID button if they are up to date on their host updates.
    • Cashiers will need exit the transaction screen (|EXIT or use an up arrow in the tran type field) and go back to 1. Cash Register from the menu before that change is applied.


Fixed Buttons

The fixed buttons in the main area of the screen allow for greater flexibility compared to the buttons at the bottom of the screen. While the buttons do not automatically change with the flow of the transaction, it is possible to navigate to secondary menus many levels deep, giving manual control to the cashier.

The transaction screen is mapped out in a grid, referenced by it’s columns and rows, and the buttons are drawn using points on the grid. If you press ALT + G you can see the grid as that the buttons are anchored to. Press ALT + G again to toggle the view off. Note that the column starts at 0, not 1.
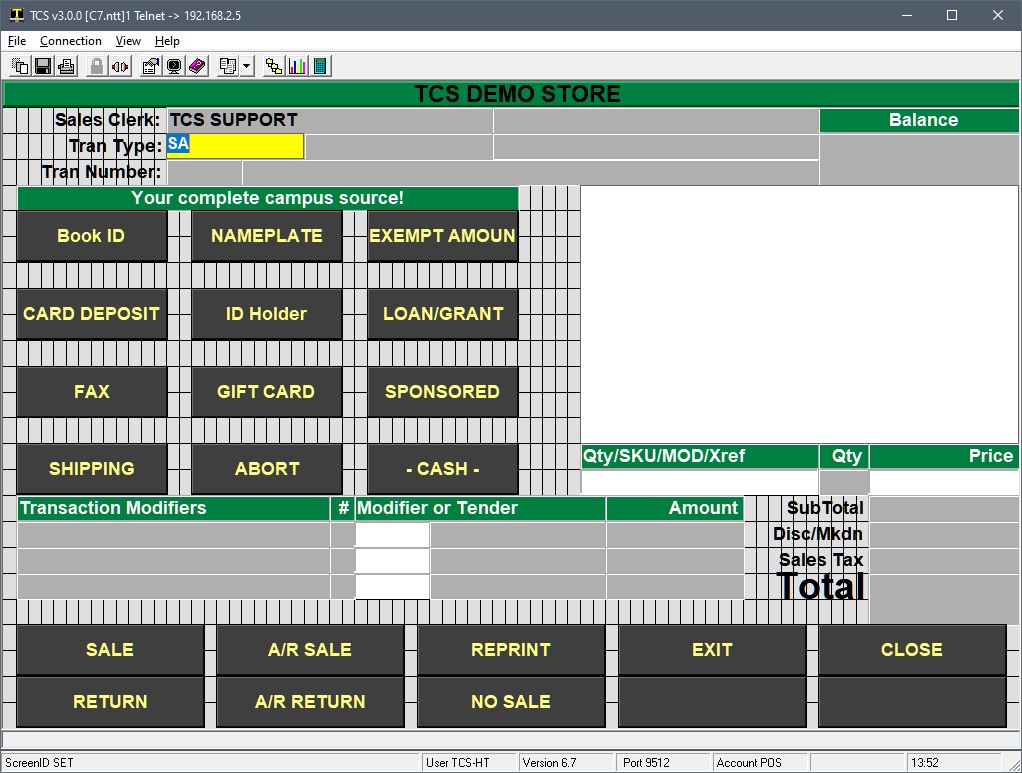
Referencing the above image, the F=Fixed Buttons screen in POS-3-22 now makes a lot more sense.

The description column is simply a reference to the element on the screen. The Col, Row, Width, Height and Just columns control the dimensions of the element. The label is what displays on the “button” and the effect controls whether or not you can click on the element, if it’s indented, raised, etc.
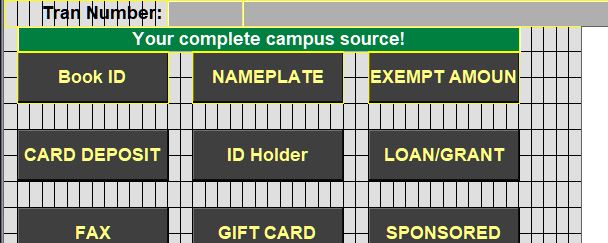
Referencing the grid view, we can see that the HEADER element is our banner/message at the top of the buttons. It starts at column 1 (furthest left is column position 0), runs 39 positions, has a height of 1 and the label is centered. The Value field can’t be empty so the word “blank” is used and the Effect 3 makes the element non-interactive.

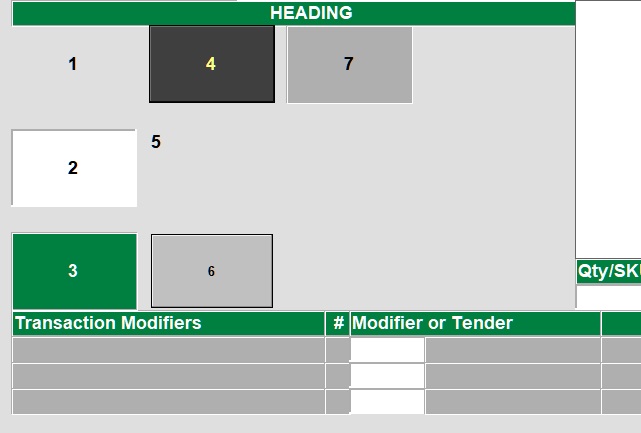
All of the buttons are then mapped out in the grid with their dimensions, labels and values. There are seven different button effects that can be used, with effects 3 and 7 being non-interactive. How each effect appears by default is shown below. Actual color, border, font, etc. is controlled by the GUI properties, Entities tab. The button number is the effect assigned to that button.
To change a Fixed button:

  1. Bring up the screen in POS-3-22 and select F=Fixed Buttons
  2. Navigate to the Label column and change the wording to match what the button will do.
    • The label is the wording that shows on the button. The text does not wrap.
  3. Specify the Value of the button
    1. This is what the button does. Buttons can be a:
      1. Transaction Type, which can be found in POS-2-5
      2. A fee, found in POS-22-23
      3. A modifier, found in POS-2-2
        • Modifiers are entered as PIPE followed by the modifier code. e.g. |IEX to use the Item Exchange modifier.
        • The pipe | character is necessary because the system needs a way to differentiate between a text based item search and actual modifier codes. If IEX were entered as the value the system would search for items that have iex as any part of their description.
      4. An item, enter the SKU of any GM or TX item
      5. A tender code, found in POS-2-4
    2. There are some pretty advanced functions that can be used for the button Value that are covered at the very bottom of this article.
  4. Repeat for any additional buttons and save your way out.

Default Menus

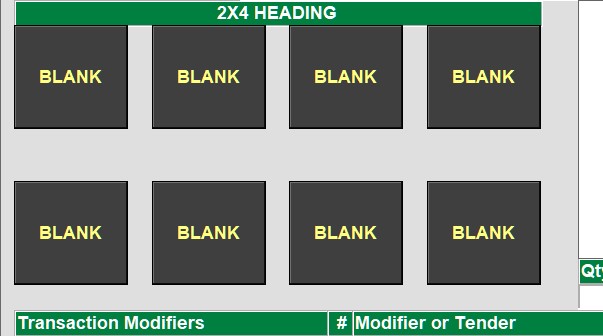
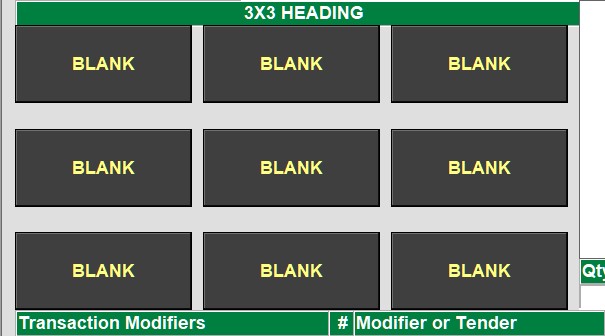
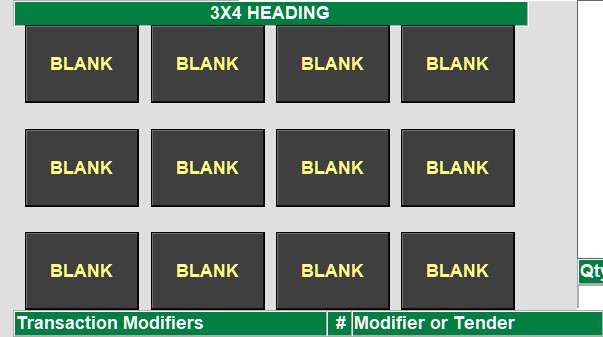
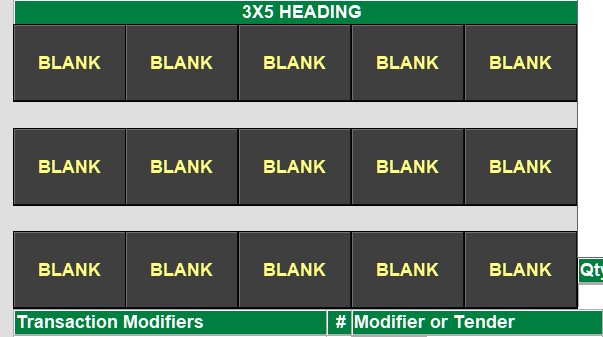
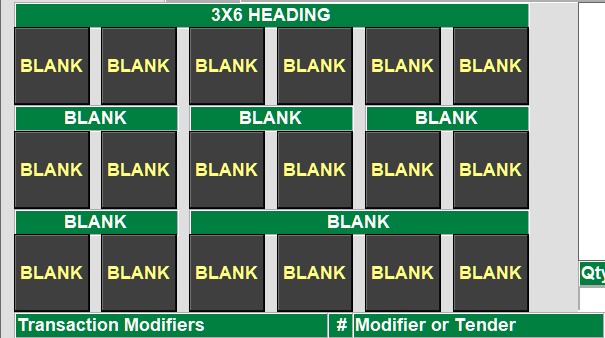
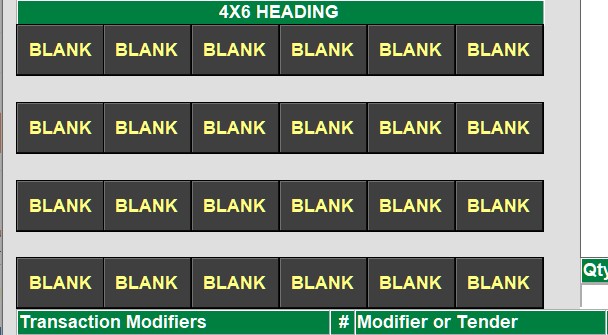
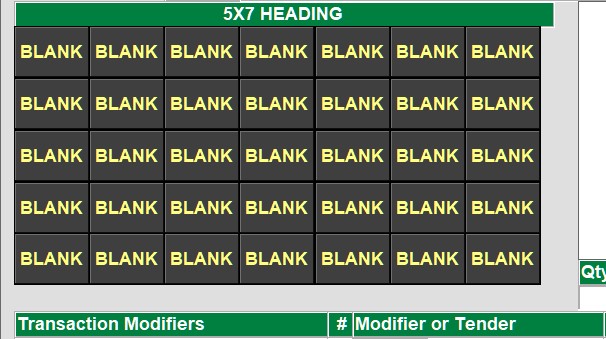
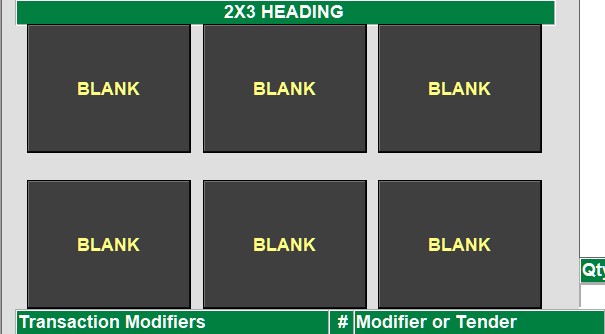
It is NOT recommended to re-arrange an existing menu by moving, shrinking or stretching elements. It is MUCH easier and safer to create a new menu by copying from an existing layout with the correct amount of buttons and then customize them as needed. TCS has a number of “default” layouts shown below that can be used to source new layouts from.

Note that these layouts are all named their heading number. e.g. 2X3 is the layout code for the first image with “2X3 HEADING” in the screen header. Contact TCS support if you don’t have these layouts and would like them on your system.

It’s recommended to reserve one button on secondary menus to reset the screen back to the main menu.
Customizing a Menu

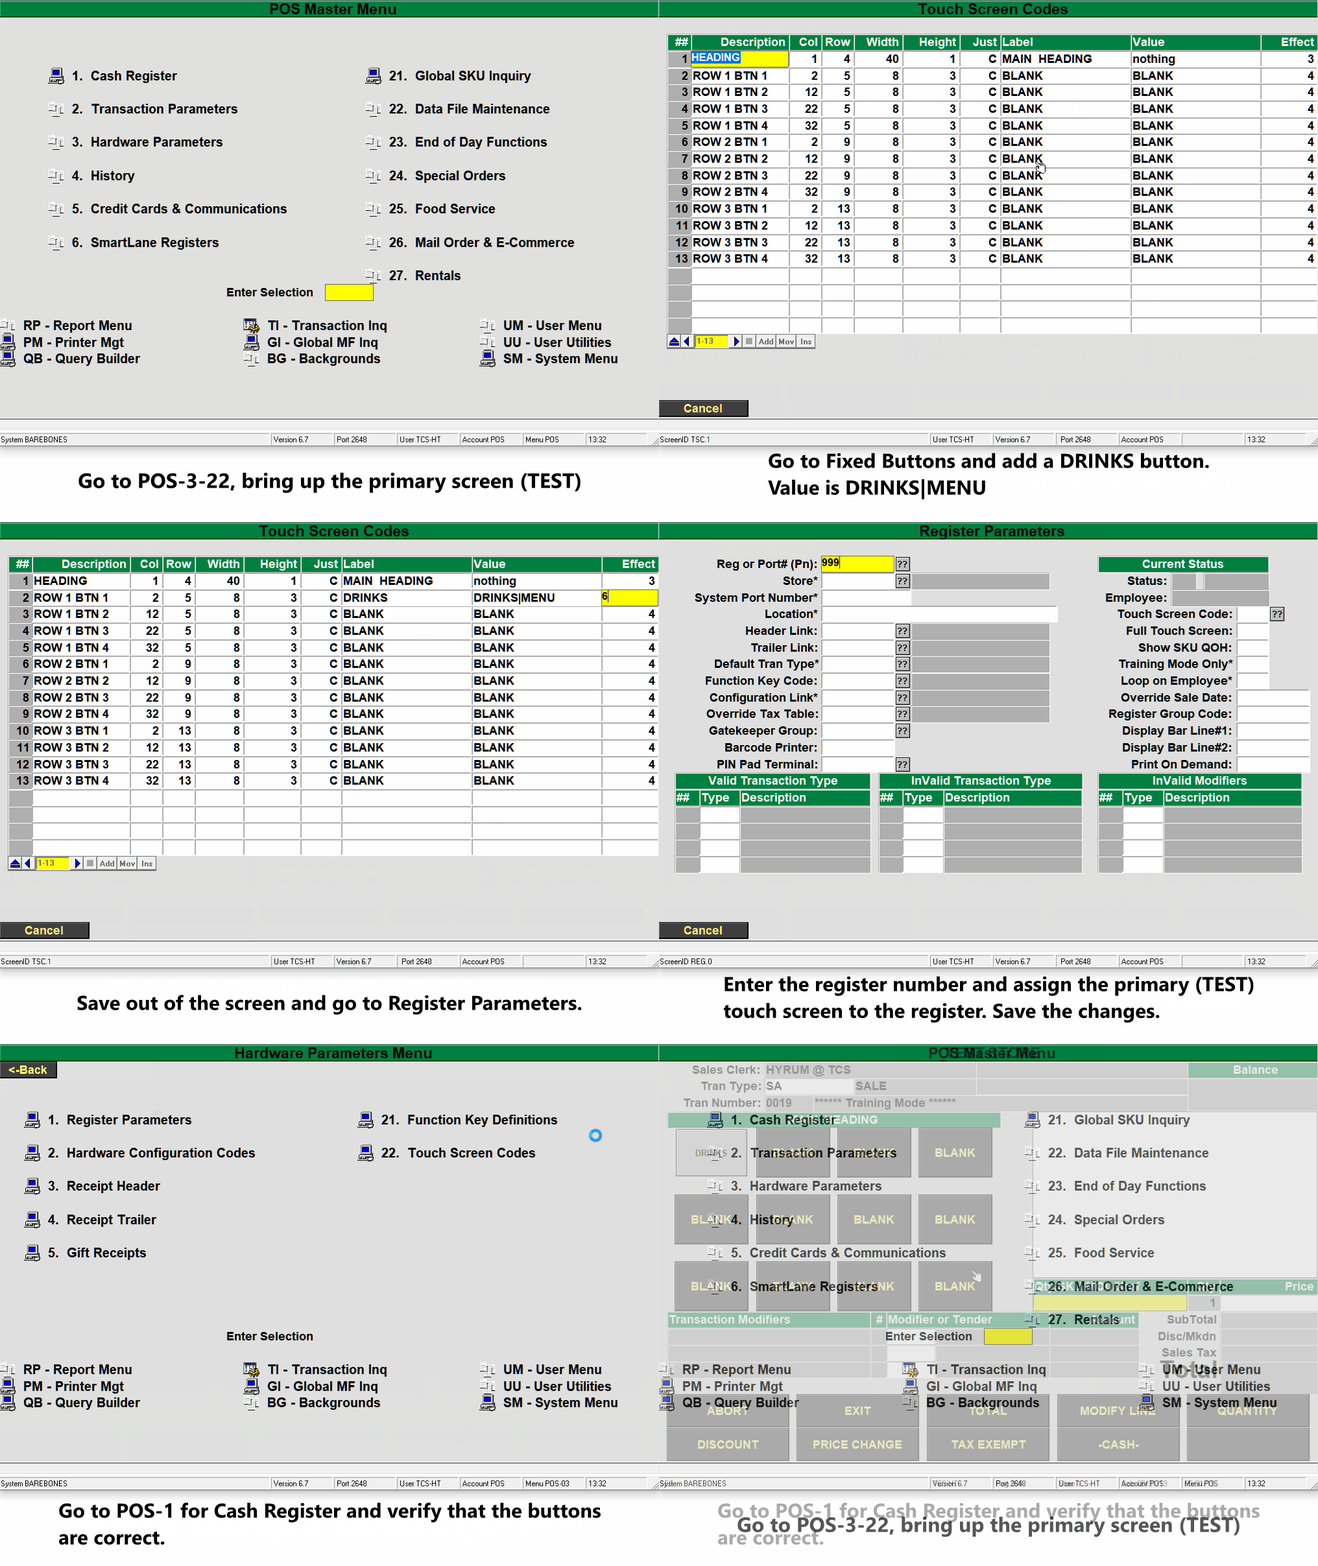
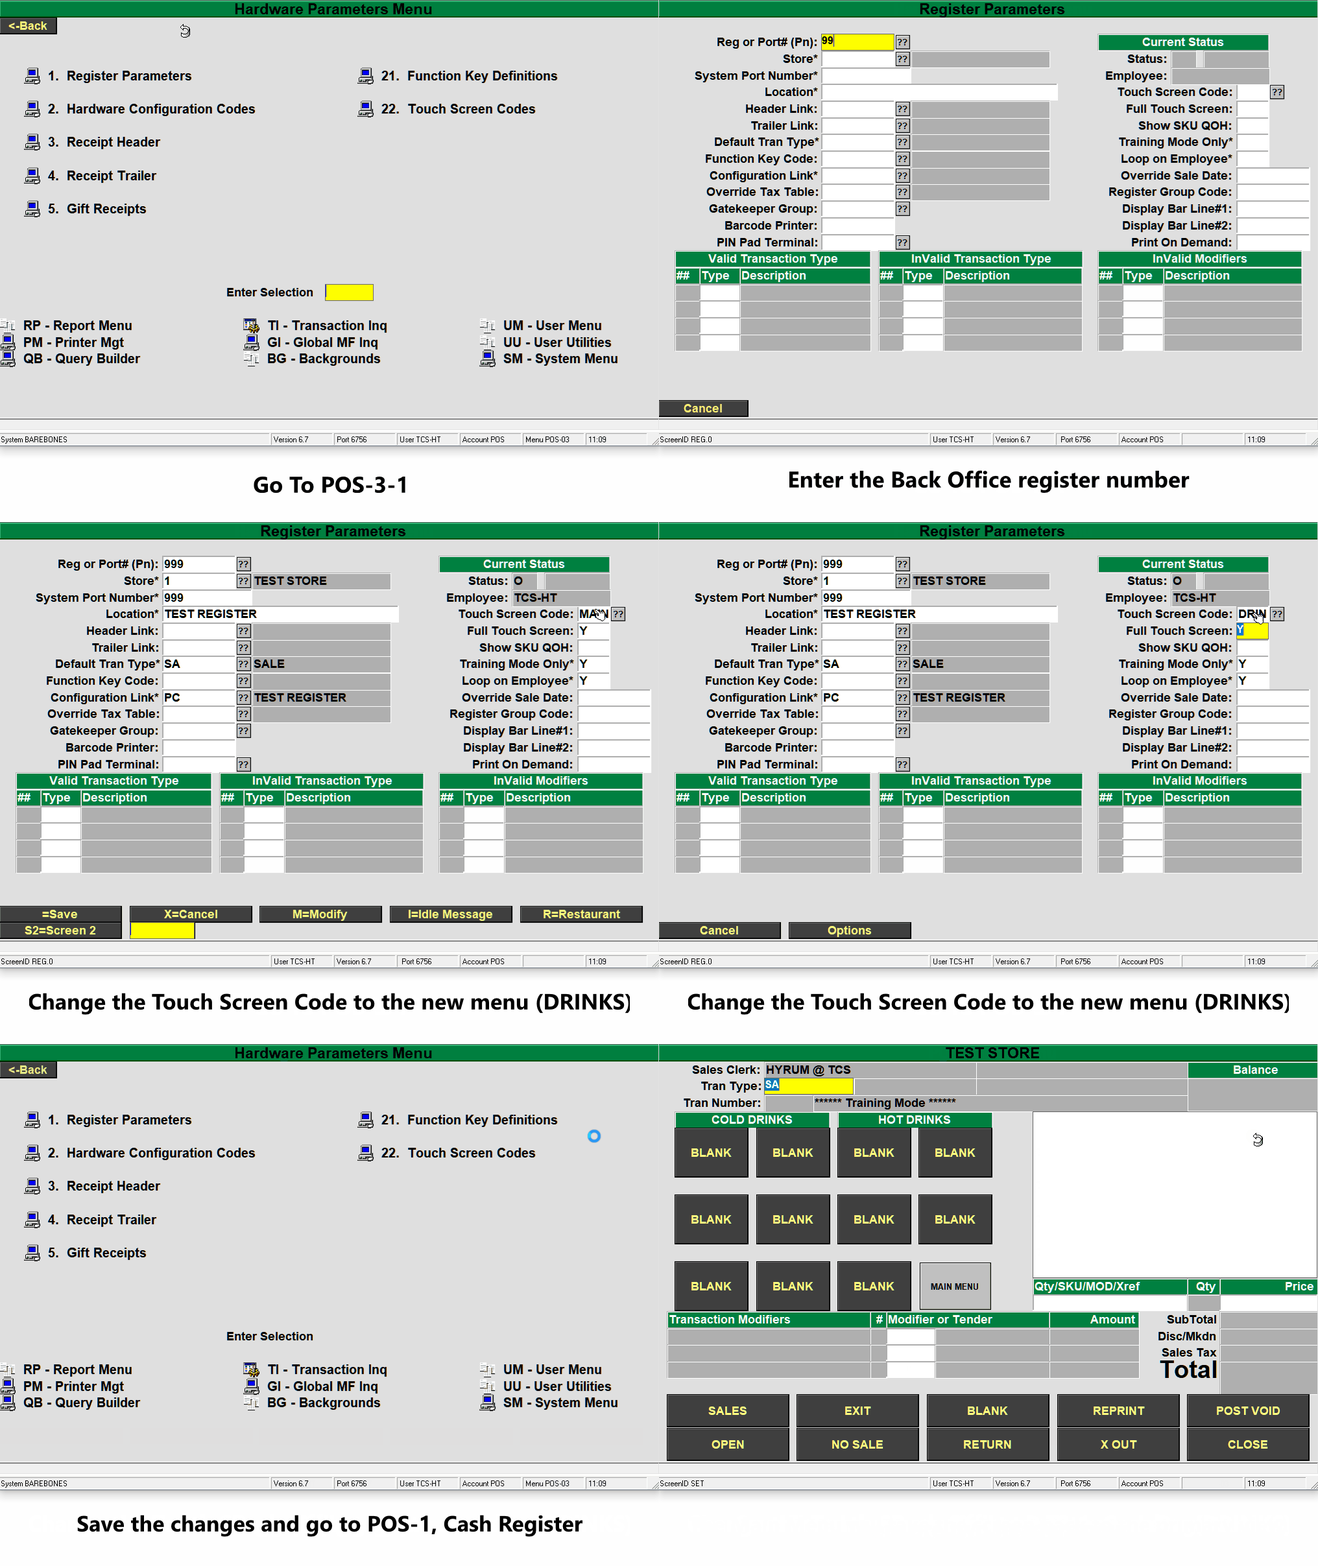
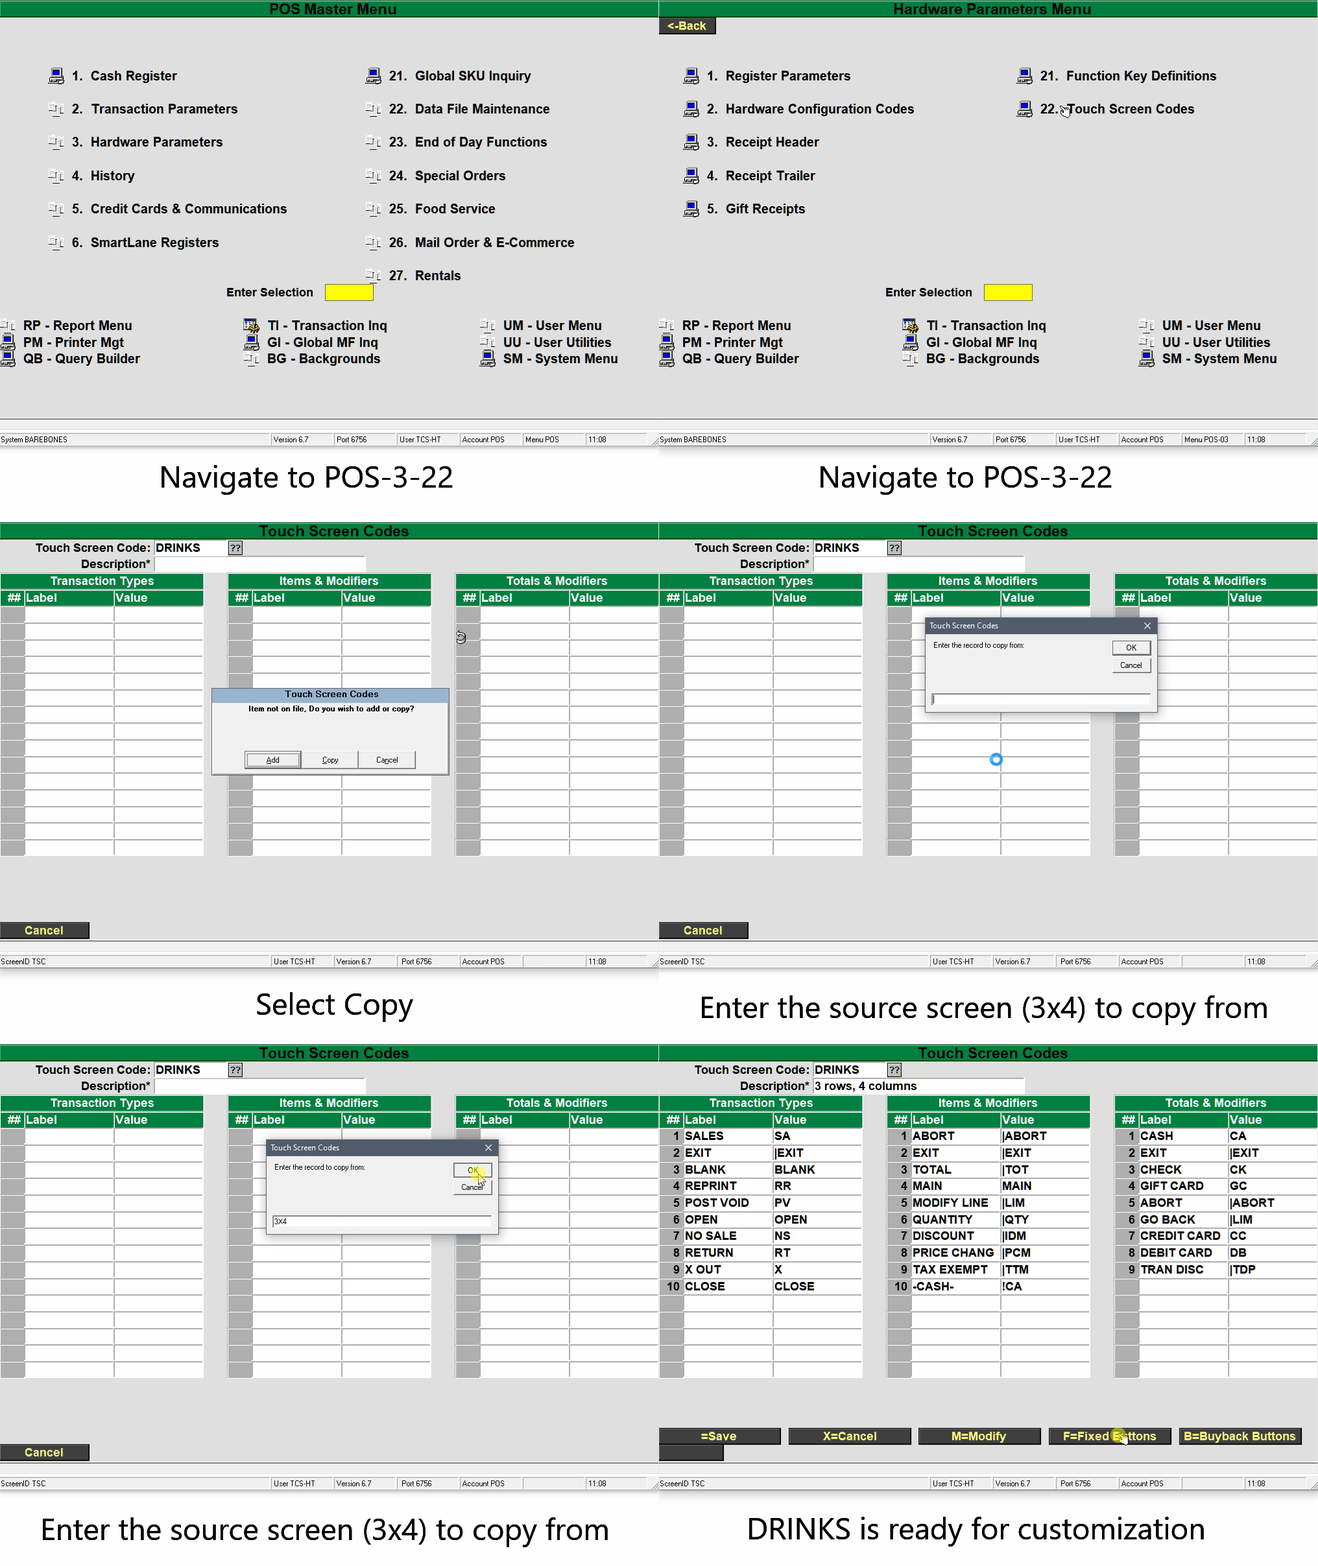
This example will cover how to create/customize a new menu and then link the TEST menu to the newly created menu. It’s recommended to temporarily assign any newly created screens to a host based register in POS-3-1 and then test the changes made as that register. The register will be set to ultimately use TEST as it’s primary touch

  1. Navigate to POS-3-22 and enter a new code for the new screen
    • This example is going to go over drinks, so DRINKS will be used
  2. Select the COPY option and then enter the layout you want to copy from
    • This example will copy from the 3X4 layout so 3X4 is entered.
    • Don’t bother changing any of the three tables of the first screen unless it is going to be assigned as the primary screen for a register.
  3. Go to the F=Fixed Buttons and start customizing the menu as needed.
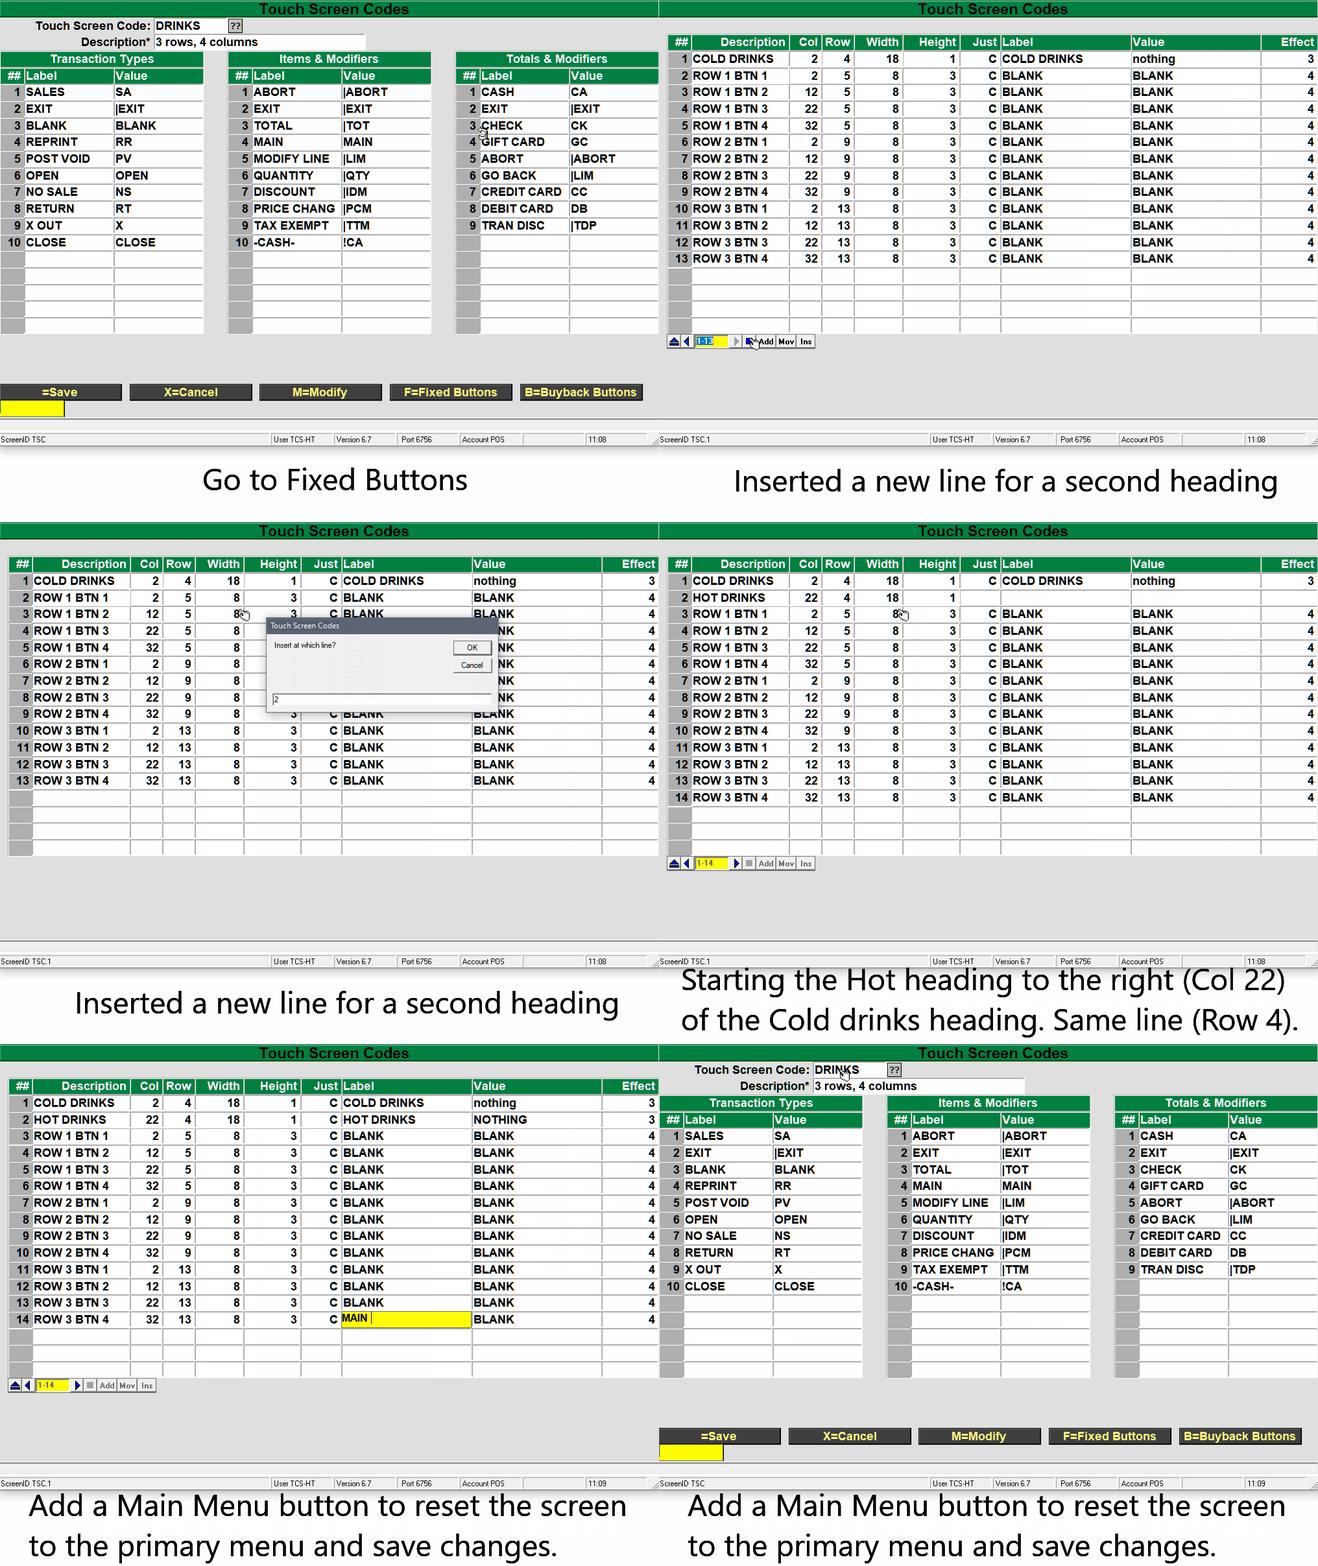
    • The goal is to have a split header (Cold Drinks and Hot Drinks) and to add a button that will return the cashier from this Drinks menu back to the primary menu.
    • The width of the Cold Drinks is shortened to 18 and the label changed.
    • A new line is inserted for the second header
    • The Hot Drinks entity is added, it starts at column 22, stays on the same row 4 and gets a matching width of 18.
    • A MAIN MENU button is added with a value of TEST|MENU
      • TEST will be the primary menu for the back office register
      • The |MENU is a modifier that tells the system go back to the MENU listed in front of the | character.
  4. Test the screen once it has been created by assigning the new screen in the Register Parameters
    1. Go to POS-3-1 and enter the back office register number the connection uses
    2. Go to the Touch Screen Code field and change it to match the new code (DRINKS)
    3. Save the changes to the register parameters and go to POS-1 for Cash Register
    4. Verify that the changes are correct.
    5. Make any necessary changes to the layout in POS-3-22
      1. Add the actual drink items to the buttons
        1. Label each button for the item it will ring up
        2. Set the SKU/Fee/etc. for each button
  5. Add a button to the primary (TEST) screen that goes to the new screen (DRINKS)
    1. POS-3-22, TEST screen code
    2. F for Fixed Buttons
    3. Label a button with the new screen code (DRINKS)
    4. The Value will be CODE|MENU (DRINKS|MENU)
    5.  Save your way out
  6. Change the primary screen for the register back to the real primary screen (TEST)
    1. POS-3-1
    2. Enter the register number
    3. Change the Touch Screen Code field to TEST
    4. Save the changes
  7. Verify that everything has come together in the transaction screen
    1. PSO-1 for Cash Register
    2. Test the buttons

Advanced Values

What a button does can go MUCH further than a single item, transaction type or modifier. Below is a list of different ways a button’s value can be set to accomplish more advanced actions.

  1. Values can be “fed” to a modifier to cut down on the amount of prompts a cashier has to respond to.
    1. If the standard discount percentage is 10%, a 10 can be fed to the |DIP (discount item percentage) modifier to automatically discount 10%
    2. The button value would be 10|DIP
  2. A : can be used to combine a modifier with an item. Think of it as a “and now” action
    1. Say 5 of an item are always rung up together. A button can be created with 5|QTY:100256
    2. Specify the quantity of 5, and now apply that to item 100256
  3. A workflow can be created that leads the cashier through a series of steps
    1. Poor example, but say a combo meal is being sold. The goal is to guide the cashier through 1) selecting the burger 2) selecting any condiments 3) selecting any sides 4) selecting their drink
      1. The burger button is pressed. The button has a value of 100256:CONDIMENTS|MENU
        • The burger is rung up and the cashier is taken to a menu full of condiments
      2. The cashier selects a mayo button, a ketchup button and then clicks on a Next button with a value of SIDES|MENU
      3. Repeat the process through the various menus
  4. A |MENU button can reset to whatever the primary touch screen is
    1. RESET|MENU
    2. This can be combined with an item and the : to always reset back to the main menu after ringing up an item.
      1. 100154:RESET|MENU will ring up item 100154 and take the cashier back to whatever the main menu was.

** NEED TO DOCUMENT |QUAL THIS IS DIFFERENT  FROM MEMO. QUAL WILL STACK ITEMS TOGETHER.


Creating a Purchase Order with New Matrix Items

The steps below cover how to create matrix items while you are in the middle of creating a purchase order.

  1. Start a new PO in GM-1-21
    1. Enter a PO# or enter a period “.” to use the next system suggested number.
    2. Optional: Enter an Alternate # for any third party reference numbers.
    3. Enter the order date.
    4. Enter the vendor number, or do a vendor lookup by entering part of the vendors name.
    5. Optional: If you are a multi-store environment then you can use the Ship To: field to specify a store to ship the merchandise to.
    6. Enter a shipment method in the Ship Via field or select one with the ?? button.
      • Additional shipment methods can be added by clicking the ?? button and then clicking on the Maint button on the bottom left.
      • You will be returned to the PO screen after creating your any necessary shipment methods. Just press Enter at the empty Ship Via Code field.
    7. Optional: Enter any order comments.
    8. Optional: Enter any deadline date in the Must Sip by field.
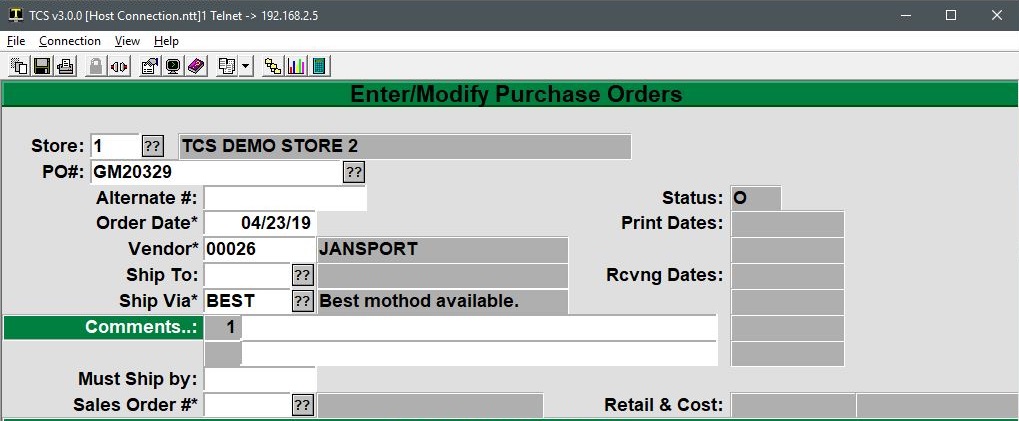
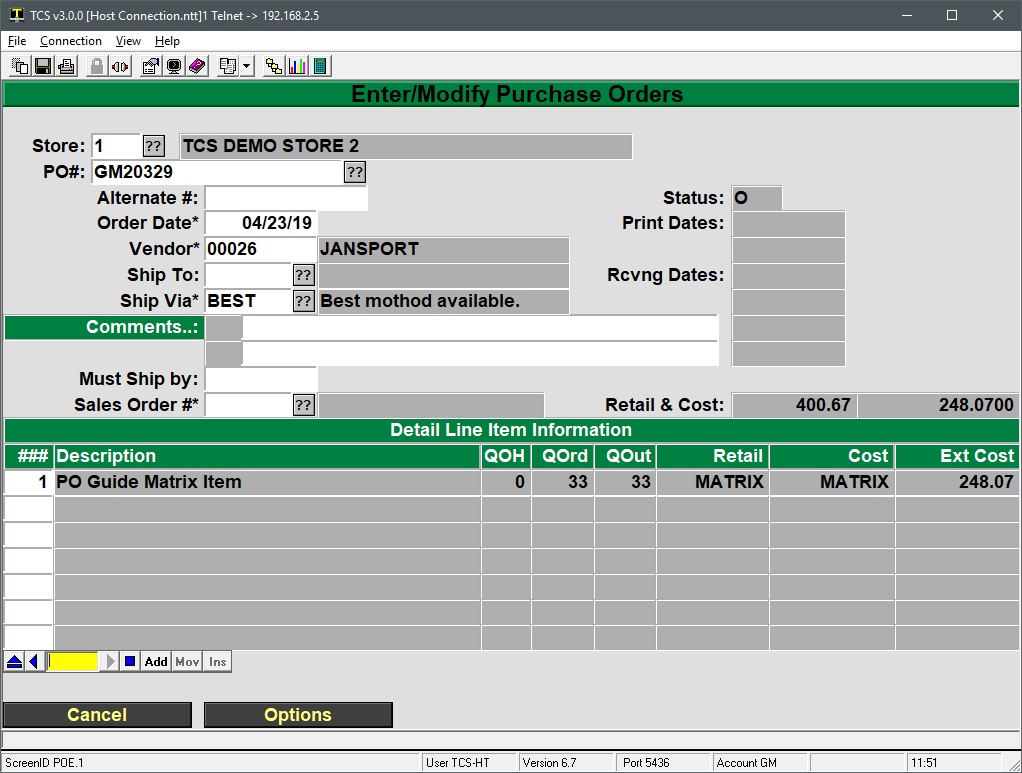
      • The top section of the PO should now look something similar to this:
  2. Start adding items to the PO
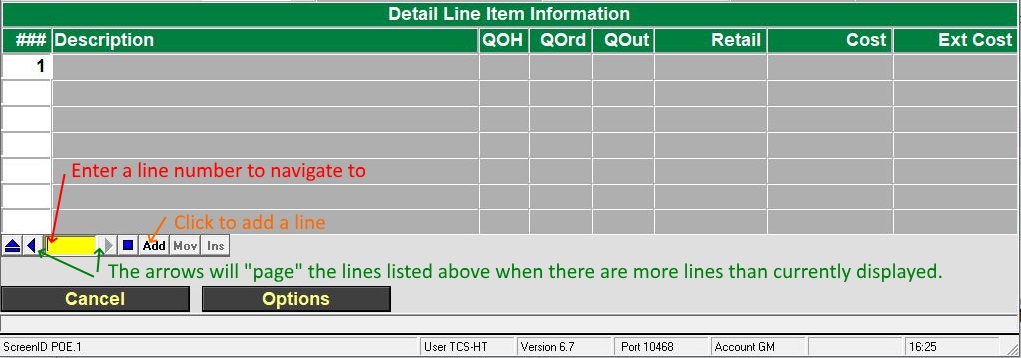
    1. After navigating past the Must Ship by field your focus will be moved to the line navigation tool.
      • This tool can be used to display additional lines not currently displayed on the screen. To add new lines to the bottom of the list, insert lines into the middle of the list, more move items in the list.
    2. Enter a 1 into the text field of the navigation tool to jump to line 1. You can also enter an “A” to add a new line to the PO to the end, if you are at the beginning then it will create the first line.
      • If there was already a line #1, you can enter the next field (2) and it would create a new line for line 2.
      • You can also click on the Add button on the navigation tool but keeping your hands on the keyboard is generally the most effect way to use the system.
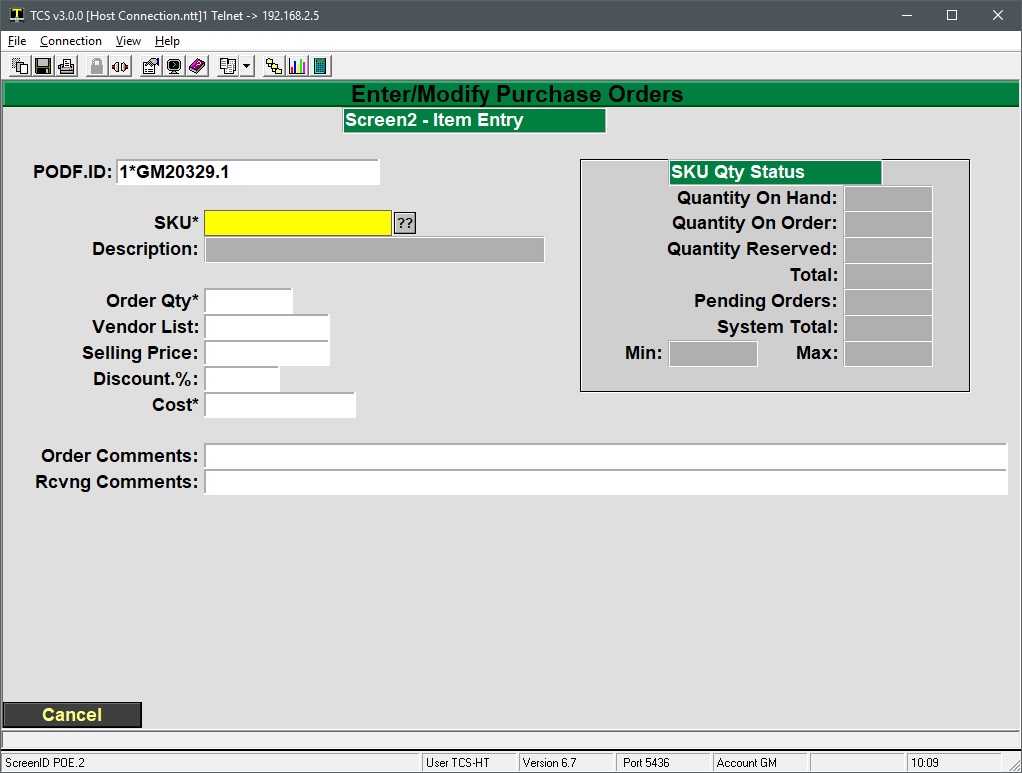
    3. At the Item Entry screen you can add an existing item or create a new item and add it to the PO.
      1. To add an existing item, enter the SKU, barcode, vendor catalog ID or part of the items description into the SKU field.
      2. To create and add a new item:
        1. Enter a . into the SKU field
        2. Select MF Entry option.
          • The quick entry is a bare bone item creation screen. Matrix items cannot be added via the quick entry method. Which falls outside the scope of this article.
          • The process is very straight forward however, simply populate the required fields in the Quick Entry screen, save your item, and then you will be taken back to the Item Entry screen where you can specify order quantities, cost, etc.
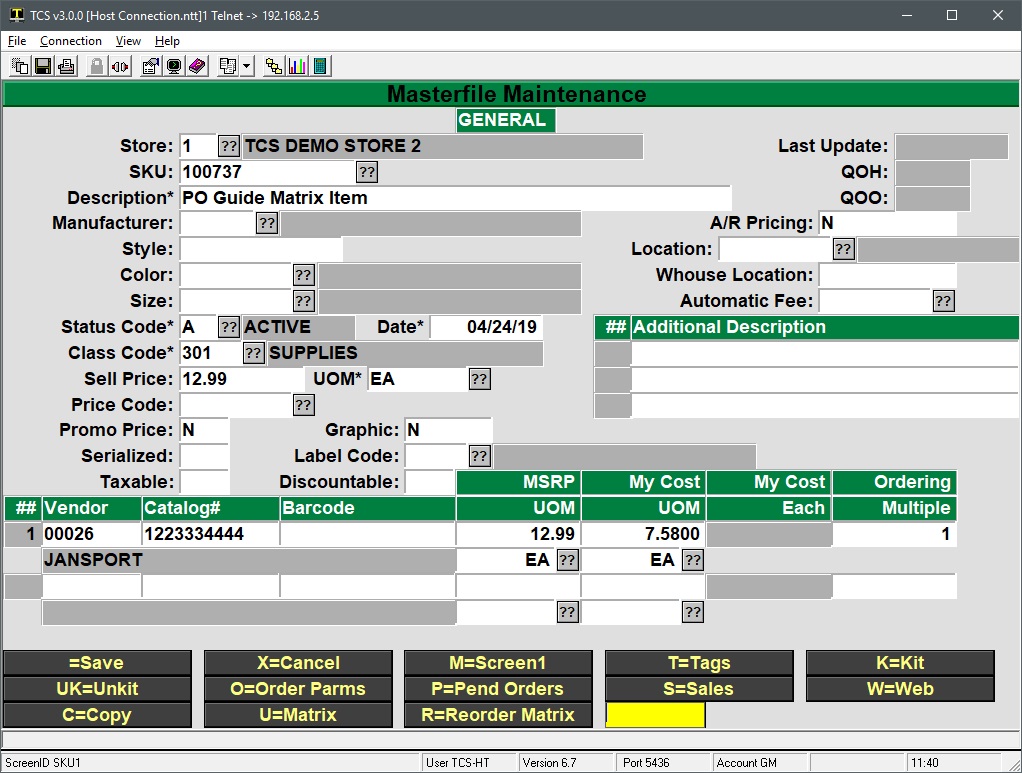
        3. The system should now be at the regular MF/Item screen to create the new item.
          1. Enter a description for the item
          2. Fill out the required fields: Status Code, Date, Class Code, Unit of Measure (UOM)
            • Also fill out any necessary optional fields, notably any color/size fields, the selling price and any vendor information
        4. Enter the order parameters for the new item
          • None of these fields are required and can be skipped by pressing ESC and then Enter
          • The Buyer Code is used to restrict the purchase of this item to a specific employee.
          • Auto Order Code is used to specify the calculation type. Essentially a collection of parameters, calculations and criteria on when an item should be placed on order via the Auto Orders process.
          • Min and Max can be used to specify a minimum or maximum order quantity
          • Order comments will be added to the PO every time the item is placed on a PO
        5. After saving (pressing enter) at the end of the Order Parameters screen the system goes back to the MF item screen.
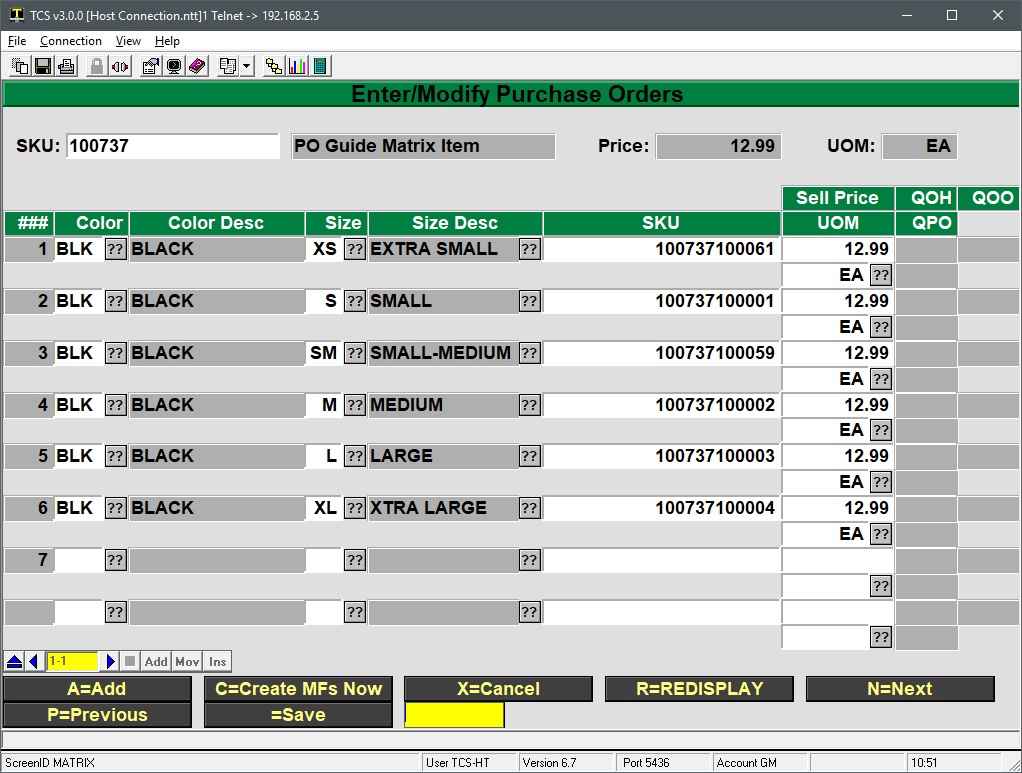
        6. Select the U=Matrix button or type U and press Enter
        7. Click on Continue at the notification that the item will be saved before proceeding to the Matrix screen.
        8. Create any child item(s) to add to this matrix set
          1. Select the A=Add option or type an A and press Enter
          2. Select the color and size codes for the first child item
          3. Press Enter at the SKU field.
          4. DO NOT click past the sku field into another field.
          5. DO NOT change the SKU value.
          6. Enter the selling price for the first child item
          7. Continue adding child items by entering their color, size and sell price of the child item(s) until done.
          8. To complete the process press Enter at an empty Color field. Then press Enter or use the =Save option to save the child items.
          9. Once back at the MF Entry screen enter a . into the SKU field and repeat the steps above to create any additional items until done.
          10. Press Enter at the MF Entry screen’s SKU field to bring the system back to the PO Item Entry process
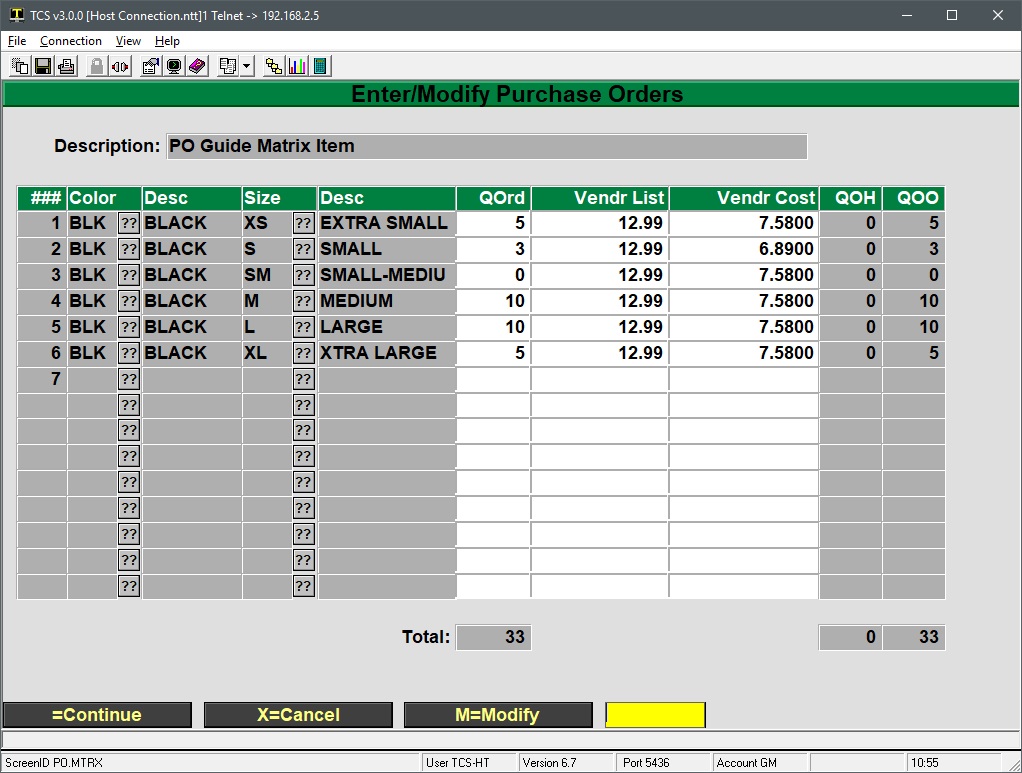
        9. Specify the quantity to order for each child item. The Vendor List and Vendor Cost can also be modified per child item.
          • Press Enter after the last child item. Then press Enter in the Line Item navigation tool to finish editing the child order data.
        10. Press Enter to save the quantities, prices, etc. specified for the child items.
          • M=Modify can be used to go back and change field values.
          • X=Cancel will cancel the ORDER information for this item. The new items will still exist in the system.
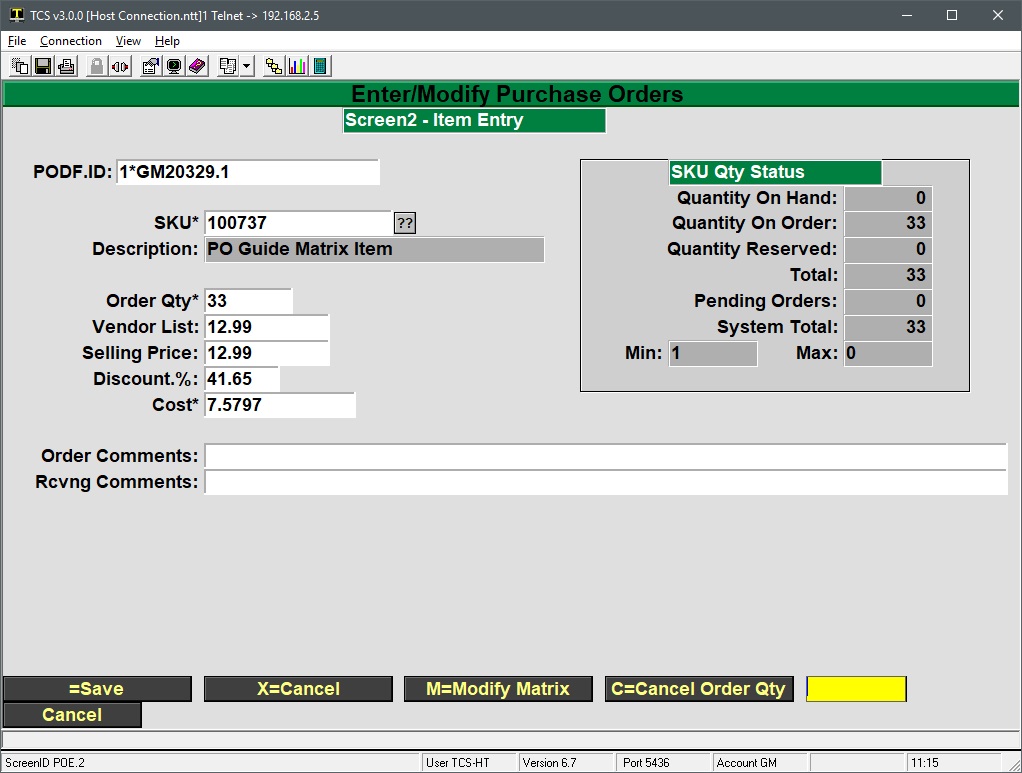
        11. The regular Item Entry screen will then be displayed with an overview of the matrix set on the PO.
          • The SKU is the Mother SKU of the matrix set
          • Order Qty is the combined quantity of the child items on order
          • The Vendor List is the list specified in the Mother SKU
          • The Selling Price is the Selling price of the Mother SKU
          • The Discount. % is the vendor list vs vendor cost percentage
          • the Cost is the average of the CHILD items ordered
        12. Add any order or receiving comments. The screen will then display the options to Save, Cancel, Modify Matrix or Cancel Order Qty. Press Enter to save.
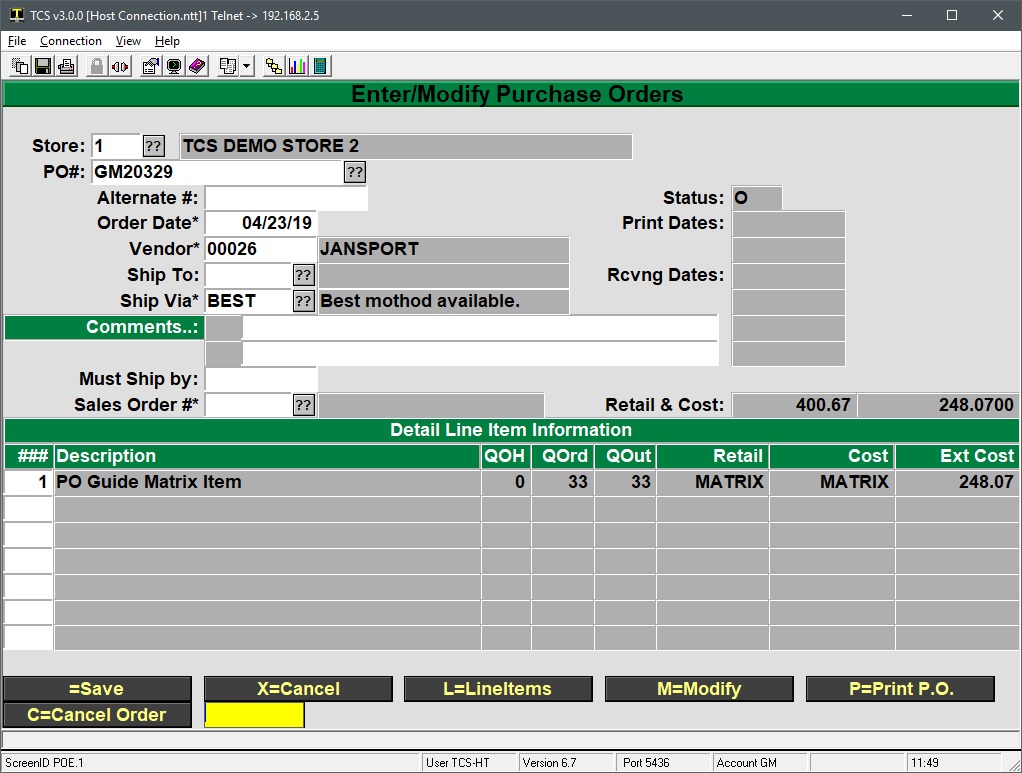
        13. The screen will then go back to the PO overview with the items added into line 1. Focus is placed in the Line Navigation tool.
          • The QOrd (quantity ordered) is the total number of child items ordered.
          • The QOut (quantity outstanding) is the number of child items that have not been received and are still outstanding.
          • The Retail and Cost columns will always display MATRIX when a matrix set has been ordered.
          • The Ext Cost (extended cost) is the combined cost of all child items.
        14. Enter a 2 into the line navigation tool or click on the Add button to add another item to the order.
        15. Pressing enter in the line navigation tool will display the options at the bottom of the screen.
          • L=LineItems can be used to navigate to a line item and view the item details, change costs, quantities, etc. for the item on that line.
            • It’s recommended to Save the PO after adding the line items and then go back in to view, modify, etc. to ensure that any work isn’t lost.
          • M=Modify will bring the focus to the top of the PO section to modify the vendor, shipment, comments, etc. fields at the top of the PO
          • C=Cancel Order will cancel the PO and the quantities on order for all items associated with the PO.


Global Inventory Procedures

  1. Preparation
    1. Check Equipment
    2. Prep Areas
    3. Clean MF
    4. Setup Inventory Parameters
  2. Close Doors
  3. Initialize Inventory
  4. Edit Cycle
    1. Scan
    2. Upload
    3. Create Worksheets
    4. Check for Errors
    5. Make Corrections
    6. Commit Worksheets
    7. Report Differences & Valuation
    8. Audit
  5. Open Doors
  6. Start Receiving
  7. Reconcile
  8. Post Worksheets to MF
  9. Adjustments after Posting

Software Overview

Each inventoried module, GM, Text and Trade requires it’s own inventory initialization and worksheet(s). The main menu to perform all of the inventory steps is (module)-21-1.

The inventory steps include interlocks to prevent you from trying to take a step out of sequence.

  • The steps in the preparation phase are used to prepare the store for inventory counting.
  • The steps in the initialization phase are executed once to set everything up.
  • The steps of the edit cycle are started with one Edit/Enter/Commit Worksheets step, after that any step can be repeated in any order as necessary.
  • The posting phase only contains the posting step, the final step of the inventory process, normally done once.

Preparation

This phase involves all the steps prior to performing the physical count.

Check Equipment

It is very important to make sure that all of the equipment to be used in the inventory process is functioning properly.

  • Be sure that all scanners can hold a charge and scan.
  • Locate all of the connection cables and/or cradles to prevent last minute hold ups.

Prep Areas

  • The system uses numbered inventory count sheets for manually entering and tracking the physical counts. We recommended that each fixture or shelf section should have a separate location number and that the location numbers should be used as your sheet numbers. All areas of the store should have a sheet/location, including the warehouse, all storage areas, register areas and offices.
  • It is recommended that each sheet/location should have up to approximately 50 different ISBN/SKU’S. (You don’t want too many items if there was a problem uploading)
  • Arrange all inventories in the sales floor and back office areas so that they are orderly, easy to access, and allow easy foot traffic through the area.
  • All inventory items on location that have been received into the system need to be scanned.
  • Clearly mark all items that have not been received to prevent them from being counted. These items include returns to vendors and items not yet received.
    • It’s a good practice to receive all items prior to counting.

Clean the Master File

Prior to inventory is a good time to clean up the Master File and purge old inventory items. There are tools located in TX-SU-1-27-5, TR-SU-1-22-5 and GM-SU-1-23-1 to help with cleaning the MF.

Test Upload

Scan some items and upload them to the server to familiarize yourself with the process. This will give you some time to iron out any problems before you count. You will want to clear the DC file of any test uploads by going to (module)-21-1-31

Setting up Inventory Parameters

Inventory parameters are set once and then left alone unless you are changing the way you are going to use worksheets. The main inventory control parameter, in (Module)-UU-22, sets how you enter your physical counts in the worksheets. You can use any of these methods:

Your Upload Folder Path will be different than the one shown. If you need assistance please call support for assistance.

  1. Have the system create worksheets for all master file items for writing and keying in the counts.
  2. Create worksheets from SKUs and counts recorded into a portable terminal and uploaded to the system (scanners).
  3. Create worksheets by keying in each SKU and count from the keyboard.
  4. Inventory Worksheets created from Tricoder Scanner.

The Physical Inventory menu screen options will vary depending upon the inventory method that you choose.

Initializing Inventory

Once the parameters have been set you can initialize your inventory. This will create a “Set ID” that consists of the store, inventory date, and location code you enter. This ID helps keep worksheets from the same module together and separate from other inventories.

Immediately afterwards, if not before inventory has been initialized, close the store to begin your inventory count.

Edit Cycle

The edit cycle consists of counting inventory, uploading the counts into the system, creating worksheets, checking for and fixing any errors and committing the worksheets.

The following steps should be completed by this point:

  • Finish Receiving
  • Separate or mark all items not to be counted i.e. items not received into the system
  • Clean the MF
  • Close the doors 2
  • Initialize inventory

Scanning

When scanning your inventory there are a few guidelines to follow:

  • Scan by sections (fixtures) top to bottom, left to right. If there are any errors, scanning in a uniform way will allow you to find the areas where these errors occurred.
  • Upload data frequently. This will help in locating items with errors and keep worksheets to a manageable size.

o Refer to your scanner’s guide for the specific steps involved in uploading data.

Uploading

Please refer to any scanner specific guides on how to upload scanned data to the system.

Depending on which inventory method you choose please proceed to the correct portion of the manual to continue.

  1. Have the system create worksheets for all master file items for writing and keying in the counts.
  2. Create worksheets from SKUs and counts recorded into a portable terminal and uploaded to the system (scanners).
  3. Create worksheets by keying in each SKU and count from the keyboard.
  4. Inventory Worksheets created from Tricoder Scanner.

Method A: Inventory Worksheets Created From the Master File

Make sure the inventory has been Initialized prior to proceeding with these steps.

Create Worksheets from MF Menu 21.1.2

This process will create worksheets for all items currently in your inventory, worksheets will be sorted according to the options selected here.

Enter ‘A’ for worksheets with all adopted ISBN’s for the specified term in academic dept, course, and section order – followed by worksheets containing any other ISBN’s that match the initialize limits.

Enter ‘B’ for worksheets containing all ISBN’s within the initialize limits, sorted by the ISBN’s first location code, author, and title.

At the sort prompt, enter ‘Y’ to begin a new worksheet each time the primary sort order value changes. Enter ‘N’ to fill each worksheet regardless of such changes. This only applies to worksheets that are automatically created. The sort order value in Text may be academic dept. (option A) or new or used location codes (option B). Trade and GM uses the value you select.

Print All Worksheets Menu 21.1.3

Once you have created you worksheets you will need to print them. The default wksht set and selected term will display. You will need to enter the beginning sheet number and the ending sheet number that you wish to print. The first sheet number and the last sheet number will be filled in for you. Leave these as they are to print all of the worksheets or you may change them to print out selected sheets.

Using the printed sheets, count the inventory in your store, be sure to count all the items in all locations in a logical process to avoid missing items.

Edit/Enter/Commit Worksheets Menu 21.1.4

When you have completed counting, the worksheet counts need to be entered in to the system.

Enter in the Sheet number; the system quantities will be entered as default. Modify these quantities as needed. You can save the sheet when you are finished making the changes. After you have spot checked the section/sheet you will need to commit the worksheet by entering the ‘C=Commit’ button, this will lock the worksheet from any future changes.

Post Inventory to Master File 21.1.10

Post is the final step in the inventory process. The following steps should be completed before you post the worksheet sets to inventory:

  • All items are scanned
  • All scanned data should be uploaded and added to worksheets
  • All worksheets need to be committed
  • Reconcile

Once you are ready to post the worksheets go to (module)-21.1.8 and post the worksheet set. Each post is module specific so be sure to post in every module where inventory was initialized. After posting inventory the process is complete.

Method B. Create worksheets from SKUs and counts recorded into a portable terminal and uploaded to the system (scanners).

Make sure the inventory has been Initialized prior to proceeding with these steps.

Create Worksheets

When using scanners, data is uploaded into the Data Collection file (DC). The system takes the counts uploaded into the DC file and creates worksheets which allow you to view and/or edit the counts. It will also check for any errors and notify you of problems.

Module-21-1-2

Check for Errors

After a worksheet has been created, you will see something similar to this screen. I included an invalid item so that you may recognize an error if one should appear.

Module-21-1-2

Make Corrections

If any errors occur, contact TCS for advice on how to handle the issue.

Modify and Commit Worksheets

After a worksheet is created you can view and edit items on that worksheet by going to (module)-21.1.3) and selecting „M‟ to modify. When a worksheet is ready to be committed enter a „C‟ to commit the worksheet. After a worksheet has been committed it is no longer possible to edit the worksheet.

Module-21-1-3

Report Differences & Valuation

The Difference & Valuation report located at (module) 21.1.6, lists any changes to the price and quantity.

Module-21-1-6

Once any issues in the Differences & Valuation report have been addressed you may:

  • Open your doors
  • Start Receiving as usual

Post Inventory to Master File 21-1-8

Post is the final step in the inventory process. The following steps should be completed before you post the worksheet sets to inventory:

  • All items are scanned
  • All scanned data should be uploaded and added to worksheets
  • All worksheets need to be committed
  • Reconcile

Once you are ready to post the worksheets go to (module)-21.1.8 and post the worksheet set. Each post is module specific so be sure to post in every module where inventory was initialized. After posting inventory the process is complete.

Method C: Create worksheets by keying in each SKU and count from the keyboard.

Make sure the inventory has been Initialized prior to proceeding with these steps.

This process is known as the Manual Entry Method. This method is best if you are using a mobile workstation such as a laptop or desktop computer on a mobile cart.

Enter/Edit/Commit Worksheets 21-1-2

The Wksht Set is a combination of the store number and the date inventory was initialized, DO NOT change the numbers. The Sheet is the worksheet that you are working on, you can see all the open sheets with the ‘??’ or you can enter in a new sheet number or you can enter a ‘.’ to let the system assign the next sequential number. It is recommended that the sheet and shelf number be the same.

Each sheet should have only one section, even if that section or shelf location only has a single item.

Enter or Scan the first item and then enter the quantity for that item, Textbooks will have New and Used quantities while General Merchandise will only have the New quantity.

Once the quantity has been entered scan or enter in the ID of the next item, continue until all items in the section have been entered. Once that is done select ‘=Save’ or hit enter to save the worksheet. ‘X=Cancel’ will cancel any entries or changes that you made. ‘M=Modify’ will take you back to the items so that you can modify them. ‘C=Commit’ will lock the sheet so that no further changes can be made, Do Not commit the sheets until after they have been spot checked and verified.

Print Non-Committed Worksheets 21-1-3

Enter in the beginning and ending sheets numbers and then select ‘R’ to run and print the report to see all of the sheets that have NOT been committed.

Post Inventory to Master File 21-1-8

Post is the final step in the inventory process. The following steps should be completed before you post the worksheet sets to inventory:

  • All items are scanned
  • All scanned data should be uploaded and added to worksheets
  • All worksheets need to be committed
  • Reconcile

Once you are ready to post the worksheets go to (module)-21.1.8 and post the worksheet set. Each post is module specific so be sure to post in every module where inventory was initialized. After posting inventory the process is complete.

Method D: Inventory Worksheets created from Tricoder Scanner.

After inventory has been initialized from option 1 (see page 7), you may begin to upload your inventory

Tricoder Input Menu-21.1.2

If there are any errors in the upload you will get a message to let you know how many. Under the validation row an item with ‘Valid’ is a good item, and item with ‘Not found’ is an item that caused the error in the upload.

You may select the ‘M=Modify’ option to edit the SKU/ISBN number or enter ‘space’ to delete the record.

Once all of the errors have been corrected select ‘P=Post’ to save to the DC (Data Collection) file.

Create Worksheets from DC Menu-21.1.3

Next choose Create Worksheets from DC (module-21-3). You can wait until all worksheets have been uploaded or you may create the worksheets after each upload. (We recommend creating the worksheets after each upload so that you can make sure everything is correct. You may also have someone start spot checking the worksheets if they have been created.)

Answer ‘N’ to both prompts.

You should get a message indicating the worksheets that were created and the number of items that were uploaded to the worksheets.

Edit/Enter/Commit Worksheets Menu 21.1.4

Now you can go in to (menu-21-4) Edit/Enter/Commit Worksheets and edit or modify the worksheet as needed. Once all editing is completed you may commit the worksheet. Committing the worksheet will lock it and prevent any further editing. The ‘Status’ will remain ‘O’ open until it has been committed.

Repeat menu options 2 – 4 for each location until you have finished inventory for the store.

Post Inventory to Master File 21-1-8

Post is the final step in the inventory process. The following steps should be completed before you post the worksheet sets to inventory:

  • All items are scanned
  • All scanned data should be uploaded and added to worksheets
  • All worksheets need to be committed
  • Reconcile

Once you are ready to post the worksheets go to (module)-21.1.8 and post the worksheet set. Each post is module specific so be sure to post in every module where inventory was initialized. After posting inventory the process is complete.

Printing Reports

Once all of the locations have been uploaded and the worksheets have been created, you need to run each of the report options. Check the information for each report and look for discrepancies from your inventory that is not acceptable.

We strongly advise all users to run all report after entering your counts and before you run the process to post your inventory.

The following are examples of a few of the reports

Print Non-Committed Worksheets

This report will print all of the worksheets that have not been committed.

Master File Status Report

You may run a report checking the Master File inventory status. The report will list the SKUs/ISBNs and their worksheet IDs and status in separate Non-worksheet, Uncommitted, Unposted and Posted reports.

Enter in the beginning and ending SKU/ISBN to include on the report, leave blank for all.

Enter in the beginning and ending Classes to include on the report, leave bland for all.

Non-Worksheet SKUS – Enter ‘Y’ for a list of SKU/ISBNs not included in any worksheet.

Uncommitted SKUs – Enter ‘Y’ for a list of SKUs/ISBNs from ‘O’pen worksheets.

Committed/Unposted SKUs – Enter ‘Y’ to include SKUs that have been Consolidated, but haven’t yet been Posted.

Posted SKUs – Enter ‘Y’ to include the SKUs that have been Posted.

Enter an ‘A’ to sort by Author or ‘W’ to sort by Worksheet.

Print Non-Consolidated Counts

Consolidate & Print Valuation

Select the sheets to include, leave blank for all

Select your preferred sort order. ‘D’ for department, ‘C’ for class or ‘S’ for SKU.

Select if you wish ‘N’ew, ‘U’sed or ‘B’oth.

Enter a ‘Y’ to include counts that are zero.

Consolidated Worksheet Detail

This report uses the data created when you ran the Consolidated Report. It includes the worksheets and the individual counts per worksheet.

If you want to limit the report to just those items that have adjustments enter a ‘Y’.


Manually Add or Remove Ebook

It is possible to manually add or remove an ebook, but there are some points of information you’ll need from Redshelf in order to add it. Once you have that information you can update your ISBN MF record to have the ebook data.

Removing an ebook is as simple as going to the ISBN MF record, E for Ebook, then replace the Store field value with an empty space and press enter. This removes that line of data, repeat for any additional lines and then save your way out. If you only want to remove specific prices, navigate to the line with that price and remove that line.

  1. Information you need from Redshelf:
    1. The internal Redshelf UPC/SKU for that title
      • Each title at Redshelf has a unique SKU for the duration and price point of a specific title. (similar to a GM matrix item with different sizes at different price points)
      • If a title is available for 60,90,120,180 days and a lifetime purchase, then there would be five different SKUs for that title
    2. The usage period and price for each SKU
  2. Adding that information to the print ISBN screen
    1. First, make sure that you know your class code for Ebooks
      1. This can be found in TX-SU-1-6-22. Click on the ?? button for the Class Number field and find the class that has ebooks in the description.
    2. Go to TX-MF and bring up the ISBN for the title you want to add the ebook options to
    3. Enter E or select the E – Ebook button
    4. Enter your ebook class code
    5. Enter 1 for the Store (store) field
    6. R for Vendor
    7. Enter the UPC/SKU number that Redshelf gives you
    8. Enter the usage period for that UPC/SKU
    9. Enter the Price
    10. Enter the Cost
      1. Repeat steps 2.4 – 2.9 for each UPC/SKU that Redshelf provided for that ISBN
      2. It should look something like this when you’re done.
  3. Save your way out of the record and you’re done.


Set or Reset a User Password

Some menus have been changed, please read carefully.

While the steps on how to change a user’s password are straight forward, there are a few points that need to be kept in mind.

  1. When you set a user’s password in User Maintenance (UU-5-1) or User-Cashier Maintenance (POS-22-1) the system automatically sets their password to reset when they first log in.
    1. This means that the password set in User Maintenance is temporary. Do not set the password to what the user would like to use long term.
  2. It is necessary to set the user’s password from the Host Connection. While these steps can be followed on an individual register, passwords that are changed on the cash register ARE NOT sent to the host or to all of the other registers.
    1. By setting the password on the host all registers will get the updated password.
    2. Check POS-6-2 to view which registers are communicating. Those who have a “To Be Xfered” amount of zero in the right hand column will immediately have the updated password.
      1. Steps to restart the register communications can be found in the Smartlane Communications video here.

To quickly reset the password for the logged in user

  1. Type PASSWORD into any menu prompt and press Enter
  2. A dialogue will appear prompting for the users password along with a Enter New Password and Confirm Password prompt
    1. Enter your current password into the “Enter Your Password” prompt
      1. This is to confirm the identity of the logged in user
    2. Enter a new password into the “Enter New Password” field.
      1. Passwords must be 8 characters long and include at least one letter and one number
        • g. 1234567A or ABCDEFG1 the password is NOT case sensitive, this means that ABCDEFG1 and abcdefg1 are both treated the same.
      2. Re-enter the new password into the “Confirm Password” field and press enter.
    3. The password has now been set for the logged in user and will update to all of the registers.


To reset the password for another user

  1. From any module, go to UU-5-1 or POS-22-1
  2. Enter the user ID of the user who’s password is going to be reset
  3. Navigate to the Password field and type in the new password
    1. Note that this new password is temporary. The user will be forced to set their own password after the log in with this temporary password.
    2. Passwords must be 8 characters long and include at least one letter and one number
      • g. 1234567A or ABCDEFG1. They can also include special characters. The password is NOT case sensitive, this means that ABCDEFG1 and abcdefg1 are both treated the same.
  4. Enter the temporary password again into the Confirm Password field
    1. Press Continue on the notification box. This is a notification that the password entered is temporary and the user will need to reset their password when they log in.
  5. Press ESC after reaching the Expires field
  6. Enter to save the password change.
  7. Have the user log in with their new temporary password.
    1. You can type in ID at the menu and press enter to display the login prompt or have them log into another connection.
  8. They will immediately get a prompt to reset their password
    1. They need to enter their new, permanent password into the Enter New Password and Confirm Password fields
    2. Passwords must be 8 characters long and include at least one letter and one number
      • g. 1234567A or ABCDEFG1. They can also include special characters. The password is NOT case sensitive, this means that ABCDEFG1 and abcdefg1 are both treated the same.
  9. After that is complete their password will update to all of the registers.


Sell and Redeem Gift Cards

Selling a Gift Card

  • Start a transaction as usual, normally this will be a SA transaction.
  • Press the ‘Sell Gift Card’ button on the keyboard, usually in the middle on the top row.
  • In the price field, enter in the selling price for the Gift Card and hit enter.
  • Select the option to ‘Add’ if you are selling a new gift card.
  • In the new window, scan or swipe the gift card in the “Voucher Number” field and then select ‘Add’, fill out as much of the rest of the information as you want to track and then hit enter to save.

  • Complete the transaction as normal.

Add money to Gift Card

To add money to a gift card you will follow the same process as selling the gift card, the difference will be when you scan the Gift Card it will not prompt you to Add, Copy or Delete, instead it will display the current card information. You can just enter through everything to add the amount that you entered on the previous screen.

Redeeming a Gift Card

  • Process transaction as normal.
  • When finished select the ‘TOTAL’ option from either the keyboard or the touch screen.
  • Select the Gift Card option from either the keyboard or the touch screen.
  • When the pop-up window displays, scan, swipe, or enter the gift card number. The window will now display the remaining balance of the GC, hit the ‘Continue’ button or hit enter on the keyboard.


TCS Department/Class Setup

Before you can add any inventory items for Fee codes you must have the Department and Classed setup that the items will be a part of. Depending on the module that you are in navigate to the appropriate place to create the department or class code; GM – GM.SU.1.4 and 2, TX-TX.SU.4.6.21 and 22, POS-POS.22.3.1 and 2, AR-AR.SU.5

It does not matter which module you use to create the department or class code since they are universal and available in all modules once they have been created.

Department Setup

The department needs to be setup first, in GM go to SU.1.4. Some examples of Departments would be Textbooks, Clothing, Food.

  • Enter a ‘.’ to create the next sequential number or enter the number that you want to use. If you create a new department you will be prompted to Add/Copy/Cancel, select Add to create from scratch or select Copy to copy a from an existing department.
  • Enter the description as you would like it to display on reports
  • Non-Merchandise – Enter ‘N’ if this is a normal ‘inventoried’ department or ‘Y’ if this department is for NON merchandise classes, such as fee codes.
  • Enter ‘Y’ to exclude this department’s sales for the flash report which is a special sales report that does daily/weekly/monthly/yearly sales comparison to same time for previous year.
  • Enter any additional descriptions that you would like to use to help explain this department.
  • GL & DSR Dist Code: – If you have created some General Ledger distribution codes then you can select them here. These are used in the reporting for general ledger.
  • Transfer Out Disc %: – This is the discount that will be used when transferring inventory from one store to another, the items in this department at cost * (1-discount). Leave the field blank for no discount.

Class Setup

Once the department has been created, you can now create the classes that are part of that department, some examples would be (Textbooks – New Books, Used Books, E-books, Rentals: Clothing – Men’s Shirts, Women’s Shirts, Children’s shirts or just Shirts, Pants, Shorts: Food – Packaged food, Prepared Food, Snacks, Sodas, Candy Bars, Chips)

  • Enter a ‘.’ to create the next sequential number or enter the number that you want to use. If you create a new class you will be prompted to Add/Copy/Cancel, select Add to create from scratch or select Copy to copy a from an existing class.
  • Enter the description as you would like it to display on reports.
  • Enter the Module that the class is part of (POS, GM, TX).
  • Enter the Department that the Class is part of.
  • ERP Method is a custom field for Datatel – call TCS if you need this.
  • Category Description – this is the Class Category fields that are maintained in GM.SU.1.1, these are used with the financial aid module to group classes together for the purpose of adding them to the financial aid customer type setup.
  • Status – ‘A’ is the normal status, you can also set the department to ‘I’ for Inactive.
  • Taxable – Blank and ‘Y’ have the same meaning, if a department is NOT taxable then enter a ‘N’.
  • Tax Table – You can enter a tax table that is different than what would be considered the Normal tax table used for the store. If a tax table is entered here it will be used for this item regardless of what is entered at the store or register level.
  • Allow Discounts – Blank and ‘Y’ have the same meaning. Enter a ‘N’ if items assigned to this department should not be allowed to be discounted at the register.
  • Maximum and Minimum Price- You can enter a Max and Min price to these fields, this will prevent you from entering a price that is too high or too low and prevent you from doing a price override at the cash register that is outside of the range set here.
  • Target Margin – Enter what you would like your margin to be for this class of item, if an item is sold without a cost associated then the system will use the margin set here to calculate the cost for reporting.
  • Default Tag type – Enter in the tag type that you would like all items in this class to use as a default, you can change this for any individual item.
  • Distribution Code – Enter a ‘N’ here if you have a preferred customer system but you do not allow rebates for purchases of items in this class. If this field is left blank, then rebates will be allowed for purchases in the class.
  • Report Group – You can enter grouping numbers here so that certain classes will report together.
  • Sub-Class is setup to be used with the NACS Universal Hierarchy for reporting to NACS.
  • Sub-Category is setup to be used with the NACS Universal Hierarchy for reporting to NACS.
  • Sub-Other is setup to be used with the NACS Universal Hierarchy for reporting to NACS.
  • NACS-Survey is setup to be used with the NACS Universal Hierarchy for reporting to NACS.
  • Modifier – You can enter any modifier that has been setup in POS2.2, this modifier will automatically get used on all transactions that sell an item in this class.


Special Orders

Overview

Special Orders are used for items not in stock. Three major processes are involved: Placing the Special Order, Receiving the Special Order, and Picking up the Special Order by the customer. The following document shows how Special Orders work with the TCS Retail software.

Placing Special Orders

  1. In Cash Register Screen in POS, enter a regular Sale transaction type.
  2. Hit the Special Orders function key you have set up (To set this up read Special Order Entry POS Modifiers on page 4).
  3. Enter the information to go on the Special Order. If a deposit is entered, this amount will be added to the Balance Due.
  4. Optional Step: For GM or TRADE create a Pending Order. For Text items, add them to a Manual PO.
  5. Finish the Sales transaction.
  6. Print off a copy of the receipt for the customer and a copy for ordering personnel.
  7. Log to the module where the item exists (GM, TRADE or TEXT).
  8. Place the Order. (Cancel if you discover an order is not necessary).
  9. Optional: Print special order tags to tag items with person’s information.

Receiving Special Orders

  1. Enter a receiving log as normal.
  2. If there are any outstanding Special Orders in the master file, a comment will be automatically added to each line item with special order quantities.
  3. Optional Step: For GM or TRADE name, phone, address, title, author, special order number, date. You must have a Special Order tag code setup (SPO tag type).
  4. Optional: Place special order tags on items.
  5. Notify customer that item has arrived.

Picking Up Special Orders

  1. Customer picks up special order items.
  2. Customer takes items to the cashier.
  3. Do a regular Sale transaction.
  4. For the line items enter the Special Order Pickup Modifier. (To set this up go to Special Order Pickup Modifier on page 6).
  5. This will take you into Special Order maintenance. Put in the quantity being picked up. The program will automatically add these items to the current transaction.
  6. Total the transaction.
  7. At the tender code entry, if a deposit was made on the special order, enter the amount of the deposit. For the tender type use the Special Order tender. (To set this up go to Special Order Tender Key on page 7).
  8. You will be prompted once more for the special order ID–enter it.
  9. Use any other tender type to pay for the remaining portion of the sales transaction.
  10. When all items are picked up, the special order will be flagged with a “P” status as “picked up”.

Setup Issues

In order for Special Orders to work, the following items need to be configured:

Special Order Entry POS Modifier

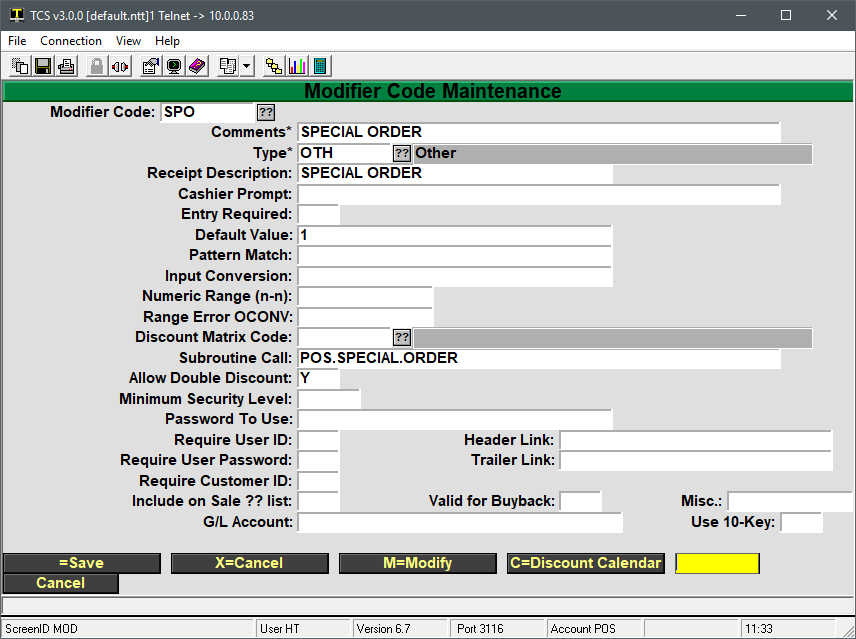
This needs to be configured in the POS system and setup on the POS function keys. First configure the modifier. A sample SPO modifier would be similar to the following screen:

(POS-2-2)


In summary, the Subroutine Call is the most important part of this modifier. This is what executes the Special Order Maintenance program. The Subroutine Call should be set to POS.SPECIAL.ORDER.

Special Order Entry Function Key

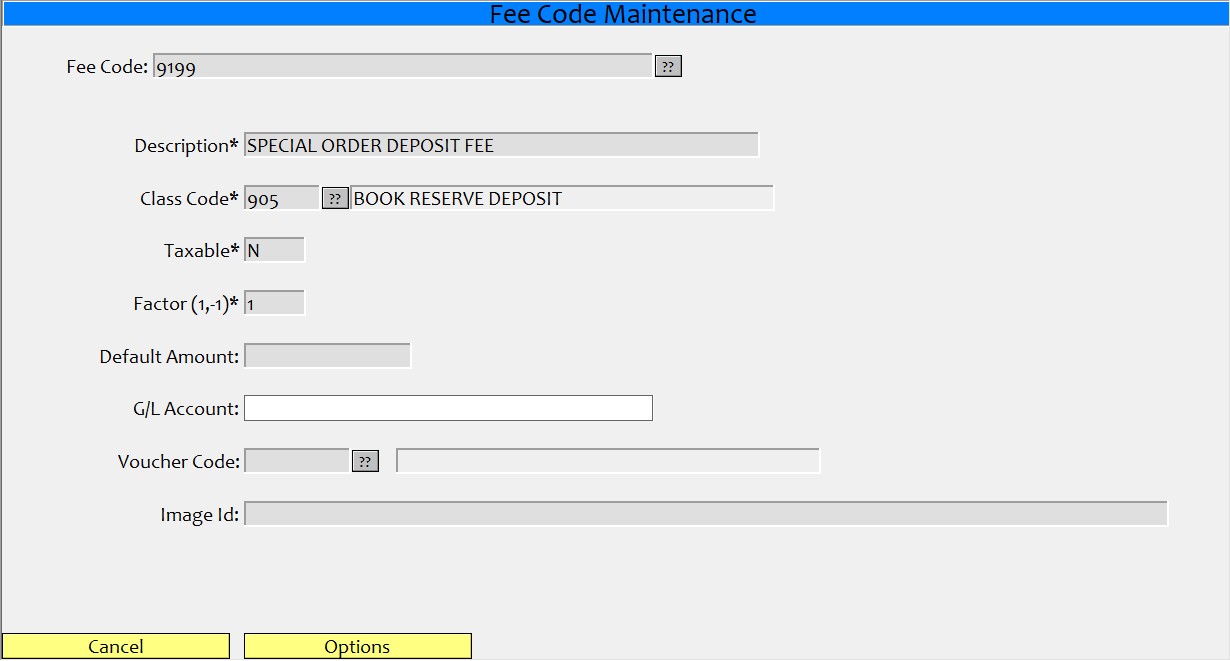
Because of accounting issues involved, if the customer puts a deposit down on Special Order items, this deposit must be accounted for much in the same way as vouchers. A fee code must be used to account for the money received from the customer. Because no merchandise is exchanged at this time, the fee code must be associated with a non-merchandise class and department.

Setting up a Fee Code

A sample Special Order fee code is shown in the screen below:

(Menu Path: POS 22—23)

Setting up a Function Key

Now that the Special Order modifier and fee code are set up, they just need to be added to the keyboard or touch screen layout. Special Orders may be entered without a function key code. However, because of the data needed to start a Special Order, it is much easier to set a function key with the data needed. For example, if my modifier to start Special Orders was SPO and the fee code was 9199, then in the Sales Entry screen, for a line item I would need to key in the following: 9199|SPO. This is much easier done with a function key set to 9199|SPO.

The FEE|SPO function can be added to a touch screen menu in POS-3-22 or to a keyboard layout in POS-3-21. Simply find an empty position in the touch screen or keyboad layout and set the Value field to be the “feecode”|SPO.

Special Order Pickup Modifier

Once items have been placed on Special Order, received, and the customer is ready to pick them up, you will need to do another sale transaction so the customer can pay the remaining due on the items ordered. Instead of manually scanning all the items to be picked up and manually setting the picked up quantities, this can all be done through the cash register.

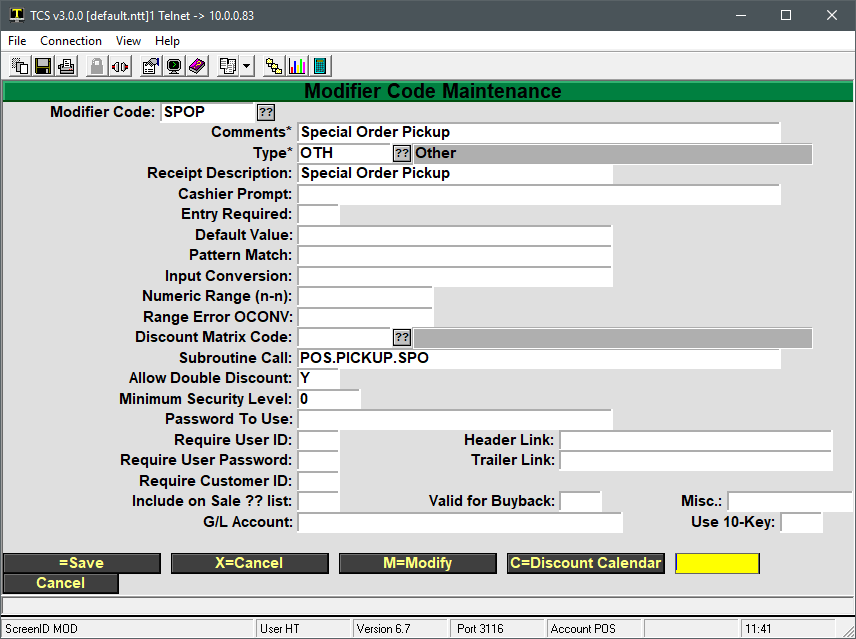
The key to doing this is by setting up another modifier for Special Order Pickups. The following is a sample modifier with the necessary routines to do this:

(Menu Path: POS 2—2)


The most important for this modifier is the Subroutine Call to POS.PICKUP.SPO. This program is what handles picking up Special Orders.

Special Order Pickup Function Key

Because this modifier can be used alone, it is not as difficult to use as the Special Order Entry modifier. Therefore, you may choose not to set it up as a function key. In order to use this modifier in POS Sales Entry, simply key in |SPOP. If you do choose to set it up as a function key, then you will need to add it to a touch screen code in POS-3-22 or a keyboard layout in POS-3-21.

Special Order Tender Key

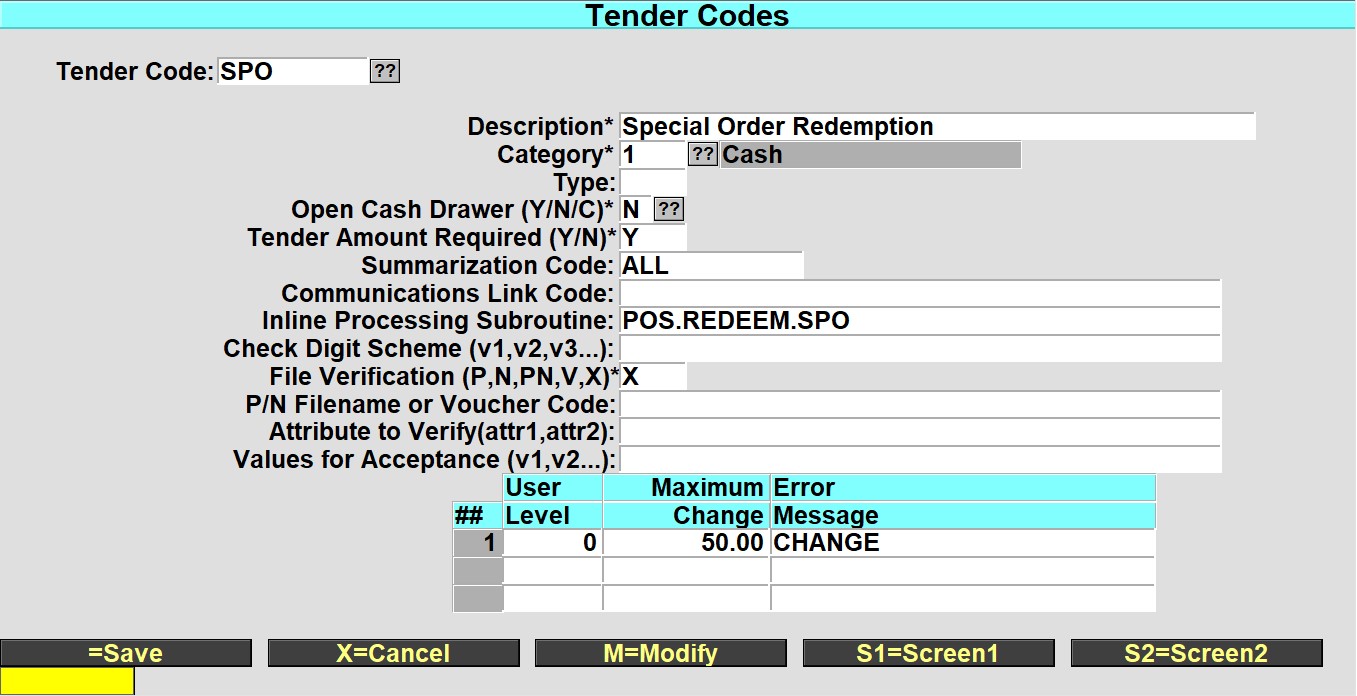
If a deposit was made at the time the Special Order was placed, then that deposit needs to be credited to the customer. This is done in the form of a tender. In order to do this, a Special Order Credit tender code must be setup. The following screen shows a sample tender code:

(Menu Path: POS 2—4)


Once again, for details on Tender Code Maintenance, see your POS documentation. The important part of this tender code is the Inline Processing Subroutine, POS.REDEEM.SPO.

Screen and Field Definitions

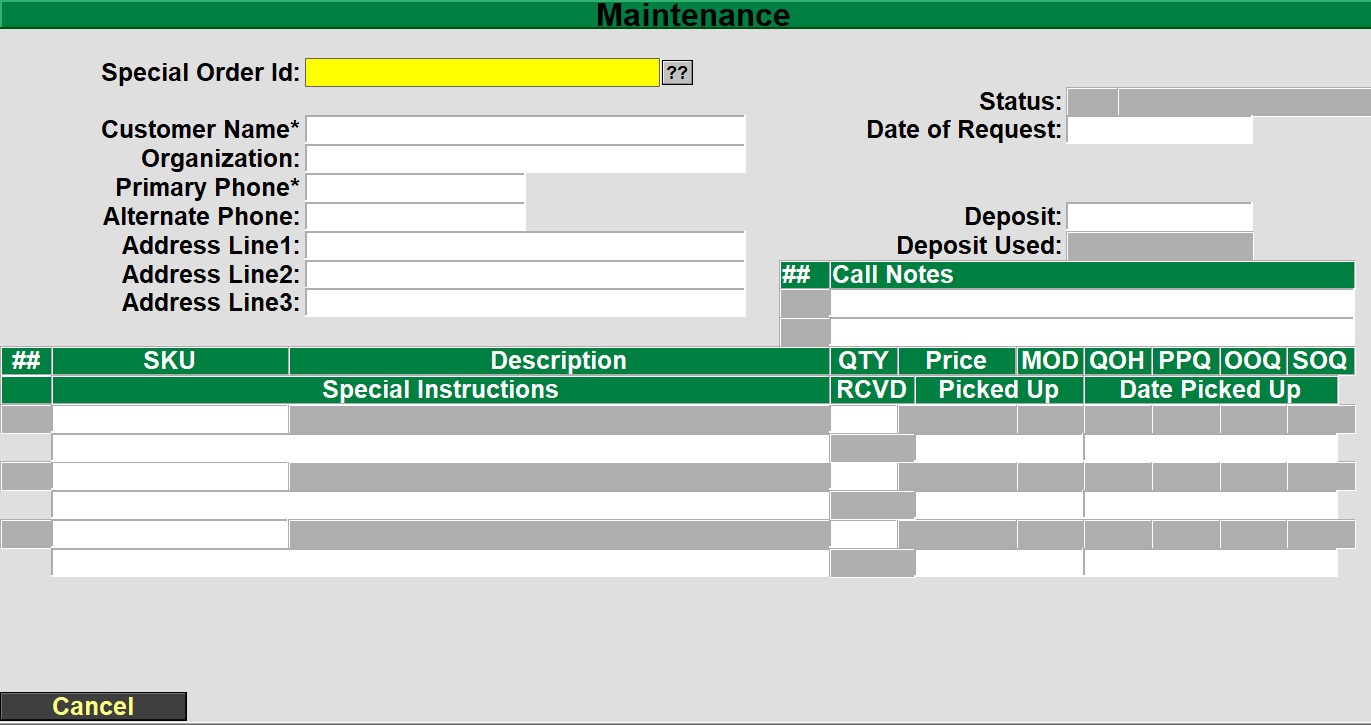
The following is the Special Order Maintenance/Entry screen. This is the screen that will be used when special orders are placed and when they are picked up.

(Menu Path: POS 24—1)

Field Definitions

Customer Name: Enter the name of the customer that is making the order. This name will appear on the Special Order Tag when the book is received.

Organization: Enter the company or organization if applicable. Only for reference in this screen.

Primary Phone: Enter the primary phone number where the customer may be reached. This phone number will appear on the Special Order Tag for quick reference when receiving and notifying customers.

Alternate Phone: Enter an alternate phone number where the customer may be reached if not able to be reached at the primary number.

Address Lines: Enter the address of the customer. This may be if notifying customers by mail instead of by phone. Also may be used for delivery of items.

Status: Display field only. This shows the status of the order. This is usually ‘O’= Open, ‘C’ = Customer Cancelled, ‘S’ = Store Cancelled, ‘P’ = Customer has picked up item.

Date of Request: Date information was first entered into this screen, or the date the customer made the request. This does not mean a PO has been made.

Deposit: Enter the amount of any deposits made. You may set up a default deposit required in POS General Parameters. If this is set, you are required to enter a certain percent of the total.

Call Notes: Enter any special instructions to be displayed and used when calling the customer to pick up the item.

Item Information: Enter the SKU/ISBN for the item to be placed on order. All standard cross-references work here, by entering author/title, title, etc. The item information is displayed and you are prompted to enter the quantity to be placed on order. The other fields show quantities already on order, on hand, and on pending order.

Qty Received: This number is entered through receiving. When an item is received, the number of items received are added here.

Qty Picked Up: This may be automatically updated to be the same number as items received by choosing the ‘P’ option at the ‘Options’ prompt. You may also manually enter here the number of items picked up by the customer if different than the items received.

Date Picked Up: This is automatically added in by choosing the ‘P’ option at the ‘Options’ prompt, or by adding a ‘Qty Picked Up’ amount. Default is the current date.

Enter any special instructions for each item on the second line of each item.

Update Options

<>=Save: Saves the item out to disk. You will then be prompted to place the item on Pending Order.

<X>=Cancel: Cancels any changes made to the order. If it is a new order, it will not be saved to disk.

<M>=Modify: Modify the current order. Make changes to items, names, etc.

<C>=Customer Cancelled: Cancels the order and sets the status to ‘C’.

<S>=Store Cancelled: Cancels the order and sets the status to ‘S’.

<P>=Picked Up All: Automatically update Qty picked up, Picked up Date and the status will be set to ‘P’.

Master File Special Order Links

In Master File inquiry, we will show the following numbers:

SPO On Order: Number of items currently on pending order or on a purchase order somewhere.

SPO Rcvd: Number of items received through the receiving log. Decrements the SPO On Order number.

SPO Picked Up: Number of items picked up by customer. Decrements the SPO Rcvd number. This number then is only a sum of active SPO’s where the total picked up does not equal the total put on special order. This is useful for accounting for an item in stock that is not out on a public shelf, because it is on reserve for special order.

Special Order Reporting

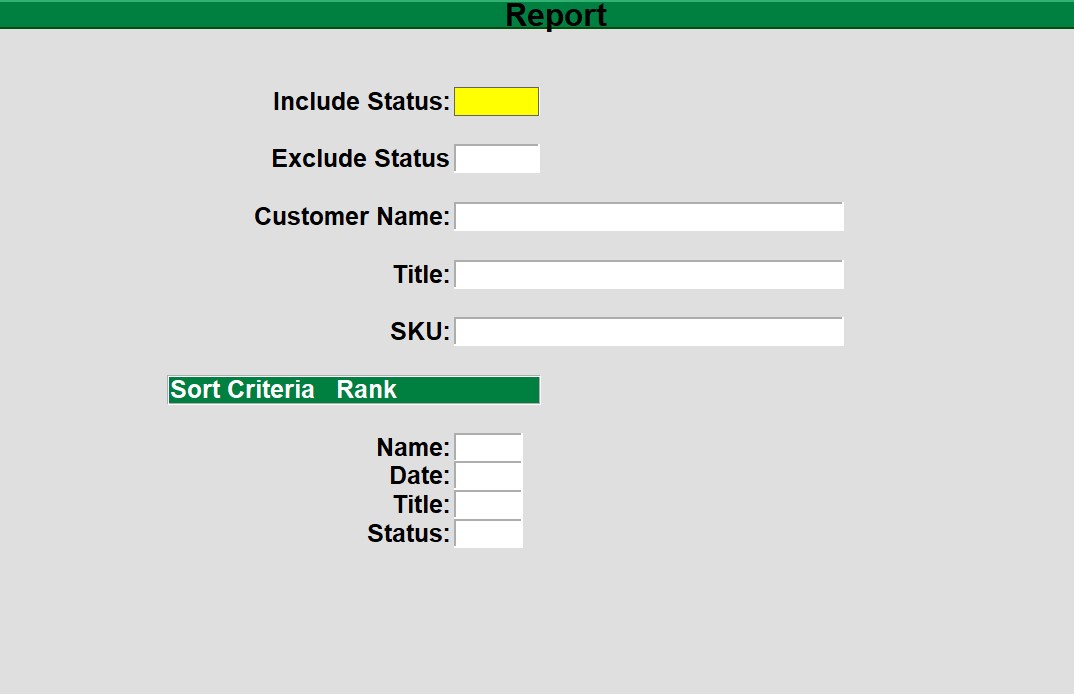
There is a report used to track special orders. The following is the screen and field definitions:

(Menu Path: POS 24—21)

Field Definitions

Include Status: Enter one or more special order statuses separated by commas or leave this field blank to display all statuses.

Exclude Status: Enter one or more statuses to be excluded from the report or leave it blank if there are no statuses to exclude.

Customer Name: Enter a customer name if you only want to display one customer. You may enter part of the customer’s name, but remember that this could result in a report including other customers who share the same letters.

Title: Enter a title or item description if you are interested in a specific item. You may enter part of the title or item, but remember that this could result in a report including other items which share the same letters.

SKU: Enter a SKU if you only want to report on a specific SKU.

Sort Criteria  or Rank,  Enter 1,2,3,4 in the fields to indicate the order that you would like to sort the results in. You can also leave these fields blank and the report will sort in the default order.


Report: Class Summary by Class

Below is an overview of the Class Detail by Date by Class report. General information on what fields are available, what they do and what data is presented in the report.

Path: POS-RP-1-3-3

Purpose: This report is used to display high level information of class dollar amounts per day.

Output: Store, Report Group (optional), Description, Sales, Returns, Markdowns, Discounts, Class Net, Cost Quantity.

Over a one day date range this report looks very similar to other class reports. Just like those reports though, the multiple days is what makes the report unique.

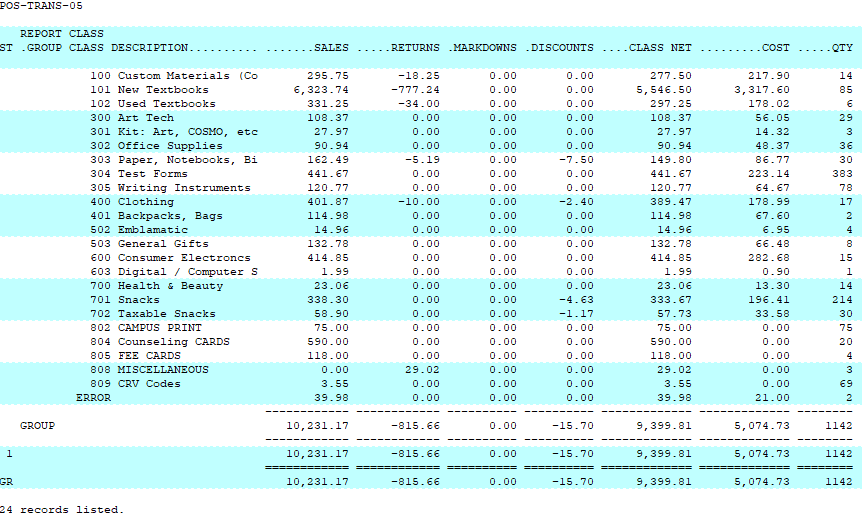
This screenshot shows a single day with the “Sort by Report Code” field set to a Y. The Y for this field triggers the optional Report Group column. If this field is a N then the column is removed.


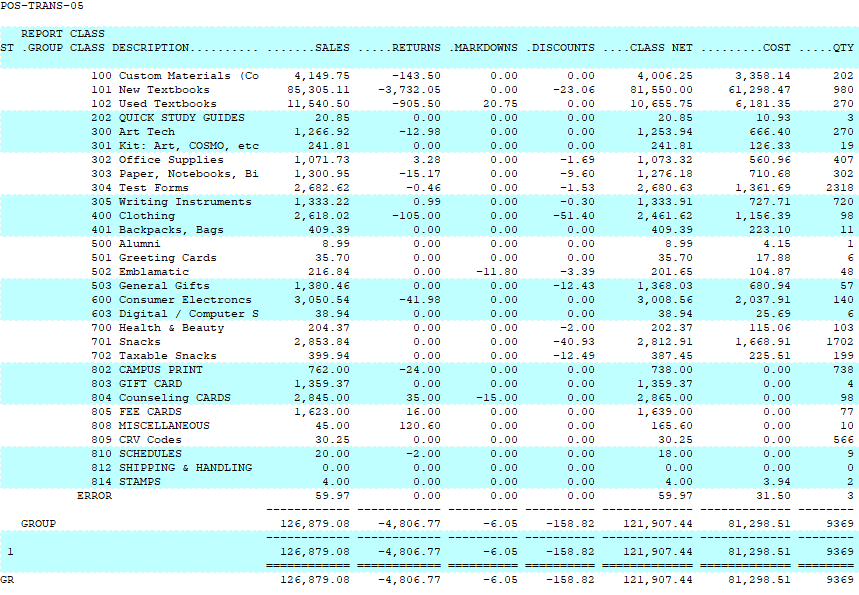
In this example we have six days worth of data. The format of this report remains the same, the numbers simply include more days.


Unique Field Options

Sort by Report Code: Allows you to override the numerical listing of class codes into their class report group. This is essentially an override of the default numerical sorting of class codes.

Creating a class Report Category is found in POS-22-3-5. Once a category has been created you can assign it to the classes belonging to that report category in POS-22-3-2.

Note: the most common fields are covered in the Reports: Best Practices and Procedures article. Only special usage scenarios or options are covered in this article.


Report: Class Detail by Class by Date

Below is an overview of the Detail by Transaction Number report. General information on what fields are available, what they do and what data is presented in the report.

Path: POS-RP-1-3-2

Purpose: This report is used to display high level class dollar amounts per class.

Output: Class, Class Description, Sales, Returns, Net Sales, Markdowns, Discounts, Class Net, Cost, Quantity and Margin.

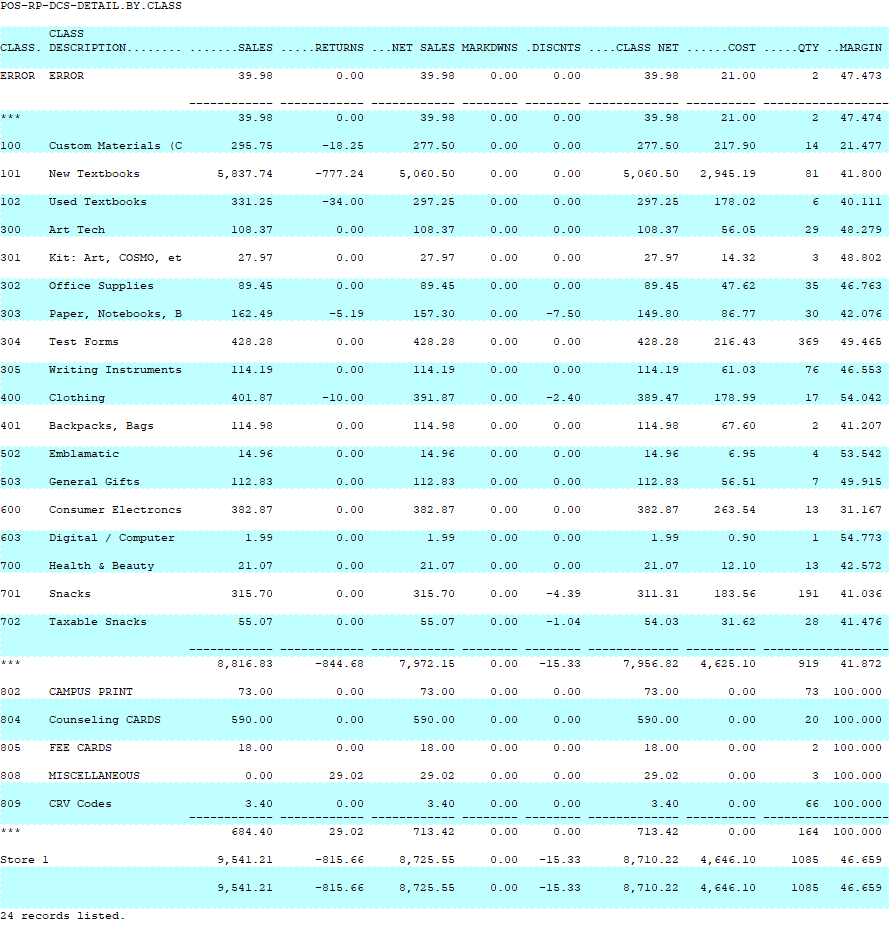
At first glance the data is very similar to the Class Detail by Date by Class report if you only run it for one date.


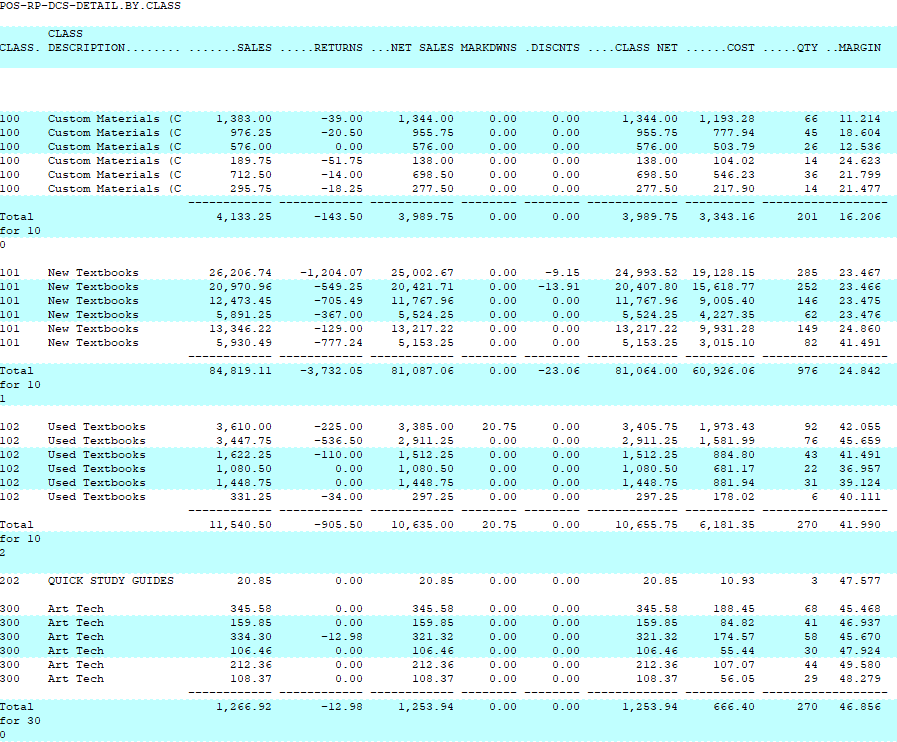
However, the format changes when you run it for multiple dates. The focus is on the class data, then by date. So class 100 is all grouped together across the date range, totaled for the date range, and then class 101 is reported for the date range, etc.

This example is for a six day span.


Unique Field Options

There are no unique fields in this report.

Note: the most common fields are covered in the Reports: Best Practices and Procedures article. Only special usage scenarios or options are covered in this article.