File Transfer Changes and Setup

TCS customers can transfer files via Secure FTP (SFTP) which allows customers to upload course imports, Redshelf catalogs and various other files for import/export into the hosted system.

Connection Information

The server can be accessed with the information below.

  1. Server: connect2.total-computing.com
    • If IP address is required: 104.209.214.232
    • Please note the server name is the preferred connection method.
  2. Port: 43522
  3. Protocol: sftp

Creating A FileZilla Connection for The First Time

The steps below cover how to install FileZilla if you don’t currently have it on your PC. Please note that you will need your credentials in order to complete the process. You can request your credentials by emailing support@total-computing.com.

  1. Download FileZilla from here.
  2. Run the installer and install with the default options.
    1. Click I Agree
    2. Typically select Anyone who uses this computer and click Next
    3. Leave the checkboxes checked, and if you would like a shortcut on your desktop, check Desktop Icon
    4. Click Next for the default Destination Folder
    5. Next in follow screen
    6. Leave Start FileZilla now checked and click Finish
      • Note that there were no prompts for any addon programs, browser toolbars, etc. as of 5/4/20. Always watch the prompts for any software you download to make sure another program hasn’t been included.
  3. Create the TCS connection and save it in the site manager
    1. FileZilla should already be open, if not, go to Start, type filezilla and open the red FileZilla App
    2. Click OK for the welcome message
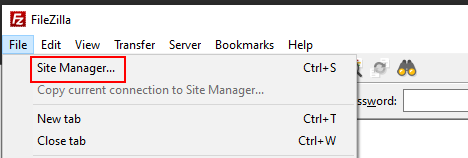
    3. Go to File and select Site Manager
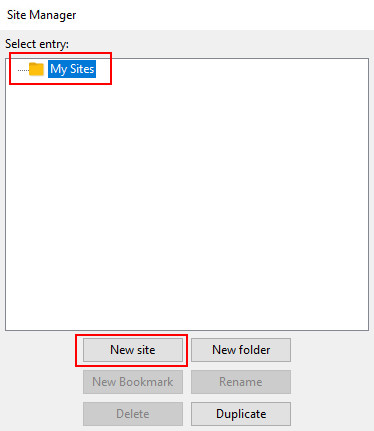
    4. With My Sites selected, click on the New site button
    5. Name the new entry created (typically TCS) and press Enter
    6. Customize as follows
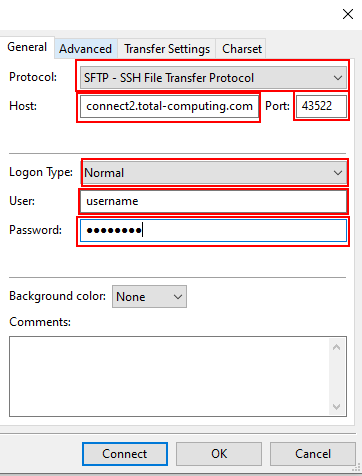
      1. Change the Protocol drop down from FTP – File Transfer Protocol to SFTP – SSH File Transfer Protocol
      2. Enter connect2.total-computing.com into the Host field
      3. Enter 43522 into the Port field
      4. Logon Type should be set to Normal
      5. Enter your username and password from TCS
      6. Click on OK to save your changes
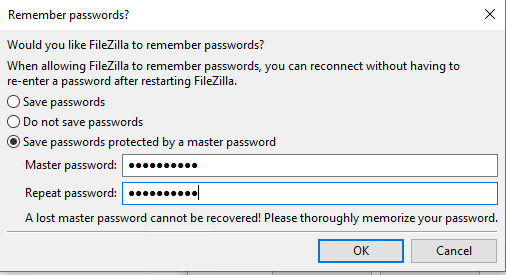
      7. You will be prompted on whether or not FileZilla should remember the site password. It’s recommended to use a master password.
        1. A master password will prompt your for your password that you create.
        2. FileZilla will prompt you for your password every time you connect to the system. After you provide your master password it will use the stored site information to connect.
  4. How to connect
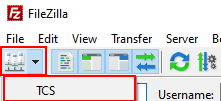
    1. Click on the small Site Manager icon right beneath the File menu option and click on TCS
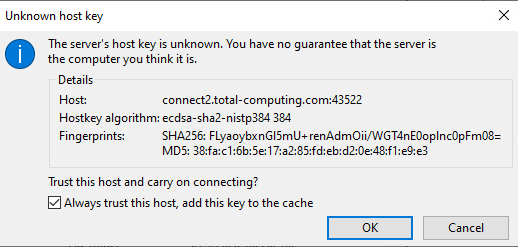
    2. The first time you connect to the new server you will be prompted to accept the server’s host key. Check the Always trust this host, add this key to the cache and click OK
    3. You should then be connected to the server with your PC files shown in the panel on the left, and the remote server files on the right.
  5. How to upload files
    1. This link will take you to their wiki article on navigating the server files, navigating the files on your PC and how to upload and download to/from the server. Please reach out to support if you have any questions after reading that article.


Set or Reset a User Password

Some menus have been changed, please read carefully.

While the steps on how to change a user’s password are straight forward, there are a few points that need to be kept in mind.

  1. When you set a user’s password in User Maintenance (UU-5-1) or User-Cashier Maintenance (POS-22-1) the system automatically sets their password to reset when they first log in.
    1. This means that the password set in User Maintenance is temporary. Do not set the password to what the user would like to use long term.
  2. It is necessary to set the user’s password from the Host Connection. While these steps can be followed on an individual register, passwords that are changed on the cash register ARE NOT sent to the host or to all of the other registers.
    1. By setting the password on the host all registers will get the updated password.
    2. Check POS-6-2 to view which registers are communicating. Those who have a “To Be Xfered” amount of zero in the right hand column will immediately have the updated password.
      1. Steps to restart the register communications can be found in the Smartlane Communications video here.

To quickly reset the password for the logged in user

  1. Type PASSWORD into any menu prompt and press Enter
  2. A dialogue will appear prompting for the users password along with a Enter New Password and Confirm Password prompt
    1. Enter your current password into the “Enter Your Password” prompt
      1. This is to confirm the identity of the logged in user
    2. Enter a new password into the “Enter New Password” field.
      1. Passwords must be 8 characters long and include at least one letter and one number
        • g. 1234567A or ABCDEFG1 the password is NOT case sensitive, this means that ABCDEFG1 and abcdefg1 are both treated the same.
      2. Re-enter the new password into the “Confirm Password” field and press enter.
    3. The password has now been set for the logged in user and will update to all of the registers.


To reset the password for another user

  1. From any module, go to UU-5-1 or POS-22-1
  2. Enter the user ID of the user who’s password is going to be reset
  3. Navigate to the Password field and type in the new password
    1. Note that this new password is temporary. The user will be forced to set their own password after the log in with this temporary password.
    2. Passwords must be 8 characters long and include at least one letter and one number
      • g. 1234567A or ABCDEFG1. They can also include special characters. The password is NOT case sensitive, this means that ABCDEFG1 and abcdefg1 are both treated the same.
  4. Enter the temporary password again into the Confirm Password field
    1. Press Continue on the notification box. This is a notification that the password entered is temporary and the user will need to reset their password when they log in.
  5. Press ESC after reaching the Expires field
  6. Enter to save the password change.
  7. Have the user log in with their new temporary password.
    1. You can type in ID at the menu and press enter to display the login prompt or have them log into another connection.
  8. They will immediately get a prompt to reset their password
    1. They need to enter their new, permanent password into the Enter New Password and Confirm Password fields
    2. Passwords must be 8 characters long and include at least one letter and one number
      • g. 1234567A or ABCDEFG1. They can also include special characters. The password is NOT case sensitive, this means that ABCDEFG1 and abcdefg1 are both treated the same.
  9. After that is complete their password will update to all of the registers.


TCS Department/Class Setup

Before you can add any inventory items for Fee codes you must have the Department and Classed setup that the items will be a part of. Depending on the module that you are in navigate to the appropriate place to create the department or class code; GM – GM.SU.1.4 and 2, TX-TX.SU.4.6.21 and 22, POS-POS.22.3.1 and 2, AR-AR.SU.5

It does not matter which module you use to create the department or class code since they are universal and available in all modules once they have been created.

Department Setup

The department needs to be setup first, in GM go to SU.1.4. Some examples of Departments would be Textbooks, Clothing, Food.

  • Enter a ‘.’ to create the next sequential number or enter the number that you want to use. If you create a new department you will be prompted to Add/Copy/Cancel, select Add to create from scratch or select Copy to copy a from an existing department.
  • Enter the description as you would like it to display on reports
  • Non-Merchandise – Enter ‘N’ if this is a normal ‘inventoried’ department or ‘Y’ if this department is for NON merchandise classes, such as fee codes.
  • Enter ‘Y’ to exclude this department’s sales for the flash report which is a special sales report that does daily/weekly/monthly/yearly sales comparison to same time for previous year.
  • Enter any additional descriptions that you would like to use to help explain this department.
  • GL & DSR Dist Code: – If you have created some General Ledger distribution codes then you can select them here. These are used in the reporting for general ledger.
  • Transfer Out Disc %: – This is the discount that will be used when transferring inventory from one store to another, the items in this department at cost * (1-discount). Leave the field blank for no discount.

Class Setup

Once the department has been created, you can now create the classes that are part of that department, some examples would be (Textbooks – New Books, Used Books, E-books, Rentals: Clothing – Men’s Shirts, Women’s Shirts, Children’s shirts or just Shirts, Pants, Shorts: Food – Packaged food, Prepared Food, Snacks, Sodas, Candy Bars, Chips)

  • Enter a ‘.’ to create the next sequential number or enter the number that you want to use. If you create a new class you will be prompted to Add/Copy/Cancel, select Add to create from scratch or select Copy to copy a from an existing class.
  • Enter the description as you would like it to display on reports.
  • Enter the Module that the class is part of (POS, GM, TX).
  • Enter the Department that the Class is part of.
  • ERP Method is a custom field for Datatel – call TCS if you need this.
  • Category Description – this is the Class Category fields that are maintained in GM.SU.1.1, these are used with the financial aid module to group classes together for the purpose of adding them to the financial aid customer type setup.
  • Status – ‘A’ is the normal status, you can also set the department to ‘I’ for Inactive.
  • Taxable – Blank and ‘Y’ have the same meaning, if a department is NOT taxable then enter a ‘N’.
  • Tax Table – You can enter a tax table that is different than what would be considered the Normal tax table used for the store. If a tax table is entered here it will be used for this item regardless of what is entered at the store or register level.
  • Allow Discounts – Blank and ‘Y’ have the same meaning. Enter a ‘N’ if items assigned to this department should not be allowed to be discounted at the register.
  • Maximum and Minimum Price- You can enter a Max and Min price to these fields, this will prevent you from entering a price that is too high or too low and prevent you from doing a price override at the cash register that is outside of the range set here.
  • Target Margin – Enter what you would like your margin to be for this class of item, if an item is sold without a cost associated then the system will use the margin set here to calculate the cost for reporting.
  • Default Tag type – Enter in the tag type that you would like all items in this class to use as a default, you can change this for any individual item.
  • Distribution Code – Enter a ‘N’ here if you have a preferred customer system but you do not allow rebates for purchases of items in this class. If this field is left blank, then rebates will be allowed for purchases in the class.
  • Report Group – You can enter grouping numbers here so that certain classes will report together.
  • Sub-Class is setup to be used with the NACS Universal Hierarchy for reporting to NACS.
  • Sub-Category is setup to be used with the NACS Universal Hierarchy for reporting to NACS.
  • Sub-Other is setup to be used with the NACS Universal Hierarchy for reporting to NACS.
  • NACS-Survey is setup to be used with the NACS Universal Hierarchy for reporting to NACS.
  • Modifier – You can enter any modifier that has been setup in POS2.2, this modifier will automatically get used on all transactions that sell an item in this class.


Custom Reports Through Query Builder

The TCS Query Builder is a very powerful tool for users of SmartSuite to customize or create new reports that more specifically meet their needs.

The Basics

Verbs Can be either SORT or LIST. List is random and SORT is ordered.
Filename The SmartSuite system is comprised of several data files unique to each module.
Dictionaries Each data file has its own unique set of dictionaries that define how data fields are represented.
Selection Criteria The rules you define to limit the volume of data to be included on a report.
Sort Criteria The rules you set to define how the data will be sorted.
Output Criteria The columns that will be included on a report.


Nearly 100% of the reports in SmartSuite utilize the same rules that the Query Builder does. We just add a more complex screen for your parameters and do a few more technical things.

The best way to create a query is to start from an existing one. If you don’t have an existing one then choose one of the system reports and see how we did it. Try to run a report that contains similar data to what you would like to create. For example, if you are going to create a report to display sale information, then use a Sales report as a reference. This way you can see what filename we are pulling sales data from and can use that same filename in your query.

You can see our query string by running the report but instead of selecting terminal, or printer, etc. choose the option to show the Command String.

Here’s a simple command from POS-RP-04-21 (Cashier Listing).

This has a Verb (SORT), a Filename (POS.EM), and Output Criteria (NAME.15 SECURITY.LEVEL.8 MISC.INFO.40. There is also a HEADING.

Screen Elements

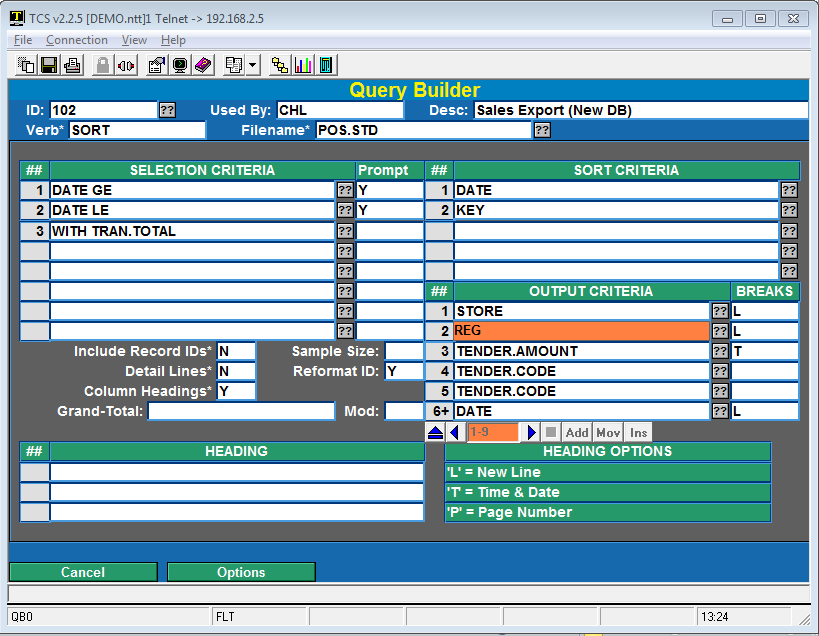
Here’s an example of a query created by an end-user for doing a sales export.

ID This can be alpha or numeric. It is just the name you want associated with the report and is assigned by the user.
Used By Can be left blank or filled in with the name of the person who will be the primary user of the report. (When you enter “??” in the ID field the list is sorted by Used By and then by Desc.)
Verb Use either SORT or LIST
Filename Enter “??” to view a list of all of the files for the database you are logged into (POS, TEXT, GM, etc.) This is where it is easier to use the Command String to see what file to use. After some experience you become familiar with our naming convention and the file names will make sense.
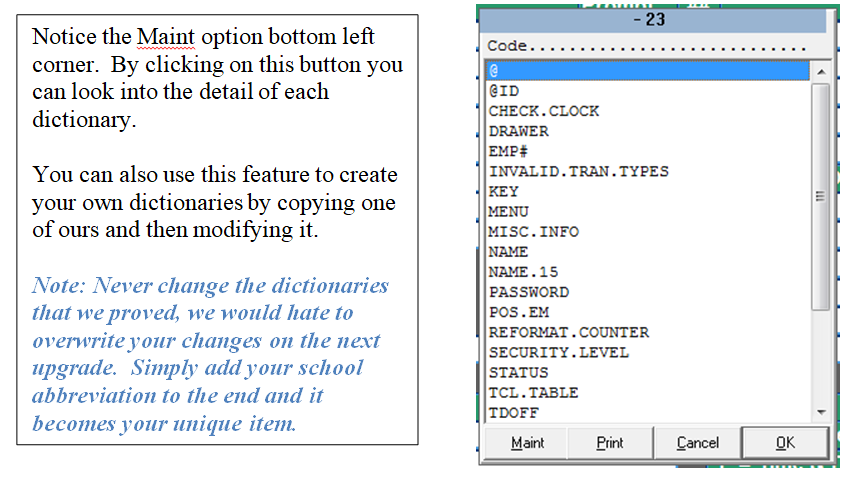
Selection Criteria Enter valid dictionary items. If you click on “??” you will see a complete list of the dictionaries for the file selected. Here is a list of the POS.EM file (employee master).

If you enter “Y” in the Prompt column then when you run the report you will be prompted for the value you want to use. Dates can be entered just like in our screens.

The “??” works the same in each area, so the explanation will not be repeated.

The “?” provides most of the information provided in this document.

Sort Criteria The report above is going to be sorted by DATE and then by KEY. Since it is using the SalesTransactionDetail file (POS.STD) the key is store*date*register*transaction.

Output Criteria This varies in that the 2nd column is for BREAKS. A Break is usually used to provide subtotals. It can also be used to create a logical break on the report. Break options include:

T Total the column

Y Break with no total

P When breaking start a new Page

D Only show the detail lines

U Underline the total

L Suppress and blank lines following a total or other break

Breaks can be combined to cause multiple effects.

Include Record IDs Frequently the ID to a file is cryptic and the data you are viewing is redundant to the ID (just formatted better); in this case enter an “N”. If you want to see the record IDs, then enter a “Y”.

Detail Lines If your primary interest is summary data then enter “N” for detail lines. The 1st time you run the report, or as you are developing it, leave this a “Y” to have a better feel for the data.

Column Headings This is almost always a “Y” but they can be turned off for exporting/importing.

Sample Size When developing the report, you may not want to wait very long for you to see what you will get. Enter number here and as soon as that number of detail records is reached the report will print (or display). We usually start with 10 and move up to 100 if necessary.

Grand Total Enter any wording you want to appear on a grand total line. The Mod: field is used to Underline any totals.

Heading This optional field will cause a heading to print at the top of the report.

There are 3 primary modifiers that can be used in defining a heading. They include:

L Create a Line Break

T Insert the Time & Date

P Insert the Page Number

Here’s a sample:


When you choose the Run option you will be prompted for any of the inputs you specified and then you will select where to print the report using the same options as all other SmartSuite reports.


Getting a Report Into Excel

These instructions cover how to save your reports as a text file and then import it into Excel. Most reports are formatted in a way that allows this but there are a few exceptions. Exceptions occur when the report data doesn’t line up perfectly into columns, such as the Tender Register Summary report (POS-RP-2-21).

  1. First, run your report as normal and send the output to Terminal.
  2. Now we need to save the report as a text file on your computer to import into Excel.
    1. Click on the Save icon at the top of the Terminal Window
    2. Select where you want to save the file.
      • This can be anywhere on your computer. Typical locations will be Documents or Desktop
    3. Name the file
      • Keep it simple and preferably without spaces.
    4. Change the “Save as type” to “Text Files”
    5. Click on the Save button

Importing Into Excel

This assumes that the steps above have been performed and you have a copy of the report on your computer as a .txt file. Things can get a little confusing but if you watch the animated image in step 6 it will cover most of the non-intuitive steps.

  1. Open Excel
  2. Go to File > Open
    • Or press and hold the Ctrl key and then press O bring up the Open dialogue.
  3. Browse to where you saved the file in step 2.2 above
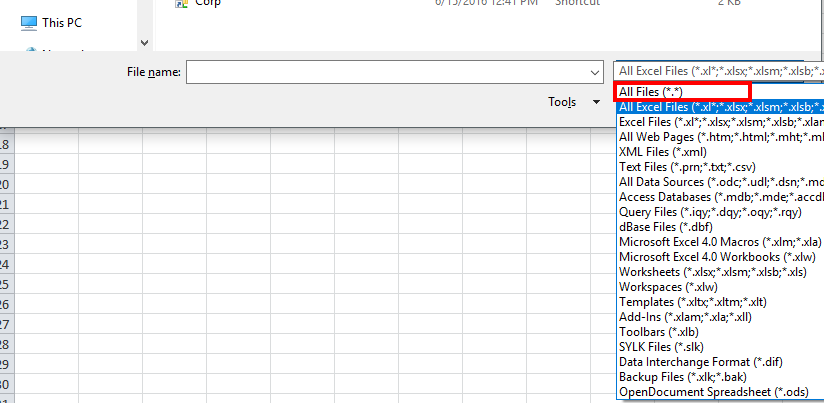
  4. Change the All Excel Files drop down box to All Files
  5. Select the .txt file saved in step 2.2 above
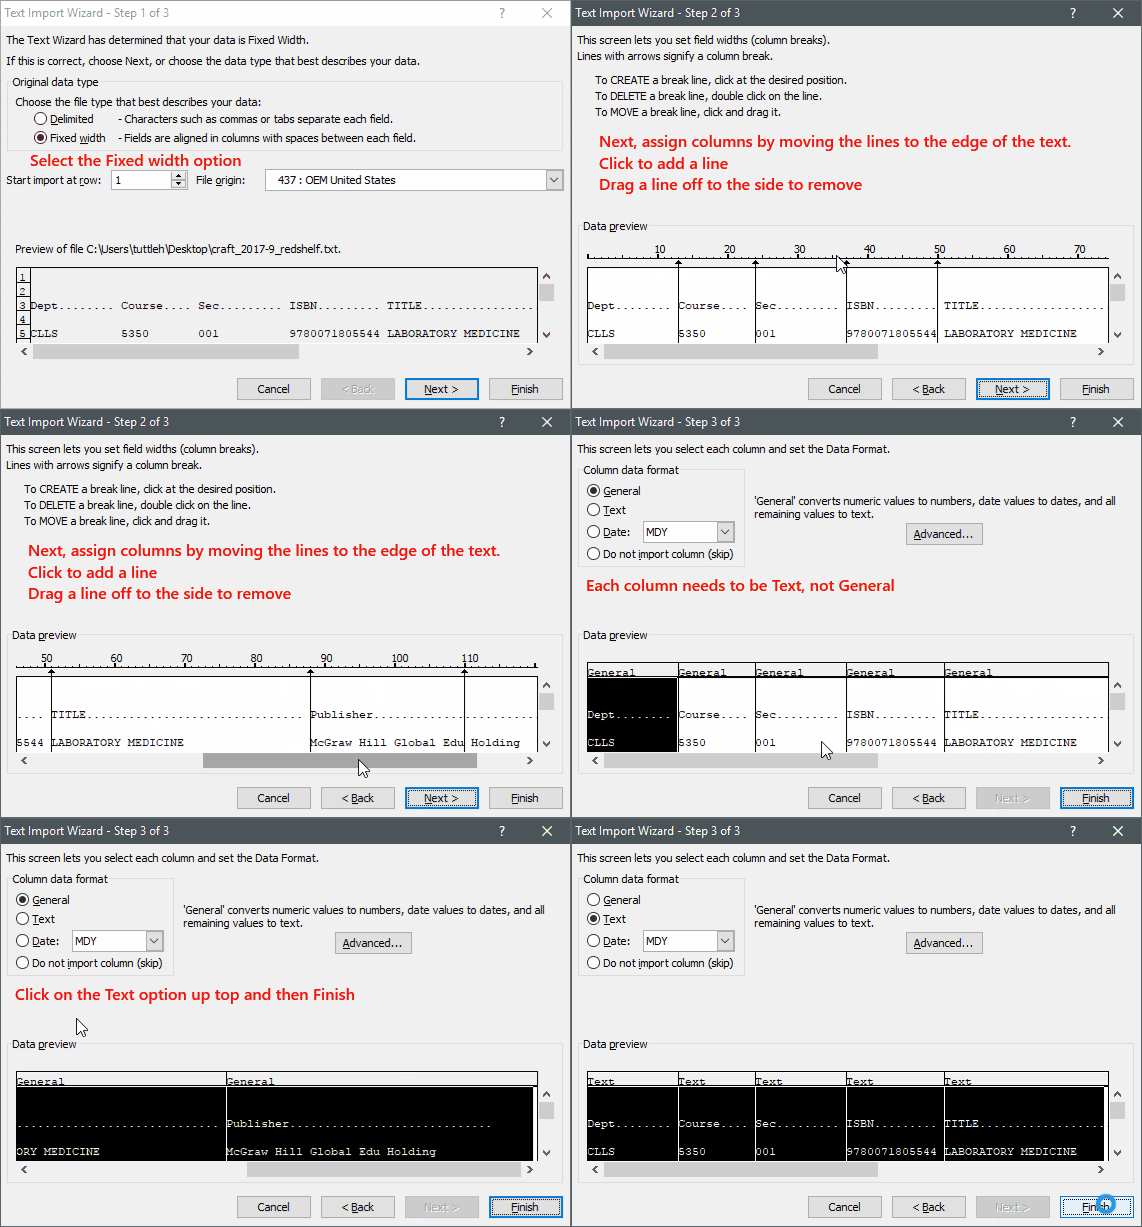
  6. In the Text Import Wizard (step 1 of 3) Select the Fixed width option
  7. In step 2 of 3, click and drag the arrows/lines to the edge of the text. These mark the columns to be used in the spreadsheet.
  8. In step 3 of 3, click on each column and asign the Text data format in the top left
    • You can select the first column, move the slider all the way to the right, press and hold SHIFT and click on the last column. With all columns selected click on the Text data format option on the top left.
    • Click Finish
  9. Now all of the data should be in the Excel document. The ISBN numbers should not look like a notation number (9.78129E+12) they should display as full ISBNs.
  10. Save the document.
    1. If sending to another organization (e.g. Redshelf ebook list, third party inventory company, etc.)
      1. Go to File > Save As.
      2. Browse to where you would like to save the document
      3. Enter a name in the File name field
      4. Click on the Save as type: drop down and select “CSV (Comma delimited) (*.csv)”
      5. Click on Save
      6. The file can now be sent as an attachment
    2. If saving for internal use
      1. Go to File > Save As.
      2. Browse to where you would like to save the document
      3. Enter a name in the File name field
      4. Choose whatever you would like as the file type. The default is typically .xlsx
      5. Click on Save


A/R General Ledger Interface

This document describes the posting of Manually Entered Invoices and Payments within the A/R module.  (Invoices and Payments at the cash register are processed with the POS transactions.)

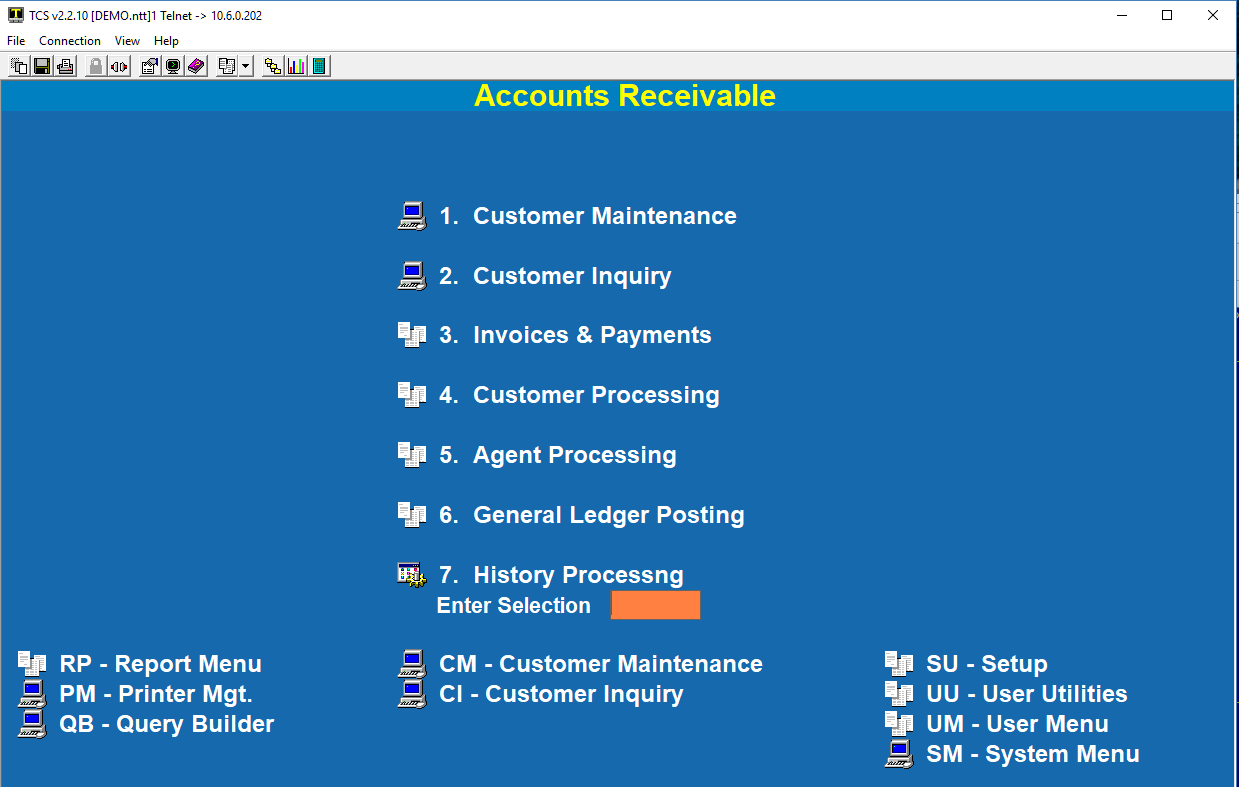
Select Option 6 from the A/R Master Menu.


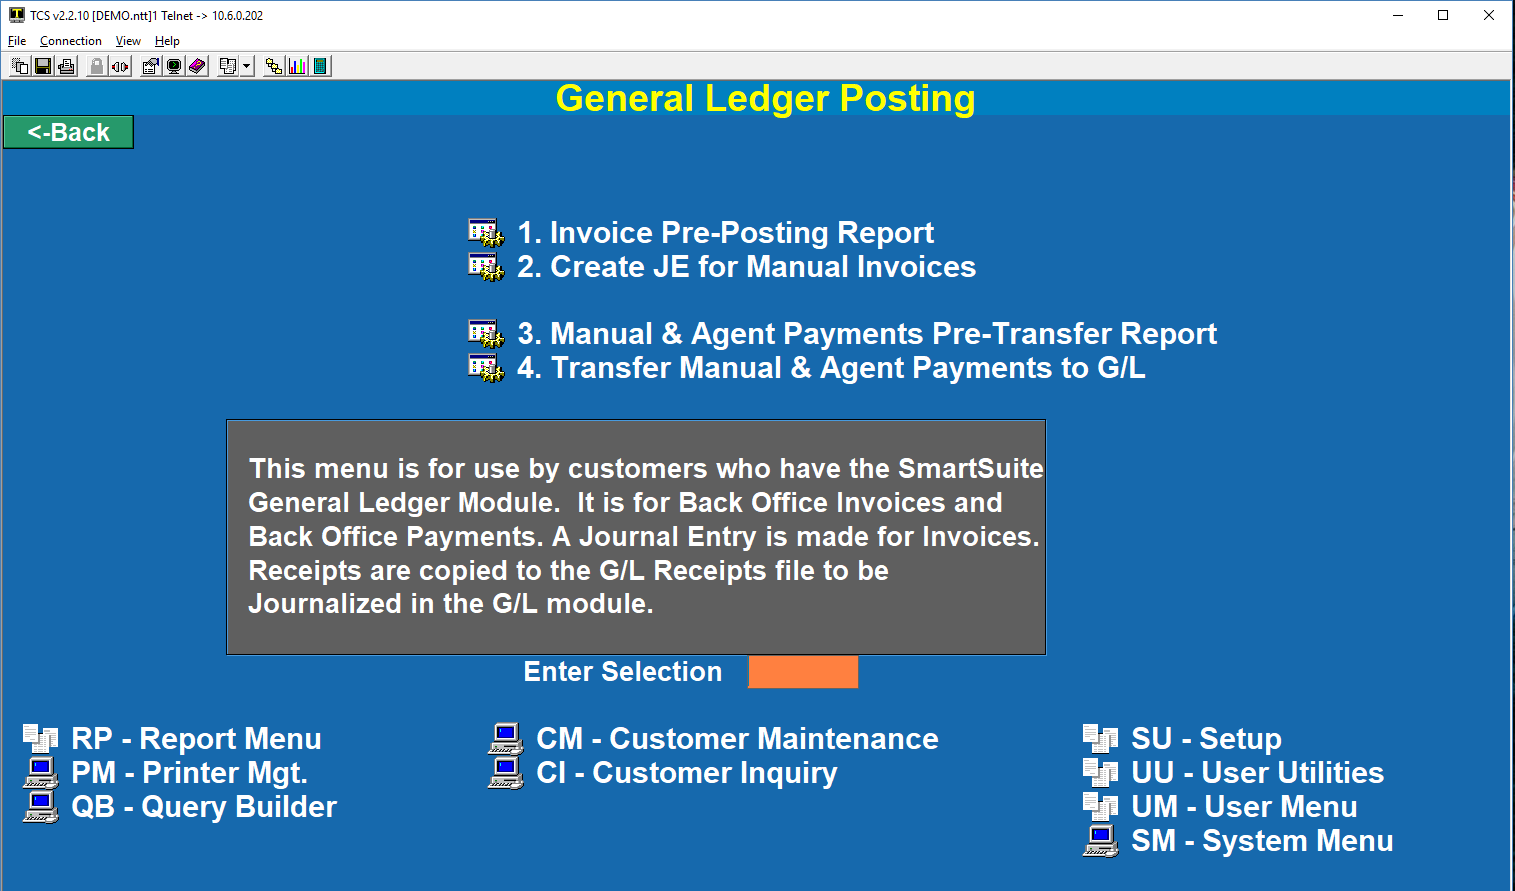
After selecting Option 6 you will see the following menu.

Options 1 and 2 are for Invoices entered in the A/R module.

Options 3 and 4 are for Payments entered in the A/R module.

Invoices

Option 1.  Invoice Pre-Posting Report
Use this report to see what, if any, invoices are eligible for posting.

Select the date range that fits the period that you are working with.  The Ending Date should match your fiscal end-of-month date.  If it does not then you will need to adjust the Journal Entry in GL-01-01 to have the correct accounting period before the JE will post.

Here is a sample report.  It has two invoices on it.  One invoice has the G/L account entered in the invoice.  The second invoice does not use the G/L field on the invoice screen.

With the 1st invoice the posting process will assume that the TCODEs are Class Codes and will use the Sales G/L Account specified in the corresponding Distribution Code for these classes.

The 2nd invoice has the G/L account specified and only that G/L account will be posted to.

Option 2. Create JE for Manual Invoices
This will create an un-posted Journal Entry in the G/L module.  You will need to review and post the Journal Entry.  See GL-01-01.

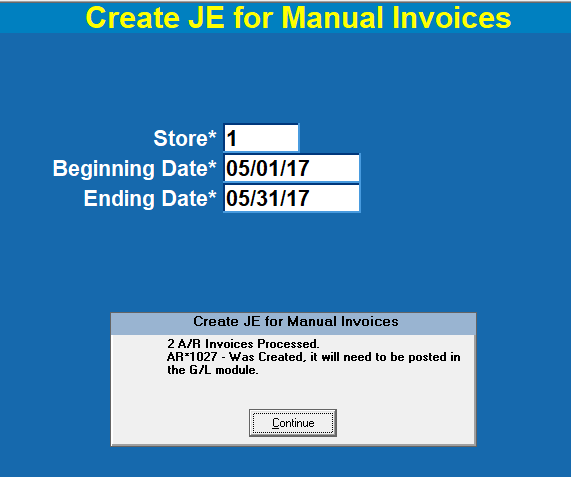
Both options use the same entry screen.

When the Journal Entry is created you will see a box in the middle of the screen with the pertinent information.

Payments

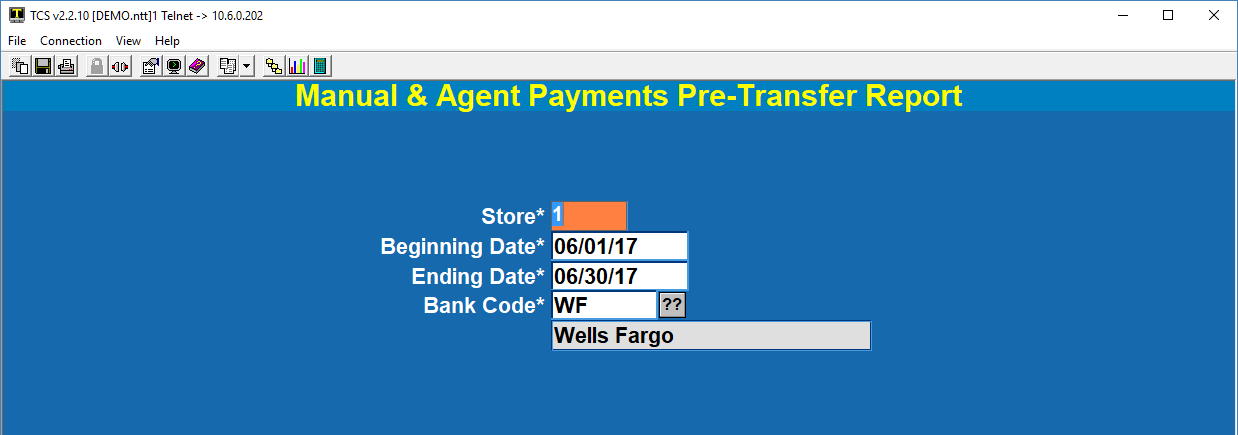
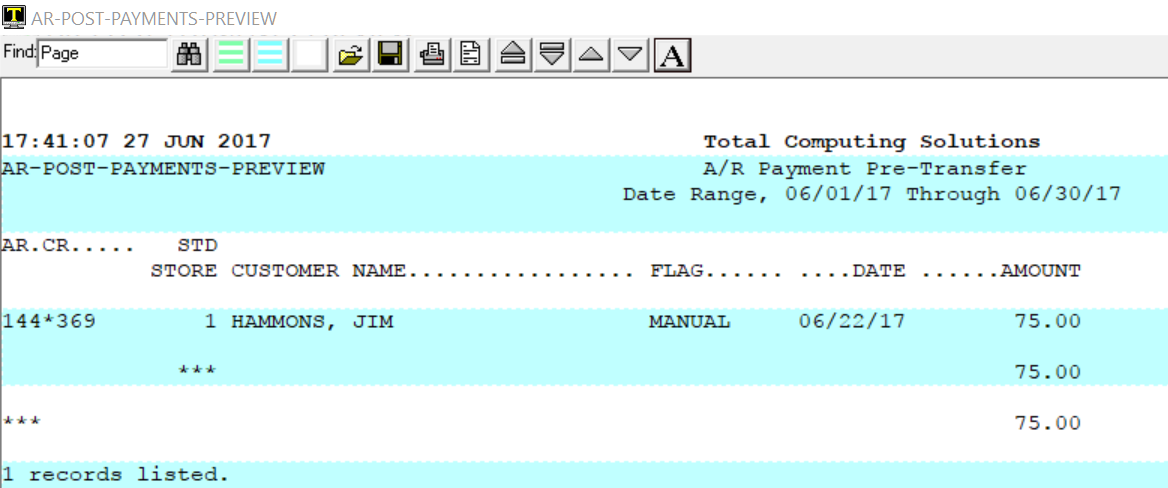
Option 3. Manual & Agent Payments Pre-Transfer Report
Use this report to see what, if any, payments can be moved to the G/L Receipts file. This will show Payments that have been manually entered and not previously transferred to the G/L.  The report is sorted by store, date, and batch flag (Manual or Agent).


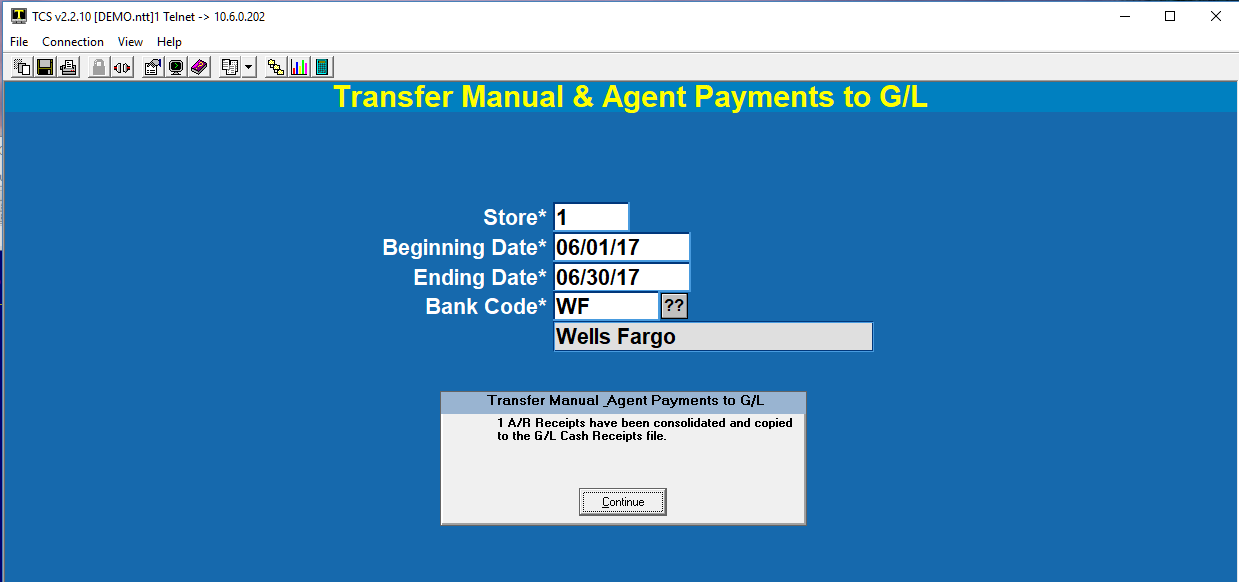
Option 4. Transfer Manual & Agent Payments to G/L

If you use the same values as you did for the report then you will post as many items as there are on the report.

Above is the result of posting a single payment to the G/L Cash Disbursements file.

One disbursement record is created for each date. For example, if your report had 50 line items but only 10 days on it there would be 10 entries in the G/L Disbursements file.

General Ledger Options include:

  1.  GL-04.  Inquiry.
  2. GL-RP-04. Report.
  3. GL-22-02. Post Misc. Receipts.  This will create a Journal Entry that you can post.
  4. GL-01-01.  Post the Journal Entry.

Don’t forget to do 3 and 4.


Create AR Customer

  1. From the Accounts Receivable master menu, choose option 1 for Customer Maintenance.
  2. Enter a period “.” to let the system assign the next available sequential number for the Customer #.
    1. To enter your own number, type an ‘A’ into the Customer # field and then enter your customer number
  3. Enter the customer’s First Name and Last Name in the appropriate fields.
  4. All the fields up to the Status field are optional, though it is recommended to fill in the Soc Sec Num field. You may come back and Modify the customer record at any time.
  5. Enter an A for Active in the Status field.
  6. Enter in the Customer Type for this customer.
    1. This is the Customer Type you have already created, or as discussed in the Accounts Receivable Training Guide.
  7. If the Customer Type that you have selected for this customer requires an Agent / Bill Code, enter in the appropriate Agent code.
  8. Enter a Y or N to both the Charge Interest, and Send Statement fields.
  9. Enter a Credit Limit if required by Customer Type.
    1. To create an unlimited account fund, type in a limit of 999,999.99
  10. The Opening Date will default to the current date, but you may change it if you wish.
  11. The Closing Date is a date in the future as chosen by you.
  12. The Statement Cycle field may be left blank, as well as the Miscellaneous Information field.
  13. If you had wanted only Authorized persons available to charge toward this account, enter the names of the Authorized People in the Authorized Persons list.
  14. Choose the Save option to save the customer record.


Creating AR Agents

  1. The first step in creating an Agent is that you must have an Agency To do this, choose option 5 for Agent Processing in the Accounts Receivable main menu.
  2. Next choose option 22 for Agency Maintenance.
  3. Enter in the Agency Code you wish to assign.
    1. This Agency Code may be either alpha or numeric.
      1. If you want the system to assign the numeric code, simply enter a period “.” to let the system assign the next sequential number available.
    2. If the Agency Code is a new code you are adding to the system, you will receive the prompt that the item is not on file. Choose the Add option to add the item.
    3. Type in the description for the Agency.
    4. Choose the Update option to finish adding the item.
    5. Next, choose option 21 from the Agent Processing menu for Agent Maintenance.
    6. Enter a period “.” to let the system assign the next sequential number for the Agent #.
    7. You must fill in all the required fields in the Agent Maintenance The required fields are:
      1. Last Name
      2. Status
        1. Use A for active
      3. Agency Code
        1. This is the Agency Code as described in steps 1-6.
      4. Statement Format
        1. Enter a double question mark (??) and choose from the list.
      5. All other fields are optional and may be filled in later if you choose by Modifying the record.
      6. Make sure you choose the Save option to save the Agent you created.


Background Processing (Self Hosted)

Overview

Background Processing allows you to run recurring reports as background processes to be run immediately or at scheduled times. This tool can be used to schedule your daily and weekly recurring reports to run after hours.

Background Processing Menu

(POS-UU-3)

1. Job Parameters – Each background process is called a job. Each job has certain parameters consisting of the job name, the times and days to run, etc. You will set all parameters necessary for each job using this menu option.

2. List Jobs – Compiles a list of jobs that are setup to process. You may output this list to printer, terminal or file.

3. List Job History – Compiles a history of jobs that have been processed, giving the dates and times that the job1 started.

21. Background Control – Gives you the ability to stop or start processes. This is where you will start and stop the background processor.

Note – There is a flag that can be set to notify you if the background processor is on. The menu path is System Administration Menu and then option 1) User Maintenance. Set the flag in User Maintenance to ‘Y’ and when you log on, the program will pause for a seconds after you enter your password to display the status.

There are two parts to background processing. The first part is to start the background processor through background control. The second part is to set up and specify the job parameters.

Managing the Background Process (BG-21)

There should be a background process running in each account that has a job to run. You will have to start the processor in each account. This can be set up to start automatically if your system is rebooted.

This screen is where you control jobs.

Start a Job – This will start a new occurrence of BG.PROCESSOR. It can start any job on the list.

Stop a Job – This will stop the job you specify. In GUI mode you must highlight the job to stop. In non-GUI mode you are prompted for the line number to stop.

Refresh List – This will remove all jobs from the JOBS file that have a status other than RUNNING or ABORT. See the following screen.

JOB SETUP

You can setup a background report in one of two ways.

You can create your report through the Report Menu by choosing the report you wish to run then entering the report parameters and selecting <R>=Run Procedure followed by G= Background Processor in the Output Options menu then <S>=Schedule and entering a name for the process. This will then put you in the Job Parameters screen with the fields populated from your report parameters where you can change any parameters as needed.

2. You can create your report manually by going directly to the Backgrounds menu and choosing Job Parameters and entering the information for your report.

JOB PARAMETERS

(POS-BG-1)

Background ID: Enter the id (alpha/numeric without spaces) to identify your background process. For example, if this was my nightly tender report then I might give it the id of TENDER.REPORT.

Account: Enter the account name the background will run in. All files used by the process must exist in the specified account.

Sender Port: This is the port that starts this process. If this process was made and started from another process, this port is automatically entered. The field serves no purpose at this time.

Notify Sender: Set this flag to ‘Y’ if you want to notify the sender every time that the process runs.

Run Status: Your options here are ‘I’ (Immediate), ‘R’ (Repeat), or ‘X’ (Cancel).

I = Run immediately, once the process has ran once, this changes to a status of ‘R’ and repeats according to intervals.

R = Repeat according to the time and day intervals that you set up. daily, weekly, monthly, hourly or any interval type of process.

X = Cancel, and stop running.

Start Date: Enter the date to start this process. (Only valid with status ‘R’)

Start Time: Enter the start time for the process to start. (Only valid with status ‘R’)

Day Intervals: Enter the interval as ‘1’ for daily, ‘7’ for weekly, etc. If run status is ‘I’, and you only want this process to run once then leave this interval blank.

Exclude Days: Enter any days that you do not want this process to run. For example, if this were a daily sales report, and the store is not open on Sundays, then you would enter ‘SUN’ to exclude the report from running on Sundays. Enter each day one at a time.

Time Interval: Enter the time interval 24:00:00 for once a day, 1:00:00 for hourly, etc…

Exclude Times: Enter the time that you do not want this process to run. This works similar to excluding days. If you run this process hourly, then you may want to exclude the hours that you are closed.

Group Code: Some processes require running a program then reporting on the outcome. For example a batch closing, you close the batches and then run the batch detail or summary reports. Here you can enter some unique code that will group the batch closing process together with the batch summary reports.

Sequence in Group: If you have entered a group code, then you will want to designate which process will run first, second, etc. (i.e. Batch closing would be sequence of ‘1’, report would be ‘2’, etc.)

Process Type: Enter P for Proc or T for TCL.

P = Proc (usually from the reports menu)

T = TCL. A cataloged program or anything else you can run from TCL with standard Pick INPUT statements. This uses a Pick DATA statement.

TD = TCL. Same as T except the inputs would come from a standard TCS input. (This populates DATA.LIST and is processing by CHAR.INPUT.)

I = ISD processsor (entry screen). Requires release 5.3 or Patch 1237.

Process ID: Enter the process id for the process you are going to run. If this is a report, enter the report id. If this is a program, enter the program name.

Output Tag: Enter here where you want the output to go. The valid options are:

T= Terminal, ‘T132’ for 132 column output to the terminal (this is like entering ‘TW’ in the reports)

P,a,b,c,d,e,f,g = Printer

a – printer number

b – L=landscape, P=Portrait

c – number of copies

d – D=Direct, H=Hold (suspend printing)

e – lines per inch (6 or 8)

f – characters per inch

g – lines per page

It is easy to set the values for a-g; simply enter P in the field and the printer assignment box will pop up, enter the values you want and they will automatically populate this field.

Inputs: Enter any parameters here that you would as if you were running the process from a menu. This means you must know the order of the parameters.

Acceptable values include:

“” = blank

DATE-n or DATE+n = Today –n days, or today +n days.

Other data is accepted as entered. I.E. “[sam]”, 05.22.03, 001, etc.


AR History

This document describes the history process for:

  1. Removing old invoices and payments from the active lookup and placing them into an index for each year.
  2. Purging old invoices and payments from the system to never be accessed again.
  3. Looking up inactive invoices and payments.

Setup

Prior to running the history process you should enter your history preferences in the General Parameters screen found in AR-SU-03 (General Parameters).

There are two fields.

  1. Months to keep on-line. This is to designate how many months of data will be in the active index. This should probably be about a year although it can be as small as 1 month.
  2. Months in history files. This is the maximum number of months to keep the invoices and payments on your system. Anything older than this is purged and no longer available. This could be for as many years as necessary, perhaps somewhere between 3 and 5 years depending on your needs.

There are 12 months in a year. So for 5 years enter 60 for the value.

The Process

(Main Menu # 6)

When you want to move invoices & payments to the annual indexes then choose this menu option. Also, when you want to purge invoices and payments completely from your system this is where you do it. You can run this option as often as desired.

After you make your selections you will see the following screen.Range of Process and Purge

The range is based on the data you entered in the General Parameters setup screen.As the process runs and is completed you will see the follow screen.

Accessing the History Data

Customer Inquiry (Main Menu #2 and CI), select IH for Invoice History.

You will then be prompted for the year to search.

If there are any invoices in the year you selected they will appear at the bottom of the screen.

You can then access the invoice by choosing clicking on the line number or entering it in the entry box.

Accessing Payment History

From the main inquiry screen choose “P” for payments then choose “PH” for payment history. You will be prompted for the year to use after which the Payment history screen will appear.


You may choose a payment line number to look at the payment detail.