Set or Reset a User Password

Some menus have been changed, please read carefully.

While the steps on how to change a user’s password are straight forward, there are a few points that need to be kept in mind.

  1. When you set a user’s password in User Maintenance (UU-5-1) or User-Cashier Maintenance (POS-22-1) the system automatically sets their password to reset when they first log in.
    1. This means that the password set in User Maintenance is temporary. Do not set the password to what the user would like to use long term.
  2. It is necessary to set the user’s password from the Host Connection. While these steps can be followed on an individual register, passwords that are changed on the cash register ARE NOT sent to the host or to all of the other registers.
    1. By setting the password on the host all registers will get the updated password.
    2. Check POS-6-2 to view which registers are communicating. Those who have a “To Be Xfered” amount of zero in the right hand column will immediately have the updated password.
      1. Steps to restart the register communications can be found in the Smartlane Communications video here.

To quickly reset the password for the logged in user

  1. Type PASSWORD into any menu prompt and press Enter
  2. A dialogue will appear prompting for the users password along with a Enter New Password and Confirm Password prompt
    1. Enter your current password into the “Enter Your Password” prompt
      1. This is to confirm the identity of the logged in user
    2. Enter a new password into the “Enter New Password” field.
      1. Passwords must be 8 characters long and include at least one letter and one number
        • g. 1234567A or ABCDEFG1 the password is NOT case sensitive, this means that ABCDEFG1 and abcdefg1 are both treated the same.
      2. Re-enter the new password into the “Confirm Password” field and press enter.
    3. The password has now been set for the logged in user and will update to all of the registers.


To reset the password for another user

  1. From any module, go to UU-5-1 or POS-22-1
  2. Enter the user ID of the user who’s password is going to be reset
  3. Navigate to the Password field and type in the new password
    1. Note that this new password is temporary. The user will be forced to set their own password after the log in with this temporary password.
    2. Passwords must be 8 characters long and include at least one letter and one number
      • g. 1234567A or ABCDEFG1. They can also include special characters. The password is NOT case sensitive, this means that ABCDEFG1 and abcdefg1 are both treated the same.
  4. Enter the temporary password again into the Confirm Password field
    1. Press Continue on the notification box. This is a notification that the password entered is temporary and the user will need to reset their password when they log in.
  5. Press ESC after reaching the Expires field
  6. Enter to save the password change.
  7. Have the user log in with their new temporary password.
    1. You can type in ID at the menu and press enter to display the login prompt or have them log into another connection.
  8. They will immediately get a prompt to reset their password
    1. They need to enter their new, permanent password into the Enter New Password and Confirm Password fields
    2. Passwords must be 8 characters long and include at least one letter and one number
      • g. 1234567A or ABCDEFG1. They can also include special characters. The password is NOT case sensitive, this means that ABCDEFG1 and abcdefg1 are both treated the same.
  9. After that is complete their password will update to all of the registers.


General Ledger Training

Initial Setup

Fiscal Periods

(GL-SU-1 also GL-24)
Fiscal periods define the ending date of an accounting period. The most current date is at the end of the list. All dates for at lease one fiscal year should be always beentered.

You can set all dates initially to the open status. They are closed automatically when the period is closed through the menus.

Generally there are 12 periods in a year. You should never need more because you can reopen and close a period multiple times.

Generlly there are 4 quarters in a year.

Account Status (GL-SU-21)

There are 3 account status codes.
A – Active (Open for posting and entry)
I – Inactive (Open for posting if already entered in a Journal Entry that is not
H – Header Used for Chart of Accounts report heading.

Account Category (GL-SU-22)

Set up as many account categories as you like.
These are generally such things as Assets, Liabilities, Sales Revenue, Sales
Expenses, etc.

Bank Codes (GL-SU-23)

Set up a bank code for each bank where you deposit or withdraw money.

Journal Codes (GL-SU-24)

Journal codes are used for classifying journal entries.
You should have the following codes and more if desired:

  • GJ – General Journal
  • POS – Sales Journal
  • AP – Accounts Payable Journal
  • AR – Accounts Receivable Journal

Account Master (GL-2)

Set up your chart of accounts. Use any formating structure you desire but be consistent. We find it best if you choose to use a fixed number of numbers for the accounts. This is not necessary as long as you remember that all sorting is done from the left (even though most people choose to use numbers). You can use letters if you want. You can also use periods or dashes if you desire.

One method to use is 6 numbers. Enter the headers first so that you have a feel for the accounts. One structure that you can use is:

10000 – Assets
13000 – Inventory
17000 – Other Assets
20000 – Current Liabilities
30000 – Capitol
40000 – Revenue
50000 – Cost of Goods Sold
60000 – Operating Expenses
80000 – Other Income

Account type is D for debit and C for credit. This is to identify the accounts normal balance.

Income Statement or Balance Sheet. Enter an I or B depending on the type of account.

All Income Statement type accounts need to have a Closing Account. This closing account is where the account balance is transferred to at the end of the year/beginning of a new year. Balance Sheet accounts do not get transferred.

Journal Entries

The journal entry process is the only process that updates the general ledger. From here you review, create, and post entries into the general ledger.

Regular Journal Entry

Enter a valid journal code – the default is GJ. Enter ?? for a list of journal codes.

Enter a journal number. The system will automatically assign a number if you enter a period.

Enter a type.

  • M – is for manual entry.
  • S – is for system generated entry (filled in automatically by A/P, POS, etc.)
  • R – is to reverse a previous entry.
  • B – is to create beginning balances.

Enter a valid accounting period.

Enter the date the entry is for.

Enter any comments. These will be seen on reports so be very descriptive.

Enter all of the account numbers, projects, references, debit amounts and credit amounts. Leave fields blank if there is not value for them.

Either save or post the entry when you are done. If debits don’t equal credits you cannot post the entry. You can save entries that are out of balance to be corrected and posted later.

Beginning Balance Journal Entry

Do everything like a regulary journal entry but use “B” for the type field. This will post to the beginning balance fields in the database.

Reverse a Journal Entry

Heaven forbid you might make a mistake!
Enter an “R” for type.
You will be prompted for the entry to reverse.
The entry will be something like GJ*1655. This is the journal code and asterisk and the journal number of the entry you want to reverse.
The debits and credits are displayed in the opposite way that they were entered.
Just press enter through every field and post it.

Disbursements (Checks)

If you are using TCS A/P then in the A/P module choose option 21 (end of period) and post your checks to G/L. This process updates the GL.CD file (CashDisbursements).

Enter/Modify Checks

Enter the check number and the bank that it is drawn on.
Enter the date, payee, amount, and any comments.
Enter the Account (G/L) distribution. It is not wise to enter the same account as the
bank that is drawn on, rather enter an account(s) for expenses, inventory, etc.

Cleared Check Entry

Enter the bank code that the checks are drawn on.
Enter the beginning check and ending check using your bank statement as a guide.
Any gaps on the bank statement should be a gap in your entry.
You can use the same check number for both beginning and ending check.

If you make a mistake you can use Cleared Check Reversal.
The input is identical to cleared check entry only when the record is updated the “clear bank” flag is set to indicate that the check has not cleared.

Outstanding Check List

Once you have entered the cleared check list you can run the outstanding check list report. This report is a list of all of your outstanding (uncashed) checks.

Miscellaneous Receipts

Use this option to enter receipts that were not taken at the cash register or though A/R.
Inputs are nearly identical to checks.

End of Period (Month or Year)

There are 4 things that happen here.

  1. Post Cash Disbursements (usually pushed here from A/P).
  2. Post Miscellaneous Receipts (manually entered in G/L).
  3. Close a Month (Months 1-11).
  4. Close a Year

(When we say month it is synonymous with fiscal period.)

Before you close a month be sure to print your income and balance sheets to make certain that there are no more journal entries to be made.

Post Cash Disbursements

Enter the bank code you are posting.
Enter the check date range to use for posting.
Enter the accounting period to use.
Indicate if you will be posting detail or summary. Most people post summary.
When you choose detail posting then if there were 1,000 checks to post there would be 1,000 line items on the journal entry.

Post Miscellaneous Receipts

Same criteria as Cash Disbursements

Close a Month

This process creates beginning balances for the next period. It updates year-to-date, quarter-to-date and project-to-date values for both financial activity and for budgets.


Month-End Closing

Prerequisite to End of Month Closing: all of the necessary G/L account codes must be setup in the following modules:

Point-of-Sale
Accounts Payable
Accounts Receivable
General Ledger

There is no requirement to close the modules in any particular order, other than G/L needs to be last.

The steps within a module should all be completed in the sequence listed.

General Merchandise

End of Period Processing

This process sets the week-to-date, month-to-date, and year-to-date sales quantity values in GM. This should be performed at the end of the day on the last day of business, or before the first day of business for each week, month, and year. (GM-23)

OR

You can run the utility to rebuild the numbers whenever you wish. (GM-SU-01-06)

Point of Sale

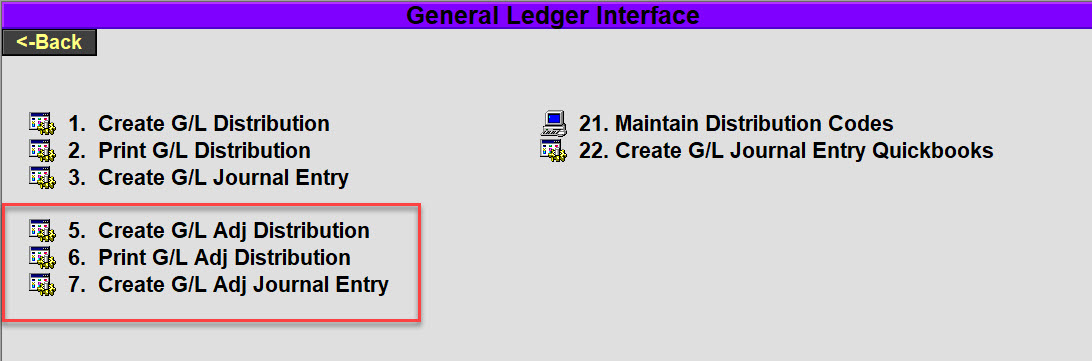
Use menu path POS-23-29 (POS, End of Day Functions, General Ledger Interface)

Create G/L Distribution

This process resolves the sales transactions with all of the associated G/L codes and creates a file for reporting and posting. (a)

    1. Enter the sales date for the first date to be included.
    2. Enter the sales date for the last date to be included.
    3. If you want to include the Over/Short results from your daily register reconciliation then enter a “Y”, otherwise enter “N”. (b)
    4. If you enter “Y” for repost then the process will ignore any prior posting of data for the date range you’ve entered. Entering “N” will cause this process to skip sales records that were posted previously.
    5. Run the procedure.

If this process encounters any errors they will be displayed on the screen. You will need to correct the cause of the error before an accurate Journal Entry can be created.

Notes: ———————————————————————————————————————

  1. All G/L codes should have been set up during and after initial training.
  2. Register Reconciliation is done at menu path POS-23-02 (POS, End of Day Functions, Register reconciliations.)

Print G/L Distribution

This report uses the data created by step 1, above.

    1. Enter a store number. If you only have one store then leave this field blank.
    2. Enter a register number. This field is almost always left blank.
    3. Enter a beginning date for the report. This date will appear on the report header. It should also fall within the range of the dates that you entered in step 1, above.
    4. Enter an ending date for the report. This date will also appear on the report header and should also be within the range of dates that you entered in step 1, above.
    5. Summary, Detail, or Errors.
      1. Enter “S” to get a summary report. This will show one line for each G/L account. Any errors are easy to find because there will not be G/L account description.
      2. If you enter “E” for errors then the 1st 10 errors will be on the screen. Fix those then run the report with the “E” option again until there are no errors.
      3. If you enter “D” for report details you get a report that is hard to read unless you are familiar with the data. Usually this is run by TCS personnel for advanced trouble shooting.
    6. Enter a G/L account number to limit the output for specific accounts. This only works in the “D” mode.
    7. Run the procedure. Select your printing or email destination.

Create G/L Journal Entry

This process will use the data created in step 1, above.

  1. Enter a store number. If you only have one store then leave this field blank.
  2. Enter a register number. This field is almost always left blank.
  3. Enter a beginning date for the report. This date will appear in the Journal Entry Comments field. It should also fall within the range of the dates that you entered in step 1, above.
  4. Enter an ending date for the report. This date will also appear in the Journal Entry Comments field and should also be within the range of dates that you entered in step 1, above.
  5. Enter the Accounting Period that this Journal Entry will apply to.
  6. Run the procedure.

This will create a Journal Entry in the format of POS*nnnn, where nnnn is a unique sequential number. This will need to be posted in the G/L module. (GL-01-01)

Accounts Payable

The first step is to find any transactions that were posted to A/P from receiving and returns (in Text, Trade, and GM) that are missing valid A/P vendor numbers.

This is done by running report AP-RP-02-01 (Unpaid Transactions by Vendor). Leave all fields empty except for Vendor Number. Use Vendor Number 99999, this is the “suspense” vendor. If the report has any lines on it then you will see in the last column which inventory vendor needs to have an A/P vendor assigned to it. You can also see this and more detail if you look up the transaction (AP-01). If there are any corrections to be made then:

  1. Assign them the correct A/P vendor code. (AP-04, Change Vendor or Invoice). (a)
  2. Correct the Inventory vendor record. (VM in Text, Trade, or GM.) (a)

Use menu path AP-03. (A/P, End of Month)

Pre-posting Report

Use this report to review if G/L account numbers, amounts, and vendors appear to be correct. (Ex. You probably do not want the G/L account number for cost of goods sold being assigned to a vendor that only sells you cleaning supplies.) Invoices with a status of “U” (unreconciled) will not appear on this report. Only the status codes of “O” (open for payment) and “H” (hold for payment) will be included. See note (a).

  1. Enter an invoice cutoff date. All transactions older than, and including, this date that have not been journalized will be on the report.
  2. Select a report type. This report has three format options depending on your level of need.
  3. S = Summary. This will create a report that summarizes all of the amounts for each G/L number into one amount. This creates a shorter concise report.
  4. D = Detail. This will create a report that has the G/L account number for each transaction. This report is very long but does show all of the account detail.
  5. E = Errors. This will create a report of transactions that have invalidG/L account numbers on them.
  6. Run the procedure. Select your printing or email destination.
  7. Make any invoice corrections if necessary.

Post Transactions

Invoices with a status of “U” (unreconciled) will not be journalized. Only the status codes of “O” (open for payment) and “H” (hold for payment) can be journalized.

  1. Enter an Invoice cutoff date. You should use the same date you used in the Pre-posting Report.
  2. Enter the accounting period that the transactions will be posted to.
  3. Run the procedure.

This will create a Journal Entry in the format of AP*nnnn, where nnnn is a unique sequential number. This will need to be posted in the G/L module. (GL-01-01)

Once a transaction has been journalized you cannot change the G/L distribution on the transaction and you cannot change the transaction amount.

If you completely mess up you can choose number 6 to remove the posting flag from all transactions for a specific Journal Entry number. Be sure to delete or void the original Journal Entry so you don’t have a double posting. This is done in GL-01-01 using a Journal Type of “V”.

Notes: ———————————————————————————————————————

  1. In order for you to stay on top of your adjustments you can run these reports daily if desired. To see your “U”nreconciled and “H”old invoices run report AP-RP-02-01; it is sorted by status so that each status code is grouped together.

Accounts Receivable

This process copies miscellaneous cash receipts from the A/R module to the G/L module. They are then posted in the G/L module. Generally, most users enter their cash receipts at the cash register and this step is not necessary.

Use menu path AR-03-24 (A/R, Invoices & Payments, Post Payments to G/L).

  1. Enter a valid store number.
  2. Enter a cutoff date. All miscellaneous payments that have not been copied to the G/L cash receipts file that are older than or equal to this date will be copied.
  3. Enter a valid bank code. If you have multiple bank codes then run this process once for each bank code.

General Ledger

This module is the last one to process and is only done after completing all of the above steps. If your system is not configured for a specific module you can skip that section.

Use menu path GL-22 (General Ledger, End of Period) for steps 1-4.

Post Cash Disbursements (checks)

  1. Run this process for all of your Bank Types.
  2. Enter a check date to start with.
  3. Enter a check date to end with.
  4. Enter the accounting period that pertains to the date range in b and c.
  5. Select Summary
  6. Run the process.

Post Miscellaneous Receipts

    1. Run this process for all of your Bank Types.
    2. Enter a beginning receipt date.
    3. Enter an ending receipt date.
    4. Enter the accounting period that pertains to the date range in b and c.
    5. Select Summary
    6. Run the process

Bank Reconciliation

If you are using the bank reconciliation option then complete this task and then post the journal entry that you create.

21. Close a Month (1-11)

Select this option now to close any or all prior months to bring their YTD, QTD account balances forward into the current month. (This could have been the 1st step in G/L. It is not critical when you run this as long as it is before you begin running reports or doing AI (account inquiry).) Many users do this step multiple times – beginning of the period, end of the period.

    1. In the Month to Close field you can enter either a specific month to close or for ease of use enter an “*” to close all months. The “*” option is preferred in case you have posted any entries to a prior period/month.
    2. Enter the 4-digit year that you are working with.
    3. Run the process.

Journal Entry Creation, Correction, and Posting.

After you have created journal entry records with several of the above process it is now time to review them for reasonableness, make any necessary corrections, and then post the entry.

Posting the entries updates the YTD, QTD, and MTD account balances.

Use menu option GL-01.

21. List Unposted JEs

This will give you a complete list of journals that have not been posted.

Journal Entries

    1. Review each entry, make any necessary corrections, enter “P” to post.

Batch Post Open Journals

    1. This allows you to skip the tedium of processing #1 multiple times and posting all open journals at once.

Year-End Closing

Prior to closing the year you will need to close your last month – month 11 following the Month-End Closing guide.

G/L Account Numbers are broken into two general categories – real and nominal. Real accounts are assets, liabilities, and equity. Nominal accounts are income and expenses.

When the year is closed the ending balance of real accounts are closed to their each real account, i.e. cash closes to cash, payables close to payables, etc. Nominal accounts close to a single common equity account, something like retained earnings (equity).

The Year-End Closing is very simple but it is important to first ensure that all of your income and expense G/L Account Numbers are set to close to the correct equity account number. This is done by running the Account Master report with all columns (GL-RP-01). Print this report if possible and go down account by account and very that the Closing Account is correct. If you need to make any adjustments do this in Account Master (GL-02).

Make certain that any Journal Entries for your 12th month are posted. (GL-01-21).

Print your Income statement and Balance sheet to make sure that they are correct. Make any necessary corrections with Journal Entries (GL-01-01), be sure to post them.

When you are satisfied that the year is ready to close then select menu option GL-22-22. Use month 12.

Do Account Inquiry (AI) and have a look at your closing account for the new year, period 1 and make sure that it looks correct.


General Ledger – POS Setup

Overview

By setting up the General Ledger interface you will be able to create the detailed information necessary to either post journal entries directly into the TCS General Ledger system or create a report of the debits and credits and account numbers to use for posting into your corporate system.

If you are using the TCS General Ledger system then refer to that documentation to set up your chart of accounts, define accounting periods, and etc.

There are six types of data records that require some form of setup. This includes:

  1. Distribution Codes Assign G/L account numbers for inventory classes or departments.
  2. Class Codes Distribution codes are assigned to one or more class codes.
  3. Tax Codes Assign G/L account numbers.
  4. Tender Categories Assign G/L account numbers.
  5. Fees and Credits Assign G/L account numbers.
  6. Modifiers Discounts and Markdowns or other codes that have a financial effect on inventory, or income, or expenses.

Setup

Account numbers are free-form and do not have any specific format although it is important to use the account numbers that will correspond to your G/L system. These account numbers are for both debits and credits – the reporting system will figure this out for you.

Distribution Codes

This setup is accessed through menu path POS-22-03-04.

Generally there is one distribution code per inventory department, you will never have more than the number of your inventory classes. The Code that you use can be alphanumeric but most often is the same as the department number. Enter the G/L account number for each activity specified on the screen. Any blank accounts may result in an error later.

Here is an example of a distribution code. (It corresponds to department 3.)

If you are not using the TCS General Ledger module you may want to change up the accounts a little by entering something at the end of the account number. For example: “43000 Supply Sales”. With the TCS General Ledger the account description will be filled in automatically when you run the G/L Distribution Report described later in this document. Without the TCS General Ledger you will only see what you have entered.

Class Codes

All that is required here is to assign the Distribution Code to each class number.

The 
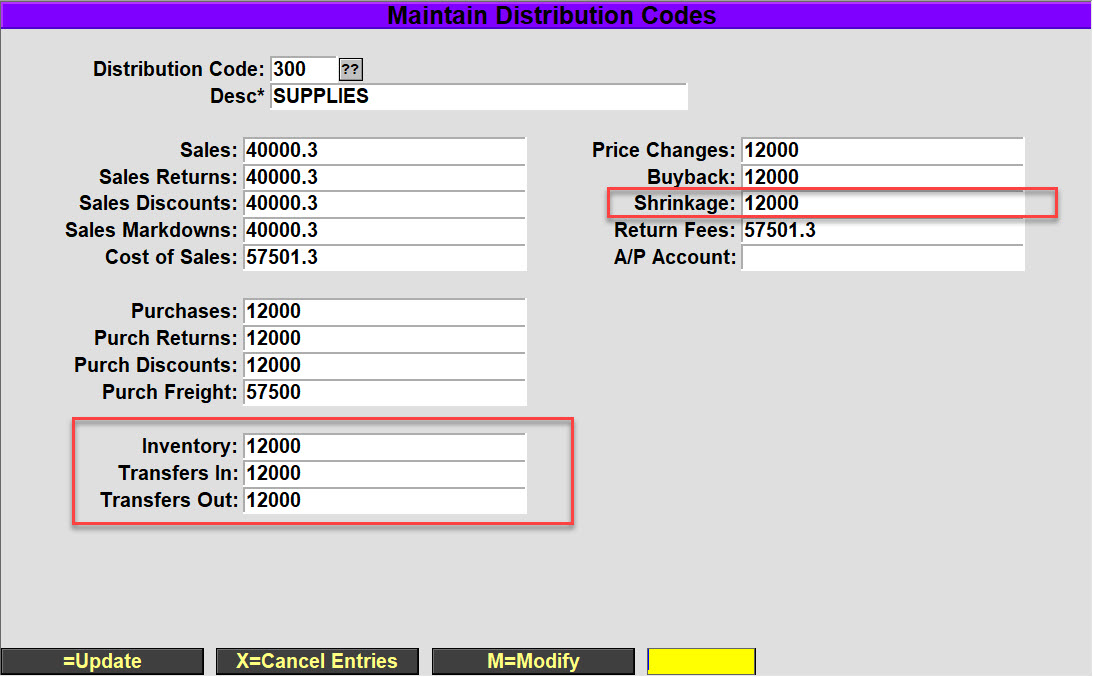
list (after the Class Number prompt) will show you the classes and their Distribution Code.


Tax Tables

All tax tables need to have the G/L Account field completed.

Tender Categories

All tender categories need to have the G/L Account field completed.

Fee Codes

All fee codes need to have the G/L Account field completed.

Modifies

It is very rare that you would have a modifier with a G/L Account associated with it. If the need arises then add it to the modifier. It is generally easiest to not assign any accounts and then look for modifier “errors” on the G/L Distribution report (POS-23-29-02).

This completes the setup portion of this document. You may need to refer back to it if there are any errors on the G/L Distribution report (POS-23-29-02).

Running Reports

The first step to viewing a report is to create the data for the report. This is done from menu POS-23-29-01 (Create G/L Distribution).

  1. Enter the Beginning Sales Date for the period that you want to create your journal entry.
  2. Enter the Ending Sales Date.
  3. Always enter “Y” in the prompt for “Is this a RePost?”
  4. At the Options Prompt enter an “R” or click on Run Procedure.

If there are errors then a report is generated with a list of all of the errors. Here’s an example of an error when class 301 does not have a Distribution Code assigned to it.

You need to correct all errors before the G/L Distribution report will be valid. If there are errors then make the appropriate corrections (in the setup above). You can run this “Running Reports” section as often as needed until all errors are corrected.

Once the data for the journal entry is created without any errors you can run the G/L Distribution Report. This is option 2 on the same menu where you created the data.

There are three report options, Summary, Detail, and Errors.

Summary: Gives you a report with one line per G/L account.

Detail: Shows every sales transaction and all of the G/L accounts for each transaction. This report is very long with anywhere from 4 to many lines per transaction.

Errors: This report will show you just the invalid G/L account numbers. You will then need to correct the appropriate control records in the database. If the error is just a number it is most likely from a distribution table or a fee code. Other errors are fairly self-explanatory with codes like TAX.CODE:6.5 or TNDR.CODE:CC.

Even though the data you enter here will be the same that you used when creating the data it will be used in the heading of the report. Make sure that the data you entered in both screens is the same.

At the Options Prompt enter an “R” or click on Run Procedure.

The report below is a sample summary report.

The 1st thing to do with this report is to review it for any “errors”. An “error” would generally be an invalid G/L Account in the “ACCOUNT DESCRIPTION” column. The invalid account will give you a clue as to what record in the setup procedures was not completed.

If there are errors then run this “Running Reports” section as often as need until all errors are corrected.

Posting to the General Ledger

If you are not using the TCS General Ledger module then you can use this information to create a manual entry into your corporate system.

If you are using the TCS General Ledger then select option 3, Create G/L Journal Entry. This step will create a journal entry in the G/L database. You will need to post the journal entry by logging into the G/L system and posting the entry in menu GL-01-01. The Journal Code that is created will be in the format of POS*nnnn where nnnn is a sequential control number.