Scanpal Usage Guide

Simple Overview

The overall process is listed below with more details following.

  1. Charge your scanners and verify that they will scan items. It’s also a good idea to do a test upload of the scanned data to the PC it connects to.
  2. You will follow the steps listed below once you start your inventory. Repeat them as necessary until it’s time to post your counts.
    1. Collect data. Be sure to enter the correct header information
    2. Upload the scanned to the SmartLane register (hosted customers) or the correct directory on your host (self hosted customers)
    3. Create your worksheets
    4. Run your reports
    5. Repeat steps 1-4 until everything is counted and reports look good.
  3. After everything appears to be correct you will post your inventory. This completes the inventory process and is irreversible.

Using the ScanPal

Upon powering on the unit you will be greeted with this main screen.

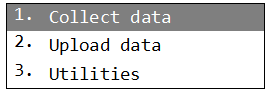
  • Collect Data is where all of the data collection settings and functions are located. You can specify stores, locations, the type of merchandise and many other settings here.
  • Upload Data is used to sync the gathered information to your PC.
  • System Utilities provides additional functions specific to the device itself as well as options on viewing or deleting data.

This guide will go through each screen step by step and explain all of the options and functions of that screen.
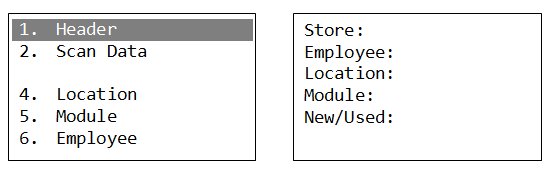
Collect Data

Collect Data contains the primary settings and functions for performing the counting process.

  • Header allows you to set the general settings to be used while scanning.
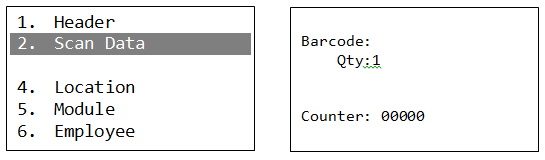
  • Scan data will scan the barcode and prompt you for a quantity
  • Location, Module, and Employee allow a temporary override of the settings specified in the header. You may quickly and temporarily change these for the next scan.

Header. These settings allow you to specify the store number, the name of the employee gathering the data, the location, module and class of the textbooks being scanned.

Scan Data. Scanning barcodes and quantities is done in this screen. The barcode may be scanned as well as manually entered. The default quantity is set to one, although this can be changed in the utilities section. The counter keeps track of the number of barcodes scanned, not the total inventory quantity.

If you need to check any data that was scanned you can go to Utilities, Browse Data to review and make changes.

Upload data.

There are a number of items that need to be setup before data can be uploaded. Check through this list to make sure that everything is ready before attempting to upload any data.

First Time Setup

  1. Please contact TCS Support to set up the ScanPal environment.

Transfer Steps

  1. Power on the scanner and from the main menu select “Upload Data”
  2. Connect the scanner to the PC
  3. Double click on the “Scanpal Upload – Shortcut” located on the desktop. If this shortcut does not exist then you will need to contact TCS support.
  4. Review the program window that opens to make sure all settings are correct
  5. Select “OK” to transfer the data to the PC
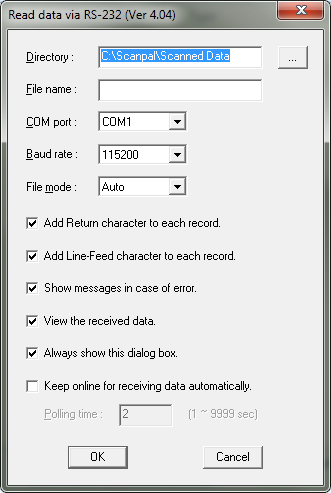
  • Directory: This is where the scanned text files are to be saved. This should be C:\Scanpal\Scanned Data but can be changed.
  • File name: You may specify a name for the file. If you specify a name please select New Name or Overwrite in the “File mode” field. It is recommended that you leave this blank and use the “Auto” file mode.
  • Enter the COM port the device is plugged into.
  • Leave Baud rate alone
  • File mode:
    • Overwrite will overwrite the previous file unless you specify a unique name
    • Append will merge all data
    • New Name is used when creating a new name
    • Auto will generate a sequential number for each file. Recommended
  • NEVER uncheck any check boxes unless directed by a TCS support technician to do so.


Transfer Data to the Data Collection File

New and existing customers will need to check the upload location in the system.

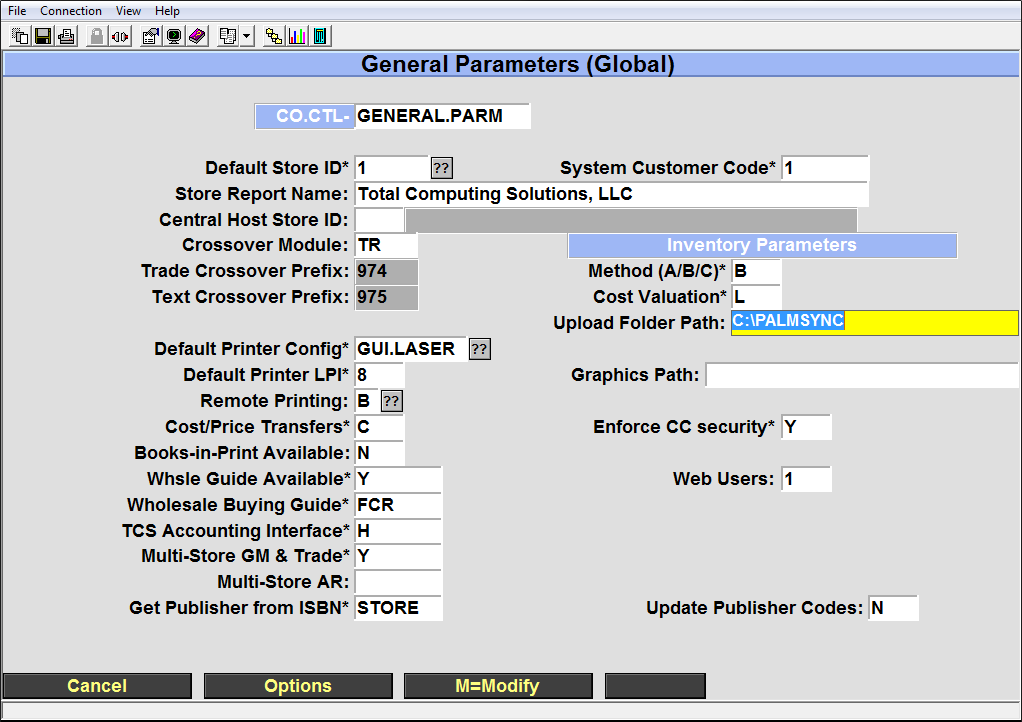
  1. Go to POS-UU-22 and verify that the Upload Folder Patch is:
    1. Typically C:\Palmsync for self hosted users
    2. C:\TCSDB\CUST\POS\HOST.SCANNED.DATA for hosted customers

Add Data to the DC File

  1. Minimize all windows until you are at the desktop
  2. On the desktop, double click the “Upload to Server – Shortcut”. Leave this open.
  3. On the desktop, double click on the “Scanner Data – Shortcut”.
    • There should be text documents containing your inventory counts in this folder
  4. Copy the text files in Scanner Data into the “Upload to Server” window.
    • These files will disappear once they have been added to the DC file on self hosted systems.
    • For hosted customers they will disappear once the SmartLane main menu option 7 – Send Inventory Scanned Data option is ran.
  5. The inventory data is now ready to be added to a worksheet.

Utilities

Utilities allows you to change the device settings, browse and manipulate scanned data, run tests and view the status of the scanner.

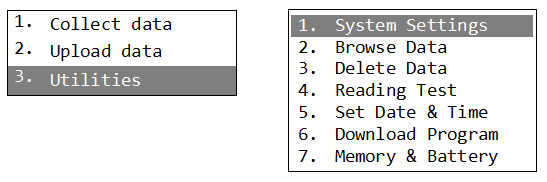
  • System Settings is a password protected section that should not be altered unless directed by a member of the TCS support team.
  • Browse Data allows you to view the data scanned, edit it or delete it by individual record. Editing in this interface is not recommended, it is simpler to edit the data in notepad.
  • Delete Data allows you to delete the last record scanned or all data. All data is automatically deleted when it is uploaded.
  • Reading Test displays the barcode type and character length of a scanned barcode.
  • Set Date & Time adjusts the date and time on the device.
  • Download Program
  • Memory & Battery displays the remaining free space and remaining battery power.

Scan Sheet Example

SP2:Str:1,Emp:CC,Loc:,Typ:GM (GM, TR, N, U)
4001134009,41
404427,218
4044227703,126
4044255903,328
4044273603,208
4044256003,130
4044256003,248
4044255903,322


Creating Kits (or Bundles)

Overview

A kit in the TCS system is a bundle of items that are sold under one SKU. For example, if you wanted to sell a tablet, cleaning cloths and a USB flash drive all as one item then a kit would need to be created.

The main item that is sold (the bundle) along with each inventoried item needs to exist prior to creating a kit. Once all of the items exist, the kit quantity on hand is generated by pulling quantities from all of the items that make up the bundle.

In the following example all items have already been created in the GM, MF database. Instructions on how to create individual items can be found in the General Merchandise Training page.

Assign Items to the Kit

  1. Bring up the MF record for the bundle that is going to be sold
  2. Select the K=Kit option at the bottom of the screen
  3. Select the M=Modify button to navigate to the item table
  4. Add each SKU that makes up a part of this bundle
    • In this example there will 2 Microfiber cloths added when we generate quantities of this bundle to sell. There will be one each of an 8inch tablet and a 8GB flash drive.
  5. Press Enter until you are at the Kits to Assemble
    • Enter the number of kits (bundles) you want to create. Notice that in this example we’re limited to 10, since there are only 20 cloths on hand and there will be 2 used per kit created.
    • If too many kits are created then the Kits to Disassemble field can be used to assign quantities back into the items that make up the kit. Simply enter how many of this kit you want to disassemble and proceed through step 6 to assign quantities back out to the kit items.
  6. Press Enter until you are at the bottom of the screen with a =Save option and press Enter to return to the main item screen.
    • At this point the QoH for each kit item has been reduced
    • The QoH of the kit will not refresh until you leave the item screen and look it up again.
  7. The kit can now be sold. All quantities sold will decrement the kit QoH since the items that make up the kit have already had their QoH reduced in step 5-6.


Getting a Report Into Excel

These instructions cover how to save your reports as a text file and then import it into Excel. Most reports are formatted in a way that allows this but there are a few exceptions. Exceptions occur when the report data doesn’t line up perfectly into columns, such as the Tender Register Summary report (POS-RP-2-21).

  1. First, run your report as normal and send the output to Terminal.
  2. Now we need to save the report as a text file on your computer to import into Excel.
    1. Click on the Save icon at the top of the Terminal Window
    2. Select where you want to save the file.
      • This can be anywhere on your computer. Typical locations will be Documents or Desktop
    3. Name the file
      • Keep it simple and preferably without spaces.
    4. Change the “Save as type” to “Text Files”
    5. Click on the Save button

Importing Into Excel

This assumes that the steps above have been performed and you have a copy of the report on your computer as a .txt file. Things can get a little confusing but if you watch the animated image in step 6 it will cover most of the non-intuitive steps.

  1. Open Excel
  2. Go to File > Open
    • Or press and hold the Ctrl key and then press O bring up the Open dialogue.
  3. Browse to where you saved the file in step 2.2 above
  4. Change the All Excel Files drop down box to All Files
  5. Select the .txt file saved in step 2.2 above
  6. In the Text Import Wizard (step 1 of 3) Select the Fixed width option
  7. In step 2 of 3, click and drag the arrows/lines to the edge of the text. These mark the columns to be used in the spreadsheet.
  8. In step 3 of 3, click on each column and asign the Text data format in the top left
    • You can select the first column, move the slider all the way to the right, press and hold SHIFT and click on the last column. With all columns selected click on the Text data format option on the top left.
    • Click Finish
  9. Now all of the data should be in the Excel document. The ISBN numbers should not look like a notation number (9.78129E+12) they should display as full ISBNs.
  10. Save the document.
    1. If sending to another organization (e.g. Redshelf ebook list, third party inventory company, etc.)
      1. Go to File > Save As.
      2. Browse to where you would like to save the document
      3. Enter a name in the File name field
      4. Click on the Save as type: drop down and select “CSV (Comma delimited) (*.csv)”
      5. Click on Save
      6. The file can now be sent as an attachment
    2. If saving for internal use
      1. Go to File > Save As.
      2. Browse to where you would like to save the document
      3. Enter a name in the File name field
      4. Choose whatever you would like as the file type. The default is typically .xlsx
      5. Click on Save


Adding GM Items to the Web

The following are instructions on how to add GM items to the website, create catalogs and assign images to an item.

Adding Items to Web

The primary way to display items is via a catalog. An example of some catalogs could be Electronics, Mens Apparel, Women’s Apparel, Prints and Frames, etc. all containing items that pertain to that theme.

An item can be assigned to as many catalogs as you would like. For example a Nike men’s t-shirt could belong to a Nike catalog, a t-shirt catalog and Men’s Apparel.

The only other way for items to appear on the website is via a search. If an item is flagged to show on the web, but does not appear on a catalog, then a search is the only way for that item to be accessible to your customers.

The recommended process is to first create your catalogs and then go to each item that will appear on the web and assign their image, alternate titles, special web pricing, etc.

Creating Catalogs

Catalogs are maintained in POS-26-2. Please note that many of the fields on the screen and their functions are under development and may not be functional or require a specific value.

  1. The Catalog ID is the record ID for the catalog
  2. Description is what will appear on the menu bar of the website
    1. Catalogs will automatically show up on the website once they are created.
  3. Sort sequence is the order in which catalogs are listed on the site menu
    1. A catalog with Sort Sequence 1 will appear first, sequence 2 will be second, etc.
    2. If two catalogs have the same sort sequence then the site will list them alphabetically
  4. Start and Expire Date allow you to specify when the catalog should or should not appear on the site.
    1. If you don’t want a catalog to appear on the site, but would like to keep it for reference or future use, then give it an expire date of -1 and it will no longer appear on the site.
  5. Suppress Thumbnails is currently under development and should be left blank.
  6. Columns on Page allows you to set the number of columns displayed when showing the catalog items.
    1. This may be overwritten by site themes which will render it unusable.
  7. Type is to set the type of catalog. The default normal catalog is ‘C’ but you can set a catalog to any type. The system will maintain certain catalogs ( BEST.SELLERS, SALE.ITEMS, NEW.ITEMS), if you wish to manually maintain these catalogs yourself then you will need to set the ‘Expire Date’ on these to an historical date and then create a new catalog with the correct description and set the ‘Type’ to correspond to catalog you are creating.
    1. C=Catalog
    2. H = Home Page
    3. F = Featured Catalog
    4. N = New Items Catalog
    5. B = Best Sellers Catalog
    6. S = Sale Items Catalog
    7. R = Recommended Items Catalog
  8. Restrict to Store is for multi store environments and allows you to restrict the catalog to the store number you enter.
  9. Sale Discount allows you to apply a percentage discount to every item listed in the catalog.
    1. It only applies to items current on the catalog. If you add items later then you will need to go back to the Sale Discount field, enter the percentage and press Enter to update the newly added items.

Adding Items to a Catalog

If items are already flagged to appear on the web then they can be added to the catalog through Catalog Maintenance by typing their SKU into the SKU field. This would be the process if the web product has been in use for some time and most items are already setup to display on the website.

New customers will need to change their GM items to appear on the web. By default all or no items are flagged to appear on the web (POS-26-4-1, GM, Use Web Flag field), so the next step is to flag the specific items you want to be available on the website. If there is a large group of items, such as all items in a particular class, then TCS staff can flag those in mass to appear on the web.

Adding an item, assigning images, customizing item page information and descriptions are all done through the GM, MF record of the item.

To get started log to the GM module and then enter MF at the menu, look up an item you would like to add and make note of the W=Web option. By choosing that we can get to the web maintenance part of the item record and add it to the website.

  1. The include on Web field must be set to a Y or an A to flag it to appear on the website.
    1. Y will have it appear as long as it meets the low and out of stock requirements. If it drops below the out of stock threshold then it will no longer appear.
    2. A marks the item as always available for purchase, regardless of stock levels. This can be used for special orders and other scenarios.
    3. N for Never would be used if, by default, all GM items are web enabled
    4. NQ for No Zero QOH is under development and should not be used
  2. Alternate Title: provides the option to specify a description other than the main description of the MF item. Whatever is entered here will override the GM description for the item when it displays on the web.
  3. Graphic Link Name: maps the GM item to the image uploaded (image uploading covered below). The name entered must be exact including case and include the image file’s extension (common file types are .jpg, gif and .png)
    1. Additional images may be added using a comma to separate the image names. The first image is the default image for the item, additional images will be in the order that they are arranged in the field but must all be separated with a comma.
  4. Special Web Price: is an override price for the item if it is sold on the web vs. rung up at the register.
  5. Out of Stock Qty and Low Stock Qty: are item specific overrides to the low and out of stock levels specified in the web general parameters (POS-26-4-1)
  6. Targeted Item: allows you to weight the item more heavily in search results on the site.
  7. Weight: can be used to specify a shipping weight.
  8. Allow Free Freight: flag as Y for free freight.
  9. Specific Freight Amt: will set a shipping cost for the item.
  10. Override Freight Code: can be used to ship the item a specific way regardless of what is chosen by the customer at checkout.
  11. Print Shipping Label: is for live fright customers only and is currently under development.
  12. Web Comments: is used for additional product info and appear at the bottom of the page. HTML markup can be used for formatting as well.
  13. Catalog ID: is a listing of catalogs that the item is currently assigned to. You can also assign the item to a catalog by entering the catalog ID in this field.

Save the record once all desired fields have been filled out. Please note that while changes are made live immediately, your browser session may have cached the catalog information and may take up to 10 minutes to update. You can typically force an update by pressing CTRL+F5 to request a non-cached version of the page.

Managing Images

Images must be uploaded for each item and the image name, including the file extension, must be included in the GM, MF, web screen shown above.

Points of Interest for Images

  1. Supported image formats:
    1. .jpg and .gif are supported on all versions of the website. .png is supported in version 3.x
  2. Image sizes
    1. When uploading an image the site will automatically generate scaled down medium and small versions for thumbnails and other views.
    2. Images should not be much larger than 1024 pixels in width. Images that are too large may not upload or will take a considerable amount of time to load for your customers.
  3. Use human friendly naming conventions.
    1. Many cameras will name images with something like 01012017_0001.jpg which is a month, day, year and counter format. Rename your images to something more meaningful to make them easier to work with.
    2. Avoid special characters in image names. A dash (-) or underscore (__) are the only special characters that should be used.

Uploading Images

  1. Log into the site with an administrative account
    1. Accounts can be elevated to admin status by going to POS-26-21, bring up the account and change the Account Type to A. If the account does not exist then you can create the user id here and set the account type to ‘A’. After you create the account you will need to go to the website and on the logon screen select the ‘Forgot Password’ option to have a temporary password sent to you.
    2. The user will need to log out and back in on the website to apply that change.
  2. Go to Site Administration on the landing page.
  3. Click on the Upload Management icon
  4.  Here you can either select the option to Upload New Files or Manage Files in the table beneath.
    1. Upload New Files
      1. Click on the Add files… button which will display a window to browse to and select your images.
      2. Multiple images can be uploaded by holding shift or ctrl when selecting images.
        • Click on the Open button once all items are selected.
      3. A list of images will appear similar to the image above.
        • Take a look at the size of each image. Anything in the KB range or low MB range (e.g. 1.05 MB) is fine. Anything over 10MB you will want to consider resizing to a smaller size.
        • All images can be uploaded by clicking on the Start upload button beneath the drop down.
        • Individual images can be uploaded by clicking on the Start button on their line.
      4. A progress bar will display for the entire upload along with a progress bar for each image being uploaded. Once each item is done uploading it will then have a Remove option in case you want to back out.

Manage Images

Images that have already been uploaded can be viewed by going to Account, Site Administration, Upload Management and then clicking on the Manage Files on the right hand side of the table.

Here you can view the image names, remove an image, download a copy or continue on to upload more images by using the Upload New Files on the top right.


Auto Orders

Auto Orders

Auto Orders automatically analyzes your need to order new items and creates pending orders when you do End of Period processing. This document first explains how to setup Auto Orders, and then how to run Auto Orders.

Setup

There are two steps for the setup of Auto Orders. First you must create Auto Order codes. Make a new code for each different calculation type you would want for an item. Secondly you must enter the Auto Order codes into items in the masterfile. We will explain these two steps in detail.

Create Auto Order Codes

Go to Auto Order Parameters. (GM-SU-2-1)

You will be in this screen:

  • Type a “.” to add a new calculation type.
  • Type a name for this calculation type in the Description field.

Note that the Screen is split into two sections, Selection and Calculate Based On. The Selection side will determine which items need to be ordered. The Calculate Based On side will determine how many of each item to order.

Here is a description of what each field does:

On-Order Qty
The quantity on hand determines whether you want to select an item to order. Enter a “Y” in this field to add the quantity on order to the quantity on hand in this calculation. Otherwise enter an “N”. This means that if there were 15 on hand and an order for 10, the auto order process would count 25. This will not change the masterfile quantities.

Pending Order Qty
Similar to the previous field, enter a “Y” in this field to add the pending order quantity to the quantity on hand. Otherwise enter an “N”. If you say “Y” to both On-Order Qty and Pending Order Qty, then it will add both of the quantities to the quantity on hand in the selection process. This will not change the masterfile quantities.

Out of Stock
Enter a “Y” to choose masterfile items that have a quantity on hand of zero. (Or any items that show a negative quantity on hand.)

QOH <= Min
Enter a “Y” to choose items that have a quantity on hand less than or equal to the mininimum for this item. This minimum is set in Masterfile Maintenance on the Ordering screen in the Min field.

QOH <= WTD Sales
Enter a “Y” to choose items that have a quantity on hand less than or equal to the week to date sales for this item.

QOH <= MTD Sales
Enter a “Y” to choose items that have a quantity on hand less than or equal to the month to date sales for this item.

QOH <= YTD Sales
Enter a “Y” to choose items that have a quantity on hand less than or equal to the year to date sales for this item. If you enter a number to divide the YTD sales by in the Divide YTD Sales by field, then it will use the result in the QOH comparison.

QOH – WTD Sales <= Min
Enter a “Y” to choose items whose quantity on hand minus the week to date sales are less than or equal to the minimum the store would like to have on hand (set in the Min field in the masterfile.)

QOH – MTD Sales <= Min
This is just like the QOH – WTD Sales <= Min field, except it uses the month to date sales in the comparison.

QOH – YTD Sales <= Min
This is like the QOH – WTD Sales <= Min field, except it uses the year to date sales in the comparision. It will use the YTD sales divided by a number you choose, if you put that number in the Divide YTD Sales by field.

Divide YTD Sales by
If you want the YTD calculations divided by a number, then enter the number here. It will only do this for the QOH <= YTD and the QOH – YTD Sales <= Min fields. It has no effect with the YTD Sales divide by field.

WTD Sales multiply by
Enter a number in here and it will be multiplied by the week to date sales. The quantity on hand will be subtracted from this number, and the result will be the quantity to order. Note however that it will not order more than the maximum for the item unless you put a “Y” in the Propose > Max field.

MTD Sales multiply by
Enter a number in here and it will be multiplied by the month to date sales. Otherwise it is handled the same as in the WTD Sales multiply by field.

MTD Sales divide by
Enter a number here for the month to date sales to be divided by. Otherwise it is handled the same as the WTD Sales multiply by field.

YTD Sales divide by
Enter a number here for the year to date sales to be divided by. Otherwise it is handled the same as the WTD Sales multiply by field.

Propose < Min
Enter a “Y” here if you will allow the number of items purchased to be less than the minimum set in the masterfile. Otherwise it assumes “N”.

Propose > Max
Enter a “Y” here if you will allow the number of items purchased to be greater than the maximum set in the masterfile. Otherwise it assumes “N”.

% Over Max to Propose when Calculation is what % OF Max
These fields work together. % Over Max to Propose will order a specified percentage over the Max only when the calculation already is a specified percentage of the Max. For example if I put in “50” and “100” like so:

If my Max was 100 for an item, then whenever the proposed quantity reached 100 it would add an extra 50 to that for a total of 150.

You can add as many auto order codes as you would like.

Add Code to Item in Masterfile

Now you must add the auto order code into the masterfile for any items that you want automatically ordered. Go into Masterfile Maintenance, type in the SKU and then type “O” to go to the ordering screen. You will be in this screen.

Type the code into the Auto Order Code field

Running Auto Orders

This process will create pending orders for each item that has an ordering need, determined by the auto order code that it contains.

Choose End of Period Processing, menu option 23 from the main GM menu.

Only enter a “Y” into the first three fields if it is the end of the specified period. Otherwise enter an “N”.

Enter the month and the year of the closing period in the first column, if you answered “Y” to End of Month field or to the End of Year field. Otherwise it does not matter what you enter into these fields.

Enter the month and Year of the Active Period (meaning the current month and year) into the second column.

Enter a “Y” in the Process Auto Orders field.

Enter the auto order code that you want to process in the Auto Order Type(s) field. Leave it blank to process all auto order types.


Store Transfers

Go to the Transfers Menu.

  • TX-22 for Text
  • GM-24 for GM

Both an Outbound Transfer and an Inbound Transfer must be done.

Outbound Transfers are created by the store sending items to another store. This decrements the inventory of the sending store (This does not increment inventory of receiving store.)

Inbound Transfers are created by the store receiving items from another store. This increments the inventory of the receiving store. (This does not decrement inventory of sending store.)

Transfers proceed as follows:

The sending store follows the steps for Outbound Transfers:

  1. Create New Outbound Transfer
  2. Print Pick/Pack Slip
  3. Pull Textbooks to be Shipped
  4. Complete Outbound Transfer

The store receiving the items follows the steps for Inbound Transfers:

  1. Create New Inbound Transfer
  2. Pull In Transfer Record
  3. Complete the Transfer

This document is split into sections for Outbound Transfers and Inbound Transfers.

Outbound Transfers

These steps are explained in detail:

Create Transfer

Choose menu option 1

Enter store number you are transferring to

  • Enter “.” in the Document field
  • Enter “L” in the Local/Remote field
  • Fill out the rest of the fields appropriately, entering each ISBN/SKU to be transferred in the ISBN/SKU field. Use the help messages to assist you.
  • Enter the quantity to be shipped in the SHQTY field
  • Now write down the document number (found in the Document field) and save the document

Print Pick/Pack Slip

In the Transfers menu choose Print Pick/Pack Slip Outbound, menu option 21

  • Leave Entry Date and Status Date fields blank
  • Enter the document number (that you wrote down) in the Document Number field
  • Hit “Y” to run report and choose a printer in Output Options

This will allow you to look over the list of textbooks that you entered into the transfer document. You can go back into Outbound Transfers and make modifications to the transfer if necessary.

Pull Items to be Shipped

Simply pull the items on the Pick/Pack Slip from the shelf and prepare them to be shipped.

Complete Outbound Transfer

Go back into Outbound Transfers, menu option 1 in the Transfers menu.

  • Enter the receiving store’s number in the To Store field
  • Enter the document number in the Document field
  • Hit “C” to complete the Transfer

This window appears:

Fill in the information as needed.

At this point the inventory will be decremented from the masterfile of the outbound store. Send the pack slip (step 3) with the inventory. When the other store receives the inventory, it must follow the steps for an inbound transfer.

Inbound Transfers

These steps are explained in detail:

Create New Inbound Transfer

Choose menu option 2 from the Transfers menu.

  • Enter Store numbers
  • Enter “.” in the Document field
  • Enter the rest of the fields appropriately

Pull in Transfer Record
After hitting Enter in the Entry Comments you will be asked:


Choose Yes

Now this window will come up:

  • Enter the document number on the packing slip that came with the inventory (created by the outbound transfer)
  • Hit “Y”

The ISBNs will come in automatically.

Enter the quantity you received for each item in the RCVQTY field

Complete the Transfer

You can hit “>” and then hit Enter to advance to the options at the bottom.

  • Hit “C” to complete

The Inbound Transfer is now finished and the inventory is updated.


Matrix Receiving

Matrix Receiving is essentially done the same way as receiving regular items. The Parent or Master SKU is what you will see in the line items of the main receiving screen. If you go to one of these Matrix Master SKUs and hit enter you will encounter an additional screen that is used for matrix members only.

Enter your receiving log as you normally would.

  • When you get to a SKU that is a Parent SKU for a matrix, hit enter.

You will be taken to a new screen that looks like this:

  • Enter unit of measure code in the UOM field, (EA is the default.)
  • Enter the quantity received in the RC QTY field.
  • The vendor list, sell price, and vendor cost will all be posted to the masterfile as they appear on this screen. Verify these to be correct.
  • Save this information by hitting enter.

Now you finish the receiving log as you normally would. If you need to go back into this matrix screen, you must select the Parent SKU again from the first screen and hit enter. You will be taken back into this screen to make any further modifications needed until you post the receiving log.


Unkit

The “unkit” option in the GM (General Merchandise) module was designed to allow you to order items that contain many sub-items in it. An example of this is a display case containing highlighters of several colors.

Setup & Maintenance

Step 1. Setup the UNKIT SKU. This is the SKU that defines the bulk order unit.
Step 2. Assign the SKUs that will be received when he UNKIT SKU is received.

Enter each SKU that will be received/sold.

Field Definitions

Distribution SKU Enter the SKU or use the XREF look up to locate each individual item.

Description This is a display of the item.

Qty to Receive Enter the number of units to be received at time of receiving.

Item Cost Enter the Cost value that will be used when this item is received.

Total Cost This is a display of the total of the extended costs.

QOH This is a display of the current QOH of the SKU

Receiving

When the UNKIT is received each SKU on the list will be updated based on the QRcv and the Cost specified in the UNKIT screen.

If 10 of the UNKIT SKU are received then the QRcv values will be multiplied by 10.

Each Distribution SKU will be updated with the receiving quantity and the costs will also be updated.

Unpost Receiving

If you unpost a receiving then the distribution SKU will be updated appropriately.

Auto Orders

Do not set up auto order/replenishment values for the UNKIT SKU. If you will be selling the UNKIT SKU then you are not using this feature how it was intended.


Preparing For Rush

Preparing for rush can always be a challenge, especially for general merchandise. One of the reports that we have is the Pre-Order Worksheet (GM-01-28) report in GM. This report will look at the sales from a previous date range and show you how many you need to purchase to stock the quantity needed if you meet the same sale figures.

Enter the information; Beginning Date and Ending Date are the sales dates for the comparison. Enter the desired sort sequence. If you wish to limit the report to only certain vendors or for certain classes then enter in the filter criteria information as needed, enter as many vendors and/or classes as desired.

Select “R” to run. Keep in mind that you can run this report as many times as needed with different filter criteria to meet your needs.

The report will show the quantity sold during the dates entered, current quantity on hand, current quantity on order, quantity that you are over compared to the previous sales and the quantity that you need to order to meet the previous sales. Adjust your orders based on what you feel you will sell this term.


Purchasing Guide

GM Purchasing Menu

Enter/Modify Pending Orders

This is menu option 1 in both the GM and Trade purchasing menus. This option allows you to create a pending purchase order for a single item in the masterfile. You can create them for as many items as you need to. This is an optional step that is preliminary to creating purchase orders. It allows you to establish a need for individual items without creating an actual purchase order. It is easy to make modifications to pending orders until the time that you decide to create purchase orders.

Print Pending Orders

Menu option 2 in GM and Trade purchasing menus. This will print all the pending orders that exist, or if you prefer only those for specified vendors. In GM it will not print items that are part of a matrix. This is left to Print Matrix Pending Orders.

Print Matrix Pending Orders

Menu option 3 in GM purchasing menu, not available in Trade. This will print the existing pending orders that contain items which are part of a color-size matrix. The matrix is setup in Masterfile Maintenance. You can also print only those matrix pending orders for certain vendors.

Create Purchase Orders (From Pending)

Menu option 4 in GM and 3 in Trade. This will consolidate all pending orders with the same vendor and the same shipping code and create purchase orders from them. This can be limited to certain vendors.

Print Purchase Orders (from Pending)

Menu option 5 in GM and 4 in Trade. In Trade “First Time” instead of “from Pending. This prints all of the purchase orders that have not been printed that were created from pending orders. You can print purchase orders for only certain vendors if you wish.

Modify Purchase Orders

Menu option 21 in GM and Trade. Here you can modify any purchase order by typing in the purchase order number. Also you create purchase orders. This is done by pressing a “.” in the first field.

Reprint Purchase Orders

Menu option 22 in GM and Trade. Here you can reprint and purchase order existing. If you created the purchase order using the “Modify Purchase Order” option, this is also where you should print your purchase order.

Purge Old Purchase Orders

Menu option 25 in GM and Trade. This clears old purchase orders from the purchase order file. You choose how old the purchase orders are.