Report: Store Sales by Store

Below is an overview of the Store Sales by Store by Register by Date report which is virtually identical to the Store Sales by Store by Date by Interval.

Path: POS-RP-1-4-1 and POS-RP-1-4-2

Purpose: These reports are used to display the number of transactions, dollar amount and item count for a given time period. This can be in detail or summary format, with store and/or date sub totals.

Output: Register, Date, Time Interval (default 30 mins) Time Transactions (transactions in time period), Time LI (line items per time period) Time Sales (dollar amount sold in time period) Time Elapsed (time between sales) Average Tran.Time (average transaction time), Secs Per Line Item, Cust Count (edge case typically not used)

A Summary can be run to get the ending value for each day, but the true value is in the detailed version of the report.


Online Orders Resume Suspend and Modify

Resuming Online and Mail Order Transactions

Prerequisite

  • The employee resuming the transactions are setup as Cashiers.
  • The PC or Register has been setup to run “Back office” or Web orders.

Once you have received your online orders you will need to resume the transactions on the system to fulfill and complete the purchases. *note that the card used to purchase the items is not changed until the resume transaction has been complete at the store. Online orders and the credit cards used for them are only verified valid and are not charged until the online order is completed in the store.

Your register must be open for the day in order to complete web transactions. Referrer to the general cash register training for Opening your register.

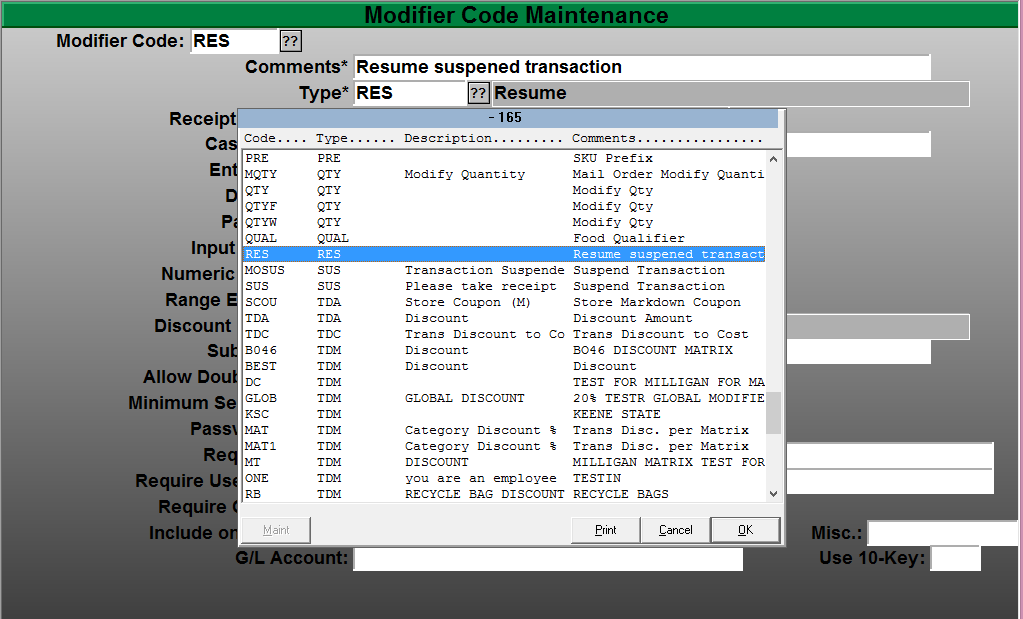
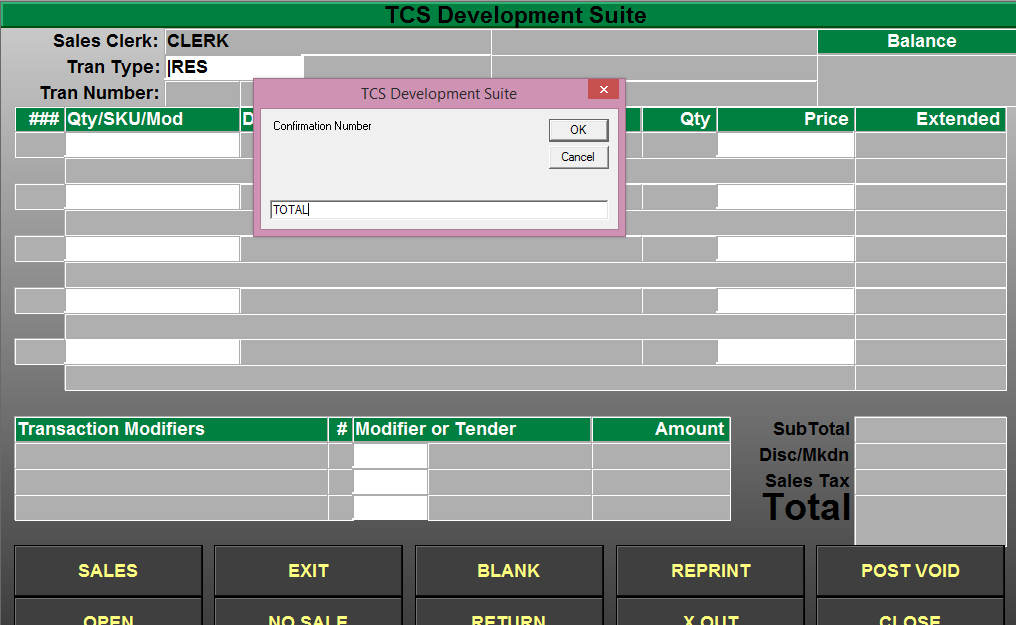
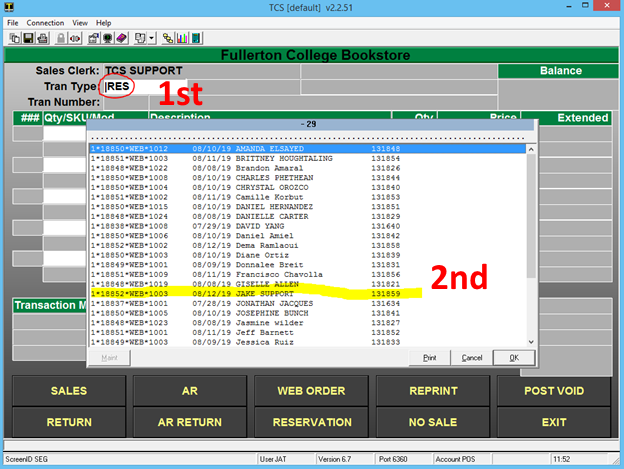
  1. Select the Transaction type Resume, Tap or Click the touch button, keyboard key or simple type |RES to bring up a listing of all pending orders on the system.
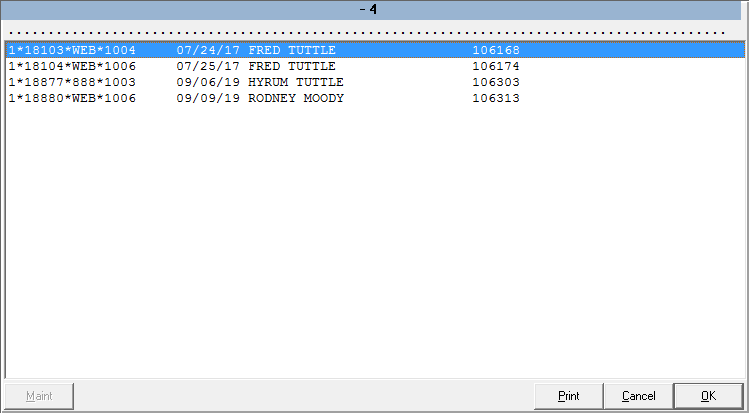
  2. Select the order you are completing from the list of suspended transactions displayed.

3. Your order will be displayed on the screen with the items the customer purchased in their online order. Review the items and remove, add or adjust and verify the contents of the order. *note that freight will display on pickup orders as a $0.00 dollar amount.

* If you modify the Freight you must use the Frieght modify option. This will be setup when the webstore and registers for processing online orders were setup (MOF) **

*If you modify the any item in the webtransaction you must use modify buttons that were created during the setup procedures.(MOM)**

*(MOM) and (MOF) are specific modifiers for online orders. Don’t you keyboard shortcuts for modifying web orders. example |LIM (line item modify) this will not work on a web transactions. 

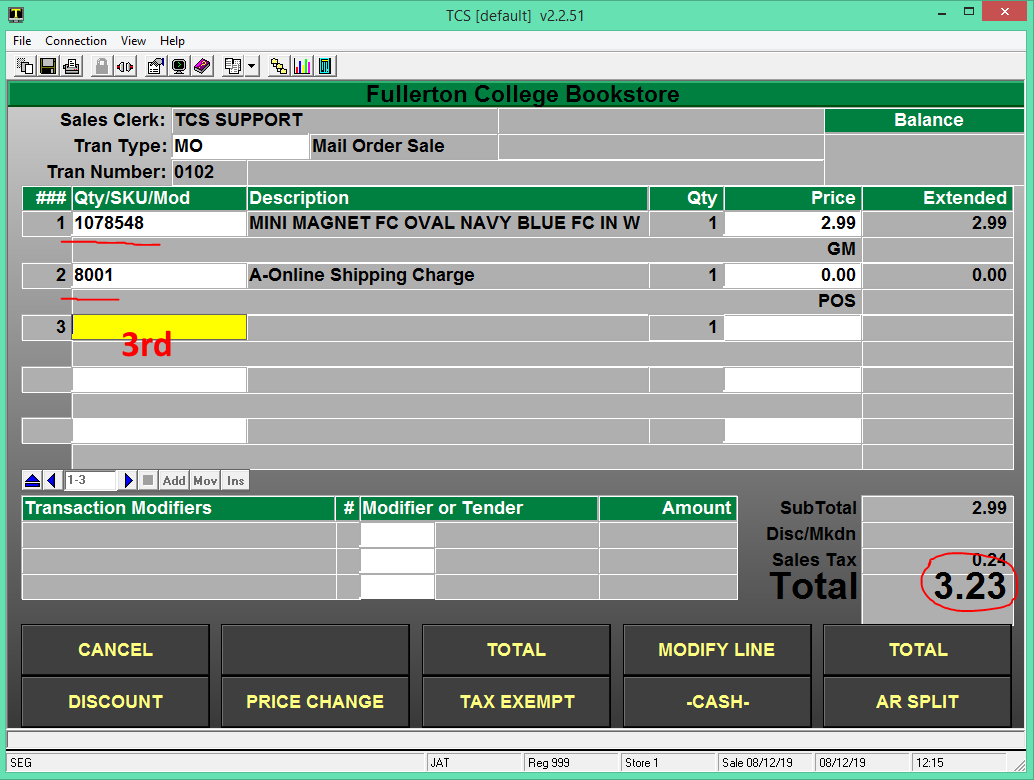
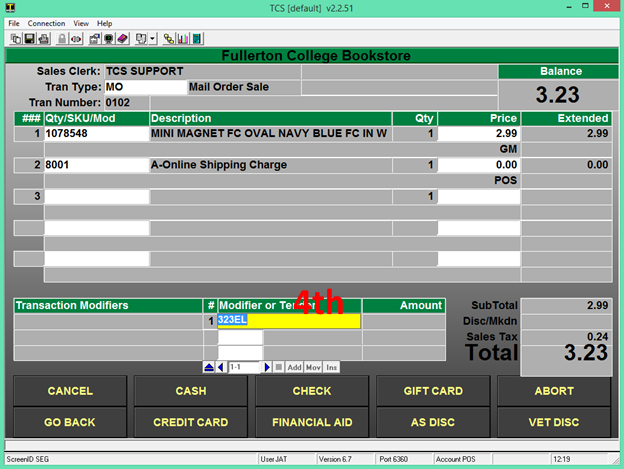
4. Totaling the online order will auto populate the tender code and transaction amount. You don’t need to do any modifications to the tender code unless the customer is using a different payment method than the one they used online to make the purchase.

  • Press enter through the tender field.

5. When the transaction is completed you will be prompted to proceed to the Next Transaction or to Reprint the current transaction.

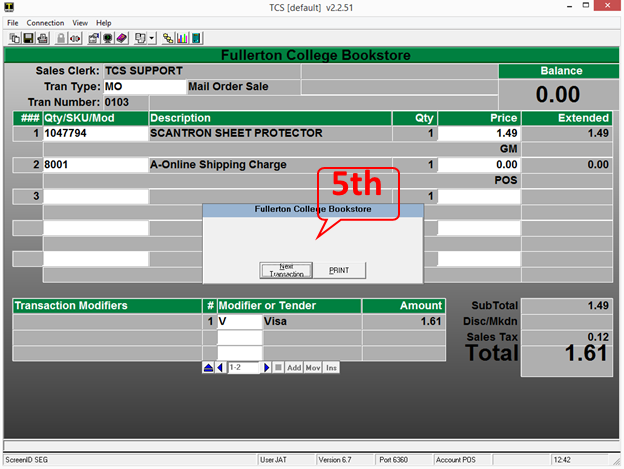
  • At this stage in the order fulfillment an email will be sent to the customer notifying them that there order has been completed. *these email setting are setup during the initial setup of the webstore

Mail Order & Online Order with Returns and Transaction Match Tender

Prerequisite

Original Transaction number, date and register. This can be in any form but all of the material is required to complete the return process.

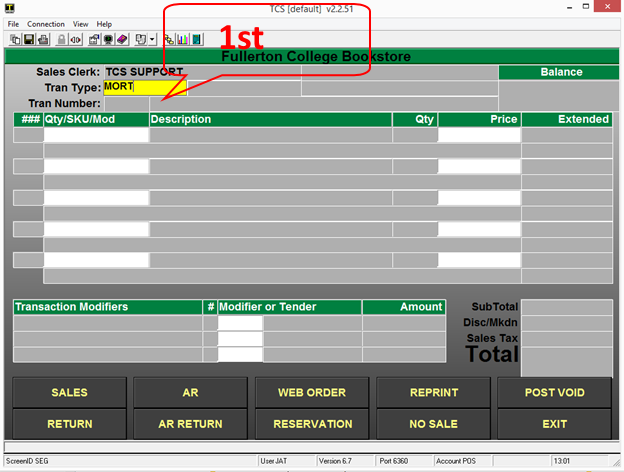
  1. On your back office, web register or any machine that has been setup to process web transactions go into the Cash Register function and select MORT, select the mail order return button or key that is setup to perform a mail order transaction.


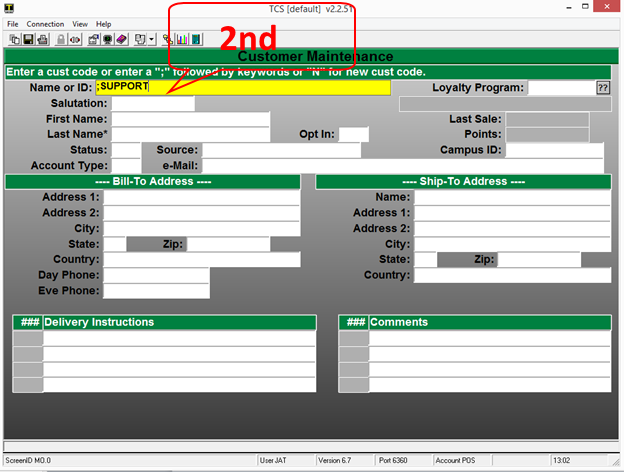
2. Input the customer ID or preform a search using the ;user’s name or portion of name.

  • You will be prompted for the customer name or ID that preformed the original transaction that you are wanting returning items against.

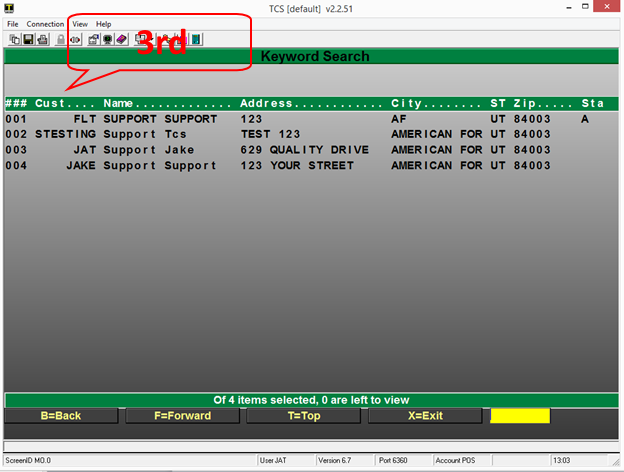
  • If you searched using the ; keyword search, select the appropriate customer to proceed to return items.
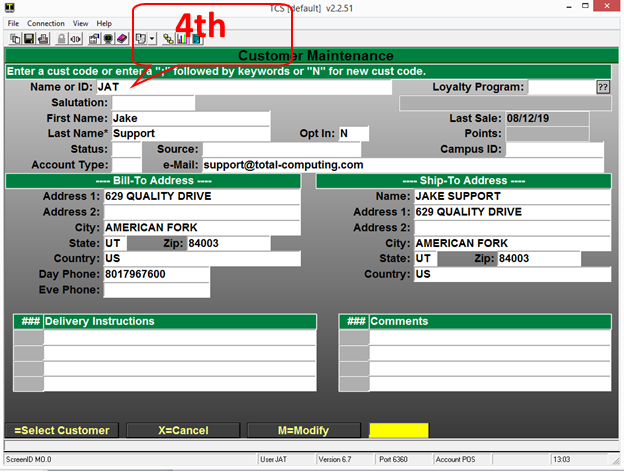
  • If you input the customer ID the search results should not display and the process should move you past the lookup and allow scanning items for the return.

5. Once you have selected or input the correct customer all you will need to do is scan or type in the items that were on the original order into the sku field.

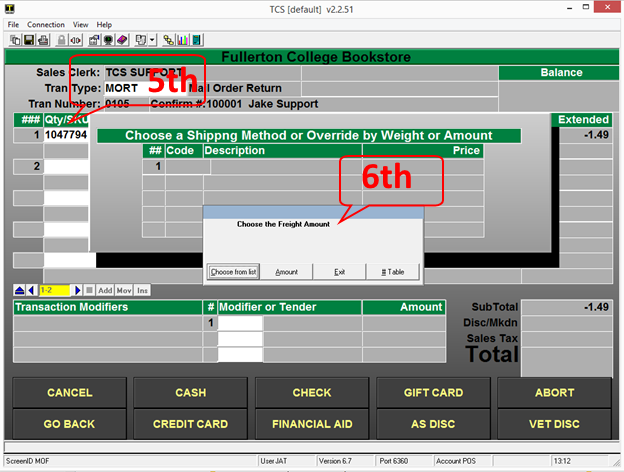
  • Once you have scanned or entered the items that you wish to return on the order and select Total you will be prompted for any shipping charges that you wish you apply to the return.
  • You can select a specific amount or select from a shipping table that you have setup or simple exit past this prompt.

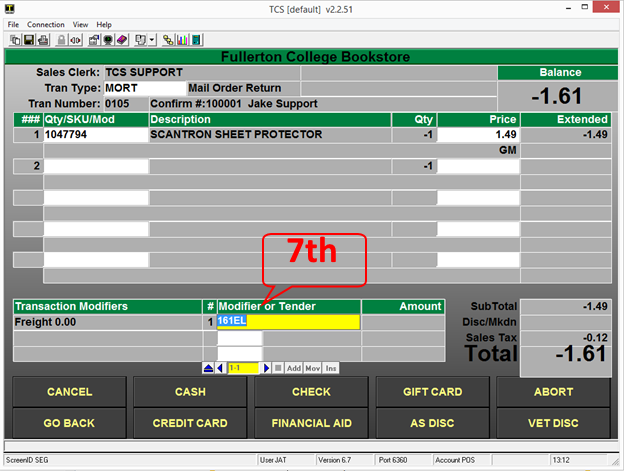
  • Once you have scanned all of the items to be returned on the online order you will just need to Total the transaction and review the transaction total.
  • The Tender and amount should auto populate based off of the original transaction.
  • You will press “Enter” to proceed to the step

*note the system will not allow the tendered amount to be greater than the original purchase amount for the order.

**do not change the default tender code unless you are giving back cash or store credit. The tender determines what the cashier is prompted for.

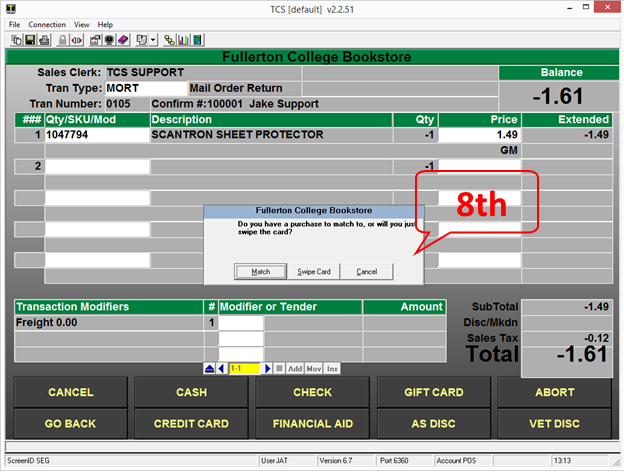
  • After you have accepted the tender and amount you will be prompted on how you would like to accept the payment return method.
    1. If the customer is present and has the credit card that they used to purchase the items you can have them swipe into your card reader their card when prompted.
    2. If you choose to refund to the original card that was used for the transaction you would select the “Match” option. You can use the “Match” option even if the customer is present with the original purchase card and the customer will not need to do anything.

*note that not all web registers are equipt with a card terminal.

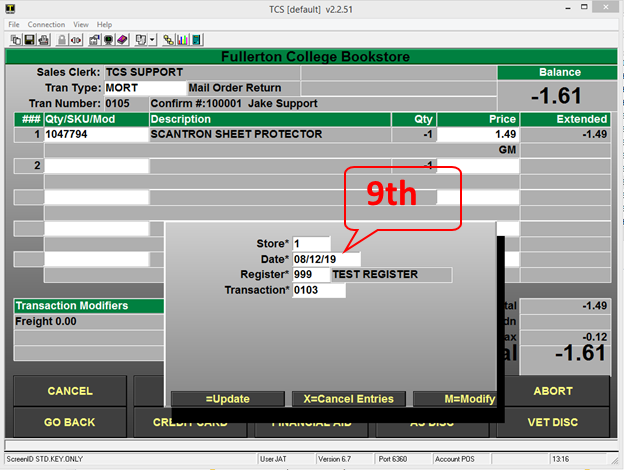
  • Input the transaction information is the only way to match a transaction against the original transaction. All of the inputs must match exactly.
  • It is important to note that even though you can have multiple Stations or Registers preforming web order usually all web registers utilize the same web register number.


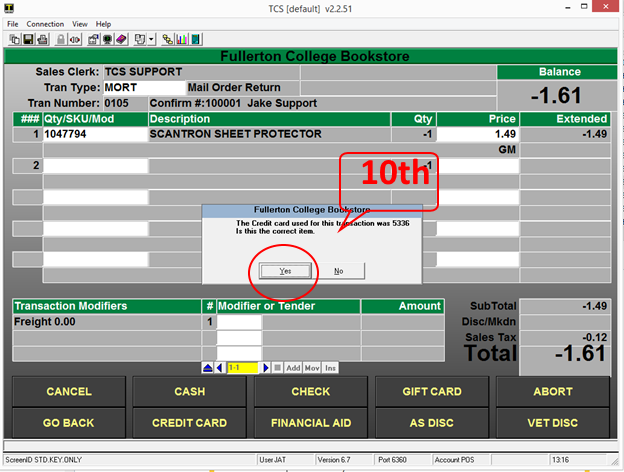
  • If the system matches the original transaction you will be prompted to verify the last 4 digits of the original transaction.

*note you can find the last 4 from the email confirmations or by reprinting the original receipt. If you do not have access to that information you may run several sales reports or lookup the transaction under the Mail order Customer Maintenance.

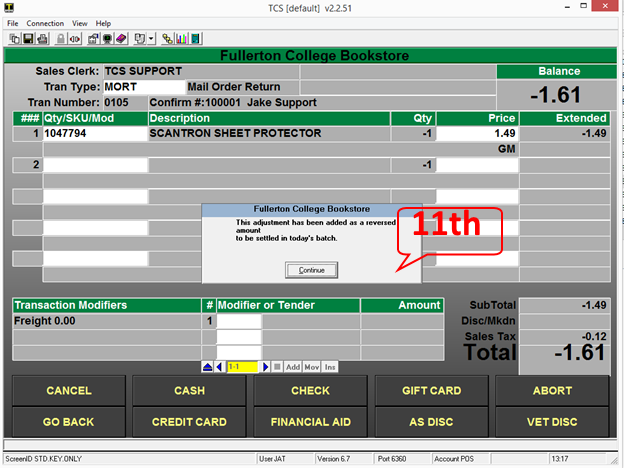
  • If the transaction matches and the tender total does not exceed the original purchase amount you will be displayed a message that the adjustment to the customer’s card has been made and the funds will be set to return to their card.

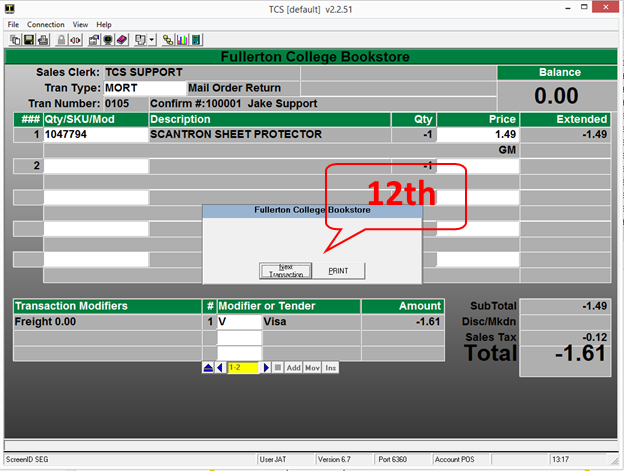
  • The last prompt you will receive once the return has been completed is to move onto the next transaction.
  • The system should print-off a return transactions receipt.

Suspending & Resuming orders from your Web register

  • Any time that you are in a weborder transactions you can EXIT or ABORT to suspend the transaction or delete the transaction.
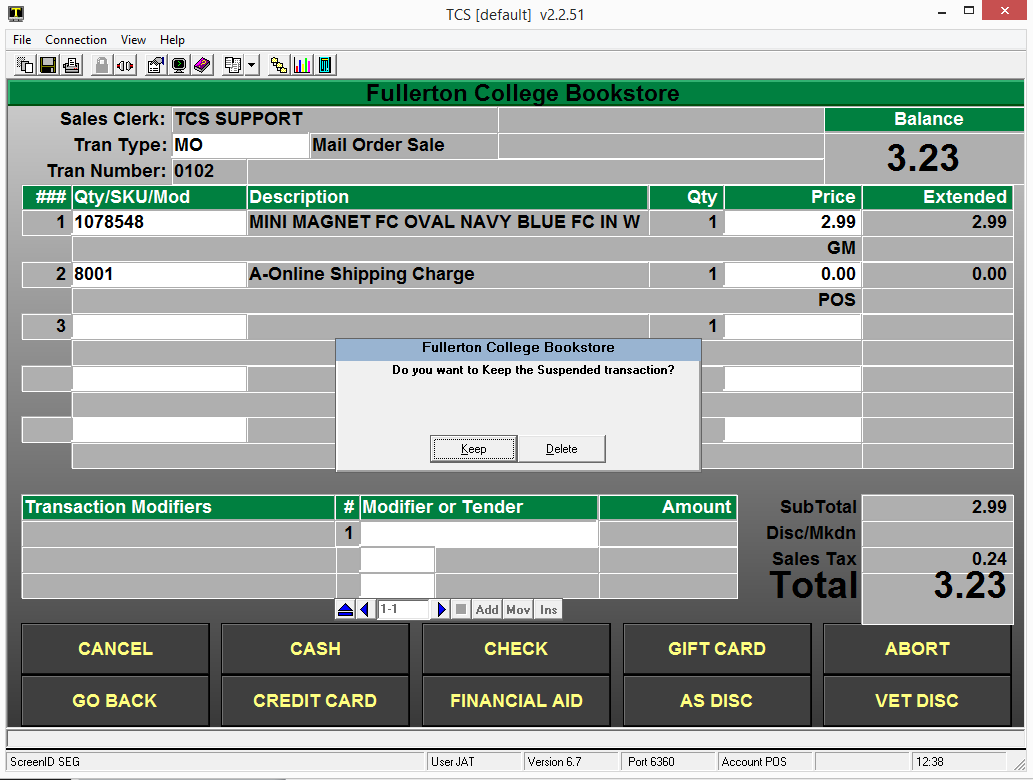
  • When you have selected a way to exit out of the web transaction you will be prompted to “Keep” or “Delete” the transaction. When you select the default option to “Keep” the transaction is restored to its original state so you can access the order at another time.
  • You can also select the “Delete” option when exiting your transactions and all of the information will be removed from the system and you will no longer be able to process that order.

*note that if you modify the online web transaction that those modifications will need to be added back as the “Keep” option restores the transaction prior to any of the users changes.

Declined Online Orders

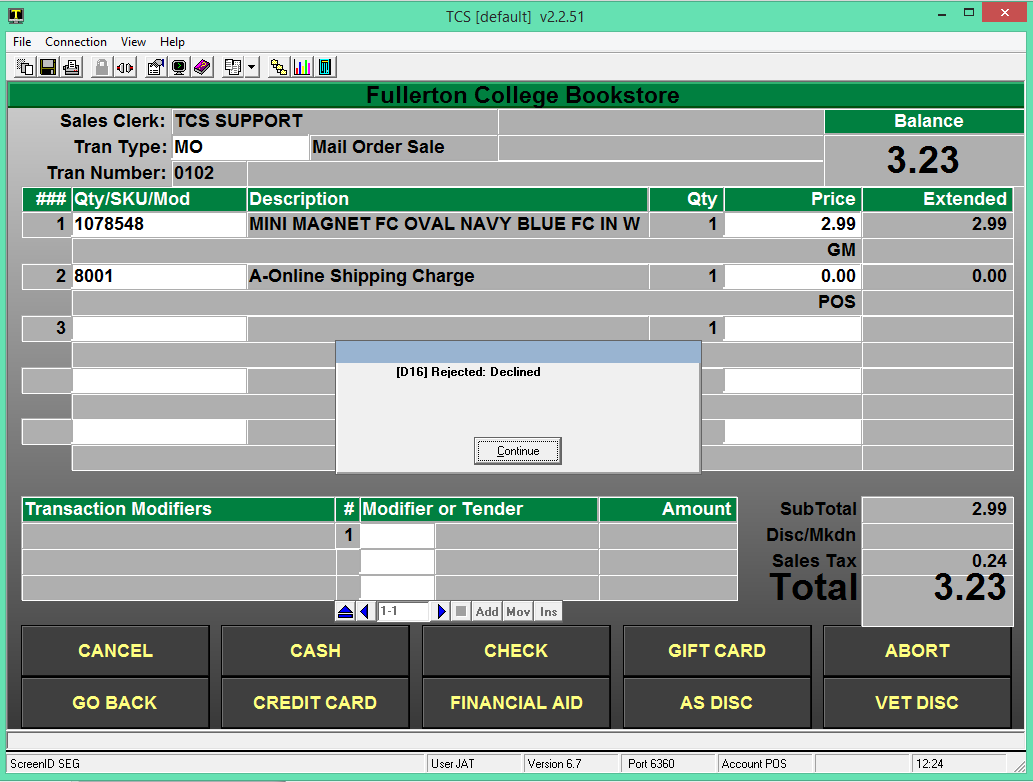
  • When you receive a declined response from the transaction when you try to process a web online order you will need to reach out to the customer to inform them that their card has been declined.
  • You can use the ABORT, EXIT or SUSPEND options to leave the transaction. Make sure that when prompted to “Keep” or “Delete” the transaction that you select the Keep option until the issue has been resolved.

*Please note that credit cards are not charged until the online order has been fulfilled at your web register.


Web Order Returns

The steps below cover how to return a web order. It’s virtually identical to a regular return, with two exceptions; the transaction type and the tender.

These steps also include returning an ebook. That part of this process is the same for web and regular orders as well.

All web returns must be completed from a Host Connection or your regular web order machine.

  1. Start by using the MORT transaction type or the return option under your web register
  2. Look up the customer
  3. Enter the items to return
    1. For an ebook, enter the ebook SKU, or scan the ISBN and select the ebook option (if applicable)
    2. Answer the prompts for the original transaction the ebook was purchased on
      1. This is so that the system can get the access codes and verify if they are valid for return
    3. Confirm the access code is correct
      1. Repeat for any other ebooks
      2. Note that any access code that has already been activated is not a valid candidate for returns per Redshelf.
  4. Total the transaction after all items have been returned
  5. Select the appropriate shipping amount (if applicable)
  6. The tender should default to the transaction amount + tender type
    1. If not, enter the amount followed by the original tender type
    2. e.g. 10.25AR 10.25CC 10.25EL 10.25BL 10.25BLM
  7. If a Credit Card was used, select either the Match or Swipe option
    1. Swipe allows the customer to return to a new card. This is rare for web transactions since the customer usually isn’t in the store with their card handy.
    2. The Match option allows you to return the funds to the original card if a card was used on the original transaction.
      1. Answer the the original transaction prompts so the system can obtain the credit card token to use.
  8. Press enter and the process is complete.


Set or Reset a User Password

Some menus have been changed, please read carefully.

While the steps on how to change a user’s password are straight forward, there are a few points that need to be kept in mind.

  1. When you set a user’s password in User Maintenance (UU-5-1) or User-Cashier Maintenance (POS-22-1) the system automatically sets their password to reset when they first log in.
    1. This means that the password set in User Maintenance is temporary. Do not set the password to what the user would like to use long term.
  2. It is necessary to set the user’s password from the Host Connection. While these steps can be followed on an individual register, passwords that are changed on the cash register ARE NOT sent to the host or to all of the other registers.
    1. By setting the password on the host all registers will get the updated password.
    2. Check POS-6-2 to view which registers are communicating. Those who have a “To Be Xfered” amount of zero in the right hand column will immediately have the updated password.
      1. Steps to restart the register communications can be found in the Smartlane Communications video here.

To quickly reset the password for the logged in user

  1. Type PASSWORD into any menu prompt and press Enter
  2. A dialogue will appear prompting for the users password along with a Enter New Password and Confirm Password prompt
    1. Enter your current password into the “Enter Your Password” prompt
      1. This is to confirm the identity of the logged in user
    2. Enter a new password into the “Enter New Password” field.
      1. Passwords must be 8 characters long and include at least one letter and one number
        • g. 1234567A or ABCDEFG1 the password is NOT case sensitive, this means that ABCDEFG1 and abcdefg1 are both treated the same.
      2. Re-enter the new password into the “Confirm Password” field and press enter.
    3. The password has now been set for the logged in user and will update to all of the registers.


To reset the password for another user

  1. From any module, go to UU-5-1 or POS-22-1
  2. Enter the user ID of the user who’s password is going to be reset
  3. Navigate to the Password field and type in the new password
    1. Note that this new password is temporary. The user will be forced to set their own password after the log in with this temporary password.
    2. Passwords must be 8 characters long and include at least one letter and one number
      • g. 1234567A or ABCDEFG1. They can also include special characters. The password is NOT case sensitive, this means that ABCDEFG1 and abcdefg1 are both treated the same.
  4. Enter the temporary password again into the Confirm Password field
    1. Press Continue on the notification box. This is a notification that the password entered is temporary and the user will need to reset their password when they log in.
  5. Press ESC after reaching the Expires field
  6. Enter to save the password change.
  7. Have the user log in with their new temporary password.
    1. You can type in ID at the menu and press enter to display the login prompt or have them log into another connection.
  8. They will immediately get a prompt to reset their password
    1. They need to enter their new, permanent password into the Enter New Password and Confirm Password fields
    2. Passwords must be 8 characters long and include at least one letter and one number
      • g. 1234567A or ABCDEFG1. They can also include special characters. The password is NOT case sensitive, this means that ABCDEFG1 and abcdefg1 are both treated the same.
  9. After that is complete their password will update to all of the registers.


Sell and Redeem Gift Cards

Selling a Gift Card

  • Start a transaction as usual, normally this will be a SA transaction.
  • Press the ‘Sell Gift Card’ button on the keyboard, usually in the middle on the top row.
  • In the price field, enter in the selling price for the Gift Card and hit enter.
  • Select the option to ‘Add’ if you are selling a new gift card.
  • In the new window, scan or swipe the gift card in the “Voucher Number” field and then select ‘Add’, fill out as much of the rest of the information as you want to track and then hit enter to save.

  • Complete the transaction as normal.

Add money to Gift Card

To add money to a gift card you will follow the same process as selling the gift card, the difference will be when you scan the Gift Card it will not prompt you to Add, Copy or Delete, instead it will display the current card information. You can just enter through everything to add the amount that you entered on the previous screen.

Redeeming a Gift Card

  • Process transaction as normal.
  • When finished select the ‘TOTAL’ option from either the keyboard or the touch screen.
  • Select the Gift Card option from either the keyboard or the touch screen.
  • When the pop-up window displays, scan, swipe, or enter the gift card number. The window will now display the remaining balance of the GC, hit the ‘Continue’ button or hit enter on the keyboard.


TCS Department/Class Setup

Before you can add any inventory items for Fee codes you must have the Department and Classed setup that the items will be a part of. Depending on the module that you are in navigate to the appropriate place to create the department or class code; GM – GM.SU.1.4 and 2, TX-TX.SU.4.6.21 and 22, POS-POS.22.3.1 and 2, AR-AR.SU.5

It does not matter which module you use to create the department or class code since they are universal and available in all modules once they have been created.

Department Setup

The department needs to be setup first, in GM go to SU.1.4. Some examples of Departments would be Textbooks, Clothing, Food.

  • Enter a ‘.’ to create the next sequential number or enter the number that you want to use. If you create a new department you will be prompted to Add/Copy/Cancel, select Add to create from scratch or select Copy to copy a from an existing department.
  • Enter the description as you would like it to display on reports
  • Non-Merchandise – Enter ‘N’ if this is a normal ‘inventoried’ department or ‘Y’ if this department is for NON merchandise classes, such as fee codes.
  • Enter ‘Y’ to exclude this department’s sales for the flash report which is a special sales report that does daily/weekly/monthly/yearly sales comparison to same time for previous year.
  • Enter any additional descriptions that you would like to use to help explain this department.
  • GL & DSR Dist Code: – If you have created some General Ledger distribution codes then you can select them here. These are used in the reporting for general ledger.
  • Transfer Out Disc %: – This is the discount that will be used when transferring inventory from one store to another, the items in this department at cost * (1-discount). Leave the field blank for no discount.

Class Setup

Once the department has been created, you can now create the classes that are part of that department, some examples would be (Textbooks – New Books, Used Books, E-books, Rentals: Clothing – Men’s Shirts, Women’s Shirts, Children’s shirts or just Shirts, Pants, Shorts: Food – Packaged food, Prepared Food, Snacks, Sodas, Candy Bars, Chips)

  • Enter a ‘.’ to create the next sequential number or enter the number that you want to use. If you create a new class you will be prompted to Add/Copy/Cancel, select Add to create from scratch or select Copy to copy a from an existing class.
  • Enter the description as you would like it to display on reports.
  • Enter the Module that the class is part of (POS, GM, TX).
  • Enter the Department that the Class is part of.
  • ERP Method is a custom field for Datatel – call TCS if you need this.
  • Category Description – this is the Class Category fields that are maintained in GM.SU.1.1, these are used with the financial aid module to group classes together for the purpose of adding them to the financial aid customer type setup.
  • Status – ‘A’ is the normal status, you can also set the department to ‘I’ for Inactive.
  • Taxable – Blank and ‘Y’ have the same meaning, if a department is NOT taxable then enter a ‘N’.
  • Tax Table – You can enter a tax table that is different than what would be considered the Normal tax table used for the store. If a tax table is entered here it will be used for this item regardless of what is entered at the store or register level.
  • Allow Discounts – Blank and ‘Y’ have the same meaning. Enter a ‘N’ if items assigned to this department should not be allowed to be discounted at the register.
  • Maximum and Minimum Price- You can enter a Max and Min price to these fields, this will prevent you from entering a price that is too high or too low and prevent you from doing a price override at the cash register that is outside of the range set here.
  • Target Margin – Enter what you would like your margin to be for this class of item, if an item is sold without a cost associated then the system will use the margin set here to calculate the cost for reporting.
  • Default Tag type – Enter in the tag type that you would like all items in this class to use as a default, you can change this for any individual item.
  • Distribution Code – Enter a ‘N’ here if you have a preferred customer system but you do not allow rebates for purchases of items in this class. If this field is left blank, then rebates will be allowed for purchases in the class.
  • Report Group – You can enter grouping numbers here so that certain classes will report together.
  • Sub-Class is setup to be used with the NACS Universal Hierarchy for reporting to NACS.
  • Sub-Category is setup to be used with the NACS Universal Hierarchy for reporting to NACS.
  • Sub-Other is setup to be used with the NACS Universal Hierarchy for reporting to NACS.
  • NACS-Survey is setup to be used with the NACS Universal Hierarchy for reporting to NACS.
  • Modifier – You can enter any modifier that has been setup in POS2.2, this modifier will automatically get used on all transactions that sell an item in this class.


Special Orders

Overview

Special Orders are used for items not in stock. Three major processes are involved: Placing the Special Order, Receiving the Special Order, and Picking up the Special Order by the customer. The following document shows how Special Orders work with the TCS Retail software.

Placing Special Orders

  1. In Cash Register Screen in POS, enter a regular Sale transaction type.
  2. Hit the Special Orders function key you have set up (To set this up read Special Order Entry POS Modifiers on page 4).
  3. Enter the information to go on the Special Order. If a deposit is entered, this amount will be added to the Balance Due.
  4. Optional Step: For GM or TRADE create a Pending Order. For Text items, add them to a Manual PO.
  5. Finish the Sales transaction.
  6. Print off a copy of the receipt for the customer and a copy for ordering personnel.
  7. Log to the module where the item exists (GM, TRADE or TEXT).
  8. Place the Order. (Cancel if you discover an order is not necessary).
  9. Optional: Print special order tags to tag items with person’s information.

Receiving Special Orders

  1. Enter a receiving log as normal.
  2. If there are any outstanding Special Orders in the master file, a comment will be automatically added to each line item with special order quantities.
  3. Optional Step: For GM or TRADE name, phone, address, title, author, special order number, date. You must have a Special Order tag code setup (SPO tag type).
  4. Optional: Place special order tags on items.
  5. Notify customer that item has arrived.

Picking Up Special Orders

  1. Customer picks up special order items.
  2. Customer takes items to the cashier.
  3. Do a regular Sale transaction.
  4. For the line items enter the Special Order Pickup Modifier. (To set this up go to Special Order Pickup Modifier on page 6).
  5. This will take you into Special Order maintenance. Put in the quantity being picked up. The program will automatically add these items to the current transaction.
  6. Total the transaction.
  7. At the tender code entry, if a deposit was made on the special order, enter the amount of the deposit. For the tender type use the Special Order tender. (To set this up go to Special Order Tender Key on page 7).
  8. You will be prompted once more for the special order ID–enter it.
  9. Use any other tender type to pay for the remaining portion of the sales transaction.
  10. When all items are picked up, the special order will be flagged with a “P” status as “picked up”.

Setup Issues

In order for Special Orders to work, the following items need to be configured:

Special Order Entry POS Modifier

This needs to be configured in the POS system and setup on the POS function keys. First configure the modifier. A sample SPO modifier would be similar to the following screen:

(POS-2-2)


In summary, the Subroutine Call is the most important part of this modifier. This is what executes the Special Order Maintenance program. The Subroutine Call should be set to POS.SPECIAL.ORDER.

Special Order Entry Function Key

Because of accounting issues involved, if the customer puts a deposit down on Special Order items, this deposit must be accounted for much in the same way as vouchers. A fee code must be used to account for the money received from the customer. Because no merchandise is exchanged at this time, the fee code must be associated with a non-merchandise class and department.

Setting up a Fee Code

A sample Special Order fee code is shown in the screen below:

(Menu Path: POS 22—23)

Setting up a Function Key

Now that the Special Order modifier and fee code are set up, they just need to be added to the keyboard or touch screen layout. Special Orders may be entered without a function key code. However, because of the data needed to start a Special Order, it is much easier to set a function key with the data needed. For example, if my modifier to start Special Orders was SPO and the fee code was 9199, then in the Sales Entry screen, for a line item I would need to key in the following: 9199|SPO. This is much easier done with a function key set to 9199|SPO.

The FEE|SPO function can be added to a touch screen menu in POS-3-22 or to a keyboard layout in POS-3-21. Simply find an empty position in the touch screen or keyboad layout and set the Value field to be the “feecode”|SPO.

Special Order Pickup Modifier

Once items have been placed on Special Order, received, and the customer is ready to pick them up, you will need to do another sale transaction so the customer can pay the remaining due on the items ordered. Instead of manually scanning all the items to be picked up and manually setting the picked up quantities, this can all be done through the cash register.

The key to doing this is by setting up another modifier for Special Order Pickups. The following is a sample modifier with the necessary routines to do this:

(Menu Path: POS 2—2)


The most important for this modifier is the Subroutine Call to POS.PICKUP.SPO. This program is what handles picking up Special Orders.

Special Order Pickup Function Key

Because this modifier can be used alone, it is not as difficult to use as the Special Order Entry modifier. Therefore, you may choose not to set it up as a function key. In order to use this modifier in POS Sales Entry, simply key in |SPOP. If you do choose to set it up as a function key, then you will need to add it to a touch screen code in POS-3-22 or a keyboard layout in POS-3-21.

Special Order Tender Key

If a deposit was made at the time the Special Order was placed, then that deposit needs to be credited to the customer. This is done in the form of a tender. In order to do this, a Special Order Credit tender code must be setup. The following screen shows a sample tender code:

(Menu Path: POS 2—4)


Once again, for details on Tender Code Maintenance, see your POS documentation. The important part of this tender code is the Inline Processing Subroutine, POS.REDEEM.SPO.

Screen and Field Definitions

The following is the Special Order Maintenance/Entry screen. This is the screen that will be used when special orders are placed and when they are picked up.

(Menu Path: POS 24—1)

Field Definitions

Customer Name: Enter the name of the customer that is making the order. This name will appear on the Special Order Tag when the book is received.

Organization: Enter the company or organization if applicable. Only for reference in this screen.

Primary Phone: Enter the primary phone number where the customer may be reached. This phone number will appear on the Special Order Tag for quick reference when receiving and notifying customers.

Alternate Phone: Enter an alternate phone number where the customer may be reached if not able to be reached at the primary number.

Address Lines: Enter the address of the customer. This may be if notifying customers by mail instead of by phone. Also may be used for delivery of items.

Status: Display field only. This shows the status of the order. This is usually ‘O’= Open, ‘C’ = Customer Cancelled, ‘S’ = Store Cancelled, ‘P’ = Customer has picked up item.

Date of Request: Date information was first entered into this screen, or the date the customer made the request. This does not mean a PO has been made.

Deposit: Enter the amount of any deposits made. You may set up a default deposit required in POS General Parameters. If this is set, you are required to enter a certain percent of the total.

Call Notes: Enter any special instructions to be displayed and used when calling the customer to pick up the item.

Item Information: Enter the SKU/ISBN for the item to be placed on order. All standard cross-references work here, by entering author/title, title, etc. The item information is displayed and you are prompted to enter the quantity to be placed on order. The other fields show quantities already on order, on hand, and on pending order.

Qty Received: This number is entered through receiving. When an item is received, the number of items received are added here.

Qty Picked Up: This may be automatically updated to be the same number as items received by choosing the ‘P’ option at the ‘Options’ prompt. You may also manually enter here the number of items picked up by the customer if different than the items received.

Date Picked Up: This is automatically added in by choosing the ‘P’ option at the ‘Options’ prompt, or by adding a ‘Qty Picked Up’ amount. Default is the current date.

Enter any special instructions for each item on the second line of each item.

Update Options

<>=Save: Saves the item out to disk. You will then be prompted to place the item on Pending Order.

<X>=Cancel: Cancels any changes made to the order. If it is a new order, it will not be saved to disk.

<M>=Modify: Modify the current order. Make changes to items, names, etc.

<C>=Customer Cancelled: Cancels the order and sets the status to ‘C’.

<S>=Store Cancelled: Cancels the order and sets the status to ‘S’.

<P>=Picked Up All: Automatically update Qty picked up, Picked up Date and the status will be set to ‘P’.

Master File Special Order Links

In Master File inquiry, we will show the following numbers:

SPO On Order: Number of items currently on pending order or on a purchase order somewhere.

SPO Rcvd: Number of items received through the receiving log. Decrements the SPO On Order number.

SPO Picked Up: Number of items picked up by customer. Decrements the SPO Rcvd number. This number then is only a sum of active SPO’s where the total picked up does not equal the total put on special order. This is useful for accounting for an item in stock that is not out on a public shelf, because it is on reserve for special order.

Special Order Reporting

There is a report used to track special orders. The following is the screen and field definitions:

(Menu Path: POS 24—21)

Field Definitions

Include Status: Enter one or more special order statuses separated by commas or leave this field blank to display all statuses.

Exclude Status: Enter one or more statuses to be excluded from the report or leave it blank if there are no statuses to exclude.

Customer Name: Enter a customer name if you only want to display one customer. You may enter part of the customer’s name, but remember that this could result in a report including other customers who share the same letters.

Title: Enter a title or item description if you are interested in a specific item. You may enter part of the title or item, but remember that this could result in a report including other items which share the same letters.

SKU: Enter a SKU if you only want to report on a specific SKU.

Sort Criteria  or Rank,  Enter 1,2,3,4 in the fields to indicate the order that you would like to sort the results in. You can also leave these fields blank and the report will sort in the default order.


Report: Class Summary by Class

Below is an overview of the Class Detail by Date by Class report. General information on what fields are available, what they do and what data is presented in the report.

Path: POS-RP-1-3-3

Purpose: This report is used to display high level information of class dollar amounts per day.

Output: Store, Report Group (optional), Description, Sales, Returns, Markdowns, Discounts, Class Net, Cost Quantity.

Over a one day date range this report looks very similar to other class reports. Just like those reports though, the multiple days is what makes the report unique.

This screenshot shows a single day with the “Sort by Report Code” field set to a Y. The Y for this field triggers the optional Report Group column. If this field is a N then the column is removed.


In this example we have six days worth of data. The format of this report remains the same, the numbers simply include more days.


Unique Field Options

Sort by Report Code: Allows you to override the numerical listing of class codes into their class report group. This is essentially an override of the default numerical sorting of class codes.

Creating a class Report Category is found in POS-22-3-5. Once a category has been created you can assign it to the classes belonging to that report category in POS-22-3-2.

Note: the most common fields are covered in the Reports: Best Practices and Procedures article. Only special usage scenarios or options are covered in this article.


Report: Class Detail by Class by Date

Below is an overview of the Detail by Transaction Number report. General information on what fields are available, what they do and what data is presented in the report.

Path: POS-RP-1-3-2

Purpose: This report is used to display high level class dollar amounts per class.

Output: Class, Class Description, Sales, Returns, Net Sales, Markdowns, Discounts, Class Net, Cost, Quantity and Margin.

At first glance the data is very similar to the Class Detail by Date by Class report if you only run it for one date.


However, the format changes when you run it for multiple dates. The focus is on the class data, then by date. So class 100 is all grouped together across the date range, totaled for the date range, and then class 101 is reported for the date range, etc.

This example is for a six day span.


Unique Field Options

There are no unique fields in this report.

Note: the most common fields are covered in the Reports: Best Practices and Procedures article. Only special usage scenarios or options are covered in this article.


Report: Class Detail by Date by Class

Below is an overview of the Class Detail by Date by Class report. General information on what fields are available, what they do and what data is presented in the report.

Path: POS-RP-1-3-1

Purpose: This report is used to display high level information of class dollar amounts per day.

Output: Class, Class Description, Sales, Returns, Net Sales, Markdowns, Discounts, Class Net, Cost, Quantity and Margin.


What makes it unique from the other class reports is the formatting when it spans multiple days. The focus is on the date, then the class totals. So the report displays the first date with all class totals, then the next day with its class totals, etc.

The screenshot below shows data on two days.


Unique Field Options

There are no unique fields in this report.

Note: the most common fields are covered in the Reports: Best Practices and Procedures article. Only special usage scenarios or options are covered in this article.