ADDING A VENDOR

ADDING A VENDOR

To add or create a new vendor in the system is the same process for General Merchandise and Textbook. If you have the Accounts Payable module then you will also need to create the vendor there and link it to the vendor that you created in GM or TX, keep in mind that GM and TX share the vendor file so if you create it in one then it will be available in the other.

Log to either GM or TX and then select the VM – Vendor Maintenance option
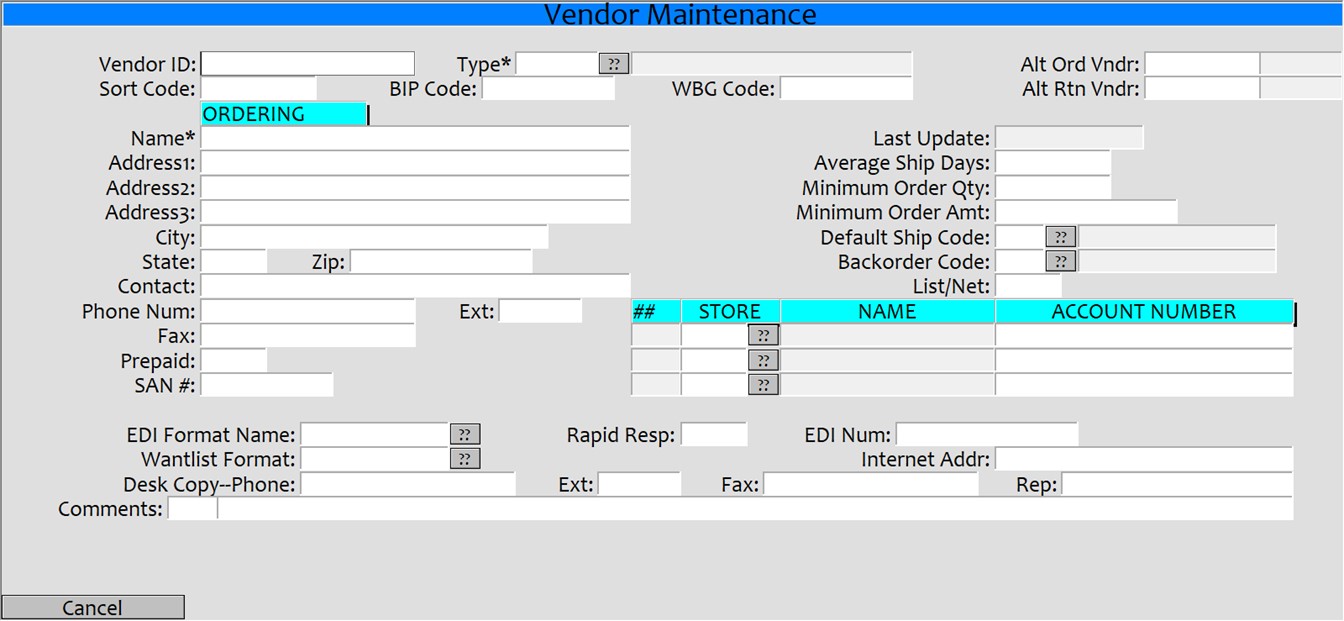
  • Vendor ID: Enter a period ‘.’ To create a new vendor number or enter 3 or more letters in the vendor’s name or sort code to bring up an existing vendor.
  • Sort Code: Enter a code that will help you find or reference this vendor. This code is used in cross-references and for sorting in reports.
  • Type: Enter the Vendor type.  Options here are D=Distributor, M=Manufacturer, P=Publisher, V=Vendor, W=Wholesaler.  Publisher and Wholesaler are normally used in Textbook (TX), Manufacture and Vendor are normally used in General Merchandise (GM) and Distributor is used in both.
  • BIP Code: Used is TX and stands for Books In Print Code, Books In Print is not commonly used anymore.
  • WBG Code: Used in TX and stands for Wholesale Buying Guide, this indicates what wholesale guide code to associate with this vendor.
  • Alt Order Vndr: This is used to indicate if an alternate vendor should be used for this Vendor, this is normally used when one vendor buys another.
  • Alt Rtn Vndr: This is used to indicate if an alternate vendor should be used for this Vendor, this is normally used when one vendor buys another.
  • Name: The name of the Vendor as it will show on reports and POs and Returns.
  • Enter Address, City, State, and other information as it is available.
  • Prepaid: Enter a ‘Y’ here if this vendor must be prepaid.
  • SAN #: This is a textbook field and stands for Standard Address Number.
  • Last Update: This field is maintained by the system
  • Average Ship Days: Enter in the average number of days it takes for shipping.
  • Minimum Order Qty: Enter the minimum order quantity that this vendor requires to process/ship an order, this is usually a GM vendor field.
  • Minimum Order Amt: Enter the minimum order amount that this vendor requires to process/ship an order, this is usually a GM vendor field.
  • Default Ship Code: Enter in the default ship code that will be used when creating a po for this vendor.
  • Backorder Code: Enter the default backorder code to use when processing a receiving for this vendor.
  • List/Net: Enter either ‘L’ or ‘N’ to set the default pricing type to use when creating a PO for this vendor. L=List pricing and N=Net pricing, List pricing usually includes a discount off of the List and Net is direct price of the item.
  • Store/Name/Account Number Enter in the store number and Account Number associated with that store
  • EDI/Wantlist/etc. This is used in TX for the electronic wantlisting.
  • Comments: Enter a ‘Y’ and then enter any comments that you would like to have associated with this vendor.

Next you should enter in the additional ordering information and the returns information.

Additional Ordering

To enter in the additional ordering information, select the ‘A=Additional Ordering’. The information on this page is used with the Accounts Payable (AP) module
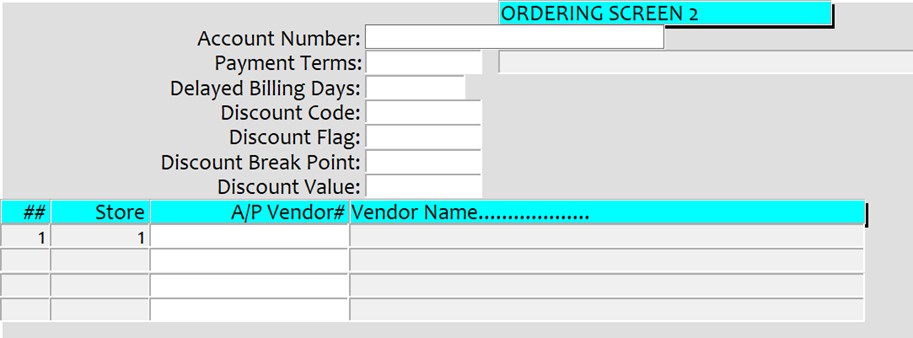
  • Account Number: Enter in the Primary Account number
  • Payment Terms: Enter the default payment terms, normally net30
  • Delayed Billing Days: Enter if there is a default billing days for this vendor.
  • Discount Code: Enter a discount code to use for this vendor.
  • Discount Flag: Enter a discount flag to use for this vendor.
  • Discount Break Point: Enter a discount break point for this vendor.
  • Discount Value: Enter a discount value to use for this vendor.
  • A/P Vendor # Enter in the A/P vendor to associate this vendor to. If this is left blank and you have the AP module then the invoices will be associated with the AP Vendor 99999. You will need to navigate to the AP module and create the appropriate vendor there and then enter that vendor number here.

Returns
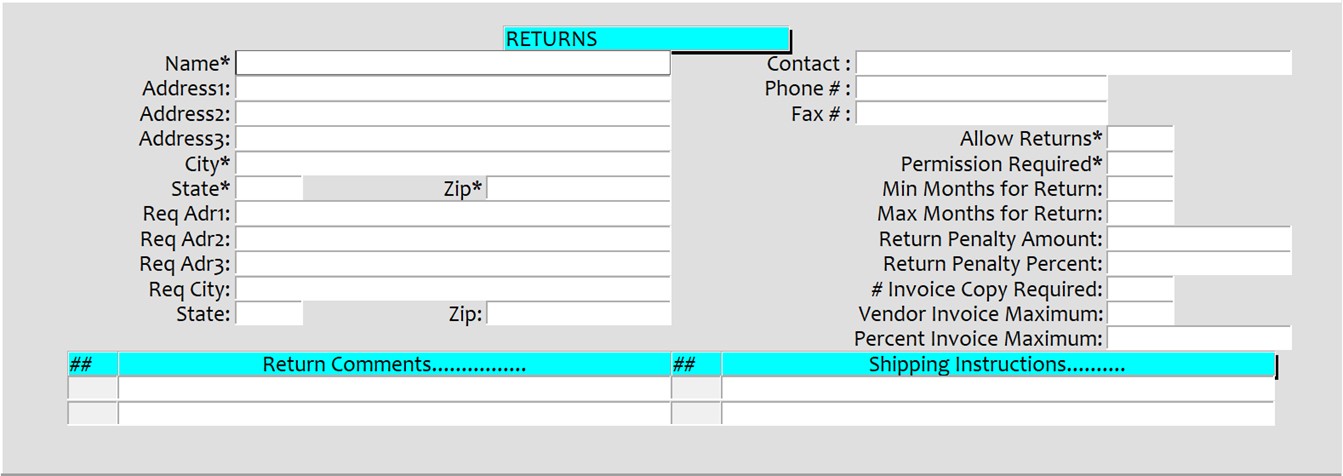
  • Name/Address Enter the Return address information for this Vendor
  • Contact/Phone/Fax#: Enter in the contact information for the Return information.
  • Allow Returns* Enter ‘Y’ if vendor allows returns or ‘N’ if they do not allow returns, this will affect the returns processing in TX.
  • Permission Required* Enter ‘Y’ if permission is required for returns or ‘N’ if no permission is required. This does affect the returns processing in TX.
  • Min/Max Months for Returns: Enter in the minimum and maximum number of months allowed for returns, maximum returns is required for the TX auto return process to work.
  • Return Penalty Amount: Enter in any penalty amount vendor will apply to returns.
  • Return Penalty Percent: Enter in any penalty percentage a vendor will apply to returns.
  • Invoice Copy Required:                 Enter in the number of invoices the vendor requires for each return.
  • Vendor Invoice Maximum: Enter the maximum dollar amount a vendor will allow you to return.
  • Percent Invoice Maximum: Enter the maximum invoice percentage that the vendor will allow to return.
  • Return Comments… Enter in any default return comments, these will print on every return created to this vendor unless overridden on the return.
  • Shipping Instructions…. Enter in any default shipping instructions that you would like to print on every PO.


Create the vendor in AP

Log to the AP module and select VM=Vendor Maintenance from the main screen.
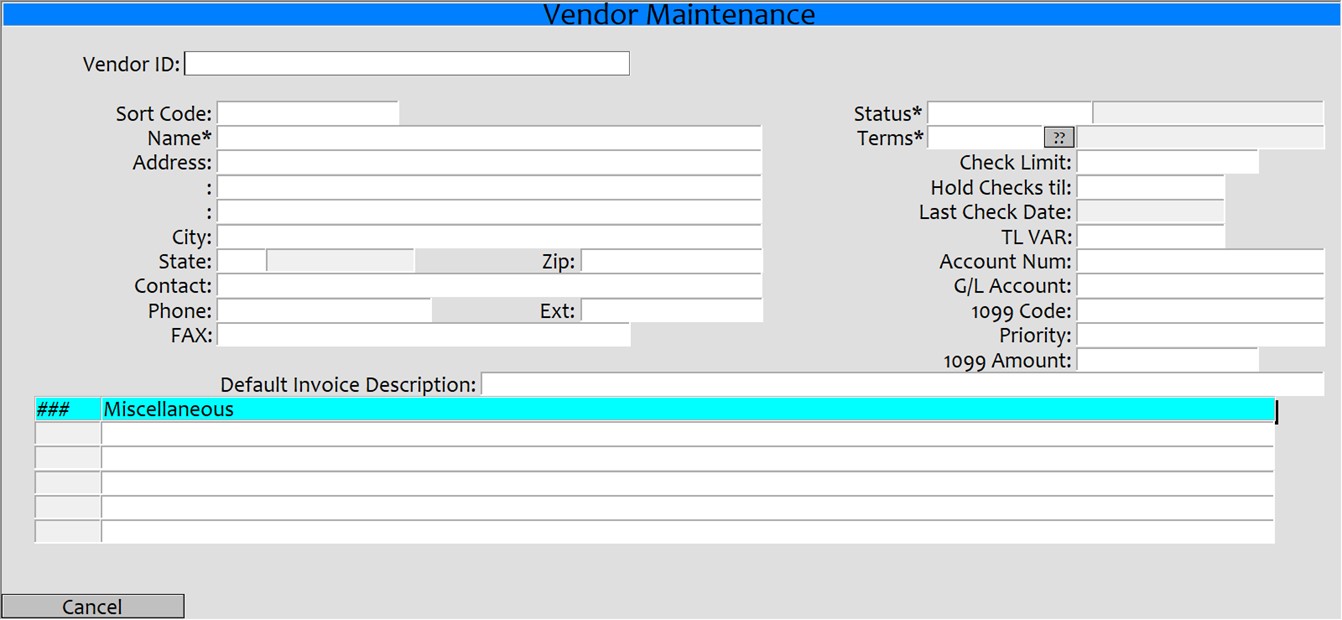
  • Vendor ID:                 Enter a period ‘.’ to create a new vendor or enter 3 or more letters in the vendor’s name to edit an existing vendor. This vendor number will be used in the GM/TX vendor record in the ‘Additional Ordering’ information screen.
  • Sort Code:                 Enter 3 or more letters to use as a sort code for the vendor.
  • Name/Address/Contact Enter the vendor’s name, address, phone, contact information.
  • Status:                 This should normally be ‘A’
  • Terms:                 This is normally N30 but can be any payment term that you have created. You can use the ?? button to select from the available terms or from the selection screen you can select the ‘Maint’ button to jump to the terms maintenance screen and create a new one if needed.
  • Check Limit:                 Enter a check limit amount for this vendor or leave blank for normal
  • Hold Checks til:                 Enter a date if you wish to hold checks until a certain date.
  • Last Check Date: This is maintained by the system and will list that last date a check was created.
  • TL VAR:                 Enter ‘Y’ if this is a TotaLink VAR, enter ‘YN’ if no checks should print.
  • Account Num:                 Enter in the account number.
  • G/L Account: Enter the GL account number that this should be associated with.
  • 1099 Code: Enter any 1099 codes for this vendor
  • Priority: This will default to 90.
  • 1099 Amount: Enter any 1099 information.
  • Default Invoice Description: Enter any default description that you would like to display.
  • Miscellaneous Enter any miscellaneous information that you would like for this vendor.


Add an E-Book only ISBN to the TX-MF

Adding an E-Book only ISBN to the MF

As times are changing, there are now titles that are only available as an e-book option normally referred as EISBN. These can be added to the system but there are a few items that need to be set correctly so that only the e-book will be an option.

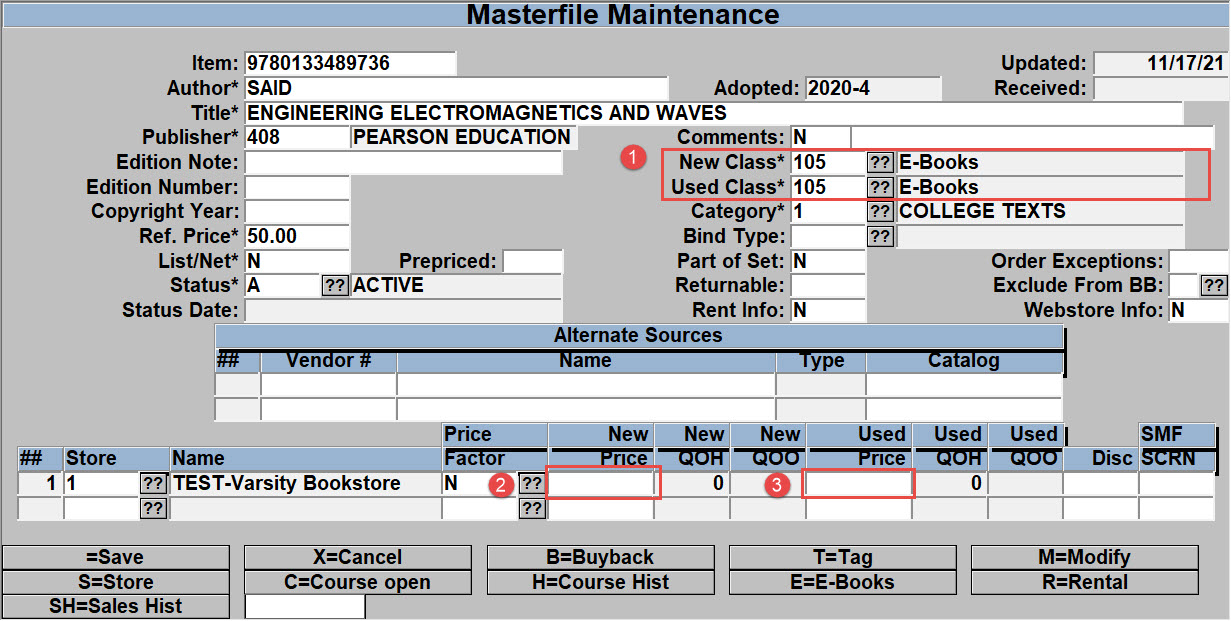
When creating the ISBN in the mf record, setting the record as below will prevent the New/Used options from displaying on the website and when selling the ISBN, only the E-Book option will be available on the register.

  1. in the New/Used Class you need to use the E-Book class code that you have setup.
  2. New Price needs to be BLANK or NULL (NOT 0.00)
  3. Used Price needs to be BLANK or NULL (NOT 0.00)

Once the MF record has been created then you can attach the ISBN to the courses the same as always. When adopting the title to courses/sections you will need to set the QTC to 0 to prevent the system from trying to order quantities through wantlisting or through publisher orders. (You may want to edit the ‘Order Exceptions’ and ‘Exclude from BB’ options in the MF record to make sure that the title is not added to a wantlist/PO and excluded from all BB options.)

If the title was created via some kind of course/book import then you will need to edit the MF record as directed above.

Set the E-book UPC codes up as normal. If you create the E-Book only ISBN then the next time you download your E-Book list from your vendor then the UPC/Selling periods will be created the same as they are with a standard ISBN.


TEXTBOOK EXPORT

TEXTBOOK EXPORT

Sometimes you may need an Excel type of file listing all of the courses and textbook information that is associated to a term. You can achieve this by running the Textbook Export report that is located in TX>RP>6>21.

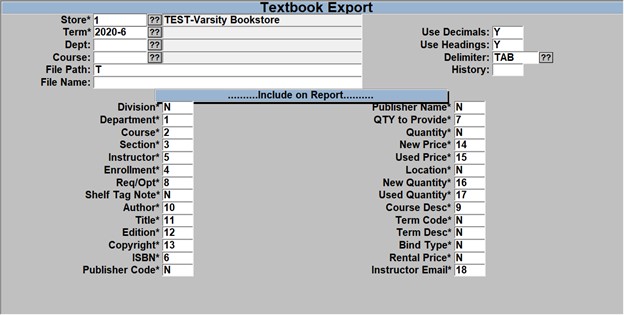
The screen will look similar to what you see below, and you can select which fields to include on the report and in which order they should be listed.

To begin you need to enter in the

  • Store and Term – if you are running for an open term then you can use the ?? to select an open term but if you are running this for a closed term then you will need to type in the term code and then, on the right side near the top, enter a ‘Y’ in the “History” field.
  • Dept/Course – If you wish to only list the information for a particular Dept/Course then enter that, otherwise leave these blank to include all Dept/Course information for the entered Term
  • File Path – Enter a ‘T’ in the field to send the report to the terminal.
  • File Name – Leave the field blank, this is only used for locations that have their own server.
  • Use Decimals – Enter a ‘Y’ to include a decimal in the price fields.
  • Use Headings – Enter a ‘Y’ to include a line for the heading, if left blank then there will be no heading line.
  • Delimiter – Use the ?? to choose which delimiter you wish to use, if you leave it blank then a pipe ‘|’ delimiter will be used.
  • History – Enter a ‘Y’ in the field if the “Term” that was entered is a “Closed” term.

For the area labeled as ‘Include on Report’, each field is required to have an entry. You can enter in an ‘N’ to exclude the field in the report or enter a ‘Y’ to include the field and they will be in the order as displayed.

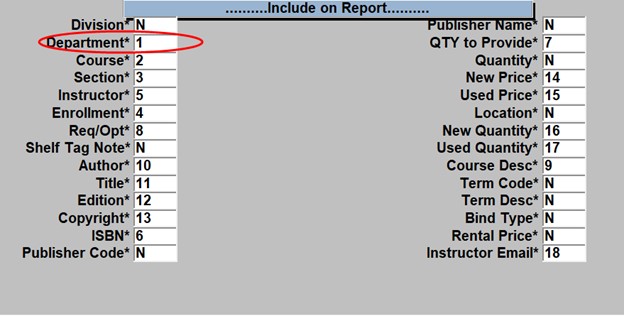
The report will be created with the columns in the same order as displayed on the screen going down the left side the the right. You can also enter the placement order that you would like the fields to be positioned in the report, so if you enter a 1 in the “Department” field then that will be the 1st column in the report and whichever field you enter a 2 in to will be the 2nd field in the report.

When all fields have been filled out, select the R=Run Procedure from the bottom.

The report will display to the screen as seen below.

Select the save icon    from the tool bar to save the report and select the location of your choice and make sure that you change the ‘Save as type’ to “Text Files”.

For additional help in importing the in to Excel then please use the link below.

https://tcs-training-wp.azurewebsites.net/dwkb/getting-a-report-into-excel/


Transfer and Import Redshelf Catalog

After adoption information has been exported and sent to Redshelf, they will send a catalog file back that contains the detailed pricing information for available titles. This file needs to be transferred to the hosting server and a process ran to import the data. This is very similar to the process of uploading and importing adoption information.

Prerequisites

  1. FileZilla (or another FTP program) is required to transfer files to the server
    • Instructions on setting up and using FileZilla can be found here.
  2. You must have access to the Redshelf email with the download link

Quick Steps

  1. Download the file from the email link sent from Redshelf
  2. Upload the file to the Redshelf directory on the hosting server via FileZilla
  3. Rename the file to redshelf.txt
  4. Import the data in TX-27-1

Upload The Catalog File

  1. Download the catalog file from the link Redshelf sends via email
    • Redshelf will send an email with a download link similar to this:
    • Click on the link and download the file. Make note of where the file downloads to.
      • If you don’t choose the file location then it typically defaults to your Downloads folder
  2. Open FileZille and connect to the hosting server
    • Navigate to the Redshelf directory in the server pane
    • Navigate to your Downloads directory on the local pane
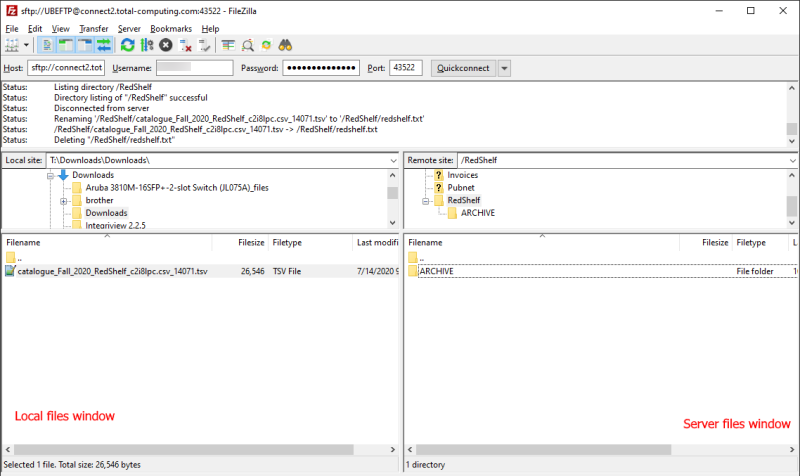
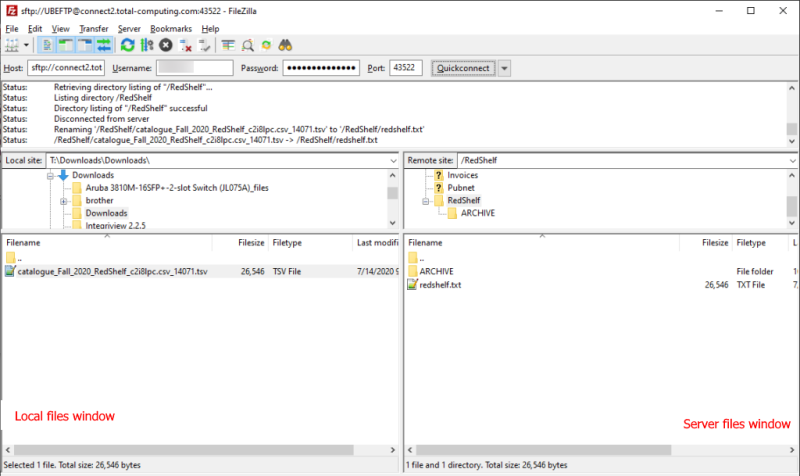
  3. Upload the catalog file to the server by right clicking the downloaded file and then Upload
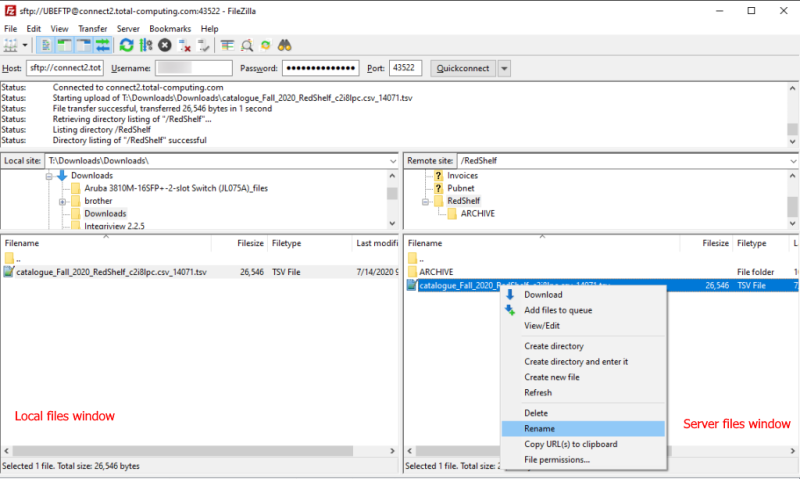
  4. Rename the file on the server to redshelf.txt by right clicking and select Rename
  5. The final result should look like this

Import The Catalog Data

It’s handy to know your ebook class code and your usage periods prior to these steps. Class codes can be found in TX-SU-1-6-22. Usage periods can be found in TX-SU-2-25,R

Note that ALL previous ebook prices will be cleared when you import.

  1. Navigate to TX-27-1 and enter your store number
    1. Vendor Code: R
    2. Ebook Class: (your class code)
    3. Access Periods: Should populate from TX-SU-2-25
      • You can manually change as needed
  2. Run the procedure
  3. Verify that the data is queued up to go to your registers
    1. Quickly navigate to POS-6-2 and there should be items in the Records to be formatted by the Host field.

Verify

  • Spot check various titles in MF > ISBN > E for Ebook to verify that the data was imported.
  • Ring up a title and verify the data is correct
    • Note that your registers must be up to date in POS-6-2 before the data is live

More on Usage Periods

Usage periods tell the system what usage periods to import from the Redshelf catalog. Only using 3-4 usage periods is recommended due to limited tag space.

Common day count periods are 60, 90, 120, 180, 360, 365
ALL can be used for all data
P is for Purchase or Lifetime

Examples:

  • Commas are used to create a list of options
    • 90,120,P
    • Imports for 90 day, 120 day and Lifetime (Purchase)
  • A forward slash is used as an OR option
    • 90,120/180, 360/365
    • Imports for 90 day, 120 when available or 180 as a fallback option, 360 days or 365 as a fallback option.


Adopt GM Items

Adopting GM Items

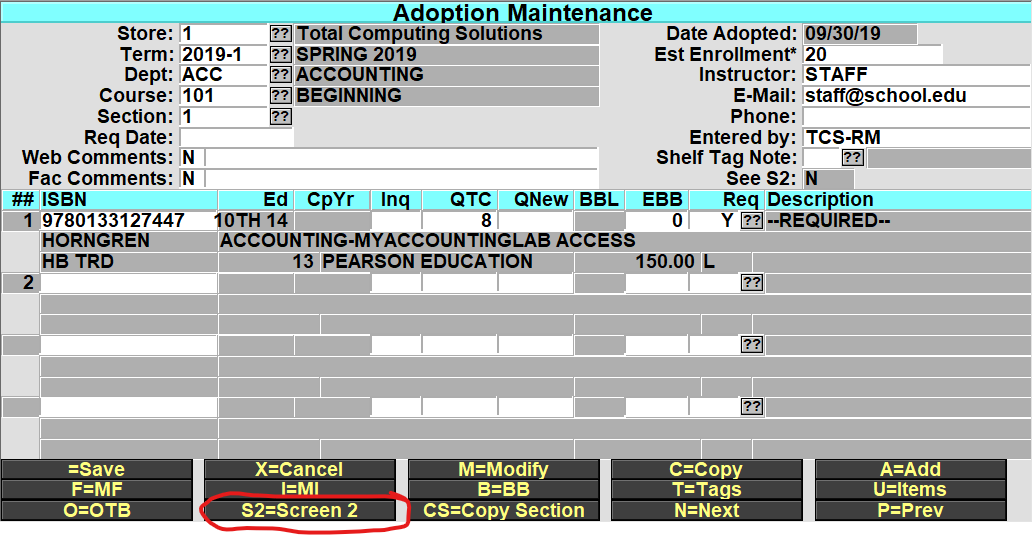
Enter or Modify your adoption TX.1.1,  select the DEPT/CRS/SECT in Adoption Maintenance you wish to add your GM item (s) to.

At the bottom-line prompt select S2=Screen 2.

In the new S2=Screen, if your campus is using a specific CRN number that identifies the DEPT/COURSE/SECT . then you can enter that here, once entered you can enter the Campus Class#, preceded by a semi colon (;) in the Dept, Course or Section fields to look up the section (i.e. ;01234567). *Campus Class is not a required field not all users use this feature. You can navigate past this field by pressing enter or click on the SKU field.

In the SKU field, enter the SKU or you may do the normal GM item lookup to find the item. If you are selecting a Matrix GM item then select the Parent SKU, This way when its displays on the web the customer will see the Color and Size drop down selectors to choose from.

Enter the QTY that the student should purchase for the section and enter R/O to indicate if the item is Required or Optional.

Adding Fee(s) Adoptions

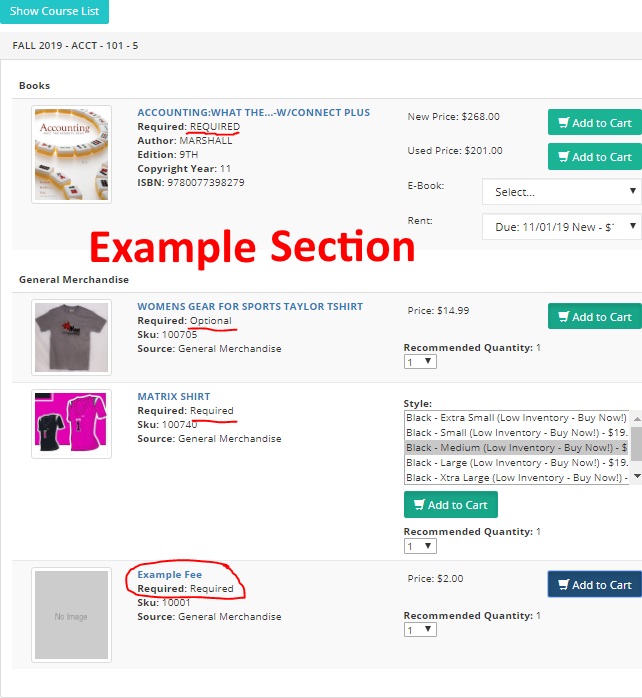
You can add POS Fee Code(s) the same way that you would add a sku in the S2=Screen 2. The fee will then be displayed along with the GM and Textbook information in the Adoption/Course search on your website.

You can also enter in Fee Code(s), this allows you to collect any additional fees that may be required for the course that has been set by the Instructor or Staff. *for details on setting up Fees Codes, reference POS Training

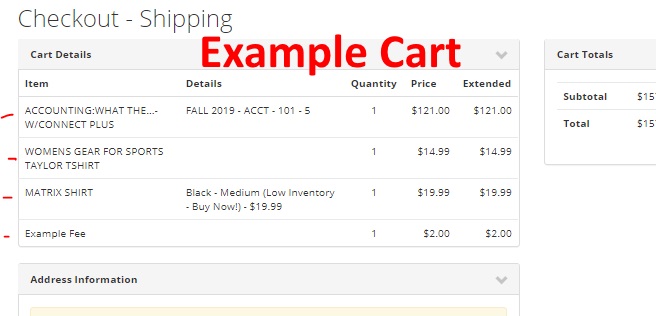
Example web cart

Resume Web Order

Resume Orders that have been placed will look the exact same as other Web Orders. *note you will have to verify the rental item and price when resuming the order. It is best that you have a copy of the order to verify the type or rental and length of rental.
Example Web Order Resume


Textbook Sales History

Added a SH=Sales History to the MF screen, when you select this, the users default store will be used, user can select a different store if more than one is available.


Link to Rental Screen from TX – MI

Added a RE=Rental to the MI screen in TX. This option will only display if there is an associated rental master record. When you view the RE=Rental screen it is passing the “Inquiry” through so you are still in Inquiry mode and will not be able to edit any information in the Rental Master record.


Manually Add or Remove Ebook

It is possible to manually add or remove an ebook, but there are some points of information you’ll need from Redshelf in order to add it. Once you have that information you can update your ISBN MF record to have the ebook data.

Removing an ebook is as simple as going to the ISBN MF record, E for Ebook, then replace the Store field value with an empty space and press enter. This removes that line of data, repeat for any additional lines and then save your way out. If you only want to remove specific prices, navigate to the line with that price and remove that line.

  1. Information you need from Redshelf:
    1. The internal Redshelf UPC/SKU for that title
      • Each title at Redshelf has a unique SKU for the duration and price point of a specific title. (similar to a GM matrix item with different sizes at different price points)
      • If a title is available for 60,90,120,180 days and a lifetime purchase, then there would be five different SKUs for that title
    2. The usage period and price for each SKU
  2. Adding that information to the print ISBN screen
    1. First, make sure that you know your class code for Ebooks
      1. This can be found in TX-SU-1-6-22. Click on the ?? button for the Class Number field and find the class that has ebooks in the description.
    2. Go to TX-MF and bring up the ISBN for the title you want to add the ebook options to
    3. Enter E or select the E – Ebook button
    4. Enter your ebook class code
    5. Enter 1 for the Store (store) field
    6. R for Vendor
    7. Enter the UPC/SKU number that Redshelf gives you
    8. Enter the usage period for that UPC/SKU
    9. Enter the Price
    10. Enter the Cost
      1. Repeat steps 2.4 – 2.9 for each UPC/SKU that Redshelf provided for that ISBN
      2. It should look something like this when you’re done.
  3. Save your way out of the record and you’re done.


Set or Reset a User Password

Some menus have been changed, please read carefully.

While the steps on how to change a user’s password are straight forward, there are a few points that need to be kept in mind.

  1. When you set a user’s password in User Maintenance (UU-5-1) or User-Cashier Maintenance (POS-22-1) the system automatically sets their password to reset when they first log in.
    1. This means that the password set in User Maintenance is temporary. Do not set the password to what the user would like to use long term.
  2. It is necessary to set the user’s password from the Host Connection. While these steps can be followed on an individual register, passwords that are changed on the cash register ARE NOT sent to the host or to all of the other registers.
    1. By setting the password on the host all registers will get the updated password.
    2. Check POS-6-2 to view which registers are communicating. Those who have a “To Be Xfered” amount of zero in the right hand column will immediately have the updated password.
      1. Steps to restart the register communications can be found in the Smartlane Communications video here.

To quickly reset the password for the logged in user

  1. Type PASSWORD into any menu prompt and press Enter
  2. A dialogue will appear prompting for the users password along with a Enter New Password and Confirm Password prompt
    1. Enter your current password into the “Enter Your Password” prompt
      1. This is to confirm the identity of the logged in user
    2. Enter a new password into the “Enter New Password” field.
      1. Passwords must be 8 characters long and include at least one letter and one number
        • g. 1234567A or ABCDEFG1 the password is NOT case sensitive, this means that ABCDEFG1 and abcdefg1 are both treated the same.
      2. Re-enter the new password into the “Confirm Password” field and press enter.
    3. The password has now been set for the logged in user and will update to all of the registers.


To reset the password for another user

  1. From any module, go to UU-5-1 or POS-22-1
  2. Enter the user ID of the user who’s password is going to be reset
  3. Navigate to the Password field and type in the new password
    1. Note that this new password is temporary. The user will be forced to set their own password after the log in with this temporary password.
    2. Passwords must be 8 characters long and include at least one letter and one number
      • g. 1234567A or ABCDEFG1. They can also include special characters. The password is NOT case sensitive, this means that ABCDEFG1 and abcdefg1 are both treated the same.
  4. Enter the temporary password again into the Confirm Password field
    1. Press Continue on the notification box. This is a notification that the password entered is temporary and the user will need to reset their password when they log in.
  5. Press ESC after reaching the Expires field
  6. Enter to save the password change.
  7. Have the user log in with their new temporary password.
    1. You can type in ID at the menu and press enter to display the login prompt or have them log into another connection.
  8. They will immediately get a prompt to reset their password
    1. They need to enter their new, permanent password into the Enter New Password and Confirm Password fields
    2. Passwords must be 8 characters long and include at least one letter and one number
      • g. 1234567A or ABCDEFG1. They can also include special characters. The password is NOT case sensitive, this means that ABCDEFG1 and abcdefg1 are both treated the same.
  9. After that is complete their password will update to all of the registers.


TCS Department/Class Setup

Before you can add any inventory items for Fee codes you must have the Department and Classed setup that the items will be a part of. Depending on the module that you are in navigate to the appropriate place to create the department or class code; GM – GM.SU.1.4 and 2, TX-TX.SU.4.6.21 and 22, POS-POS.22.3.1 and 2, AR-AR.SU.5

It does not matter which module you use to create the department or class code since they are universal and available in all modules once they have been created.

Department Setup

The department needs to be setup first, in GM go to SU.1.4. Some examples of Departments would be Textbooks, Clothing, Food.

  • Enter a ‘.’ to create the next sequential number or enter the number that you want to use. If you create a new department you will be prompted to Add/Copy/Cancel, select Add to create from scratch or select Copy to copy a from an existing department.
  • Enter the description as you would like it to display on reports
  • Non-Merchandise – Enter ‘N’ if this is a normal ‘inventoried’ department or ‘Y’ if this department is for NON merchandise classes, such as fee codes.
  • Enter ‘Y’ to exclude this department’s sales for the flash report which is a special sales report that does daily/weekly/monthly/yearly sales comparison to same time for previous year.
  • Enter any additional descriptions that you would like to use to help explain this department.
  • GL & DSR Dist Code: – If you have created some General Ledger distribution codes then you can select them here. These are used in the reporting for general ledger.
  • Transfer Out Disc %: – This is the discount that will be used when transferring inventory from one store to another, the items in this department at cost * (1-discount). Leave the field blank for no discount.

Class Setup

Once the department has been created, you can now create the classes that are part of that department, some examples would be (Textbooks – New Books, Used Books, E-books, Rentals: Clothing – Men’s Shirts, Women’s Shirts, Children’s shirts or just Shirts, Pants, Shorts: Food – Packaged food, Prepared Food, Snacks, Sodas, Candy Bars, Chips)

  • Enter a ‘.’ to create the next sequential number or enter the number that you want to use. If you create a new class you will be prompted to Add/Copy/Cancel, select Add to create from scratch or select Copy to copy a from an existing class.
  • Enter the description as you would like it to display on reports.
  • Enter the Module that the class is part of (POS, GM, TX).
  • Enter the Department that the Class is part of.
  • ERP Method is a custom field for Datatel – call TCS if you need this.
  • Category Description – this is the Class Category fields that are maintained in GM.SU.1.1, these are used with the financial aid module to group classes together for the purpose of adding them to the financial aid customer type setup.
  • Status – ‘A’ is the normal status, you can also set the department to ‘I’ for Inactive.
  • Taxable – Blank and ‘Y’ have the same meaning, if a department is NOT taxable then enter a ‘N’.
  • Tax Table – You can enter a tax table that is different than what would be considered the Normal tax table used for the store. If a tax table is entered here it will be used for this item regardless of what is entered at the store or register level.
  • Allow Discounts – Blank and ‘Y’ have the same meaning. Enter a ‘N’ if items assigned to this department should not be allowed to be discounted at the register.
  • Maximum and Minimum Price- You can enter a Max and Min price to these fields, this will prevent you from entering a price that is too high or too low and prevent you from doing a price override at the cash register that is outside of the range set here.
  • Target Margin – Enter what you would like your margin to be for this class of item, if an item is sold without a cost associated then the system will use the margin set here to calculate the cost for reporting.
  • Default Tag type – Enter in the tag type that you would like all items in this class to use as a default, you can change this for any individual item.
  • Distribution Code – Enter a ‘N’ here if you have a preferred customer system but you do not allow rebates for purchases of items in this class. If this field is left blank, then rebates will be allowed for purchases in the class.
  • Report Group – You can enter grouping numbers here so that certain classes will report together.
  • Sub-Class is setup to be used with the NACS Universal Hierarchy for reporting to NACS.
  • Sub-Category is setup to be used with the NACS Universal Hierarchy for reporting to NACS.
  • Sub-Other is setup to be used with the NACS Universal Hierarchy for reporting to NACS.
  • NACS-Survey is setup to be used with the NACS Universal Hierarchy for reporting to NACS.
  • Modifier – You can enter any modifier that has been setup in POS2.2, this modifier will automatically get used on all transactions that sell an item in this class.