Sell Gift Cards Online

The purpose of this article is to cover the steps a customer can take to sell a gift card online.

The general process is to create fee codes at the desired price points, assign them to a a web catalog, and then generate the unique Gift Card/Voucher code when the order has been completed.

Pre-Requisites

  1. Determine the desired price points
  2. Determine the correct class code
  3. If using an image, have the full image name handy

Create Gift Card Fee Code(s)

  1. Navigate to POS-22-23 for Fee Code Maintenance and fill out the necessary fields
  2. Add a new code (we recommend at least four digits)
  3. Enter a description for the gift card
    1. This will display on the website. We recommend stating the value in the description if multiple price options are used.
  4. Assign the appropriate Class Code
  5. Flag whether or not the purchase is taxable (typically no)
  6. Set Factor to 1
  7. Enter the desired amount for Default Amount
  8. Set the Voucher Code to GC
  9. Enter the name of the image to display in the Image ID field (optional)
    1. Be sure to upload any image assigned to the website under the GM Images directory
  10. Repeat as needed for each price point

Add Gift Card Fee to Web Catalog

  1. Navigate to POS-22-5 and enter the desired Catalog ID
  2. Fill out the required fields if this is a new catalog
  3. Add the Fee Code(s) created above in the SKU column
  4. Save your changes
  5. The price points are now available for purchase on the website
    1. Customers can search or navigate through the catalog to get to the item

Order Fulfillment

When processing the transaction, the clerk will process and activate the Gift Card the same as if it was sold in a regular transaction. The only difference is that instead of prompting for a dollar amount, the fee code automatically populate with a dollar amount.


Colleague Split Tender Checkout (FA)

Colleague-POSConnect/AR Split Tender


Setup

Please contact support to setup AR or POSCONNCECT Split Tender options.

Web Customer View

The change that you will see on the web is, as a customer, they will shop as normal. When they select the option to go to the cart the first thing they see will be the cart details and asking if the will pay with Financial Aid.

If they select ‘No I will NOT use Financial Aid’ then they will continue as normal

If they select ‘Yes I’d like to use Financial Aid’ as seen below.

Select Fin-Aid option

The customer will get presented with their address information to confirm/edit as needed and at the bottom of the screen they will need to enter in their student ID and then click on the ‘Show Shipping Options’.

Address Information

Now they will select their Shipping option from the list setup by the store.

Enter in any Order Comments that are needed and then click/check the checkout policy box then ‘Proceed To Payment’.

Order Comments

The customer will then need to enter in their credit card information, this will only be used if they order items that are not covered by the amount or type of aid the customer has.

And finally, if the customer will see a message thanking them for their order and then receive an email with the order information confirming that the order has been received.

Store processing of Split Tender


The order will come to the store as a suspended transaction, just like a normal CC transaction. The store personnel will be able to run the pick slip reports (POS.26.10 or 13) and pending order reports the same as they do regular web transactions.

Bring up the suspended transaction the same as other web transactions

Since this will be treated as a POS Connect or FA order, you will get prompted to look up the customer the same as your existing POSCONNECT/FA transaction (POS Connect is used in the example).

The Account ID will be brought in from the transaction where the customer entered it on the web site.

Select the fund source that you wish to use for this transaction

The transaction will load each item and validate the customer has the funds to cover each item that was ordered. If the customer goes over their limit or has purchased something that is not covered by their fund source then a message will display that the SubClass limit has been exceeded or that the limit has been reached. Click on the ‘Yes’ button to add the item to the cart and to proceed, if you select ‘No’ then the item will not be added to the cart.

Once all of the items have been added to the transaction, the transaction will show the Total amount and also the Original fund amount, Available funds and the cash due that will be placed on to the credit card when the transaction is finalized.

After selecting the ‘TOTAL’ button, the transaction will automatically enter the amount of funds to be used by the FA/POS Connect transaction tender, the cashier will just hit the ‘Enter’ key on the keyboard.

The transaction will then apply the financial aid funds to the customers fund source and report if there were any issues. Once the financial aid amount has been successfully applied then any additional amount will be applied to the credit card that was entered on the website.


Coupon, Promo, Voucher, Gift Certificate and Gift Card Setup – Online Redemption and Checkout

Setting up – redeeming Coupons, Promos, Vouchers, Gift Cards and Certificates.

This training document will walk you through setting up your Coupon/Promo Code(s) Along with Gift Cards, Vouchers and Certificates for the purpose of online ordering and order fulfillment.

*You can mix and match different Promos, Coupons, Vouchers, Gift Cards and Certificates with any valid webstore Tender.

Coupon & Promo Setup/Configuration

Menu Path POS-22-25-22

  • You can add a new Coupon Code by either typing in and Select the “Add” or “Copy” Option. You can also modify any previous coupon. You can also use the standard period “.” for the next numeric sequence number. *If you modify coupons after a Web Order has been placed the modified coupon will not be applied to any suspended transactions only to new Orders.
  • You will need to fill-in all of the required fields. For detailed field information input a single question mark for more help.
  • Selecting the “Tran/Item/Class” type of discount will determine your choices throughout the setup.
    T=Tran type discounts will apply the discount to the whole order.
    I=Item type discounts will apply the discounts to the “Specific SKUs” you list for the discount.
    C=Class type discounts will use the table defined in the “Beg. Class – End Class”. *note if you are adding groupings of class codes you will need to make sure they are in sequential order, example: 100-200 600-700.
    The CA option behaves the same as C but the discount will apply to all items in the defined class instead of just the first item added to the transaction.
  • Choosing either the Mfgr or Store Coupon will make a difference on if the coupon is treated  as a discount or as a tender amount.
    • A Manufacturer coupon will be treated as a TENDER amount and is normally issued by the manufacturer. As such it will decrease the balance due and will report as a tender amount.
    • A store coupon is issued by the store, maybe as a promotion to get people to shop at the store, and will be treated as a normal discount. These items will be treated as taxable, in other words, tax will be charged on the original retail amount before applying the coupon. The discount will be reported as any other discount.
  • Min Purchase Amt* – The way this field is applied depends on the coupon type (Tran/Item/Class) you set up.
    • Transaction – The transaction Subtotal amount must meet the minimum, once the subtotal meets the minimum then the coupon will apply the coupon amount.
    • Item – The line item amount must meet the minimum before the discount will be applied. If the item sells for 10.00 and the minimum is 30.00 then the item will not apply unless the quantity is more than 3 to meet the 30.00 minimum. The coupon will only be applied 1 time regardless of how many items meet the minimum.
    • Class – The class must meet the minimum, the coupon will only be applied to the first item of the class. The total is not cumulative.
    • Class All – When the minimum is met by a cumulative of all the classes in the coupon then the discount will be applied to the total amount for the valid classes or the dollar amount will be applied 1 time.


Applying Coupon(s) Promo(s)

During the Checkout process the online user will have the option to enter the Promo/Coupon Code that was setup. Users can add additional Codes using the instructions listed online.


Selecting the “Submit” Button will apply the Codes to the users cart.

Resuming Orders Promo/Coupon


  • You will need to print Pick Slips or the email confirmation to see the type of Promo Code that your customer used at checkout.
  • To enter a Promo/Coupon code, after selecting TOTAL, you need to select the ‘coupon’ key or int the ‘Modifier or Tender’ field enter CPN and press enter. You will then enter the promo/coupon code in the pop up box.
  • Depending on the type of Promo/Coupon Code that was used on the online store will determine where the Code is applied in the transaction. See Gift, Voucher and Card Setup. to see how to check the types of Codes that are being used. example: T=Transaction I=Item C=Class

Adding and Maintaining Vouchers and Gift Certificates.

*See Gift, Voucher and Card Setup.

Redeeming Voucher, Certificates and Cards at Online Checkout.

During checkout the user will have the option to Apply Gift Cards, Certificates and/or Promo Codes.

  • When a valid Voucher is entered and applied using the “Submit” button the shopping cart will update and reflect the new total.
  • The balance on the voucher will also be shown to the user on their checkout page.

*note that Vouchers, Gift Certificates and Cards follow the same rule as Credit Cards for Bookstore Clients. Funds are not changed until order fulfillment at the register.

Resuming Orders Vouchers, Cards and Certificates

  • You will need to print the order Pick Slip or the email confirmation to see the type of Voucher, Gift Certificate or Card that your customer used at checkout.
  • To enter a Promo/Coupon code, after selecting TOTAL, you need to select the ‘coupon’ key or int the ‘Modifier or Tender’ field enter CPN and press enter. You will then enter the promo/coupon code in the pop up box.
  • You can utilize the TCS standard types of Tender Codes and their rules e.g. Splitting Tenders between the Voucher, Gift Certificate or Card and other valid Tenders for web checkout.

*note you must be running webstore version 3.x.x or greater for these features to be available.


Online Orders Resume Suspend and Modify

Resuming Online and Mail Order Transactions

Prerequisite

  • The employee resuming the transactions are setup as Cashiers.
  • The PC or Register has been setup to run “Back office” or Web orders.

Once you have received your online orders you will need to resume the transactions on the system to fulfill and complete the purchases. *note that the card used to purchase the items is not changed until the resume transaction has been complete at the store. Online orders and the credit cards used for them are only verified valid and are not charged until the online order is completed in the store.

Your register must be open for the day in order to complete web transactions. Referrer to the general cash register training for Opening your register.

  1. Select the Transaction type Resume, Tap or Click the touch button, keyboard key or simple type |RES to bring up a listing of all pending orders on the system.
  2. Select the order you are completing from the list of suspended transactions displayed.

3. Your order will be displayed on the screen with the items the customer purchased in their online order. Review the items and remove, add or adjust and verify the contents of the order. *note that freight will display on pickup orders as a $0.00 dollar amount.

* If you modify the Freight you must use the Frieght modify option. This will be setup when the webstore and registers for processing online orders were setup (MOF) **

*If you modify the any item in the webtransaction you must use modify buttons that were created during the setup procedures.(MOM)**

*(MOM) and (MOF) are specific modifiers for online orders. Don’t you keyboard shortcuts for modifying web orders. example |LIM (line item modify) this will not work on a web transactions. 

4. Totaling the online order will auto populate the tender code and transaction amount. You don’t need to do any modifications to the tender code unless the customer is using a different payment method than the one they used online to make the purchase.

  • Press enter through the tender field.

5. When the transaction is completed you will be prompted to proceed to the Next Transaction or to Reprint the current transaction.

  • At this stage in the order fulfillment an email will be sent to the customer notifying them that there order has been completed. *these email setting are setup during the initial setup of the webstore

Mail Order & Online Order with Returns and Transaction Match Tender

Prerequisite

Original Transaction number, date and register. This can be in any form but all of the material is required to complete the return process.

  1. On your back office, web register or any machine that has been setup to process web transactions go into the Cash Register function and select MORT, select the mail order return button or key that is setup to perform a mail order transaction.


2. Input the customer ID or preform a search using the ;user’s name or portion of name.

  • You will be prompted for the customer name or ID that preformed the original transaction that you are wanting returning items against.

  • If you searched using the ; keyword search, select the appropriate customer to proceed to return items.
  • If you input the customer ID the search results should not display and the process should move you past the lookup and allow scanning items for the return.

5. Once you have selected or input the correct customer all you will need to do is scan or type in the items that were on the original order into the sku field.

  • Once you have scanned or entered the items that you wish to return on the order and select Total you will be prompted for any shipping charges that you wish you apply to the return.
  • You can select a specific amount or select from a shipping table that you have setup or simple exit past this prompt.

  • Once you have scanned all of the items to be returned on the online order you will just need to Total the transaction and review the transaction total.
  • The Tender and amount should auto populate based off of the original transaction.
  • You will press “Enter” to proceed to the step

*note the system will not allow the tendered amount to be greater than the original purchase amount for the order.

**do not change the default tender code unless you are giving back cash or store credit. The tender determines what the cashier is prompted for.

  • After you have accepted the tender and amount you will be prompted on how you would like to accept the payment return method.
    1. If the customer is present and has the credit card that they used to purchase the items you can have them swipe into your card reader their card when prompted.
    2. If you choose to refund to the original card that was used for the transaction you would select the “Match” option. You can use the “Match” option even if the customer is present with the original purchase card and the customer will not need to do anything.

*note that not all web registers are equipt with a card terminal.

  • Input the transaction information is the only way to match a transaction against the original transaction. All of the inputs must match exactly.
  • It is important to note that even though you can have multiple Stations or Registers preforming web order usually all web registers utilize the same web register number.


  • If the system matches the original transaction you will be prompted to verify the last 4 digits of the original transaction.

*note you can find the last 4 from the email confirmations or by reprinting the original receipt. If you do not have access to that information you may run several sales reports or lookup the transaction under the Mail order Customer Maintenance.

  • If the transaction matches and the tender total does not exceed the original purchase amount you will be displayed a message that the adjustment to the customer’s card has been made and the funds will be set to return to their card.

  • The last prompt you will receive once the return has been completed is to move onto the next transaction.
  • The system should print-off a return transactions receipt.

Suspending & Resuming orders from your Web register

  • Any time that you are in a weborder transactions you can EXIT or ABORT to suspend the transaction or delete the transaction.
  • When you have selected a way to exit out of the web transaction you will be prompted to “Keep” or “Delete” the transaction. When you select the default option to “Keep” the transaction is restored to its original state so you can access the order at another time.
  • You can also select the “Delete” option when exiting your transactions and all of the information will be removed from the system and you will no longer be able to process that order.

*note that if you modify the online web transaction that those modifications will need to be added back as the “Keep” option restores the transaction prior to any of the users changes.

Declined Online Orders

  • When you receive a declined response from the transaction when you try to process a web online order you will need to reach out to the customer to inform them that their card has been declined.
  • You can use the ABORT, EXIT or SUSPEND options to leave the transaction. Make sure that when prompted to “Keep” or “Delete” the transaction that you select the Keep option until the issue has been resolved.

*Please note that credit cards are not charged until the online order has been fulfilled at your web register.


Campus Webstore Parameters

The following steps cover setting up the Campus Webstore parameters, email parameters, shipping and other settings in order to use the web store.

Email Parameters

The email parameters pertain to the email contents a customer receives when placing an order, which bookstore staff receive order notifications and what events trigger emails to be sent. These are found in POS-26-5.

The more technical fields will already be populated with the correct information (program file path, website url, SMTP settings, etc.). The only fields that a typical user needs to modify are listed below.

  1. From Name: allows you to specify the name that appears on the email that customers receive. E.g. ABC Bookstore.
  2. From Address: is where you would put an email address belonging to your organization. Typically whoever would interact with web customers and fulfill web orders.
  3. Send CC to: allows you to specify multiple bookstore recipients who may wish to be notified when an order has been placed.
    1. Multiple email addresses must be separated with a ; without any spaces
      • e.g. user1@bookstore.com;user2@bookstore.com
  4. Subject: specifies what subject will appear on the order confirmation email that a customer receives.
  5. Send email when user submits web order: Enter either a Y or N. Typically a Y
  6. Send email when invoice is printed: When an order is fulfilled a Y will have the system email the customer that the order has been processed.
  7. The “T-Mail Text” button goes to a second screen where the body of the email text can be manipulated. There is some code and variables that will appear in the default text. Those codes and variables should remain in the screen but specific parts can be changed.
    1. For example the text may contain a line like “Your order #=CONFIRMATION has been processed. Expect it to ship within 24 hours.” Feel free to edit the regular verbiage or wording like the 24 hours but don’t remove the #=CONFIRMATION. This is a flag the system is looking for to inject the order confirmation number and could cause issues if removed.

Campus Webstore Parameters

The general parameters contain the bulk of the web store settings and are located in POS-26-4-1. This is where fee codes, shipping options, transaction types, tenders and other settings are maintained.

This setup presents a bit of a chicken or the egg paradox. Many of the fields prompt for entries like fee codes that may not be setup yet. If you would prefer to set those up first then they can be maintained in POS-22-3.  Tax tables should already exist in POS-2-3-1. Shipping Tables (commonly referred to as Freight Tables) are covered in this document. Below are the points of interest for the different codes you will need.

  • Taxable freight code
  • Non-Taxable freight code (freight amount, not items, that is non-taxable)
  • Sales tax rate for pickup orders
    • This should already exist for regular transactions. Reference POS-2-1 for the tax table currently in use for in store purchases.
  • A shipping table for each shipping method you may use.

We’ll start with the first, main screen and then progress from there.

  1. Freight Taxable Fee Code: specifies what fee code to use when freight amount is taxed
  2. Freight Non-Taxable Fee Code: specifies what fee code to use when freight amount is non-taxable
  3. Pickup Order Tax State: enter the two character state code where items are being picked up.
    1. For example, Utah would be UT, Arkansas is AK, etc.
  4. Display ISBN Order Detail: enter a Y to display the ISBN in the order details.
  5. Origination Zip Code: enter the zip code for the location shipping the order.
  6. Encryption Type: will typically be ELEMENT
  7. Default Tran Type: needs to be a web specific transaction type, typically MO
  8. WebAR Tran Type: enter the transaction type used for AR tendered web orders, typically WEBAR.
  9. Store #: should match the store entered at the top of the screen.
  10. Register: must be set to WEB.
  11. Default Tax Table: enter the default tax table to be used when processing web orders.
  12. Tran Taxable: specify if web transactions should be taxable by default.
  13. Use TotaLink: should be set to Y.
  14. Taxable Merchandise table:
    1. Enter the two character state code for any possible destination states. Tax rate used is based off of the billing address.
  15. Taxable Freight table:
    1. Enter the two character state code for any possible destination states. Tax rate used is based off of the billing address.
  16. Shipping Tables table
    1. These codes are maintained in POS-26-4-2 and are options that customers can select when checking out on the website.
  17. Campus Integration
    1. This is used for sites that integrate with a campus portal such as Black Board. Students can be directed from the campus portal to the website and automatically have their required books populated. This is not standard with the website but is available as a billable feature.
  18. Tenders table:
    1. This is typically already set with a CC tender and a description for each credit card network.

The Buyback screen – This is where you will setup your Online Buyback parameters.

Ratex screen is currently under development and is a special use case.
The Akademos screen is a special use case and is setup by TCS personnel.
The Faculty Adoption screen is covered in the faculty adoption process.

Below are instructions on how to utilize the GM, Text and Email parameter screens.

GM Webstore Parameters

This screen is reached by going to POS-26-4-1, then enter GM at the bottom of the screen.

  1. Use Alternate Desc: a Y will tell the system to use the Alternate Description from the GM, MF web screen for an item as the items description on the website. A N will have the system use the regular description from the GM, MF record.
  2. Use Web Flag: a Y will only allow GM items specifically flagged to show on the website to appear on the site. A N will allow ALL GM records to appear on the site.
  3. Show Out of Stock: a Y will allow items to be purchased even if their quantity on hand is below the Out of Stock Qty level. A N will prevent items from selling on the website if their QoH is below the Out of Stock Qty level.
  4. Multi Store Flag: should be a Y if you are a multi store environment.
  5. Use Quantity on Order: flags the system to include the quantity on order in the quantity on hand calculations.
  6. Allow Free Shipping: set to Y if you want to allow free shipping for GM specific items.
  7. Image Path: is under development and should be left blank.
  8. Low Stock Qty: set the quantity on hand amount where the system will display a Low Inventory message for items on the website.
  9. Low Stock Msg: specify the message to display when an item meets the Low Stock Qty threshold.
  10. Out of Stock Qty: set the quantity on hand level for when an item should be considered out of stock to the website.
    1. This exists to prevent items that may be in a customer’s hands in the store from being sold by the website.
  11. Out of Stock Msg: specify the message to display when an item meets the Out of Stock Qty threshold.
  12. Default Weight: sets a default weight to be used for items that do not have a weight specified in their GM, MF web screen.
  13. Override Store: can be used to specify which store’s inventory to pull quantity from in a multi store setup.
  14. Block Purchases: will block the ability for all GM items to be purchased on the website. They will still be shown, but there will be no add to cart button.

TX Webstore Parameters

This screen is reached by going to POS-26-4-1, then enter TX at the bottom of the screen.

  1. Honor MF Flag: a Y will only allow TX items specifically flagged to show on the website to appear on the site. A N will allow ALL TX records to appear on the site. This is typically a N for textbook items.
  2. Image Path: Under development and should not be used.
  3. Show Out of Stock Message: enter a Y to display the out of stock message or a N to not show the message once New and Used out of stock threshold has been reached.
  4. Use Pending Return Qty: tells the system to use pending return quantities in the quantity on hand calculations. Typically a N.
  5. Default Weight: specify a default weight to be used when weight has not be specified in the TX, MF record.
  6. Allow Free Shipping: can be used to deny or allow free shipping for TX items.
  7. New Low Stock Qty: set the NEW quantity on hand amount where the system will display a Low Inventory message for items on the website.
  8. New Low Stock Message: specify the message to display when an item meets the NEW Low Stock Qty threshold.
  9. New Out of Stock Qty: set the NEW quantity on hand level for when an item should be considered out of stock to the website.
    1. This exists to prevent items that may be in a customer’s hands in the store from being sold by the website.
  10. New Out of Stock Message: specify the message to display when an item meets the New Out of Stock Qty threshold.
  11. Used Low Stock Qty: set the USED quantity on hand amount where the system will display a Low Inventory message for items on the website.
  12. Used Low Stock Message: specify the message to display when an item meets the USED Low Stock Qty threshold.
  13. Used Out of Stock Qty: set the USED quantity on hand level for when an item should be considered out of stock to the website.
    1. This exists to prevent items that may be in a customer’s hands in the store from being sold by the website.
  14. Used Out of Stock Message: specify the message to display when an item meets the Used Out of Stock Qty threshold.
  15. Override Store: can be used to specify which store’s inventory to pull quantity from in a multi store setup.
  16. Show New Prices: left empty or Y will display New textbook prices on the site. N will now show prices.
  17. Show Used Prices: left empty or Y will display Used textbook prices on the site. N will now show prices.
  18. Show Rentals: a Y will display rental items for purchase. N will block rentals from showing.
  19. Show eBooks: a Y will display eBook items for purchase. N will block eBooks from showing.
  20. Block Purchases: will block the ability for all TX items to be purchased on the website. They will still be shown, but there will be no add to cart button.

Buyback Parameters

Online Buyback Parameters

To enable the ‘Buyback’ option on your website menu, call support.

Log to POS.26.4.1, enter in your store number and then select BB=Buyback from the bottom options

Fill in each of the parameters below as you need for your store.


  • Store Credit %: This is where you can issue store credit for an item. Leave blank if you will not be issuing store credit but instead you will be issuing a check.
  • Retail %: This is the percentage of the retail selling price that will be displayed for the buyback, similar to the percentage parameter setup in Textbook buyback.
  • Retail Rounding: This is the rounding direction used for the Retail percentage. (‘U’p, ‘D’own)
  • Retail Coin: This is the rounding coin to use for online BB. (5, 10, 25, 50, 00)
  • Wholesale %: Same as retail but for wholesale pricing
  • Wholesale Rounding: Same as retail but for wholesale pricing
  • Wholesale Coin: Same as retail but for wholesale pricing
  • Retail Wording: This is where you can set the verbiage to display for Retail Pricing.
  • Wholesale Wording: This is where you can set the wholesale verbiage.
  • EBB Need Wording: Enter the verbiage to use to show what your need is.
  • Buying Wording: Enter the verbiage to use to display that you will be buying a title.

Not Buying Wording: Enter the verbiage to use for titles that you will not be buying.

Email Webstore Parameters

These parameters can be found in POS-26-4-1 and then enter E for Email Parameters

This screen allows you to list the staff email address(s) to send email notifications when an order has been placed. Simply enter one email per line.

Setting up Shipping Tables

Shipping tables, which are often times referred to as freight tables, are used to establish different price points to charge for freight based off of the total order amount. They can be found in POS-26-4-2 or by clicking the ?? button next to the Code field and then clicking on the Maint button at the bottom of the selection list found in POS-26-4-1.

  1. Freight Code: is the code used to reference the freight table.
  2. Web Description: is what the customer sees when selecting the shipping options when checking out.
  3. Shipper Code: is a free form field for reference. Examples would be FedEx, UPS, USPS, etc.
  4. Ship Method: is a free form field that should reference a shipping method supported by the shipping company. E.g. second day, over night, ground, etc.
  5. Days to Ship: is a reference field where you can enter the average number of days in transit for this shipping method.
  6. Live Freight: references a billable add on module to the website and is typically False
  7. Free Shipping Subtotal: allows specifying a minimum order amount, that when met or surpassed, will trigger free shipping.
    1. For example, if 100.00 is entered any order over $100.00 will not be charged shipping.
  8. Additional Handling Fee: enter an amount to be charged to every order as a handling fee.
  9. Calculation Method: left blank
  10. Dollar Amount Freight Table
    1. Any amount UP TO the amount entered will be charged the fee entered in the Shipping Fee Field
    2. In the screenshot shown every order will be charged 9.21 in shipping
    3. If multiple price points are desired then the lowest “cap” should be entered first with the next level cap being entered second and so on.
      1. Sub total of 100.00 with fee 9.00
      2. Sub total of 200.00 with fee 12.00
      3. Sub total of 500 with fee 15.00
      4. Sub Total of 99,999.99 with fee 20.00
      5. Would result in orders of $1 – 100 being charged $9 in shipping. Orders of $100.01 – $200.00 being charged $12 and $200.01 – $500.00 will be charged $15.00 with everything above that up to $99,999.99 being charged $20.00
  11. Quantity Freight: charges specific fee amounts per item on the order.
    1. First Item Fee: specifies the fee amount to charge for the first item.
    2. Additional Item(s) Fee: the fee amount to charge for each additional item beyond the first item.


Adding GM Items to the Web

The following are instructions on how to add GM items to the website, create catalogs and assign images to an item.

Adding Items to Web

The primary way to display items is via a catalog. An example of some catalogs could be Electronics, Mens Apparel, Women’s Apparel, Prints and Frames, etc. all containing items that pertain to that theme.

An item can be assigned to as many catalogs as you would like. For example a Nike men’s t-shirt could belong to a Nike catalog, a t-shirt catalog and Men’s Apparel.

The only other way for items to appear on the website is via a search. If an item is flagged to show on the web, but does not appear on a catalog, then a search is the only way for that item to be accessible to your customers.

The recommended process is to first create your catalogs and then go to each item that will appear on the web and assign their image, alternate titles, special web pricing, etc.

Creating Catalogs

Catalogs are maintained in POS-26-2. Please note that many of the fields on the screen and their functions are under development and may not be functional or require a specific value.

  1. The Catalog ID is the record ID for the catalog
  2. Description is what will appear on the menu bar of the website
    1. Catalogs will automatically show up on the website once they are created.
  3. Sort sequence is the order in which catalogs are listed on the site menu
    1. A catalog with Sort Sequence 1 will appear first, sequence 2 will be second, etc.
    2. If two catalogs have the same sort sequence then the site will list them alphabetically
  4. Start and Expire Date allow you to specify when the catalog should or should not appear on the site.
    1. If you don’t want a catalog to appear on the site, but would like to keep it for reference or future use, then give it an expire date of -1 and it will no longer appear on the site.
  5. Suppress Thumbnails is currently under development and should be left blank.
  6. Columns on Page allows you to set the number of columns displayed when showing the catalog items.
    1. This may be overwritten by site themes which will render it unusable.
  7. Type is to set the type of catalog. The default normal catalog is ‘C’ but you can set a catalog to any type. The system will maintain certain catalogs ( BEST.SELLERS, SALE.ITEMS, NEW.ITEMS), if you wish to manually maintain these catalogs yourself then you will need to set the ‘Expire Date’ on these to an historical date and then create a new catalog with the correct description and set the ‘Type’ to correspond to catalog you are creating.
    1. C=Catalog
    2. H = Home Page
    3. F = Featured Catalog
    4. N = New Items Catalog
    5. B = Best Sellers Catalog
    6. S = Sale Items Catalog
    7. R = Recommended Items Catalog
  8. Restrict to Store is for multi store environments and allows you to restrict the catalog to the store number you enter.
  9. Sale Discount allows you to apply a percentage discount to every item listed in the catalog.
    1. It only applies to items current on the catalog. If you add items later then you will need to go back to the Sale Discount field, enter the percentage and press Enter to update the newly added items.

Adding Items to a Catalog

If items are already flagged to appear on the web then they can be added to the catalog through Catalog Maintenance by typing their SKU into the SKU field. This would be the process if the web product has been in use for some time and most items are already setup to display on the website.

New customers will need to change their GM items to appear on the web. By default all or no items are flagged to appear on the web (POS-26-4-1, GM, Use Web Flag field), so the next step is to flag the specific items you want to be available on the website. If there is a large group of items, such as all items in a particular class, then TCS staff can flag those in mass to appear on the web.

Adding an item, assigning images, customizing item page information and descriptions are all done through the GM, MF record of the item.

To get started log to the GM module and then enter MF at the menu, look up an item you would like to add and make note of the W=Web option. By choosing that we can get to the web maintenance part of the item record and add it to the website.

  1. The include on Web field must be set to a Y or an A to flag it to appear on the website.
    1. Y will have it appear as long as it meets the low and out of stock requirements. If it drops below the out of stock threshold then it will no longer appear.
    2. A marks the item as always available for purchase, regardless of stock levels. This can be used for special orders and other scenarios.
    3. N for Never would be used if, by default, all GM items are web enabled
    4. NQ for No Zero QOH is under development and should not be used
  2. Alternate Title: provides the option to specify a description other than the main description of the MF item. Whatever is entered here will override the GM description for the item when it displays on the web.
  3. Graphic Link Name: maps the GM item to the image uploaded (image uploading covered below). The name entered must be exact including case and include the image file’s extension (common file types are .jpg, gif and .png)
    1. Additional images may be added using a comma to separate the image names. The first image is the default image for the item, additional images will be in the order that they are arranged in the field but must all be separated with a comma.
  4. Special Web Price: is an override price for the item if it is sold on the web vs. rung up at the register.
  5. Out of Stock Qty and Low Stock Qty: are item specific overrides to the low and out of stock levels specified in the web general parameters (POS-26-4-1)
  6. Targeted Item: allows you to weight the item more heavily in search results on the site.
  7. Weight: can be used to specify a shipping weight.
  8. Allow Free Freight: flag as Y for free freight.
  9. Specific Freight Amt: will set a shipping cost for the item.
  10. Override Freight Code: can be used to ship the item a specific way regardless of what is chosen by the customer at checkout.
  11. Print Shipping Label: is for live fright customers only and is currently under development.
  12. Web Comments: is used for additional product info and appear at the bottom of the page. HTML markup can be used for formatting as well.
  13. Catalog ID: is a listing of catalogs that the item is currently assigned to. You can also assign the item to a catalog by entering the catalog ID in this field.

Save the record once all desired fields have been filled out. Please note that while changes are made live immediately, your browser session may have cached the catalog information and may take up to 10 minutes to update. You can typically force an update by pressing CTRL+F5 to request a non-cached version of the page.

Managing Images

Images must be uploaded for each item and the image name, including the file extension, must be included in the GM, MF, web screen shown above.

Points of Interest for Images

  1. Supported image formats:
    1. .jpg and .gif are supported on all versions of the website. .png is supported in version 3.x
  2. Image sizes
    1. When uploading an image the site will automatically generate scaled down medium and small versions for thumbnails and other views.
    2. Images should not be much larger than 1024 pixels in width. Images that are too large may not upload or will take a considerable amount of time to load for your customers.
  3. Use human friendly naming conventions.
    1. Many cameras will name images with something like 01012017_0001.jpg which is a month, day, year and counter format. Rename your images to something more meaningful to make them easier to work with.
    2. Avoid special characters in image names. A dash (-) or underscore (__) are the only special characters that should be used.

Uploading Images

  1. Log into the site with an administrative account
    1. Accounts can be elevated to admin status by going to POS-26-21, bring up the account and change the Account Type to A. If the account does not exist then you can create the user id here and set the account type to ‘A’. After you create the account you will need to go to the website and on the logon screen select the ‘Forgot Password’ option to have a temporary password sent to you.
    2. The user will need to log out and back in on the website to apply that change.
  2. Go to Site Administration on the landing page.
  3. Click on the Upload Management icon
  4.  Here you can either select the option to Upload New Files or Manage Files in the table beneath.
    1. Upload New Files
      1. Click on the Add files… button which will display a window to browse to and select your images.
      2. Multiple images can be uploaded by holding shift or ctrl when selecting images.
        • Click on the Open button once all items are selected.
      3. A list of images will appear similar to the image above.
        • Take a look at the size of each image. Anything in the KB range or low MB range (e.g. 1.05 MB) is fine. Anything over 10MB you will want to consider resizing to a smaller size.
        • All images can be uploaded by clicking on the Start upload button beneath the drop down.
        • Individual images can be uploaded by clicking on the Start button on their line.
      4. A progress bar will display for the entire upload along with a progress bar for each image being uploaded. Once each item is done uploading it will then have a Remove option in case you want to back out.

Manage Images

Images that have already been uploaded can be viewed by going to Account, Site Administration, Upload Management and then clicking on the Manage Files on the right hand side of the table.

Here you can view the image names, remove an image, download a copy or continue on to upload more images by using the Upload New Files on the top right.


Legacy Faculty Adoptions – Web Side

Overview

This document will walk Faculty and/or Staff through the process of creating an Adoption request via the campus bookstore’s website. Please keep in mind that this is a request. The bookstore staff will have to approve and enter the information that you request into their system for the course at the school.

All of the connection information should have been sent to you prior to you attempting to create an Adoption request.

Once your request(s) have been submitted the store’s staff will be informed via e-mail.

If you have any questions please contact the campus store.

The website will timeout if left unattended. If a session times out with inactivity you will have to restart the process from the beginning.

1. You will need to connect to your Campus Store’s website and Sign In.

  • You should have been provided a User name to sign into the website. The user you are assigned will have the permissions to make Faculty Adoption requests. If you have not been provided an account, or you are already a customer of the site without faculty permissions, contact the store so they can add your account to the Faculty group, enabling you to create Faculty Adoptions.

2. Type in the user name and password you were provided into the “Log On” fields.

  • Your Password is case sensitive; please keep this in mind. Your User Name is not case sensitive

3. Create a Faculty Adoption Request.

  • You will notice that there is an icon located on your landing page for Faculty. Select this icon to proceed on to the Faculty request

4. Select Enter an Adoption

  • This will take you into the Adoption Form

5. Enter in your information and the instructor’s information

  • If the person entering the Adoption Request Form is the Instructor select “I am the Instructor” for this course. This option will automatically fill in the fields from the above information.

6. Inputting Course information

  • You must fill in all of the information on this section: Campus, Term, Department, Course, and Section. You can also enter the Estimated Enrollment and any comments you would like to add to the request.

7. Selecting the books for your section.

  • There are several ways to search and add books to your section. You can use any of the options across the top of this form to view and select books.
  • Note that the information you entered in the previous screen is displayed under the Adoption Progress.

8. Select the textbook you wish to adopt.

9. Update Adoption book information.

  • Once you select a book for adoption you can update any information about the book and add comments to the requested book.

10. Adopt the book for the section

  • Once you have selected all the books for your Adoption you will need to review the information about the request.

11. Reviewing the Adoptions Request information

  • Verify that all of the information is correct.

12. Verifying your recommended book.

  • Verify that all of the information regarding the book are correct.

13. Adoption Request complete

  • Once you have submitted the request a Thank you message will appear and an e-mail verifying the information you submitted will be sent to the address listed in the Requests, step 5. An e-mail will also be sent to the bookstore.
  • To submit another request select “My Account” to go back to the Faculty Adoption page.


Advanced Faculty Adoptions – Web Side

Overview

Faculty or department personnel will log in to the bookstore’s online faculty adoption website and submit their course requests or adoptions. These requests will be reviewed by the Department approvers and/or the Bookstore where the adoptions will be accepted and/or denied. Once the adoptions are accepted the TCS Textbook adoption system will be updated with the requests automatically. If they are denied the faculty will have the opportunity to modify the adoption and resubmit them for department/bookstore approval.

Faculty and Department Sign In

Each faculty and department member will need to sign into the campus WebStore system in order to enter the faculty adoptions. The account should be setup using the email address of the faculty/department personnel. The first time signing into the WebStore system the staff will need to choose the ‘forgot my password’ (Screen 1) option so a new password can be generated and emailed to the staff.

(Screen 1)

Once the new password is received via email continue to log into the WebStore system with the new password. The password can be changed by clicking on the ‘Account Details’ button (Screen 2) and by entering the old and new password information (Screen 3). Save the changes at the bottom of the page. This password will be used as long as the account is setup in the system (multiple terms).

(Screen 2)

(Screen 3)


Inputting Faculty Adoptions

Each faculty/department will be responsible for inputting their course requests/adoptions into the system. Signing into the WebStore system the personnel will be presented with three (3) options: Account Details, Order History or Faculty. Click on the Faculty button and then ‘Proceed to Faculty Adoptions’ to submit adoptions (Screen 4).

(Screen 4)

Select the desired term to submit the adoptions. Then a list of adoptions will display. The ‘Status’ column will display the current status of the adoption. The ‘New’ status adoptions will be at the top of the page, click on the ‘Begin Adoption’ (Screen 5) to continue with the adoption process.

(Screen 5)

The preliminary information about the adoption will be displayed on the screen for the faculty/department to update and review. (Screen 6)

(Screen 6)

Section A (Screen 6) will display the instructor name, email and estimated enrollment. The faculty/department will need to review and update this information if needed.

Section B (Screen 6) will give the options for attaching titles to the course adoption. The ‘Add Book’ has a drop down feature with search criteria for choosing the correct title to adopt to the section:

  1. Search by Adoption History – This feature allows the staff member to search previous adoptions to find the title they would like to adopt for the current term.
  2. Search by ISBN – Input the ISBN of the title.
  3. Search by Author – Input the author of the desired title.
  4. Search by Title – Input one or more words in the title.
  5. My Previous Adoptions – This would allow the staff to search historical adoptions they have submitted in the past for this department/course/section. Making it easier to use the same title used for previous semesters.

Section C (Screen 6) will give the staff the ability to apply the same titles that were added to the current section to other sections by using the ‘Apply to Other Adoptions’ link. They can also use the ‘Copy Adoption’ link to copy all of the Adoption details and title adoptions on the section and easily paste them to another section.

Once the adoption detail and title adoptions have been made, ‘SAVE’ the adoption by pressing the ‘Save Adoption’ button on the bottom of the screen. This will save and exit the currently selected adoption and return the staff to the Adoption listing.

Completing the Adoption

The system is designed to allow the staff to modify many adoptions and then submit all the adoptions at one time. Once the staff has modified all adoptions and added the titles necessary, they must complete the adoption by scrolling to the bottom of the adoption listing and ‘Submitting the Adoption’ (Screen 7). If the adoptions are not submitted by clicking on the ‘Submit Adoption’ button all changes will be lost.

(Screen 7)

Approving Faculty Adoptions (if necessary)

If the system is setup to require department “approvers” then proceed to the next steps.

Once the department approvers have logged into the online adoption system, they need to click on the faculty button and then ‘Proceed to Adoption Approvals’ (Screen 8).

(Screen 8)

The department approver will be presented with a page containing all adoptions waiting on approval. They can filter the listing by Campus, Term, Department or Course. If they would like to only approve one or all pending adoptions, the check boxes to the side of the screen can to be used. Once they have made their selection of the adoptions (by check marking the desired adoption) to be viewed, updated and approved they must add these to their “Queue” for processing (Screen 9).

Screen 9

To view, update and approve the adoption the department approver must review the “queued” adoptions and decide if the current adoption information is correct. Double check the following fields:

  1. Adoption Details – Ensure the Professor Name, Email and Estimated enrollment are all correct. Make changes where necessary.
  2. Books – Ensure the correct title is adopted to the section, and that the title is Required, Optional or Not Wanted.

Once all information has been reviewed and/or updated, the department approver can either ‘Mark as Ready’ to continue with more approvals, or click on the button to save and exit out of the adoption queue.

(Screen 10)

Continue with the adoption approval process until all items in the queue have been updated and approved. Watch for any email notifications where other adoptions have been submitted for approval and continue the process.


Advanced Faculty Adoptions – Store Side

 Overview

Faculty or department heads will login to the bookstore’s online faculty adoption website and submit the course requests or adoptions. These requests will be reviewed by the Department approvers and/or the Bookstore where the adoptions will be accepted/denied. Once they are accepted the TCS Textbook adoption system will be updated with the requests automatically. If they are denied the faculty will have the opportunity to modify the adoption and resubmit them for department/bookstore approval.

Required/Optional Flags

Adoption book flag- (TX SU-3-25)

Adoption Book Flag: Here you will put the code you want to use for the flag. Examples include

R – Required
O – Optional

Description: Enter the description for the flag here. Examples include

Optional
Required
Recommended

Required: This flag says if the book is required or not. Examples are

Y – Yes
N – No

Include on web: This allows you to show this flag on the Adoptions page.
Note: This flag does not affect adoption entry in the back office.

Blank – Display on Web
Y – Display on Web
N – Not Displayed on Web

Store Setup

Set Term and Store Notification emails – (POS 26.4.1)

Input your store number.

Choose ‘FA’ for Faculty Adoptions from the bottom options (the options on the first screen are not changed for faculty adoptions).

Ensure the Term is setup correctly for the active adoption term. Input the terms that are available for the faculty to submit adoptions. If a term is no longer needed, choose the line of the term and press the space bar and then press enter to remove the term.

Store Notification Email(s): Once the faculty/department has approved the adoption the bookstore will receive an email. Input the email address for the personnel to receive the notification emails where an adoption has been approved and is ready for the bookstore to process, enter one address per line.

Number of History Links to Show: This is how many terms to show the faculty when they are searching previous adoptions. If it’s blank it will default to 12 terms.

Faculty Setup

Online Faculty Adoption Structure

The store must determine how the faculty adoptions will be entered into the system. A couple of questions need to be answered:

  1. Will the faculty/instructors be entering their own adoptions?
  2. Will the departments be required to approve the adoptions once the faculty/instructors have submitted their requests?

If the instructors will be allowed to enter their own adoptions through the online adoption system, then all email addresses MUST be attached to the department/course/sections they are teaching. This can be done with a course import from the administration (TX 1.23.1) OR this can be done manually by the bookstore as they are entering in the department/course/section/instructor information (TX 1.1).

Each faculty/instructor staff member will need to have an account setup in the adoption system. If a file is being imported with the email addresses from an administrative import, follow the next steps, otherwise, the bookstore will need to manually input the email addresses as they are entering the adoptions (TX 1.1) and then run the Update Pref Customer from Adoptions process (TX.1.23.22).

Import Adoption Headers – (TX 1.23.1)

You must have a file from your administration to proceed with this import. If not, please proceed to the next section. For more information on this import process, please contact the TCS Service Center.

Enter the Adoption term you will be importing. – The term will already have to exist in Term Maintenance (TX.SU.1.2.1).

Enter the path of file to import * – The name of the file must be “Adpt-Imp.txt” or “course.asc” for the Budgetext format. Please ensure that the path exists and the file is named correctly for the import to be successful.

Add Non-existing Departments and Courses * – Enter a ‘Y’ if you wish the program to automatically add Departments and Courses that are not currently on file, but are contained within the import file. If you enter ‘N’, then the program will warn you each time it finds a Department or Course that is not on file and will not add the adoption record.

Convert spaces in key fields to: Spaces are not allowed in the key fields of a store, term, department, course and/or section number. If your import file contains spaces enter the character you would like it converted to. If you leave it blank the spaces will be stripped out. Asterisks (*) are not allowed.

Create eCommerce records for faculty* – Enter a ‘Y’ so the system will automatically create the eCommerce records (Pref Customer record) so faculty can log into the faculty adoptions.

Update Processing Type* – Options are ‘R’ Report only, ‘I’ Import only and ‘B’ Import and Report

Once you are satisfied with your entries you MUST choose ‘R’ Run Procedure. If you need assistance with this process please contact the TCS Service Center.

*** Important ***

If you are doing multiple imports throughout the term, after the first import, choose ‘R’ report ONLY to see any changes that need to be MANUALLY input in the adoption system.

If department personnel are required to approve the submitted adoptions by the faculty, then their emails MUST be setup in the department/classes section (TX SU 1.6.2) Screen 1.

(Screen 1)

If more than one person in the department is allowed to input adoptions then email address of the additional personnel must be entered in the next screen. Once the department personnel email address has been entered into the department maintenance (Screen 1) press enter until the options at the bottom of the screen are displayed. Press the ‘A’ for adoptions and the screen will change to allow for entry of ‘Submittal Emails’ for additional Update and Submit personnel. They will be allowed to update and submit the adoptions submitted by the faculty staff for this department.

If the adoption policies requires an ‘Approver’ that person’s email address must be entered into the ‘Approval Emails’ section. They will be allowed to update and approve the adoptions submitted by the faculty staff for this department.

Approval Level Required for Completion:

  1. Will the faculty/instructors be entering their own adoptions?
  2. Will the departments be required to approve the adoptions once the faculty/instructors have submitted their requests?

If you answered question 1 – YES – and question 2 – YES, then the approval level required for completion needs to be set to 1.

If you answered question 1 – YES – and question 2 – NO, then the approval level required for completion needs to be set to 0 (zero).

Update Pref Customer from Adoptions Process – (TX 1-23-22)

If the bookstore manually enters the faculty/instructors email addresses when building the adoptions (TX 1.1) then the preferred customer file must be created so the faculty can log into the online adoption website. Any department emails that are entered (previous section) will also be created by this process.

Enter the Store number.

Enter the active term for the online adoption period.

Optional – Enter a department or course to filter the update.

Change Adoption Instructor Info – (TX-1-23-23)

If the bookstore should need to change an email address, Name or Phone number for an instructor (i.e. Instructor get married/divorced or just wants to use a different email than the schools) you can make the change here and then run the process and that will change for all
courses the instructor is attached.

Enter Old Email
Enter New Email if it has changed.
Enter New Name if it has changed.
Enter New Phone # if it has changed.

Changing Customer/Faculty Account Type Flags – (POS 26.21)

Once a customer/faculty account has been created (steps above), they are automatically setup as an ‘F’ faculty member account status. This means they have the ability to input and/or approve adoptions. If you need to change their status at any time see the below steps.

POS 26.21 – Customer Maintenance

(Screen 2)

Name or ID: This will be the faculty/instructor’s email address.

Account Type: Options for the account type:

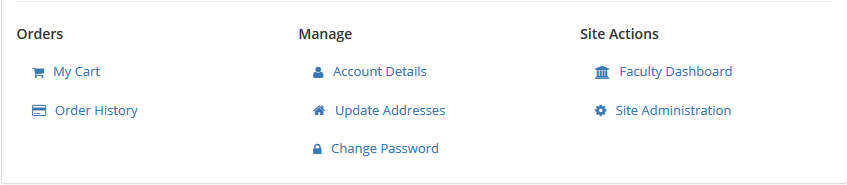
  • F = Faculty, this allows the account details, order history and the faculty buttons to be available online.
  • A = Administrator, this allows the account details, order history, faculty and administrator buttns to be available online. Should be reserved for bookstore staff only.
  • C or blank = Customer, this allows ONLY the account details and order history buttons to be buttons to be available online. Not to be used for faculty/instructors, this is for student customers only.

If you are setup as an administrator you can also change the account type for a customer online. Once logged in go to the Admin panel section, find the customer and change the account type.

TX 1.23.3 – Instructor Email List – OPTIONAL

This report is for those department/course/sections where an instructor email has been assigned to the section. The report can be generated to show the bookstore all the instructor email addresses that will be notified when running the email process.

TX.1-23-4 – Department Email List – OPTIONAL

This report will show the Department email addresses entered in to the primary contact field and the mail addresses for those entered in the Submittal- and Approval fields.

Notifying Faculty through Email – (TX 1.23.5)

When the bookstore is ready to open the Online Faculty Adoptions website the faculty/departments must be notified that the term is open.

TX 1.23.5 – Adoption Notification Email – (Screen 3) – This will send an email to either the instructor or departments (your choice). This notification is setup by the bookstore (subject/email body).

(Screen 3)

Term: Input the term for which the adoptions are active.

Notifications can be filtered to only be sent to a particular department or for a particular course. These are not required fields.

Email Department: If you ONLY want to send the email out to the department emails setup on the department/classes, enter a ‘Y’. This will NOT send out a notification to the faculty/instructors.

Reply To Email: Enter the email address that the faculty/instructors/departments should use to send inquiries back to the bookstore.

Subject: Enter the subject of the email.

Email Body: Enter the body of the email.

Send Test Email: Enter a ‘Y’ to ONLY send a test email to the email address entered in the ‘Reply to Address’.


Adoption Pending Approval – (TX-1-23-6) optional

This report will show all of the adoptions and the status of waiting for Department or Bookstore approval.

Enter Store #– required.

Enter Term – required.

Department – this will filter and only show the department selected.

Course – this will only show those with the selected course number.

Pending – this will show only those with the status entered. Options are ‘D’ for Department, ‘S’ for Store, ‘B’ for Both.

Adoptions with NO Text Assigned – (TX-1-23-7) optional

This report will give you a list of the courses that have been submitted by with ‘NO TEXTBOOKS REQURED’ submitted by the Instructor/Department.

STORE – required

TERM – required

Department – this will filter and only show the department selected.

Course – this will only show those with the selected course number.

Faculty Adoptions (TX-1-23-21) optional

This report will show all of the adoptions that have been submitted by the faculty.

Enter Store #– required.

Enter Term – required.

Department – this will filter and only show the department selected.

Course – this will only show those with the selected course number.


Store Approval of Submitted Adoptions – (TX 1.23.24)

Once the faculty/department has submitted an approved adoption the bookstore will receive an email notification. This should be a trigger for the bookstore to know that adoptions are pending their approval.

OPTIONAL: Report TX 1.23.6 – Adoption Pending Approval

This report can be run to see how many adoptions are pending approvals by the bookstore and/or the departments (if necessary). It is recommended to display to the screen/terminal for review.

Adopt from Pending – (TX 1.23.24)

Once the bookstore receives a notification that adoptions are pending approval, they must review and make any required changes to the adoption before the adoption will be added to the specified course. This step will allow the bookstore to cycle through all pending bookstore approval adoptions to view and update them into the TCS system.

(Screen 4)

Input the store and term to update the pending adoptions. You also have the ability to filter your selection by Department or Course. Run the Procedure. The system will show how many adoptions are pending, press continue.

(Screen 5)

The system will present the first approved adoption on the screen. If the faculty/instructor entered any comments, a window will display (Screen 5) with the comments. You have the option of Printing the comments, Canceling the acceptance or selecting OK to have the comments added to the “FacComments” field. These comments only for the bookstore personnel and will not display unless you add them to the “Web Comments” field or the “Shelf Tag Note” field.

(Screen 6)

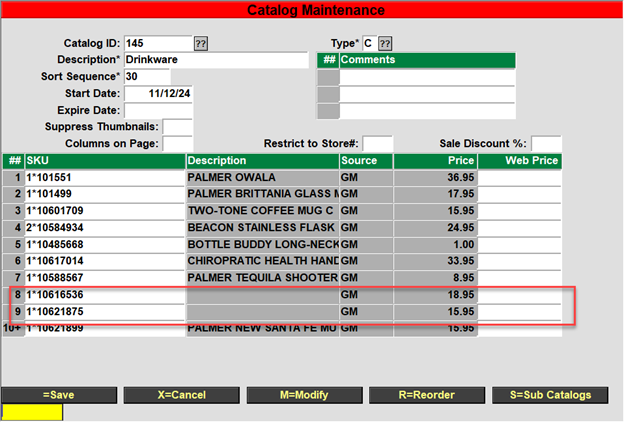
Look for ANY ‘/’ slashes in the screen (Screen 6). These are the changes that were submitted by the faculty/instructor and will need to be updated by the bookstore. Update the record by removing the slashes and inputting the correct information in the field.

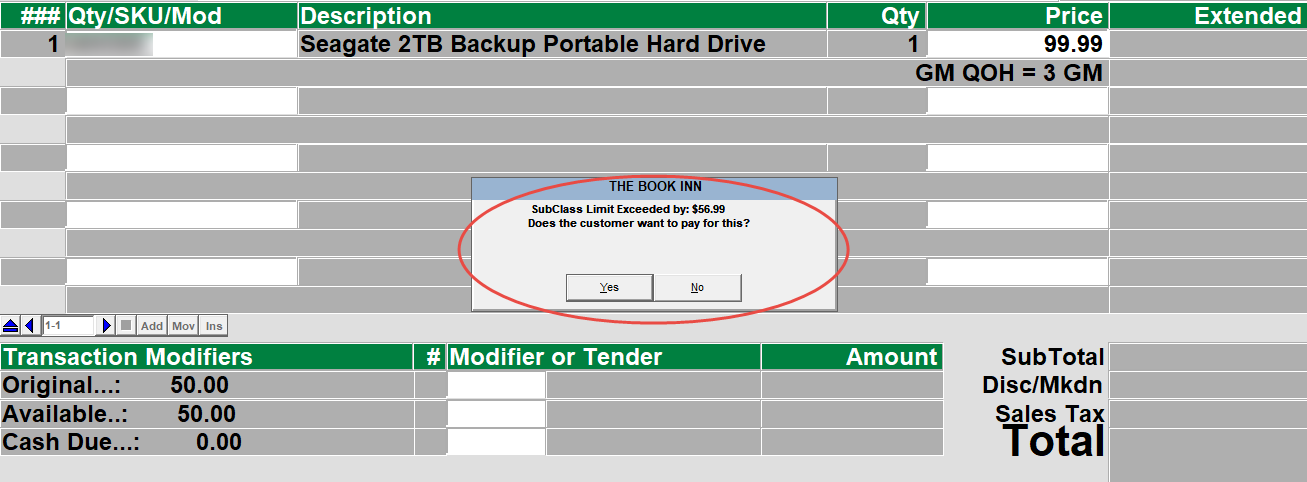
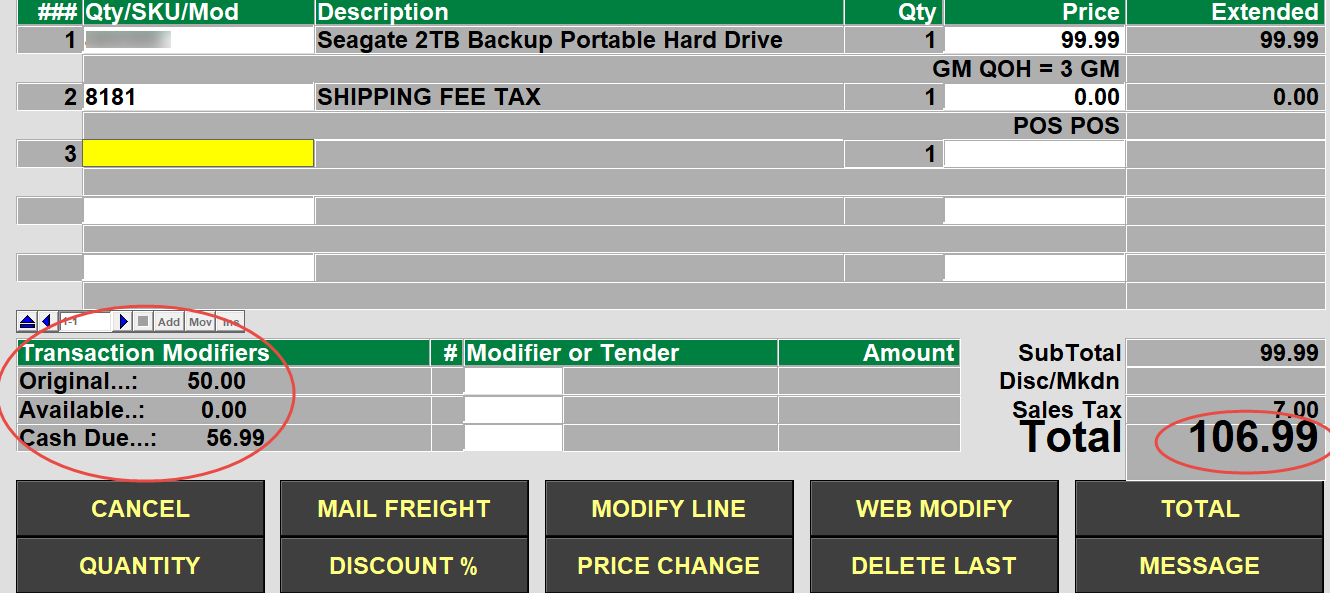
To help the bookstore with determining the quantity to cover (QTC), the ‘inq’ column is available so the bookstore can view historical information on this title. By putting a ‘Y’ in the ‘inq’ field, a screen will display with previous terms historical information and the bookstore can make a better determination on the quantity needed. The ‘EBB’ field is available for the bookstore to input estimated buyback figuresfor this title.

By clicking the ‘Save’ or pressing ‘ENTER’ the system will prompt with the fields that need to be updated and then exit the adoption screen. If you would like to proceed to the next pending record, press ‘N’ for next, this will save the currently displayed adoption and cycle the next pending adoption to the screen.

Be sure to SAVE the record or press ‘X’ to exit the record without saving your changes. By pressing ‘X’ or exit, the system will add the adoption back to the pending bookstore approval file for processing later.

Other options along the bottom of this screen allow the bookstore to navigate throughout the pending adoptions.

‘SP’ Skip to Previous – Allows the bookstore to bypass the currently displayed adoption and move to the previous adoption in the pending file.

‘SN’ Skip to Next – Allows the bookstore to skip to the next pending adoption and skip the currently displayed adoption.


Mail Orders & eCommerce also known as Web Order Processing

Fluency in basic POS functions is required. This document will not attempt to train basic POS functions, except as they will apply to MO and eCommerce

The primary difference between a Mail Order and an eCommerce order is that the eCommerce order is pre-loaded by the customer over the Internet and is stored in the Suspended Transactions File while awaiting store action.

From the POSiTrak Main Menu, choose 1 or MO or choose option 26 (and then 1). Some logins can be designed to skip this step and automatically log the user onto the Mail Order Menu.

The menu is divided into four parts; Order Entry & General Parameters, Maintenance & Inquiry, Reports, and Freight.

Sales are entered the same way that a regular walk-in customer is handled with only a few exceptions. The Sales Screen is divided into three parts.

  • The Upper portion of the Cash Register screen contains header information about the transaction. The Sales Clerk field defaults to the individual logging onto the register, the Tran Type field determines what type of transaction is being used and is either MO or MORT for Sales and Returns, the Tran Number field is a sequential counter for that specific register, the Store field defaults to the store number, the Date defaults to the current date, and the Register number is a unique identifying number for that register, Customer Name and Confirmation Number. All of these components are vital in identifying each individual transaction, and are printed on the Pick List and Invoice.
  • Main Sales Entry – This is where all of the individual items are entered into the register. Items can be scanned in using the register scanner or entered manually using the keyboard. Many of the programmable function keys of the keyboard will be used in this area. eCommerce and Suspended transactions will have this portion preloaded with the merchandise purchased.
  • Tender / Totals – This is where all your tenders will be entered. You will also see the sub-total, tax, and total amounts here.

Exiting

Use the ‘EXIT’ key to exit out of the Cash Register screen.

You may exit out of and return to the cash register screen as many times as you wish. Exiting does not close out your register or zero out any totals. When you return to your register screen, you will be able to continue with your normal sequence of transactions.

To get back to the Cash Register screen, follow the directions for ‘Logging On’.

Make sure you use the EXIT key only while the cursor is at the ‘TRAN TYPE’ field. If you use the EXIT key while in the middle of a transaction, it will act like the ‘TRANSACTION ABORT’ key and will nullify any information you have entered during your present transaction.

If you do not have a preprogrammed keyboard you can type |Exit. (The “|” (pipe) symbol is usually above the enter key).

Transaction Types

The following are available transaction types with a brief description.

Open

This will be used to Open the register. Until the register has been opened, no transactions can be run on the register.

MO

This is used for most Sale transactions. Since this is usually set as the default Tran Type there is no function key setup. At the end of each transaction, the cursor will default back to the Tran Type field.

MORT

This is used for most Return type transactions. To use this Tran Type, either type in the MORT code or press the function key labeled MO Return. AR Returns will not use this Tran Type

X

The X is used to get an ‘X-REPORT’. This is used when you are ready to count and reconcile your drawer. The x-report will give you all totals for sales and tenders since the last time your drawer was set back to ‘zero’ through a z-close. The x-report will not zero out any amounts.

CLOSE

The CLOSE key is used to do a ‘Z-CLOSE’ when you are ready to close out the register and do a final reconciliation of the drawer. The z-close will close out the register and zero out any totals. The z-close report will give you all the same information that the x-report does.

Tender Codes

The Tender Code determines whether the transaction will be processed by credit card, debit card, cash, check or by other means. The most common tenders are listed below with a brief description. All of these tenders have a function key assigned to them.

Multiple tenders can be used until the total amount of the amount due is paid.

CHECK

Used in accepting either a personal or business check as a method of payment.

CREDIT CARD

Used in accepting credit cards as the method of payment. The system can be setup to accept Visa, Master Card, American Express, Diners Club, as well as others.

DEBIT CARD

Used in accepting debit cards as the method of payment. Unless a “Debit Card” system has been setup at the University, this will usually not be an option. Visa type debit cards will normally be processed as a credit card unless a ‘pin’ number is required. Special setup is required to accept cards using a pin number.

GIFT CERTIFICATE

Used in accepting system generated gift certificates as the method of payment.

ACCOUNTS RECEIVABLE

Used in most cases of Accounts Receivable / University Charge type transactions.

Entering Transactions

From the POSiTrak Main Menu, select the Cash Register option to get to the POSiTrak Sales Entry screen (POS-01). Some logins can be designed to skip this step and automatically logon to the Cash Register.

The Sales Clerk field is filled in automatically by the system with the name of the employee currently logged in.

In the Tran Type field, enter the transaction type that you would like to use. You can see a list of transaction types by entering “??”. Many of the registers will be defaulted to a transaction type of Sale. If you wish to close the register, enter the transaction type that is set up to close the register; if you wish to open it, enter the transaction type that is set up to do so. Upon first entering the register (anytime after the register has been closed), the transaction type of OPEN will automatically appear.

The Tran Number field is automatically filled in with a sequential transaction number. The Store field is automatically filled in with the store number from the register parameters. The Date field is automatically filled in with the register date. The Register field is automatically filled in with the register number from the register parameters.

In the Qty/Sku/Mod field, you can enter a SKU, an ISBN, or a modifier. To change the quantity, enter the new quantity then press the Quantity key. The Qty field should change to reflect the new quantity. You can select a SKU or ISBN by entering the item name, title, or other cross-reference term.

The Description field is filled in automatically. If the SKU or ISBN that you enter doesn’t have a price associated with it, you must fill in the Price field with the appropriate price. The Extended field is calculated by multiplying the value in the Price field with the value in the Qty field.

To move from the item entry section of the cash register screen to the tender entry section, press the Total key. When the Total modifier has been entered, the Sub Total, Sales Tax, and TOTAL fields are automatically filled in.

In the Modifier or Tender field, enter the tender amount followed by the tender code. For three dollars in cash, you would enter “3.00” and then press the key for the tender that you wish to use. You can also enter a modifier in this field to void an item or transaction, return to the item entry section, apply a discount to the transaction, and the like.

Once you have entered enough tenders to meet or exceed the total amount due, the system will tell you the amount of change that should be given to the customer. It then gives you the option to continue or reprint the receipt. Once you press [ENTER] to continue, you will be returned to the Tran Type field to begin a new transaction.

Scanning Items

Scan in the item with the hand-held scanners. You may scan a manufacturer’s bar code, or a system generated bar code. To scan, press trigger on scanner while holding over bar code. Try not to move the scanner around too much while scanning for better scanning results.

Manually Entering Items

By SKU

Enter in the item number. When you manually enter the number, the number must match exactly as it is in the Master File. The system will not accept only part of the number.

By Description

Enter in any part of the description of the item. The system will match exactly the description you tell it to. For example, if you type in “SHAM”, it will pick up ‘Shampoo’ as well as ‘Shamrock’, but will not pick up ‘Shmp’(as an abbreviation for Shampoo).

If a ‘List Box’ is displayed, you may scroll through the list until you find the item you are looking for. If you do not find the item, you may want to try under a different description. When you have located the item in a list box, choose the corresponding number to the left of the item.

Modifying Items / Transactions

Changing Quantities

Enter in the quantity amount of the item being purchased.

Press the ‘QUANTITY’ key to accept the amount entered.

Continue entering items or press Total to complete the transaction.

Applying Discounts

There are several different keys defined to apply a percentage discount or a dollar amount discount.

Changing Tax Status

Use the keys defined to modify the tax on an item or for the entire transaction.

Price Changing

Press the ‘PRICE CHANGE’ key if the price displayed is incorrect, or if there is a special sell price for the item.

Enter in the new price of the item as indicated by the prompt in the bottom left hand corner of the screen. When the new prompt displays, it will show as a markdown at the line item level, but will reflect the correct pricing at the sub-total line.

Complete the transaction as you would any other transaction.

The ‘PRICE CHANGE’ key will only work for the line item most recently entered. If you need to change the price of a line item other than the one that you have just entered, you will not be able to use this key.

Precautions should be used to password or set security levels on this key to prevent unauthorized use.

Canceling items

To cancel the last lined entered:

Press the ‘CANCEL LAST LINE’ key when you want to cancel the last line item entered in the sales entry screen.

Resume entering in items or press total to complete the transaction.

You may only cancel the last line item only once. Though you may use the ‘Cancel Last Line’ key multiple times throughout the transaction, you can only use it once per line.

To cancel any line:

Press the ‘CANCEL ANY LINE’ key.

Enter in the line number of the transaction you wish to cancel.

The ‘Cancel Any Line’ key may be used multiple times during any transaction.

e-Commerce

(These options will also work for Mail Order transactions.)

Resuming online Financial Aid Transactions

Split Tenders FA Transactions.

PosConnect/AR Split Tender

See details here http://tcs-training-wp.azurewebsites.net/dwkb/colleague-split-tender-checkout/

Setup

Please contact support to setup AR or POSCONNCECT Split Tender options.

Web Customer View

The change that you will see on the web is, as a customer, they will shop as normal. When they select the option to go to the cart the first thing they see will be the cart details and asking if the will pay with Financial Aid.

If they select ‘No I will NOT use Financial Aid’ then they will continue as normal

If they select ‘Yes I’d like to use Financial Aid’ as seen below.

The customer will get presented with their address information to confirm/edit as needed and at the bottom of the screen they will need to enter in their student ID and then click on the ‘Show Shipping Options’.

Now they will select their Shipping option from the list setup by the store.

Enter in any Order Comments that are needed and then click/check the checkout policy box then ‘Proceed To Payment’.

The customer will then need to enter in their credit card information, this will only be used if they order items that are not covered by the amount or type of aid the customer has.

And finally, if the customer will see a message thanking them for their order and then receive an email with the order information confirming that the order has been received.

Processing a Web Order

Once you have received your online orders you will need to resume the transactions on the system to fulfill and complete the purchases. *note that the card used to purchase the items is not changed until the resume transaction has been complete at the store. Online orders and the credit cards used for them are only verified valid and are not charged until the online order is completed in the store.

Your register must be open for the day in order to complete web transactions. Referrer to the general cash register training for Opening your register.

  1. Select the Transaction type Resume, Tap or Click the touch button, keyboard key or simple type |RES to bring up a listing of all pending orders on the system.
  2. Select the order you are completing from the list of suspended transactions displayed.

3. Your order will be displayed on the screen with the items the customer purchased in their online order. Review the items and remove, add or adjust and verify the contents of the order. *note that freight will display on pickup orders as a $0.00 dollar amount.

* If you modify the Freight you must use the Frieght modify option. This will be setup when the webstore and registers for processing online orders were setup (MOF) **

*If you modify the any item in the webtransaction you must use modify buttons that were created during the setup procedures.(MOM)**

*(MOM) and (MOF) are specific modifiers for online orders. Don’t you keyboard shortcuts for modifying web orders. example |LIM (line item modify) this will not work on a web transactions. 

4. Totaling the online order will auto populate the tender code and transaction amount. You don’t need to do any modifications to the tender code unless the customer is using a different payment method than the one they used online to make the purchase.

  • Press enter through the tender field.

5. When the transaction is completed you will be prompted to proceed to the Next Transaction or to Reprint the current transaction.

  • At this stage in the order fulfillment an email will be sent to the customer notifying them that there order has been completed. *these email setting are setup during the initial setup of the webstore

Mail Order & Online Order with Returns and Transaction Match Tender

Prerequisite

Original Transaction number, date and register. This can be in any form but all of the material is required to complete the return process.

  1. On your back office, web register or any machine that has been setup to process web transactions go into the Cash Register function and select MORT, select the mail order return button or key that is setup to perform a mail order transaction.


2. Input the customer ID or preform a search using the ;user’s name or portion of name.

  • You will be prompted for the customer name or ID that preformed the original transaction that you are wanting returning items against.

  • If you searched using the ; keyword search, select the appropriate customer to proceed to return items.
  • If you input the customer ID the search results should not display and the process should move you past the lookup and allow scanning items for the return.

5. Once you have selected or input the correct customer all you will need to do is scan or type in the items that were on the original order into the sku field.

  • Once you have scanned or entered the items that you wish to return on the order and select Total you will be prompted for any shipping charges that you wish you apply to the return.
  • You can select a specific amount or select from a shipping table that you have setup or simple exit past this prompt.

  • Once you have scanned all of the items to be returned on the online order you will just need to Total the transaction and review the transaction total.
  • The Tender and amount should auto populate based off of the original transaction.
  • You will press “Enter” to proceed to the step

*note the system will not allow the tendered amount to be greater than the original purchase amount for the order.

**do not change the default tender code unless you are giving back cash or store credit. The tender determines what the cashier is prompted for.

  • After you have accepted the tender and amount you will be prompted on how you would like to accept the payment return method.
    1. If the customer is present and has the credit card that they used to purchase the items you can have them swipe into your card reader their card when prompted.
    2. If you choose to refund to the original card that was used for the transaction you would select the “Match” option. You can use the “Match” option even if the customer is present with the original purchase card and the customer will not need to do anything.

*note that not all web registers are equipt with a card terminal.

  • Input the transaction information is the only way to match a transaction against the original transaction. All of the inputs must match exactly.
  • It is important to note that even though you can have multiple Stations or Registers preforming web order usually all web registers utilize the same web register number.


  • If the system matches the original transaction you will be prompted to verify the last 4 digits of the original transaction.

*note you can find the last 4 from the email confirmations or by reprinting the original receipt. If you do not have access to that information you may run several sales reports or lookup the transaction under the Mail order Customer Maintenance.

  • If the transaction matches and the tender total does not exceed the original purchase amount you will be displayed a message that the adjustment to the customer’s card has been made and the funds will be set to return to their card.

  • The last prompt you will receive once the return has been completed is to move onto the next transaction.
  • The system should print-off a return transactions receipt.

Suspending & Resuming orders from your Web register

  • Any time that you are in a weborder transactions you can EXIT or ABORT to suspend the transaction or delete the transaction.
  • When you have selected a way to exit out of the web transaction you will be prompted to “Keep” or “Delete” the transaction. When you select the default option to “Keep” the transaction is restored to its original state so you can access the order at another time.
  • You can also select the “Delete” option when exiting your transactions and all of the information will be removed from the system and you will no longer be able to process that order.

*note that if you modify the online web transaction that those modifications will need to be added back as the “Keep” option restores the transaction prior to any of the users changes.

Declined Online Orders

  • When you receive a declined response from the transaction when you try to process a web online order you will need to reach out to the customer to inform them that their card has been declined.
  • You can use the ABORT, EXIT or SUSPEND options to leave the transaction. Make sure that when prompted to “Keep” or “Delete” the transaction that you select the Keep option until the issue has been resolved.

*Please note that credit cards are not charged until the online order has been fulfilled at your web register.

Store processing of Split Tender

The order will come to the store as a suspended transaction, just like a normal CC transaction. The store personnel will be able to run the pick slip reports (POS.26.10 or 13) and pending order reports the same as they do regular web transactions.

Bring up the suspended transaction the same as other web transactions

Since this will be treated as a POS Connect or FA order, you will get prompted to look up the customer the same as your existing POSCONNECT/FA transaction (POS Connect is used in the example).

The Account ID will be brought in from the transaction where the customer entered it on the web site.

Select the fund source that you wish to use for this transaction

The transaction will load each item and validate the customer has the funds to cover each item that was ordered. If the customer goes over their limit or has purchased something that is not covered by their fund source then a message will display that the SubClass limit has been exceeded or that the limit has been reached. Click on the ‘Yes’ button to add the item to the cart and to proceed, if you select ‘No’ then the item will not be added to the cart.

Once all of the items have been added to the transaction, the transaction will show the Total amount and also the Original fund amount, Available funds and the cash due that will be placed on to the credit card when the transaction is finalized.

After selecting the ‘TOTAL’ button, the transaction will automatically enter the amount of funds to be used by the FA/POS Connect transaction tender, the cashier will just hit the ‘Enter’ key on the keyboard.

The transaction will then apply the financial aid funds to the customers fund source and report if there were any issues. Once the financial aid amount has been successfully applied then any additional amount will be applied to the credit card that was entered on the website.

Adding a Memo

Use the MEMO modifier to add a memo to a line.  If the memo is not for the current item that was entered/scanned then you can preface the command with the line number you want to add them memo to.  For example: to add a memo to the current line just press the MEMO key. If you want to add a memo to line 2 enter a 2 followed by the MEMO key.  If you don’t have a MEMO key then enter |MEMO (to add a memo to line 2 enter 2|MEMO).

Back Orders, Cancellations

To change the quantity of an item choose the MOModify key.  If you don’t have one you can type |MOM.  You will be prompted for the line number to modify – enter the line number.  You will then be able to: 1) Change the Quantity Shipped, Change the item from New to Used (or Used to New), and specify a Back Order quantity, and you can add a memo to the line.

Override Freight Amount

To change the freight amount choose the ModifyFreight key.  If you don’t have one you can type |MOF.  This will allow you to modify the freight from the list of your freight options, enter a specific amount, or select a specific freight table.

Printing a Picking List

To print a Pick List choose the PickList key.  If you don’t have one then  you can type |PICK.  This will print a pick list to use for gathering the merchandise.  It is best to EXIT the e-Commerce transaction afterwards.

Other Register Functions

Global Inquiry

Press the ‘ITEM INQUIRY’ key to look up an item.

Scan or manually enter in the item in question.

Press enter to exit out of the item.

Press enter to return to the Cash Register screen.

The item inquiry key can be used at any time while in the cash register screen. When you return to the cash register screen, you will return to the point from where you left from. You may use the item inquiry key as many times during a transaction as you wish.

Gift Certificates

Purchasing a Gift Certificate:

  1. Press the ‘Gift Cert Purchase’ key.
  2. In the window that displays, enter in the information you need. (all the fields are optional except the value field – enter in the value of the gift cert) (it is recommended that you fill in the “Purchased By” and “Purchased For” fields)
  3. When you fill in the amount of the gift certificate on the actual gift certificate, you must write down the voucher number on the gift certificate! The voucher number is automatically given to you when you press the ‘Purchase Gift Certificate’ key. The number is located towards the top left hand corner of your screen with the prompt of “Voucher Number:”
  4. After you have filled in all the necessary information for the gift certificate, and only after you have written the amount and voucher number on the gift certificate, press “Enter” to ‘Save’ the gift certificate to the system.
  5. Continue on with your transaction as you would any other transaction.

NOTE:

You may purchase multiple gift certificates per transaction (if they are buying 2 $20.00 gift certificates, you will be processing two different gift certificates in the system and they will have two separate ‘voucher numbers’.

Only sell a gift certificate during a “SALE” transaction since that is what you are doing – you are ‘selling’ an item to them.

Redeeming a Gift Certificate:

  1. After entering in the items the customer is purchasing and you have pressed the total key, press the “Gift Certificate” tender key.
  2. At the prompt “Enter Voucher Number”, enter in the voucher number written on the gift certificate.
  3. Validate the gift certificate through the receipt printer.
  4. Complete the transaction as you normally would.

Line Item Memo

After entering an item to purchase, you can press the “Memo” key to add a free form text message that pertains to that specific item. The text message will print on the receipt.

Suspend

  1. You can suspend any SALE transaction as long as you have not placed a Tender (form of payment) towards the transaction.
    1. Process the Sale transaction as you would any other transaction.
    2. After all items have been entered into the register, press the Suspend key.
      1. The suspend key can be pressed while either in the sales entry screen or in the tender area.
    3. At the prompt Enter the customer’s name, enter the name of the customer for whom you are suspending the transaction for.
      1. Once you enter the customer’s name and press enter, the system will move the transaction to a separate file and you will be returned to the Cash Register screen.
  2. To get a report on your suspended transactions;
    1. From the POS Master Menu, choose the RP option for the Report Menu.
    2. Next choose option number 6 for Miscellaneous Reports, then option number 5 for the Suspended Transaction Report.
  3. You can choose to print the report to your screen (terminal) or to the printer.

Resume

  1. To resume a suspended transaction, press the Resume key when the cursor is at the Tran Type field.
  2. Choose the transaction that you want to resume from the list of transactions.
  3. Complete the transaction as you would any other transaction.

Item Exchange

  1. While in the ‘POSiTrak Sales Entry’ screen, press “Enter” to accept the default tender of “SA” for a sale transaction.
  2. Enter items as you would a normal sale transaction.
  3. To enter a ‘return’ item:
    1. Press the “ITEM EXCHANGE” button
      1. (if you have more than one of the same item being returned, enter in the amount being returned then press the item exchange button — if two items are being returned, press “2” then “ITEM EXCHANGE”)
    2. Enter the item by scanning, manually entering the SKU number, or by description.
  4. When you are through entering in items being sold or returned, press the “TOTAL” key.
  5. Complete the transaction by entering the amount tendered

Store Credit

Issuing a Store Credit

  1. A store credit can be issued any time the balance owed (the total) is a negative balance (whether through a return or exchange). If you have a negative balance after you have pressed the ‘Total” key, press the “Store Credit” key.
  2. A small window will display where you must fill in the name, address, and phone.
  3. All the fields in the window are required fields. It is recommended that you enter their name, their ‘company’ or ‘squadron’ for the address, “WP” (for West Point) for City, ST Zip, and then a phone number (any phone number will do)
  4. Press “Enter” to save the store credit to the system.
  5. Make sure you give the customer the receipt. The receipt will have the voucher number on it, and they must provide the receipt in order to redeem their store credit.

Redeeming a Store Credit

  1. After entering in the items the customer is purchasing and pressing the total key, press the “Redeem Credit” key.
  2. At the prompt “Enter Voucher Number”, enter the voucher number that is on their original receipt.
  3. Complete the transaction as you normally would.

Aborting (Voiding) a Transaction

Press the ‘TRAN ABORT’ key when you want to cancel any transaction.

The Tran Abort key can be used any time during the transaction to cancel it out. A transaction is not completed until a Tender amount and Key have been entered. Once a Tender Key has been pressed you must complete the transaction you are on. You must then use the ‘Post Void’ key to cancel out the transaction.

Special Orders

Overview

Special Orders are used when an item that is not in stock is placed on order by a customer. The order can then be added to another PO going to the same vendor, or created specifically for that customer. When the order arrives, the customer will then be notified to pick up the item. The following document shows how Special Orders work with the TCS Retail software.

Special Orders are used for items not in stock. Three major processes are involved: Placing the Special Order, Receiving the Special Order, and Picking up the Special Order by the customer.

Placing Special Orders

  1. In Cash Register Screen in POS, enter a regular Sale transaction type.
  2. Hit the Special Orders function key you have set up.
  3. Enter the information to go on the Special Order. If a deposit is entered, this amount will be added to the Balance Due.

Special Order Maintenance

There are two ways to get to the Special Order Entry screen (POS-24-1). If you wish to enter a new special order, you must access the screen by selecting the Cash Register option from the POSiTrak Main Menu and then entering “SPO” as the transaction type. For more information on the cash register, see page XYZ. If you are going to modify an existing special order, you can access the screen from the POSiTrak Main Menu by selecting the Special Orders option followed by the Maintenance option.

In the Special Order ID field, enter a period to assign the next available ID number to the new special order. If you are modifying an existing order, enter the ID number assigned to that order, the name of the customer, or enter “??” to see a list of existing orders.

In the Customer Name field, enter the name of the customer who is placing the order. If the customer is representing an organization, enter the name of that organization in the Organization field.

In the Primary Phone field, enter the primary phone number where the customer can be reached.

In the Secondary Phone field, enter any other phone number where the customer might be reached.

In the Address fields, enter the customer’s address.

The Date of Request field is automatically filled in with the current date. If the customer requested the items earlier, you can modify it.

In the Deposit Field, enter any deposit amount that the customer will pay on the items.

You can enter up to three lines of notes in the Call Notes field.

In the SKU field, enter the SKU of the item that is being ordered. The Description field is filled in automatically.

In the QTY field, enter the quantity that the customer wishes to order.

In the Special Instructions field, enter any special instructions on the handling of the item.

If the customer picks up the items, enter the number of items picked up in the Picked Up field. The Date Picked Up field is automatically filled in with the current date, but it can be modified.

Repeat steps 10 through 13 for each item you would like to order.

Press [ENTER] twice to save the order.

If you want to create Pending Orders for the items, enter “Y.” Otherwise, enter “N.”

Optional Step:: For GM or TRADE create a Pending Order. For Text items, add them to a Manual PO.

Finish the Sales transaction.

Print off a copy of the receipt for the customer and a copy for ordering personnel.

Log to the module where the item exists (GM, TRADE or TEXT).

Place the Order. (Cancel if you discover an order is not necessary).

Receiving Special Orders

  1. Enter a receiving log as normal.
  2. If there are any outstanding Special Orders in the master file, a comment will be automatically be added to each line item with special order quantities.
  3. Optional: Print special order tags to tag items with person’s
  4. Optional Step: For GM or TRADE name, phone, address, title, author, special order number, date. You must have a Special Order tag code setup (SPO tag type).
  5. Optional: Place special order tags on items.
  6. Notify customer that item has arrived.

Picking up Special Orders

  1. Customer picks up special order items.
  2. Customer takes items to the cashier.
  3. Do a regular Sale transaction.
  4. For the line items enter the Special Order Pickup Modifier. (To set this up go to Special Order Pickup Modifier.
  5. This will take you into Special Order maintenance. Put in the quantity being picked up.
  6. The program will automatically add these items to the current transaction.
  7. Total the transaction.
  8. At the tender code entry, if a deposit was made on the special order, enter the amount of the deposit. For the tender type use the Special Order tender.
  9. You will be prompted once more for the special order id, enter it.
  10. Use any other tender type to pay for the remaining portion of the sales transaction. When all items are picked up, the special order will be flagged with a “P” status as “Picked up”.