TEXTBOOK EXPORT

TEXTBOOK EXPORT

Sometimes you may need an Excel type of file listing all of the courses and textbook information that is associated to a term. You can achieve this by running the Textbook Export report that is located in TX>RP>6>21.

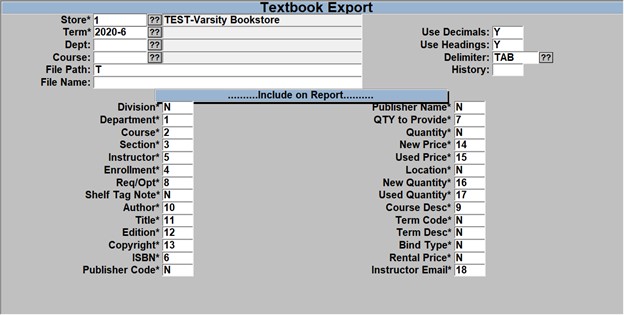
The screen will look similar to what you see below, and you can select which fields to include on the report and in which order they should be listed.
To begin you need to enter in the

  • Store and Term – if you are running for an open term then you can use the ?? to select an open term but if you are running this for a closed term then you will need to type in the term code and then, on the right side near the top, enter a ‘Y’ in the “History” field.
  • Dept/Course – If you wish to only list the information for a particular Dept/Course then enter that, otherwise leave these blank to include all Dept/Course information for the entered Term
  • File Path – Enter a ‘T’ in the field to send the report to the terminal.
  • File Name – Leave the field blank, this is only used for locations that have their own server.
  • Use Decimals – Enter a ‘Y’ to include a decimal in the price fields.
  • Use Headings – Enter a ‘Y’ to include a line for the heading, if left blank then there will be no heading line.
  • Delimiter – Use the ?? to choose which delimiter you wish to use, if you leave it blank then a pipe ‘|’ delimiter will be used.
  • History – Enter a ‘Y’ in the field if the “Term” that was entered is a “Closed” term.

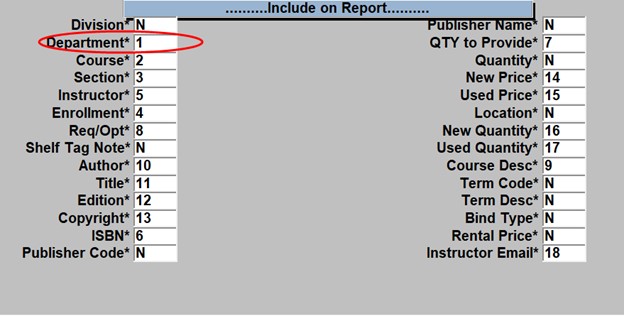
For the area labeled as ‘Include on Report’, each field is required to have an entry. You can enter in an ‘N’ to exclude the field in the report or enter a ‘Y’ to include the field and they will be in the order as displayed.

The report will be created with the columns in the same order as displayed on the screen going down the left side the the right. You can also enter the placement order that you would like the fields to be positioned in the report, so if you enter a 1 in the “Department” field then that will be the 1st column in the report and whichever field you enter a 2 in to will be the 2nd field in the report.
When all fields have been filled out, select the R=Run Procedure from the bottom.

The report will display to the screen as seen below.

Select the save icon    from the tool bar to save the report and select the location of your choice and make sure that you change the ‘Save as type’ to “Text Files”.

For additional help in importing the in to Excel then please use the link below.

https://tcs-training-wp.azurewebsites.net/dwkb/getting-a-report-into-excel/


Redshelf Adoption Export

This is an overview on how to export your adoption list to Redshelf. This is done each semester after adoptions have been entered so that Redshelf can provide a list of available ebooks.

Redshelf will generate an import file from the adoption information which can be imported following the steps in the Redshelf Import article

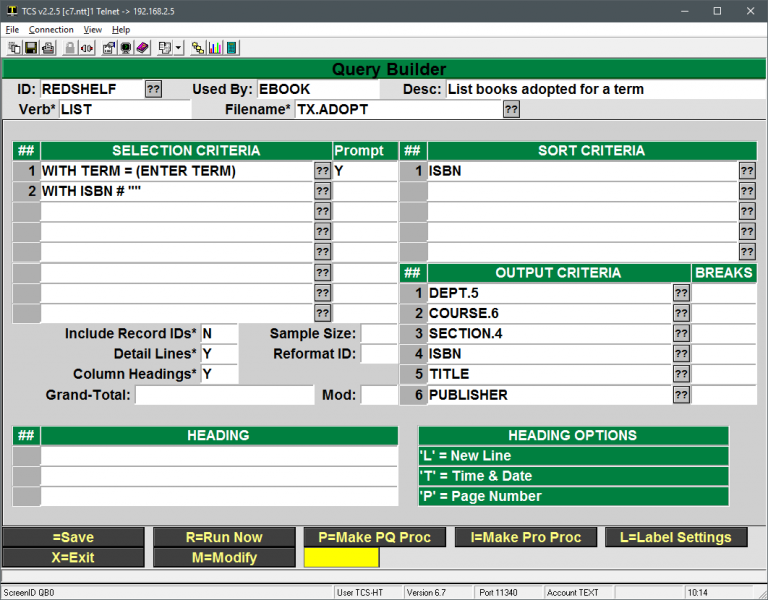
  1. First, we need to run a Query Builder report to generate the file we’re going to send to Redshelf.
    1. Log to the TEXT module
    2. Type QB at the menu
    3. Enter REDSHELF in the ID field
      • You will see this Query Builder screen
    4. Select the R=Run Now option
    5. Enter you store number at the Store prompt (certain locations only)
    6. Enter your term code at the prompt
    7. Select the Terminal option for the destination
  2. Now we need to save the report as a text file and send that file to Redshelf
    1. Click on the Save icon at the top of the Terminal Window
    2. Select where you want to save the file.
      • This can be anywhere on your computer. Typical locations will be Documents or Desktop
    3. Name the file
      • Keep it simple and preferably without spaces. E.g. redshelf, redshelf2017-2, adoption_list, etc.
    4. Change the “Save as type” to “Text Files”
    5. Click on the Save button
  3. Next the file needs to be sent to Redshelf. If your Redshelf rep requests an Excel or CSV file, follow the steps below in the Importing Into Excel section.
    1. Open your email application, typically Outlook or through a web site
    2. Create a new message addressed to your Redshelf contact
    3. Attach the file to the email
      • This can vary depending on your email client. There may be an Insert > Attach File option, an Attach File button or you can typically navigate to where you saved the file in Windows and drag it into the email message.

Importing Into Excel

Sometimes a Redshelf rep will request that the file be sent to them as an Excel document or a CSV document. The steps below cover how to do that. This assumes that the steps above have been performed and you have a copy of the report on your computer as a .txt file.

  1. Open Excel
  2. Go to File > Open
    • Or press and hold the Ctrl key and then press O bring up the Open dialogue.
  3. Browse to where you saved the file in step 2.2 above
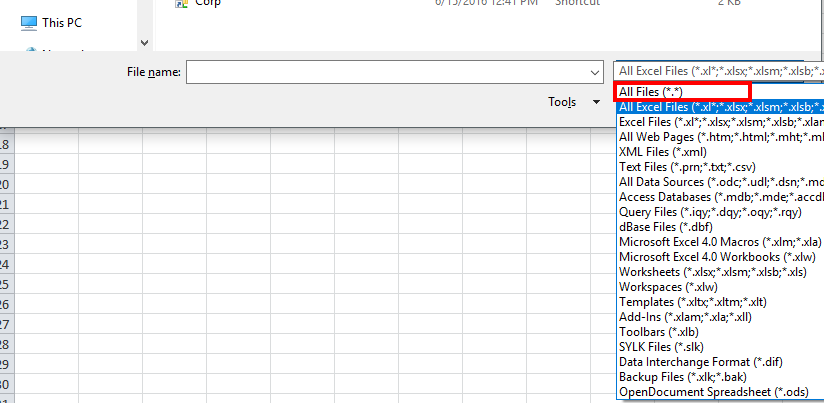
  4. Change the All Excel Files drop down box to All Files
  5. Select the .txt file saved in step 2.2 above
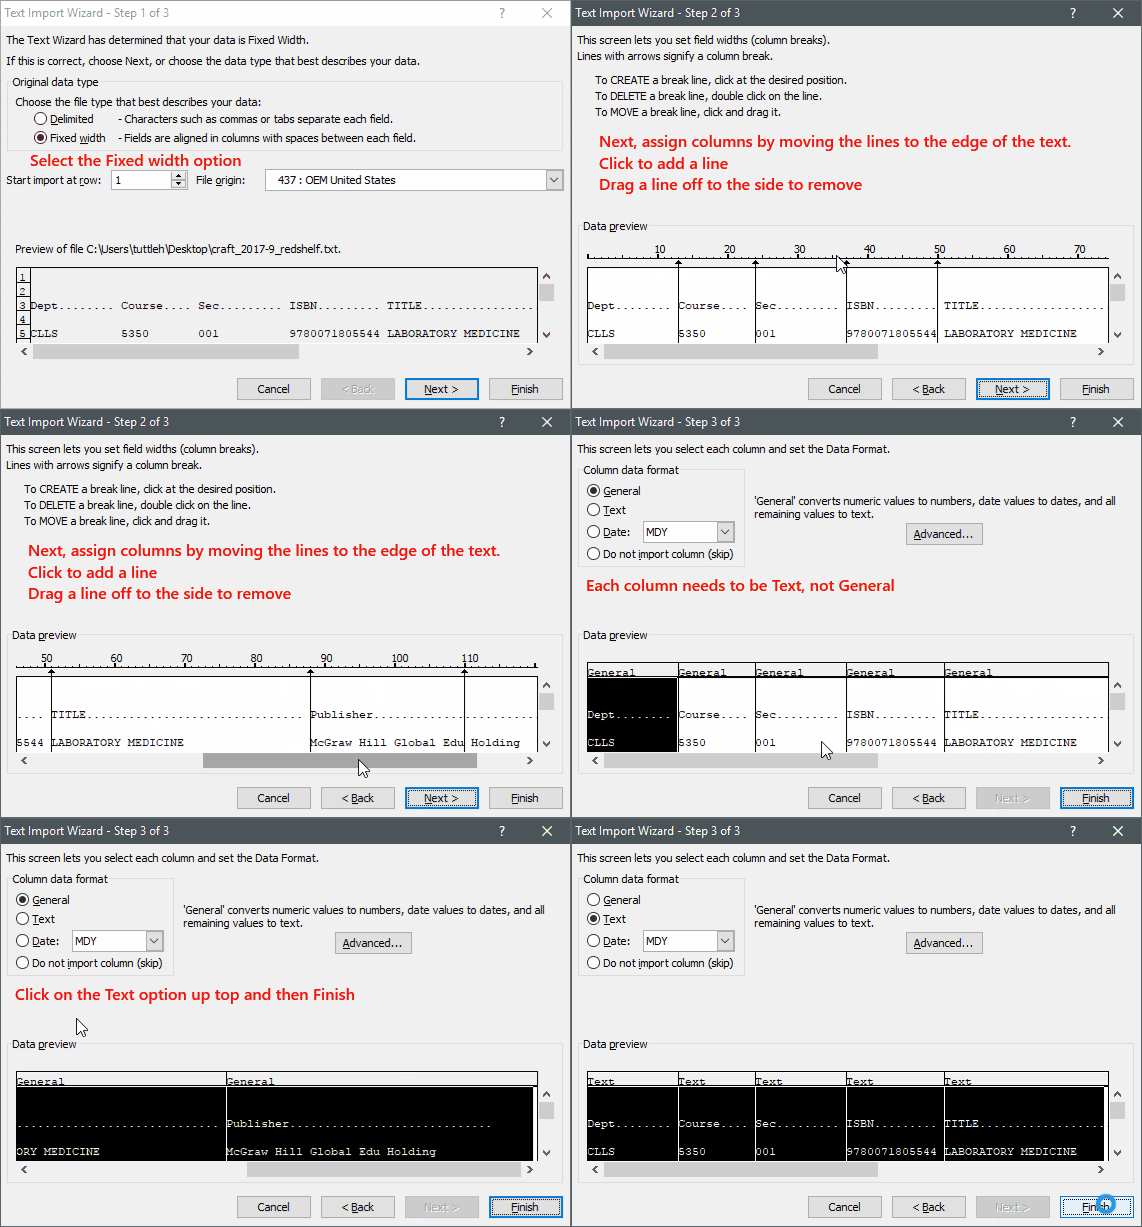
  6. In the Text Import Wizard (step 1 of 3) Select the Fixed width option
  7. In step 2 of 3, click and drag the arrows/lines to the edge of the text. These mark the columns to be used in the spreadsheet.
  8. In step 3 of 3, click on each column and asign the Text data format in the top left
    • You can select the first column, move the slider all the way to the right, press and hold SHIFT and click on the last column. With all columns selected click on the Text data format option on the top left.
    • Click Finish
  9. Now all of the data should be in the Excel document. The ISBN numbers should not look like a notation number (9.78129E+12) they should display as full ISBNs.
  10. Save the document
    1. Go to File > Save As.
    2. Browse to where you would like to save the document
    3. Enter a name in the File name field
    4. Click on the Save as type: drop down and select the option with “CSV (MS-DOS)”
    5. Click on Save
  11. Send the new csv file to your Redshelf representative.
  12. Note that if you open the document in Excel after closing the ISBN fields will be truncated with 9.78129E+12. Select the for the ISBNs, right click and select Format Cells, change the format to Number and change the decimal count to 0.


Export AR Charges

This document describes how to use the specialized report for special formatting of invoice data to be “normalized” and exported into an Excel spreadsheet.

Step 1. Select AR-RP-02-08

Step 2. Enter the reporting criteria you want for the report.

Step 3. Click on the save Icon and save the report.

  1. Save the report in any folder you wish.
  2. Give it name that will be meaningful.
  3. Save it as a Text File


Step 4. Click “Save”
Step 5. Open the item with Excel.
The import Wizard will come up automatically.
Make the following adjustments


Click “Next”

Click “Next”

Highlight the column over the SSN/Contract and flag it as “Text”

Click “Finish”

With a little Excel magic you can now create sub totals and sort the report anyway that you like.