Transfer and Import Redshelf Catalog

After adoption information has been exported and sent to Redshelf, they will send a catalog file back that contains the detailed pricing information for available titles. This file needs to be transferred to the hosting server and a process ran to import the data. This is very similar to the process of uploading and importing adoption information.

Prerequisites

  1. FileZilla (or another FTP program) is required to transfer files to the server
    • Instructions on setting up and using FileZilla can be found here.
  2. You must have access to the Redshelf email with the download link

Quick Steps

  1. Download the file from the email link sent from Redshelf
  2. Upload the file to the Redshelf directory on the hosting server via FileZilla
  3. Rename the file to redshelf.txt
  4. Import the data in TX-27-1

Upload The Catalog File

  1. Download the catalog file from the link Redshelf sends via email
    • Redshelf will send an email with a download link similar to this:
    • Click on the link and download the file. Make note of where the file downloads to.
      • If you don’t choose the file location then it typically defaults to your Downloads folder
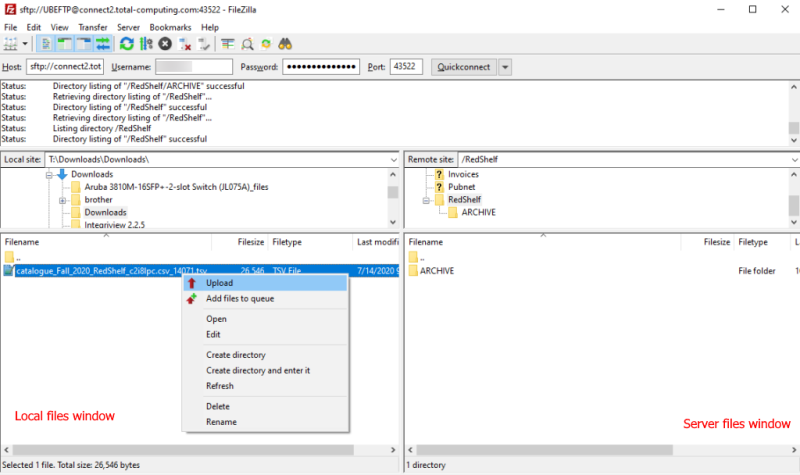
  2. Open FileZille and connect to the hosting server
    • Navigate to the Redshelf directory in the server pane
    • Navigate to your Downloads directory on the local pane
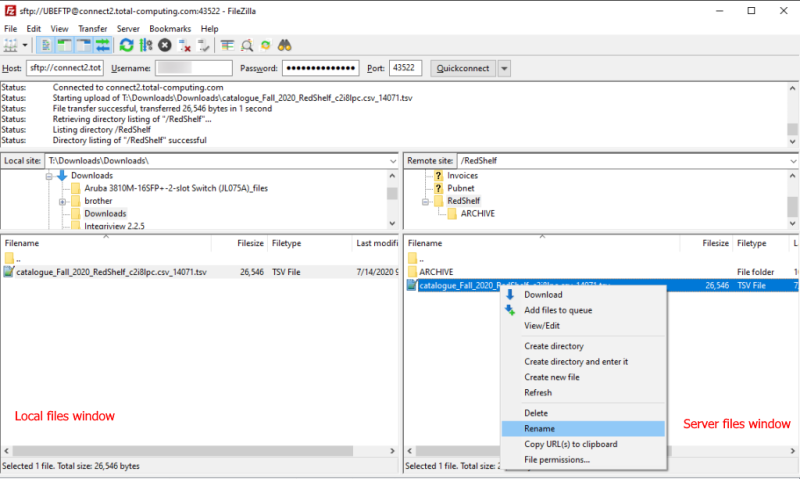
  3. Upload the catalog file to the server by right clicking the downloaded file and then Upload
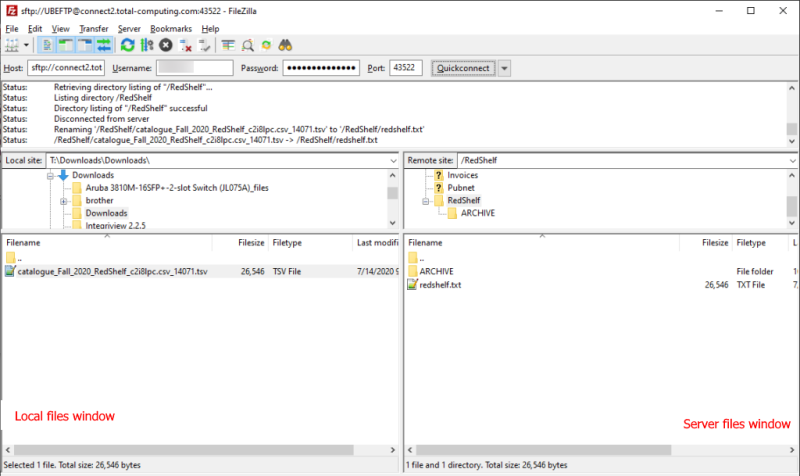
  4. Rename the file on the server to redshelf.txt by right clicking and select Rename
  5. The final result should look like this

Import The Catalog Data

It’s handy to know your ebook class code and your usage periods prior to these steps. Class codes can be found in TX-SU-1-6-22. Usage periods can be found in TX-SU-2-25,R

Note that ALL previous ebook prices will be cleared when you import.

  1. Navigate to TX-27-1 and enter your store number
    1. Vendor Code: R
    2. Ebook Class: (your class code)
    3. Access Periods: Should populate from TX-SU-2-25
      • You can manually change as needed
  2. Run the procedure
  3. Verify that the data is queued up to go to your registers
    1. Quickly navigate to POS-6-2 and there should be items in the Records to be formatted by the Host field.

Verify

  • Spot check various titles in MF > ISBN > E for Ebook to verify that the data was imported.
  • Ring up a title and verify the data is correct
    • Note that your registers must be up to date in POS-6-2 before the data is live

More on Usage Periods

Usage periods tell the system what usage periods to import from the Redshelf catalog. Only using 3-4 usage periods is recommended due to limited tag space.

Common day count periods are 60, 90, 120, 180, 360, 365
ALL can be used for all data
P is for Purchase or Lifetime

Examples:

  • Commas are used to create a list of options
    • 90,120,P
    • Imports for 90 day, 120 day and Lifetime (Purchase)
  • A forward slash is used as an OR option
    • 90,120/180, 360/365
    • Imports for 90 day, 120 when available or 180 as a fallback option, 360 days or 365 as a fallback option.


Manually Add or Remove Ebook

It is possible to manually add or remove an ebook, but there are some points of information you’ll need from Redshelf in order to add it. Once you have that information you can update your ISBN MF record to have the ebook data.

Removing an ebook is as simple as going to the ISBN MF record, E for Ebook, then replace the Store field value with an empty space and press enter. This removes that line of data, repeat for any additional lines and then save your way out. If you only want to remove specific prices, navigate to the line with that price and remove that line.

  1. Information you need from Redshelf:
    1. The internal Redshelf UPC/SKU for that title
      • Each title at Redshelf has a unique SKU for the duration and price point of a specific title. (similar to a GM matrix item with different sizes at different price points)
      • If a title is available for 60,90,120,180 days and a lifetime purchase, then there would be five different SKUs for that title
    2. The usage period and price for each SKU
  2. Adding that information to the print ISBN screen
    1. First, make sure that you know your class code for Ebooks
      1. This can be found in TX-SU-1-6-22. Click on the ?? button for the Class Number field and find the class that has ebooks in the description.
    2. Go to TX-MF and bring up the ISBN for the title you want to add the ebook options to
    3. Enter E or select the E – Ebook button
    4. Enter your ebook class code
    5. Enter 1 for the Store (store) field
    6. R for Vendor
    7. Enter the UPC/SKU number that Redshelf gives you
    8. Enter the usage period for that UPC/SKU
    9. Enter the Price
    10. Enter the Cost
      1. Repeat steps 2.4 – 2.9 for each UPC/SKU that Redshelf provided for that ISBN
      2. It should look something like this when you’re done.
  3. Save your way out of the record and you’re done.


Redshelf Adoption Export

This is an overview on how to export your adoption list to Redshelf. This is done each semester after adoptions have been entered so that Redshelf can provide a list of available ebooks.

Redshelf will generate an import file from the adoption information which can be imported following the steps in the Redshelf Import article

  1. First, we need to run a Query Builder report to generate the file we’re going to send to Redshelf.
    1. Log to the TEXT module
    2. Type QB at the menu
    3. Enter REDSHELF in the ID field
      • You will see this Query Builder screen
    4. Select the R=Run Now option
    5. Enter you store number at the Store prompt (certain locations only)
    6. Enter your term code at the prompt
    7. Select the Terminal option for the destination
  2. Now we need to save the report as a text file and send that file to Redshelf
    1. Click on the Save icon at the top of the Terminal Window
    2. Select where you want to save the file.
      • This can be anywhere on your computer. Typical locations will be Documents or Desktop
    3. Name the file
      • Keep it simple and preferably without spaces. E.g. redshelf, redshelf2017-2, adoption_list, etc.
    4. Change the “Save as type” to “Text Files”
    5. Click on the Save button
  3. Next the file needs to be sent to Redshelf. If your Redshelf rep requests an Excel or CSV file, follow the steps below in the Importing Into Excel section.
    1. Open your email application, typically Outlook or through a web site
    2. Create a new message addressed to your Redshelf contact
    3. Attach the file to the email
      • This can vary depending on your email client. There may be an Insert > Attach File option, an Attach File button or you can typically navigate to where you saved the file in Windows and drag it into the email message.

Importing Into Excel

Sometimes a Redshelf rep will request that the file be sent to them as an Excel document or a CSV document. The steps below cover how to do that. This assumes that the steps above have been performed and you have a copy of the report on your computer as a .txt file.

  1. Open Excel
  2. Go to File > Open
    • Or press and hold the Ctrl key and then press O bring up the Open dialogue.
  3. Browse to where you saved the file in step 2.2 above
  4. Change the All Excel Files drop down box to All Files
  5. Select the .txt file saved in step 2.2 above
  6. In the Text Import Wizard (step 1 of 3) Select the Fixed width option
  7. In step 2 of 3, click and drag the arrows/lines to the edge of the text. These mark the columns to be used in the spreadsheet.
  8. In step 3 of 3, click on each column and asign the Text data format in the top left
    • You can select the first column, move the slider all the way to the right, press and hold SHIFT and click on the last column. With all columns selected click on the Text data format option on the top left.
    • Click Finish
  9. Now all of the data should be in the Excel document. The ISBN numbers should not look like a notation number (9.78129E+12) they should display as full ISBNs.
  10. Save the document
    1. Go to File > Save As.
    2. Browse to where you would like to save the document
    3. Enter a name in the File name field
    4. Click on the Save as type: drop down and select the option with “CSV (MS-DOS)”
    5. Click on Save
  11. Send the new csv file to your Redshelf representative.
  12. Note that if you open the document in Excel after closing the ISBN fields will be truncated with 9.78129E+12. Select the for the ISBNs, right click and select Format Cells, change the format to Number and change the decimal count to 0.


Redshelf User Guide

RedShelf User Guide

This guide provides instructions to implement RedShelf with the Total Computing Solutions (TCS) point of sale and web store systems. RedShelf is an online only E-book access provider. Before using this guide, assure that all RedShelf files and programs are in place by following and completing the RedShelf Setup Manual. The three RedShelf access points that will be covered in this guide are host registers, Smart Lane registers and web transactions.

Labels

RedShelf will provide tags to place on or by your textbook shelves. The RedShelf Setup Manual describes how to print RedShelf barcode labels to stick onto the RedShelf tags. These labels will typically print a 13-digit number that begins with 278, the associated bar code, available usage periods and prices as well as the title, author and course information. Since different types of printers and label size may limit some information, your labels may differ slightly from the above description. The system is intended for the student to bring a label with them to the register to be scanned or manually entered.

Host Registers

If your operation includes host registers, access your POS cash register screen and enter SA for sale. When prompted for an ISBN, enter or scan the 13-digit number on the label. If there are multiple usage periods for that E-book title, these will be displayed on the screen along with a price for each usage period. Select the desired usage period, and continue the transaction as usual. If multiple accesses to the same title are required, they must be entered on separate lines since quantity will always be 1 for each RedShelf item. After the transaction has been tendered, a unique RedShelf access code will print on the receipt along with instructions on how to redeem the code. This access code and instructions will also be available if the receipt needs to be reprinted. If multiple RedShelf E-books are requested, multiple access codes will print on the receipt.

Smart Lane Registers

If your operation includes Smart Lane Registers, follow the same procedures outlined in the Host Registers section. Your Smart Lane register will automatically communicate with RedShelf to receive the appropriate access codes and with the host machine to permanently store transaction information.

Web Store Transactions

When RedShelf is properly setup and activated on a system, an “E-Book” button will automatically show up when a textbook title with that option is accessed.

Version 2.x

In version 2.x of the online web store application, only one RedShelf option will be available. That option will be the longest usage period that is not a Purchase. A Purchase option will only show up if there are no other usage periods for that textbook.

Version 3.x

The new version 3.x of the online web store application is in Beta testing and is not available for general release at this writing. It will create a drop-down menu with all available usage period options and prices when the E-Book button is activated. At that point the user may select their desired usage period.

Completing the transaction

When the transaction is completed at a register and the payment is processed, an email will automatically be sent with the access code(s) and redemption instructions to the person who ordered the E-Book. It is advisable that a copy of the email be sent to an accessible in-house email address in case a review or resend is necessary.

Refunds

The receipts and emails containing access codes also contain a message explicitly explaining that once the access code is used there are no refunds for that product. If an access code has not been used, process refunds just as if a textbook were being returned for a refund. RedShelf is excellent to work with in case of exceptional circumstances where a student may request a refund after accessing their E-Book, and they will consider each case individually.

If you do decide to give the customer a refund after the code has been accessed then you will need to do the refund to the CLASS CODE that is assigned to E-Books. You will process the refund as a normal refund but use the class code instead of the ISBN/SKU.

Testing

Before allowing students to order textbooks via RedShelf, we highly recommend that the POS E-Book process be tested on all host registers, Smart Lane registers and the web store. Process a transaction to purchase a RedShelf item. If the purchase is successful and has printed an activation code and redemption instructions on a receipt or email, post void that transaction and continue to the next register until all registers and the web store have successfully processed a RedShelf E-Book. If any of these point of sale, receipt printing or email processes is unsuccessful, contact the Total Computing Customer Support Team for assistance.