TEXTBOOK EXPORT
TEXTBOOK EXPORT
Sometimes you may need an Excel type of file listing all of the courses and textbook information that is associated to a term. You can achieve this by running the Textbook Export report that is located in TX>RP>6>21.
The screen will look similar to what you see below, and you can select which fields to include on the report and in which order they should be listed.
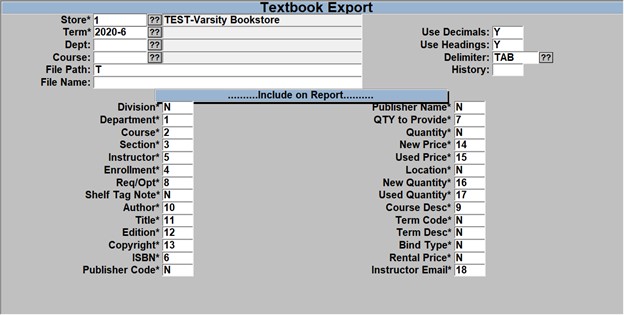
To begin you need to enter in the
- Store and Term – if you are running for an open term then you can use the ?? to select an open term but if you are running this for a closed term then you will need to type in the term code and then, on the right side near the top, enter a ‘Y’ in the “History” field.
- Dept/Course – If you wish to only list the information for a particular Dept/Course then enter that, otherwise leave these blank to include all Dept/Course information for the entered Term
- File Path – Enter a ‘T’ in the field to send the report to the terminal.
- File Name – Leave the field blank, this is only used for locations that have their own server.
- Use Decimals – Enter a ‘Y’ to include a decimal in the price fields.
- Use Headings – Enter a ‘Y’ to include a line for the heading, if left blank then there will be no heading line.
- Delimiter – Use the ?? to choose which delimiter you wish to use, if you leave it blank then a pipe ‘|’ delimiter will be used.
- History – Enter a ‘Y’ in the field if the “Term” that was entered is a “Closed” term.
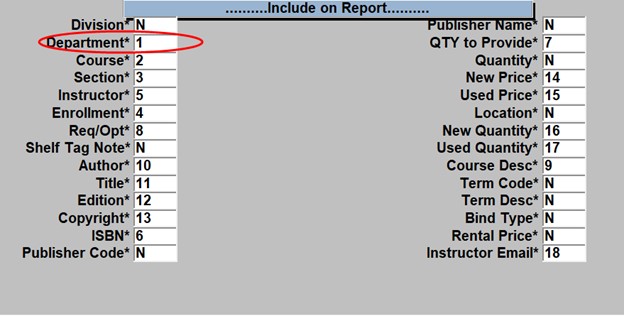
For the area labeled as ‘Include on Report’, each field is required to have an entry. You can enter in an ‘N’ to exclude the field in the report or enter a ‘Y’ to include the field and they will be in the order as displayed.
The report will be created with the columns in the same order as displayed on the screen going down the left side the the right. You can also enter the placement order that you would like the fields to be positioned in the report, so if you enter a 1 in the “Department” field then that will be the 1st column in the report and whichever field you enter a 2 in to will be the 2nd field in the report.
When all fields have been filled out, select the R=Run Procedure from the bottom.
![]()
The report will display to the screen as seen below.
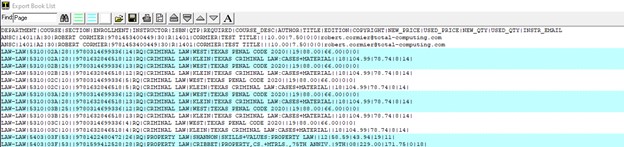
Select the save icon ![]() from the tool bar to save the report and select the location of your choice and make sure that you change the ‘Save as type’ to “Text Files”.
from the tool bar to save the report and select the location of your choice and make sure that you change the ‘Save as type’ to “Text Files”.
For additional help in importing the in to Excel then please use the link below.
https://tcs-training-wp.azurewebsites.net/dwkb/getting-a-report-into-excel/